
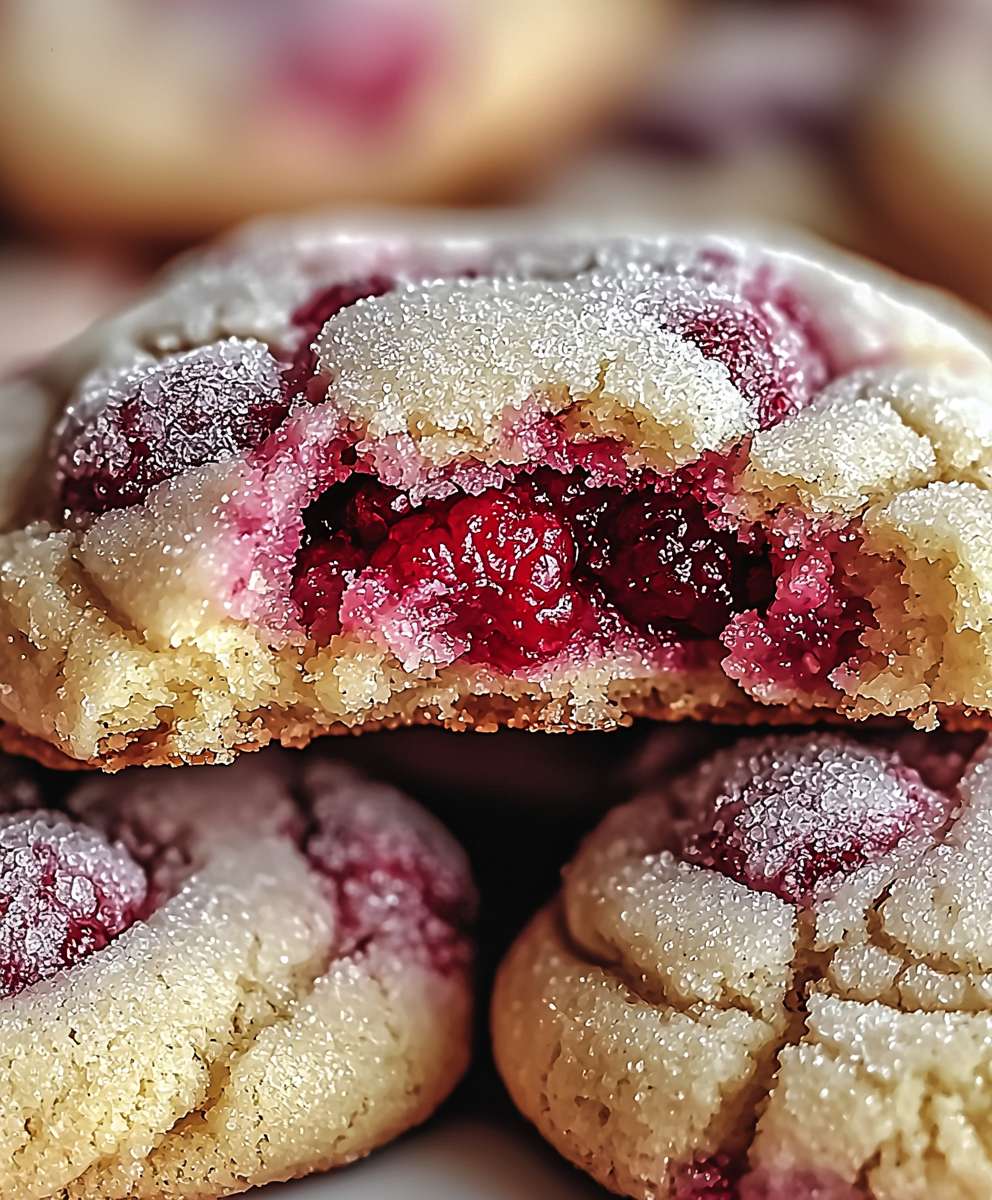
Raspberry Sugar Cookies: Prepare to be enchanted by these delightful treats that are as visually stunning as they are delicious! Imagine biting into a soft, buttery cookie, its delicate sweetness perfectly balanced by the tangy burst of fresh raspberries. These aren’t just cookies; they’re a little piece of edible art, guaranteed to brighten any day.
Sugar cookies, in their simplest form, have a long and storied history, tracing back to the Middle Ages. Over time, they’ve evolved from plain biscuits to canvases for creativity, adorned with colorful icings and festive sprinkles. But the addition of raspberries elevates the humble sugar cookie to a whole new level of sophistication. The slight tartness of the raspberries cuts through the richness of the cookie, creating a flavor profile that is both comforting and exciting.
What makes these Raspberry Sugar Cookies so irresistible? It’s the perfect combination of textures the soft, almost melt-in-your-mouth crumb of the cookie, contrasted with the juicy pop of the raspberries. They’re also incredibly versatile. Perfect for afternoon tea, a special occasion, or simply a sweet treat to enjoy with a cup of coffee, these cookies are sure to become a family favorite. Plus, they’re surprisingly easy to make, so you can whip up a batch whenever the craving strikes. Let’s get baking!

Ingredients:
- For the Cookies:
- 2 1/4 cups (281g) all-purpose flour, plus more for dusting
- 1 teaspoon baking powder
- 1/2 teaspoon baking soda
- 1/4 teaspoon salt
- 1 cup (2 sticks or 226g) unsalted butter, softened
- 3/4 cup (150g) granulated sugar
- 1 large egg
- 1 teaspoon vanilla extract
- 1/2 teaspoon almond extract (optional, but adds a lovely flavor!)
- 1/2 cup (about 4 ounces) freeze-dried raspberries, finely ground into a powder
- For the Raspberry Sugar Coating:
- 1/2 cup (about 2 ounces) freeze-dried raspberries, finely ground into a powder
- 1/2 cup (100g) granulated sugar
Preparing the Raspberry Sugar
Okay, let’s start with the raspberry sugar. This is what gives these cookies their signature look and extra burst of raspberry flavor. It’s super easy!
- Grind the Freeze-Dried Raspberries: If you haven’t already, grab your freeze-dried raspberries and grind them into a fine powder. A food processor works best for this, but you can also use a spice grinder or even a sturdy zip-top bag and a rolling pin. Just make sure there are no large chunks left. We want a consistent powder for the best coating.
- Combine with Sugar: In a small bowl, whisk together the raspberry powder and granulated sugar until well combined. Make sure there are no clumps of raspberry powder. This mixture is what we’ll use to coat the cookies before baking. Set this aside for now.
Making the Cookie Dough
Now for the fun part the cookie dough! This is a pretty standard sugar cookie dough, but the addition of raspberry powder takes it to the next level. Don’t be intimidated; it’s easier than you think!
- Whisk Dry Ingredients: In a medium bowl, whisk together the flour, baking powder, baking soda, and salt. This ensures that the baking powder and baking soda are evenly distributed throughout the dough, which is crucial for a good rise and texture. Set this aside.
- Cream Butter and Sugar: In a large bowl (or the bowl of your stand mixer), cream together the softened butter and granulated sugar until light and fluffy. This usually takes about 3-5 minutes on medium speed. The mixture should be noticeably lighter in color and have a smooth, airy texture. This step is important because it incorporates air into the dough, which helps create a tender cookie.
- Add Egg and Extracts: Beat in the egg until well combined. Then, stir in the vanilla extract and almond extract (if using). The almond extract is optional, but I highly recommend it! It complements the raspberry flavor beautifully.
- Gradually Add Dry Ingredients: Gradually add the dry ingredients to the wet ingredients, mixing on low speed until just combined. Be careful not to overmix! Overmixing can develop the gluten in the flour, resulting in tough cookies. Mix until the flour is just incorporated, and then stop.
- Incorporate Raspberry Powder: Add the remaining 1/2 cup of ground freeze-dried raspberries to the dough and mix until evenly distributed. The dough should turn a lovely pink color.
- Chill the Dough: Wrap the dough in plastic wrap and chill in the refrigerator for at least 1 hour, or preferably 2 hours. This is a crucial step! Chilling the dough allows the gluten to relax, which prevents the cookies from spreading too much in the oven. It also makes the dough easier to handle.
Shaping and Baking the Cookies
Almost there! Now it’s time to shape and bake these beauties. Get ready for your kitchen to smell amazing!
- Preheat Oven and Prepare Baking Sheets: Preheat your oven to 350°F (175°C). Line baking sheets with parchment paper or silicone baking mats. This will prevent the cookies from sticking and make cleanup a breeze.
- Roll and Cut Out Cookies: On a lightly floured surface, roll out the chilled dough to about 1/4 inch thickness. Use cookie cutters to cut out your desired shapes. I love using heart-shaped cutters for these cookies, but any shape will work.
- Coat with Raspberry Sugar: Gently press the tops of the cookies into the raspberry sugar mixture, coating them evenly. You can also sprinkle the sugar on top if you prefer.
- Bake: Place the cookies on the prepared baking sheets, leaving about 1-2 inches between each cookie. Bake for 8-10 minutes, or until the edges are lightly golden brown. Be careful not to overbake them! Overbaked cookies will be dry and crumbly.
- Cool: Let the cookies cool on the baking sheets for a few minutes before transferring them to a wire rack to cool completely.
Tips for Perfect Raspberry Sugar Cookies
Here are a few extra tips to ensure your raspberry sugar cookies turn out perfectly every time:
- Use Softened Butter: Make sure your butter is properly softened before creaming it with the sugar. It should be soft enough to easily press your finger into, but not melted.
- Don’t Overmix the Dough: Overmixing the dough can lead to tough cookies. Mix until the flour is just incorporated, and then stop.
- Chill the Dough: Chilling the dough is crucial for preventing the cookies from spreading too much in the oven. Don’t skip this step!
- Grind the Raspberries Finely: Make sure the freeze-dried raspberries are ground into a very fine powder. This will ensure that the raspberry flavor is evenly distributed throughout the dough and the sugar coating.
- Bake Until Just Golden: Be careful not to overbake the cookies. They should be lightly golden brown around the edges.
- Store Properly: Store the cooled cookies in an airtight container at room temperature for up to 5 days.
Variations
Want to mix things up a bit? Here are a few variations you can try:
- Add Lemon Zest: A little lemon zest in the dough can add a bright, citrusy flavor that complements the raspberry beautifully.
- Use Different Cookie Cutters: Get creative with your cookie cutters! Use different shapes for different holidays or occasions.
- Make Sandwich Cookies: Sandwich two cookies together with a layer of raspberry jam or buttercream frosting.
- Drizzle with White Chocolate: Drizzle the cooled cookies with melted white chocolate for an extra touch of sweetness and elegance.
Troubleshooting
Encountering issues? Here are some common problems and how to fix them:
- Cookies Spreading Too Much: This is usually caused by not chilling the dough long enough or using too much butter. Make sure to chill the dough for at least 1 hour, and double-check your butter measurement.
- Cookies Too Dry: This is usually caused by overbaking. Bake the cookies until they are just lightly golden brown around the edges.
- Cookies Too Tough: This is usually caused by overmixing the dough. Mix until the flour is just incorporated, and then stop.
Conclusion:
And there you have it! These Raspberry Sugar Cookies are more than just a treat; they’re a little burst of sunshine, a sweet hug in cookie form, and a guaranteed crowd-pleaser. I truly believe this recipe is a must-try for anyone who loves baking, enjoys a touch of fruity sweetness, or simply wants to impress their friends and family with something truly special. The combination of the buttery, melt-in-your-mouth cookie base with the tangy raspberry swirl is simply divine. It’s a flavor profile that’s both comforting and exciting, familiar yet unique. But why is this recipe a must-try, you ask? Well, beyond the incredible taste, it’s also surprisingly easy to make. I’ve broken down each step to ensure even beginner bakers can achieve perfect results. Plus, the vibrant pink hue of the raspberry swirl makes these cookies visually stunning perfect for gifting, parties, or simply brightening up your own day. Imagine presenting a plate of these beauties at your next gathering! They’re guaranteed to disappear in minutes. And the best part? The possibilities are endless! While I adore these cookies exactly as they are, there are so many ways to customize them to your liking. For a richer flavor, try using brown butter in the cookie dough. The nutty notes of brown butter complement the raspberry beautifully. If you’re feeling adventurous, add a sprinkle of chopped white chocolate to the dough for an extra layer of sweetness and texture. Or, for a more sophisticated touch, drizzle the finished cookies with a simple glaze made from powdered sugar and raspberry liqueur. Serving suggestions? Oh, where do I even begin! These cookies are perfect on their own with a cup of tea or coffee. They also make a delightful addition to a dessert platter alongside other treats like brownies, cupcakes, and fruit tarts. For a truly decadent experience, try sandwiching two cookies together with a dollop of raspberry buttercream frosting. And if you’re looking for a unique ice cream topping, crumble these cookies over your favorite vanilla or raspberry ice cream. Trust me, you won’t regret it!Variations to Explore:
* Lemon Raspberry: Add lemon zest to the cookie dough and a squeeze of lemon juice to the raspberry swirl for a bright and zesty twist. * Almond Raspberry: Incorporate almond extract into the cookie dough and top the cookies with slivered almonds before baking. * Chocolate Raspberry: Add cocoa powder to half of the cookie dough and create a chocolate-raspberry swirl. * White Chocolate Chip Raspberry: Fold in white chocolate chips to the cookie dough for added sweetness and texture. * Raspberry Thumbprint Cookies: Instead of swirling the raspberry mixture, create a thumbprint in the center of each cookie and fill it with raspberry jam. I’m so excited for you to try this recipe and experience the joy of baking these delicious Raspberry Sugar Cookies for yourself. Don’t be afraid to get creative and experiment with different flavors and variations. Baking should be fun, so relax, enjoy the process, and let your imagination run wild! Once you’ve made these cookies, I would absolutely love to hear about your experience. Did you try any of the variations I suggested? Did you add your own special touch? Share your photos and stories with me in the comments below! I can’t wait to see what you create. Happy baking! PrintRaspberry Sugar Cookies: The Ultimate Guide to Baking Perfection

Delicate raspberry sugar cookies bursting with real raspberry flavor and coated in sweet raspberry sugar. Perfect for any occasion!
- Prep Time: 30 minutes
- Cook Time: 8 minutes
- Total Time: 98 minutes
- Yield: 24–36 cookies 1x
Ingredients
- 2 1/4 cups (281g) all-purpose flour, plus more for dusting
- 1 teaspoon baking powder
- 1/2 teaspoon baking soda
- 1/4 teaspoon salt
- 1 cup (2 sticks or 226g) unsalted butter, softened
- 3/4 cup (150g) granulated sugar
- 1 large egg
- 1 teaspoon vanilla extract
- 1/2 teaspoon almond extract (optional)
- 1/2 cup (about 4 ounces) freeze-dried raspberries, finely ground into a powder
- 1/2 cup (about 2 ounces) freeze-dried raspberries, finely ground into a powder
- 1/2 cup (100g) granulated sugar
Instructions
- Prepare Raspberry Sugar: Grind freeze-dried raspberries into a fine powder using a food processor, spice grinder, or zip-top bag and rolling pin. In a small bowl, whisk together the raspberry powder and granulated sugar until well combined. Set aside.
- Whisk Dry Ingredients: In a medium bowl, whisk together the flour, baking powder, baking soda, and salt. Set aside.
- Cream Butter and Sugar: In a large bowl (or stand mixer), cream together the softened butter and granulated sugar until light and fluffy (3-5 minutes).
- Add Egg and Extracts: Beat in the egg until well combined. Stir in the vanilla extract and almond extract (if using).
- Gradually Add Dry Ingredients: Gradually add the dry ingredients to the wet ingredients, mixing on low speed until just combined. Do not overmix.
- Incorporate Raspberry Powder: Add the remaining 1/2 cup of ground freeze-dried raspberries to the dough and mix until evenly distributed.
- Chill the Dough: Wrap the dough in plastic wrap and chill in the refrigerator for at least 1 hour, or preferably 2 hours.
- Preheat Oven and Prepare Baking Sheets: Preheat oven to 350°F (175°C). Line baking sheets with parchment paper or silicone baking mats.
- Roll and Cut Out Cookies: On a lightly floured surface, roll out the chilled dough to about 1/4 inch thickness. Use cookie cutters to cut out desired shapes.
- Coat with Raspberry Sugar: Gently press the tops of the cookies into the raspberry sugar mixture, coating them evenly.
- Bake: Place the cookies on the prepared baking sheets, leaving about 1-2 inches between each cookie. Bake for 8-10 minutes, or until the edges are lightly golden brown.
- Cool: Let the cookies cool on the baking sheets for a few minutes before transferring them to a wire rack to cool completely.
Notes
- Use softened butter for best results.
- Don’t overmix the dough to avoid tough cookies.
- Chilling the dough is crucial to prevent spreading.
- Grind the freeze-dried raspberries very finely for even flavor distribution.
- Bake until just golden brown to avoid dryness.
- Store cooled cookies in an airtight container at room temperature for up to 5 days.
- Variations: Add lemon zest to the dough, use different cookie cutters, make sandwich cookies with raspberry jam or buttercream, or drizzle with white chocolate.
- Troubleshooting:
Cookies Spreading Too Much: Chill dough longer, reduce butter slightly.
Cookies Too Dry: Don’t overbake.
Cookies Too Tough: Don’t overmix.


Leave a Comment