
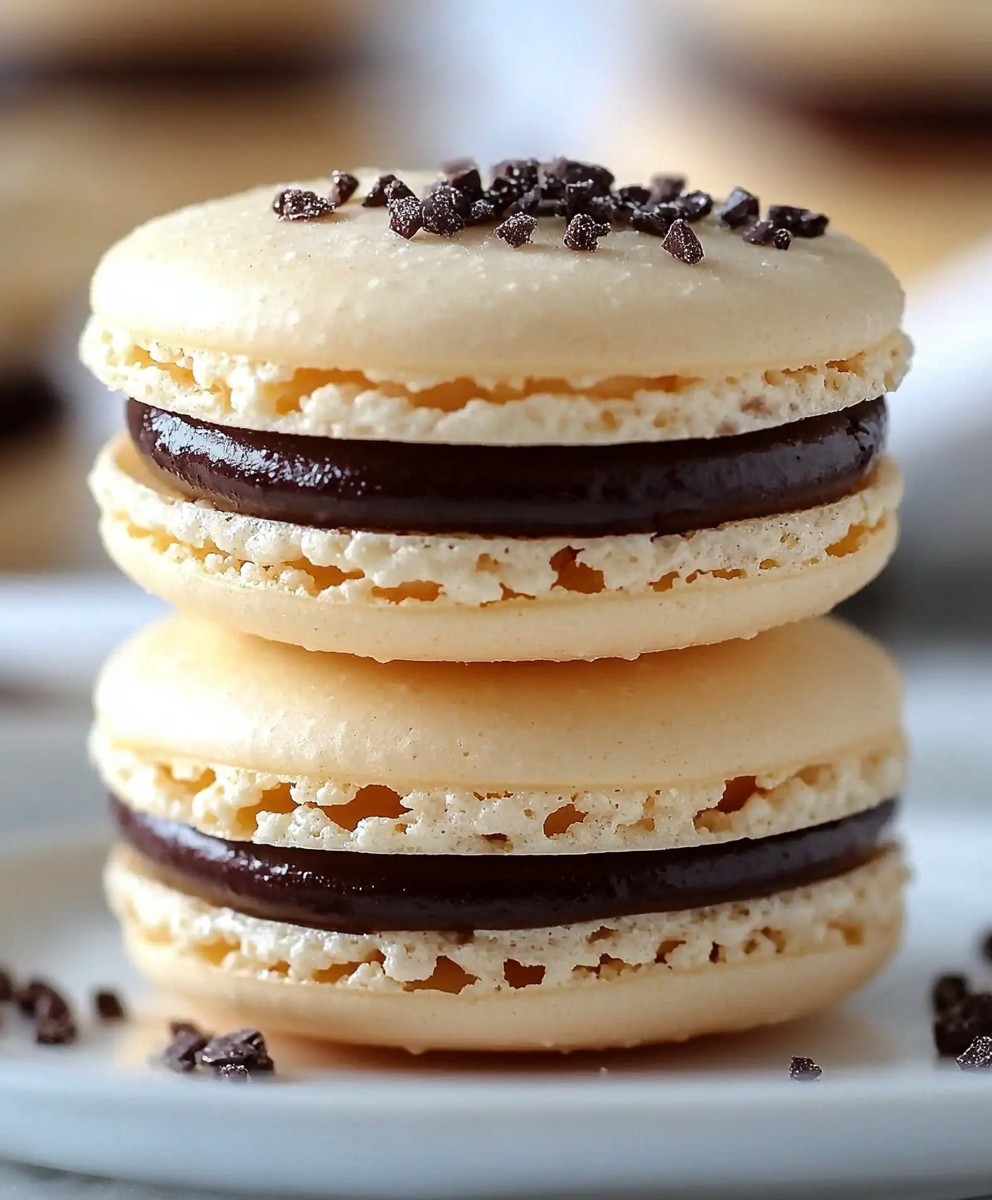
Boston Creme Pie Macarons: Prepare to be amazed! Imagine the delicate, melt-in-your-mouth texture of a classic French macaron, but with the rich, creamy, and utterly irresistible flavors of a Boston Creme Pie. Yes, you read that right! We’re taking two iconic desserts and merging them into one unforgettable treat.
The Boston Creme Pie, despite its name, is actually a cake! It originated in the mid-19th century at Boston’s Parker House Hotel and quickly became a beloved American classic. Its layers of light sponge cake, creamy custard filling, and decadent chocolate glaze have captivated dessert lovers for generations.
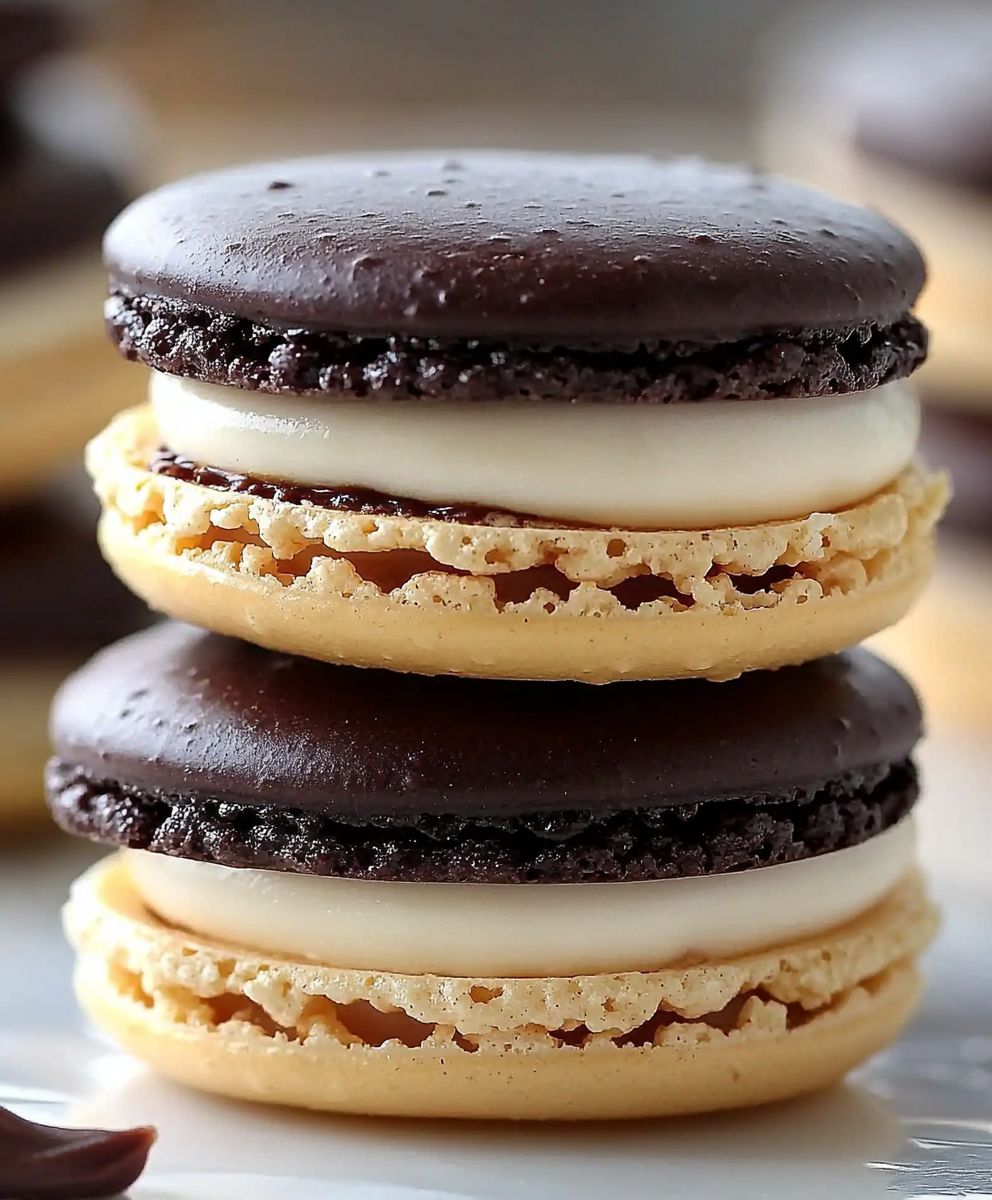
So, why do people adore this flavor combination? It’s the perfect balance of textures and tastes. The airy cake contrasts beautifully with the smooth, rich custard, and the chocolate provides a satisfyingly sweet finish. Now, imagine all of that, perfectly miniaturized and intensified within the delicate shell of a macaron. These Boston Creme Pie Macarons are not only visually stunning but also offer an explosion of flavor in every bite. They’re the perfect sophisticated treat for any occasion, or simply a delightful way to elevate your afternoon tea. Get ready to impress your friends and family with this unique and delicious recipe!
Ingredients:
- For the Macaron Shells:
- 125g almond flour, finely ground
- 125g powdered sugar
- 50g egg whites, aged (separated and left in the refrigerator for 24-48 hours)
- 1/4 teaspoon cream of tartar
- 50g granulated sugar
- Yellow gel food coloring (optional, for a slight yellow tint)
- For the Pastry Cream Filling:
- 2 cups whole milk
- 1/2 cup granulated sugar
- 1/4 cup cornstarch
- 1/4 teaspoon salt
- 4 large egg yolks
- 2 tablespoons unsalted butter
- 1 teaspoon vanilla extract
- For the Chocolate Ganache:
- 4 ounces semi-sweet chocolate, finely chopped
- 1/2 cup heavy cream
- 1 tablespoon unsalted butter
Preparing the Macaron Shells:
- Sift the Dry Ingredients: In a large bowl, sift together the almond flour and powdered sugar. This step is crucial for removing any lumps and ensuring a smooth macaron shell. If you have a food processor, you can pulse the almond flour and powdered sugar together for about 30 seconds to further refine the mixture.
- Make the Meringue: In a clean, grease-free bowl (stainless steel or glass is best), beat the aged egg whites with an electric mixer until soft peaks form. Add the cream of tartar and continue beating until stiff, glossy peaks form. Gradually add the granulated sugar, one tablespoon at a time, while continuing to beat. The meringue should be firm and hold its shape. If you’re using gel food coloring, add it now, a tiny drop at a time, until you reach your desired shade of yellow. Be careful not to overmix after adding the color.
- Macaronage: This is the most important step! Gently fold the dry ingredients into the meringue in three additions. Use a spatula and cut down the center of the bowl, scrape along the sides, and fold the mixture over itself. Continue folding until the batter flows like lava. It should be smooth and shiny, and when you lift the spatula, the batter should fall back into the bowl in a ribbon that slowly disappears back into the mixture within 20-30 seconds. This is the “ribbon stage.” Be careful not to overmix, as this will result in flat, runny macarons. Undermixing will result in lumpy macarons.
- Piping: Transfer the macaron batter to a piping bag fitted with a round tip (about ½ inch in diameter). Pipe circles onto a baking sheet lined with parchment paper or a silicone mat. Aim for circles about 1.5 inches in diameter, leaving some space between each macaron.
- Tapping: After piping, firmly tap the baking sheet against the counter several times. This helps release any air bubbles trapped in the batter and creates a smooth surface.
- Resting: Let the piped macarons rest at room temperature for 30-60 minutes, or until a skin forms on the surface. You should be able to gently touch the surface without the batter sticking to your finger. This step is essential for developing the “feet” of the macarons. The resting time will vary depending on the humidity in your kitchen.
- Baking: Preheat your oven to 300°F (150°C). Bake the macarons for 12-15 minutes, or until they have developed feet and are firm to the touch. Rotate the baking sheet halfway through baking to ensure even cooking.
- Cooling: Once baked, remove the macarons from the oven and let them cool completely on the baking sheet before removing them. They should easily peel off the parchment paper or silicone mat when they are cool.
Preparing the Pastry Cream Filling:
- Heat the Milk: In a medium saucepan, combine the milk and half of the sugar (1/4 cup). Heat over medium heat until simmering, stirring occasionally to prevent scorching.
- Whisk the Egg Yolks: In a separate bowl, whisk together the egg yolks, remaining sugar (1/4 cup), cornstarch, and salt until pale and smooth.
- Temper the Egg Yolks: Slowly drizzle a small amount of the hot milk mixture into the egg yolk mixture, whisking constantly to prevent the eggs from scrambling. This process is called tempering. Continue adding the hot milk in a slow, steady stream until the egg yolk mixture is warm.
- Cook the Pastry Cream: Pour the tempered egg yolk mixture back into the saucepan with the remaining milk. Cook over medium heat, whisking constantly, until the mixture thickens and comes to a boil. Continue cooking for 1-2 minutes, whisking vigorously, to ensure the cornstarch is fully cooked.
- Finish the Pastry Cream: Remove the saucepan from the heat and stir in the butter and vanilla extract.
- Cool the Pastry Cream: Pour the pastry cream into a clean bowl, cover the surface with plastic wrap (pressing the plastic wrap directly onto the surface to prevent a skin from forming), and refrigerate for at least 2 hours, or preferably overnight, to allow it to cool completely and thicken further.
Preparing the Chocolate Ganache:
- Heat the Cream: In a small saucepan, heat the heavy cream over medium heat until it just begins to simmer. Do not boil.
- Pour over Chocolate: Place the finely chopped chocolate in a heatproof bowl. Pour the hot cream over the chocolate and let it sit for 1 minute to soften the chocolate.
- Stir Until Smooth: Gently stir the chocolate and cream together until the chocolate is completely melted and the ganache is smooth and glossy.
- Add Butter: Stir in the butter until it is fully incorporated and the ganache is even more glossy.
- Cool Slightly: Let the ganache cool slightly at room temperature for about 15-20 minutes, or until it thickens to a spreadable consistency.
Assembling the Macarons:
- Pair the Shells: Match up the macaron shells by size and shape.
- Fill with Pastry Cream: Pipe or spoon a generous amount of pastry cream onto the flat side of one macaron shell.
- Top with Ganache: Spread a thin layer of chocolate ganache on the flat side of another macaron shell.
- Assemble: Gently sandwich the two shells together, pressing lightly to distribute the filling evenly.
- Chill: Place the assembled macarons in an airtight container and refrigerate for at least 24 hours before serving. This allows the flavors to meld together and the macaron shells to soften slightly, resulting in a perfect texture.
- Enjoy: After chilling, bring the macarons to room temperature for about 15-20 minutes before serving. This will enhance the flavors and textures. Enjoy your homemade Boston Creme Pie Macarons!
Conclusion:
And there you have it! These Boston Creme Pie Macarons are truly a must-try for any baking enthusiast or lover of classic desserts. They perfectly capture the essence of the beloved Boston Creme Pie in a delicate, bite-sized form. The crisp, almond-flavored shells, the rich and creamy pastry cream filling, and the decadent chocolate ganache all come together in a symphony of flavors and textures that will leave you wanting more. I know, I know, macarons can seem intimidating, but trust me, with a little patience and attention to detail, you can absolutely master this recipe and impress your friends and family. Why are these macarons so special? They’re not just another pretty dessert; they’re a conversation starter, a showstopper, and a delicious way to elevate any occasion. The combination of the classic Boston Creme Pie flavors in a macaron format is unexpected and delightful. Plus, the satisfaction of creating these intricate treats from scratch is incredibly rewarding. But the fun doesn’t stop there! Feel free to get creative with your serving suggestions and variations. These macarons are perfect on their own, of course, but they also make a stunning addition to a dessert platter. Imagine serving them alongside fresh berries, whipped cream, and other miniature pastries. You could also use them to decorate a cake or cupcake, adding a touch of elegance and sophistication. Looking for variations? Consider adding a hint of coffee extract to the pastry cream for a mocha twist. Or, for a richer chocolate flavor, use dark chocolate for the ganache. You could even experiment with different food colorings to create macarons in various shades of brown and beige, mimicking the colors of a traditional Boston Creme Pie. Another fun idea is to sprinkle the tops of the macarons with cocoa powder or shaved chocolate before the ganache sets.Serving Suggestions:
* Serve with a cup of hot coffee or tea. * Include them in a dessert box for a special occasion. * Pair them with fresh fruit for a balanced treat. * Use them as edible decorations for cakes and cupcakes.Variations to try:
* Mocha Boston Creme Pie Macarons: Add coffee extract to the pastry cream. * Dark Chocolate Ganache: Use dark chocolate for a richer flavor. * Caramel Boston Creme Pie Macarons: Add a layer of salted caramel between the pastry cream and the ganache. * Decorate with cocoa powder or shaved chocolate. I truly believe that anyone can make these Boston Creme Pie Macarons with a little practice and the right guidance. Don’t be afraid to experiment and put your own spin on the recipe. Baking should be fun, so relax, enjoy the process, and don’t worry if your first batch isn’t perfect. The most important thing is to learn from your mistakes and keep trying. So, what are you waiting for? Gather your ingredients, preheat your oven, and get ready to embark on a macaron-making adventure! I’m confident that you’ll be thrilled with the results. And when you do, please, please, please share your creations with me! I’d love to see your photos and hear about your experience. Tag me on social media and let me know how your Boston Creme Pie Macarons turned out. Happy baking! I can’t wait to see what you create! Let me know in the comments if you have any questions! PrintBoston Creme Pie Macarons: A Deliciously Decadent Recipe

Delicate almond meringue shells filled with creamy pastry cream and rich chocolate ganache. A sophisticated twist on a classic dessert!
- Prep Time: 90 minutes
- Cook Time: 15 minutes
- Total Time: 120 minutes
- Yield: 24–30 macarons 1x
Ingredients
- 125g almond flour, finely ground
- 125g powdered sugar
- 50g egg whites, aged (separated and left in the refrigerator for 24–48 hours)
- 1/4 teaspoon cream of tartar
- 50g granulated sugar
- Yellow gel food coloring (optional, for a slight yellow tint)
- 2 cups whole milk
- 1/2 cup granulated sugar
- 1/4 cup cornstarch
- 1/4 teaspoon salt
- 4 large egg yolks
- 2 tablespoons unsalted butter
- 1 teaspoon vanilla extract
- 4 ounces semi-sweet chocolate, finely chopped
- 1/2 cup heavy cream
- 1 tablespoon unsalted butter
Instructions
- In a large bowl, sift together the almond flour and powdered sugar. This step is crucial for removing any lumps and ensuring a smooth macaron shell. If you have a food processor, you can pulse the almond flour and powdered sugar together for about 30 seconds to further refine the mixture.
- In a clean, grease-free bowl (stainless steel or glass is best), beat the aged egg whites with an electric mixer until soft peaks form. Add the cream of tartar and continue beating until stiff, glossy peaks form. Gradually add the granulated sugar, one tablespoon at a time, while continuing to beat. The meringue should be firm and hold its shape. If you’re using gel food coloring, add it now, a tiny drop at a time, until you reach your desired shade of yellow. Be careful not to overmix after adding the color.
- Gently fold the dry ingredients into the meringue in three additions. Use a spatula and cut down the center of the bowl, scrape along the sides, and fold the mixture over itself. Continue folding until the batter flows like lava. It should be smooth and shiny, and when you lift the spatula, the batter should fall back into the bowl in a ribbon that slowly disappears back into the mixture within 20-30 seconds. This is the “ribbon stage.” Be careful not to overmix, as this will result in flat, runny macarons. Undermixing will result in lumpy macarons.
- Transfer the macaron batter to a piping bag fitted with a round tip (about ½ inch in diameter). Pipe circles onto a baking sheet lined with parchment paper or a silicone mat. Aim for circles about 1.5 inches in diameter, leaving some space between each macaron.
- After piping, firmly tap the baking sheet against the counter several times. This helps release any air bubbles trapped in the batter and creates a smooth surface.
- Let the piped macarons rest at room temperature for 30-60 minutes, or until a skin forms on the surface. You should be able to gently touch the surface without the batter sticking to your finger. This step is essential for developing the “feet” of the macarons. The resting time will vary depending on the humidity in your kitchen.
- Preheat your oven to 300°F (150°C). Bake the macarons for 12-15 minutes, or until they have developed feet and are firm to the touch. Rotate the baking sheet halfway through baking to ensure even cooking.
- Once baked, remove the macarons from the oven and let them cool completely on the baking sheet before removing them. They should easily peel off the parchment paper or silicone mat when they are cool.
- In a medium saucepan, combine the milk and half of the sugar (1/4 cup). Heat over medium heat until simmering, stirring occasionally to prevent scorching.
- In a separate bowl, whisk together the egg yolks, remaining sugar (1/4 cup), cornstarch, and salt until pale and smooth.
- Slowly drizzle a small amount of the hot milk mixture into the egg yolk mixture, whisking constantly to prevent the eggs from scrambling. This process is called tempering. Continue adding the hot milk in a slow, steady stream until the egg yolk mixture is warm.
- Pour the tempered egg yolk mixture back into the saucepan with the remaining milk. Cook over medium heat, whisking constantly, until the mixture thickens and comes to a boil. Continue cooking for 1-2 minutes, whisking vigorously, to ensure the cornstarch is fully cooked.
- Remove the saucepan from the heat and stir in the butter and vanilla extract.
- Pour the pastry cream into a clean bowl, cover the surface with plastic wrap (pressing the plastic wrap directly onto the surface to prevent a skin from forming), and refrigerate for at least 2 hours, or preferably overnight, to allow it to cool completely and thicken further.
- In a small saucepan, heat the heavy cream over medium heat until it just begins to simmer. Do not boil.
- Place the finely chopped chocolate in a heatproof bowl. Pour the hot cream over the chocolate and let it sit for 1 minute to soften the chocolate.
- Gently stir the chocolate and cream together until the chocolate is completely melted and the ganache is smooth and glossy.
- Stir in the butter until it is fully incorporated and the ganache is even more glossy.
- Let the ganache cool slightly at room temperature for about 15-20 minutes, or until it thickens to a spreadable consistency.
- Match up the macaron shells by size and shape.
- Pipe or spoon a generous amount of pastry cream onto the flat side of one macaron shell.
- Spread a thin layer of chocolate ganache on the flat side of another macaron shell.
- Gently sandwich the two shells together, pressing lightly to distribute the filling evenly.
- Place the assembled macarons in an airtight container and refrigerate for at least 24 hours before serving. This allows the flavors to meld together and the macaron shells to soften slightly, resulting in a perfect texture.
- After chilling, bring the macarons to room temperature for about 15-20 minutes before serving. This will enhance the flavors and textures. Enjoy your homemade Boston Creme Pie Macarons!
Notes
- Aged egg whites are crucial for macaron success. They create a more stable meringue.
- Macaronage (folding the dry ingredients into the meringue) is the trickiest part. Watch videos and practice!
- Resting the macarons before baking is essential for developing the “feet.”
- Chilling the assembled macarons for 24 hours is important for the best flavor and texture.
- Humidity can affect macaron baking. On humid days, you may need to rest the macarons longer.

Leave a Comment