
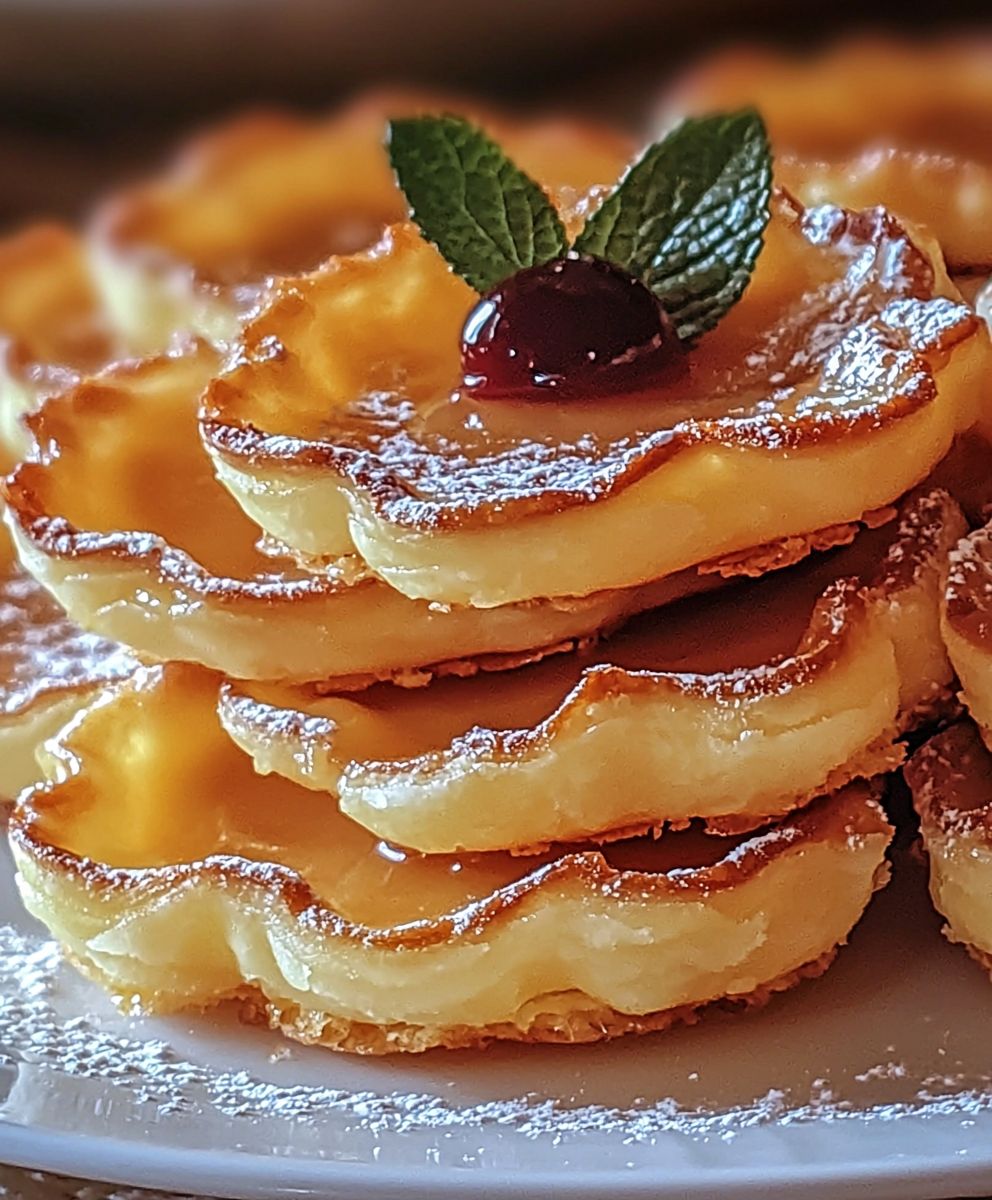
Thin tarts, those delicate and delightful pastries, are about to become your new favorite obsession. Imagine biting into a crisp, buttery crust that shatters perfectly with each mouthful, giving way to a sweet and flavorful filling. Are you ready to embark on a baking adventure that promises both simplicity and sophistication?
While the exact origins of thin tarts are debated, similar pastries have graced tables across Europe for centuries. From the fruit-filled galettes of France to the savory pies of England, the concept of a simple, open-faced tart has resonated with cooks and eaters alike. They represent a celebration of seasonal ingredients and the joy of homemade goodness.
What makes these tarts so irresistible? It’s the perfect balance of textures and flavors. The buttery, flaky crust provides a satisfying crunch, while the filling whether it’s sweet berries, creamy custard, or savory vegetables offers a burst of deliciousness. Plus, their relatively small size makes them ideal for individual servings or for creating a beautiful dessert platter. They are also incredibly versatile and can be adapted to suit any taste or dietary need. So, let’s get baking and create some magic with these delightful treats!

Ingredients:
- For the Crust:
- 2 1/2 cups all-purpose flour, plus more for dusting
- 1 teaspoon salt
- 1 cup (2 sticks) unsalted butter, very cold and cut into 1/2-inch cubes
- 1/2 cup ice water, plus more if needed
- 1 tablespoon apple cider vinegar
- For the Apple Filling:
- 6 medium apples (such as Honeycrisp, Gala, or Fuji), peeled, cored, and thinly sliced
- 1/2 cup granulated sugar
- 1/4 cup packed light brown sugar
- 2 tablespoons all-purpose flour
- 1 teaspoon ground cinnamon
- 1/4 teaspoon ground nutmeg
- 1/4 teaspoon ground allspice
- 2 tablespoons unsalted butter, cut into small pieces
- 1 tablespoon lemon juice
- For the Egg Wash (Optional):
- 1 large egg
- 1 tablespoon milk or water
- For the Sugar Topping (Optional):
- 2 tablespoons granulated sugar
Preparing the Crust:
- Combine Dry Ingredients: In a large bowl, whisk together the flour and salt. This ensures the salt is evenly distributed throughout the dough, which is crucial for flavor and gluten development.
- Cut in the Butter: Add the cold, cubed butter to the flour mixture. Using a pastry blender or your fingertips (work quickly to prevent the butter from melting), cut the butter into the flour until the mixture resembles coarse crumbs. You should still see some small pieces of butter these are what create flaky layers in the crust. The size of the butter pieces is key here; too small, and you won’t get the desired flakiness; too large, and the butter won’t be evenly distributed.
- Add Wet Ingredients: In a small bowl, whisk together the ice water and apple cider vinegar. The vinegar helps to tenderize the dough. Gradually add the ice water mixture to the flour and butter mixture, mixing gently with a fork until the dough just comes together. Be careful not to overmix, as this will develop the gluten and result in a tough crust. Add more ice water, one tablespoon at a time, if needed, until the dough forms a shaggy mass. The amount of water needed can vary depending on the humidity and the type of flour you’re using.
- Form the Dough: Turn the dough out onto a lightly floured surface. Gently gather it into a ball. Divide the dough in half. Flatten each half into a disc, wrap tightly in plastic wrap, and refrigerate for at least 2 hours, or preferably overnight. This chilling time is essential for relaxing the gluten and allowing the butter to firm up, which will make the dough easier to roll out and prevent it from shrinking during baking.
Preparing the Apple Filling:
- Combine Filling Ingredients: In a large bowl, combine the sliced apples, granulated sugar, brown sugar, flour, cinnamon, nutmeg, and allspice. The flour helps to thicken the filling as it bakes, preventing it from becoming too watery. Toss gently to coat the apples evenly with the sugar and spices.
- Add Butter and Lemon Juice: Dot the apple mixture with the small pieces of butter. This adds richness and flavor to the filling. Drizzle the lemon juice over the apples to prevent them from browning and to add a touch of brightness to the flavor. Toss again to combine.
Assembling and Baking the Tarts:
- Preheat Oven: Preheat your oven to 375°F (190°C). Place a baking sheet in the oven while it preheats. This helps to ensure that the bottom crust of the tarts is cooked through.
- Roll Out the Dough: On a lightly floured surface, roll out one disc of dough into a thin circle, about 12 inches in diameter. The thinner the dough, the more delicate the tart will be. Be careful not to roll it too thin, or it will tear easily.
- Cut Out Tart Circles: Using a 4-inch round cookie cutter or a sharp knife, cut out circles from the rolled-out dough. You should be able to get about 6-8 circles from each disc of dough. Reroll the scraps to get as many circles as possible.
- Transfer to Baking Sheet: Carefully transfer the dough circles to the preheated baking sheet lined with parchment paper. The parchment paper prevents the tarts from sticking to the baking sheet.
- Fill the Tarts: Spoon the apple filling onto the center of each dough circle, leaving a small border around the edge. Don’t overfill the tarts, or the filling will spill out during baking.
- Fold the Edges: Gently fold the edges of the dough over the filling, pleating them as you go to create a rustic, free-form tart. Press the pleats lightly to seal them.
- Prepare Egg Wash (Optional): In a small bowl, whisk together the egg and milk or water. Brush the egg wash over the exposed dough of the tarts. This will give the crust a golden-brown color and a shiny finish.
- Sprinkle with Sugar (Optional): Sprinkle the tarts with granulated sugar. This adds a touch of sweetness and a nice crunch to the crust.
- Bake: Bake for 30-35 minutes, or until the crust is golden brown and the filling is bubbly. The baking time may vary depending on your oven, so keep an eye on the tarts and adjust the time as needed.
- Cool: Let the tarts cool on the baking sheet for a few minutes before transferring them to a wire rack to cool completely. This prevents the tarts from sticking to the baking sheet and allows the filling to set.
Tips for Success:
- Keep the Butter Cold: This is the most important tip for making a flaky crust. Cold butter creates steam as it bakes, which separates the layers of dough.
- Don’t Overmix the Dough: Overmixing develops the gluten in the flour, which results in a tough crust. Mix the dough just until it comes together.
- Chill the Dough: Chilling the dough allows the gluten to relax and the butter to firm up, which makes the dough easier to roll out and prevents it from shrinking during baking.
- Use a Variety of Apples: Using a mix of apple varieties will give the filling a more complex flavor.
- Don’t Overfill the Tarts: Overfilling the tarts will cause the filling to spill out during baking.
- Adjust Baking Time as Needed: The baking time may vary depending on your oven, so keep an eye on the tarts and adjust the time as needed.
Serving Suggestions:
- Serve the tarts warm or at room temperature.
- Top with a scoop of vanilla ice cream or a dollop of whipped cream.
- Dust with powdered sugar.
- Serve with a cup of coffee or tea.
Conclusion:
And there you have it! These thin tarts are truly a must-try for anyone looking for a simple yet elegant dessert thats guaranteed to impress. From the satisfyingly crisp crust to the burst of flavor from the filling, every bite is a little piece of heaven. I know I’ve made them countless times, and they’re always a hit, whether it’s a casual weeknight treat or a special occasion dessert. What makes these tarts so special, you ask? It’s the perfect balance of textures and tastes. The delicate, buttery crust provides a wonderful contrast to the sweet and tangy filling. Plus, they’re incredibly versatile! You can easily adapt the filling to suit your own preferences and the ingredients you have on hand. Think of it as a blank canvas for your culinary creativity. But the real magic lies in their simplicity. You don’t need to be a seasoned baker to whip up a batch of these beauties. The recipe is straightforward, the ingredients are readily available, and the results are consistently delicious. Trust me, even if you’re a beginner in the kitchen, you can totally nail this recipe. Now, let’s talk serving suggestions and variations. While these thin tarts are delightful on their own, a scoop of vanilla ice cream or a dollop of whipped cream takes them to the next level. For a more sophisticated touch, try pairing them with a glass of dessert wine or a cup of freshly brewed coffee. And don’t be afraid to experiment with different fillings! If you’re a fan of berries, try using a mix of raspberries, blueberries, and strawberries. For a more tropical flavor, mango or pineapple would be fantastic. You could even add a sprinkle of chopped nuts or a drizzle of chocolate for an extra layer of indulgence. Here are a few more ideas to get your creative juices flowing:Serving Suggestions:
- Serve warm with a scoop of vanilla bean ice cream.
- Dust with powdered sugar for an elegant presentation.
- Pair with a dessert wine like Moscato or Sauternes.
- Add a dollop of freshly whipped cream and a sprinkle of cinnamon.
Variations:
- Berry Bliss: Use a mix of fresh raspberries, blueberries, and strawberries for a vibrant and fruity filling.
- Tropical Tango: Incorporate diced mango and pineapple for a taste of the tropics.
- Chocolate Hazelnut Dream: Add a layer of Nutella to the crust before adding the filling, and sprinkle with chopped hazelnuts.
- Apple Cinnamon Spice: Use thinly sliced apples and a generous amount of cinnamon for a warm and comforting flavor.
- Lemon Zest Zing: Add lemon zest to both the crust and the filling for a bright and citrusy twist.
Thin Tarts: Delicious Recipes and Baking Tips

Rustic apple tarts with flaky homemade crust and sweet, spiced filling. Perfect fall dessert!
- Prep Time: 45 minutes
- Cook Time: 35 minutes
- Total Time: 180 minutes
- Yield: 12–16 tarts 1x
Ingredients
- 2 1/2 cups all-purpose flour, plus more for dusting
- 1 teaspoon salt
- 1 cup (2 sticks) unsalted butter, very cold and cut into 1/2-inch cubes
- 1/2 cup ice water, plus more if needed
- 1 tablespoon apple cider vinegar
- 6 medium apples (such as Honeycrisp, Gala, or Fuji), peeled, cored, and thinly sliced
- 1/2 cup granulated sugar
- 1/4 cup packed light brown sugar
- 2 tablespoons all-purpose flour
- 1 teaspoon ground cinnamon
- 1/4 teaspoon ground nutmeg
- 1/4 teaspoon ground allspice
- 2 tablespoons unsalted butter, cut into small pieces
- 1 tablespoon lemon juice
- 1 large egg
- 1 tablespoon milk or water
- 2 tablespoons granulated sugar
Instructions
- In a large bowl, whisk together the flour and salt.
- Add the cold, cubed butter to the flour mixture. Using a pastry blender or your fingertips (work quickly), cut the butter into the flour until the mixture resembles coarse crumbs.
- In a small bowl, whisk together the ice water and apple cider vinegar. Gradually add the ice water mixture to the flour and butter mixture, mixing gently with a fork until the dough just comes together. Add more ice water, one tablespoon at a time, if needed, until the dough forms a shaggy mass.
- Turn the dough out onto a lightly floured surface. Gently gather it into a ball. Divide the dough in half. Flatten each half into a disc, wrap tightly in plastic wrap, and refrigerate for at least 2 hours, or preferably overnight.
- In a large bowl, combine the sliced apples, granulated sugar, brown sugar, flour, cinnamon, nutmeg, and allspice. Toss gently to coat the apples evenly.
- Dot the apple mixture with the small pieces of butter. Drizzle the lemon juice over the apples. Toss again to combine.
- Preheat oven to 375°F (190°C). Place a baking sheet in the oven while it preheats.
- On a lightly floured surface, roll out one disc of dough into a thin circle, about 12 inches in diameter.
- Using a 4-inch round cookie cutter or a sharp knife, cut out circles from the rolled-out dough. Reroll the scraps to get as many circles as possible.
- Carefully transfer the dough circles to the preheated baking sheet lined with parchment paper.
- Spoon the apple filling onto the center of each dough circle, leaving a small border around the edge.
- Gently fold the edges of the dough over the filling, pleating them as you go to create a rustic, free-form tart. Press the pleats lightly to seal them.
- (Optional) In a small bowl, whisk together the egg and milk or water. Brush the egg wash over the exposed dough of the tarts.
- (Optional) Sprinkle the tarts with granulated sugar.
- Bake for 30-35 minutes, or until the crust is golden brown and the filling is bubbly.
- Let the tarts cool on the baking sheet for a few minutes before transferring them to a wire rack to cool completely.
Notes
- Keep the Butter Cold: This is the most important tip for making a flaky crust.
- Don’t Overmix the Dough: Overmixing develops the gluten in the flour, which results in a tough crust.
- Chill the Dough: Chilling the dough allows the gluten to relax and the butter to firm up.
- Use a Variety of Apples: Using a mix of apple varieties will give the filling a more complex flavor.
- Don’t Overfill the Tarts: Overfilling the tarts will cause the filling to spill out during baking.
- Adjust Baking Time as Needed: The baking time may vary depending on your oven.
- Serve the tarts warm or at room temperature.
- Top with a scoop of vanilla ice cream or a dollop of whipped cream.
- Dust with powdered sugar.
- Serve with a cup of coffee or tea.

Leave a Comment