
Tex Mex Hot Dogs: Prepare to ditch the ketchup and mustard! We’re about to embark on a flavor fiesta that will redefine your summer grilling game. Forget everything you thought you knew about this classic American staple, because we’re injecting it with a vibrant, zesty Tex-Mex twist that will have everyone begging for seconds.
The beauty of Tex-Mex cuisine lies in its bold, unapologetic flavors, a fusion of Southwestern American and Mexican culinary traditions. While the exact origins of the hot dog are debated, its popularity exploded in the United States, becoming synonymous with baseball games and backyard barbecues. By combining these two iconic culinary worlds, we create a symphony of taste that’s both familiar and excitingly new.
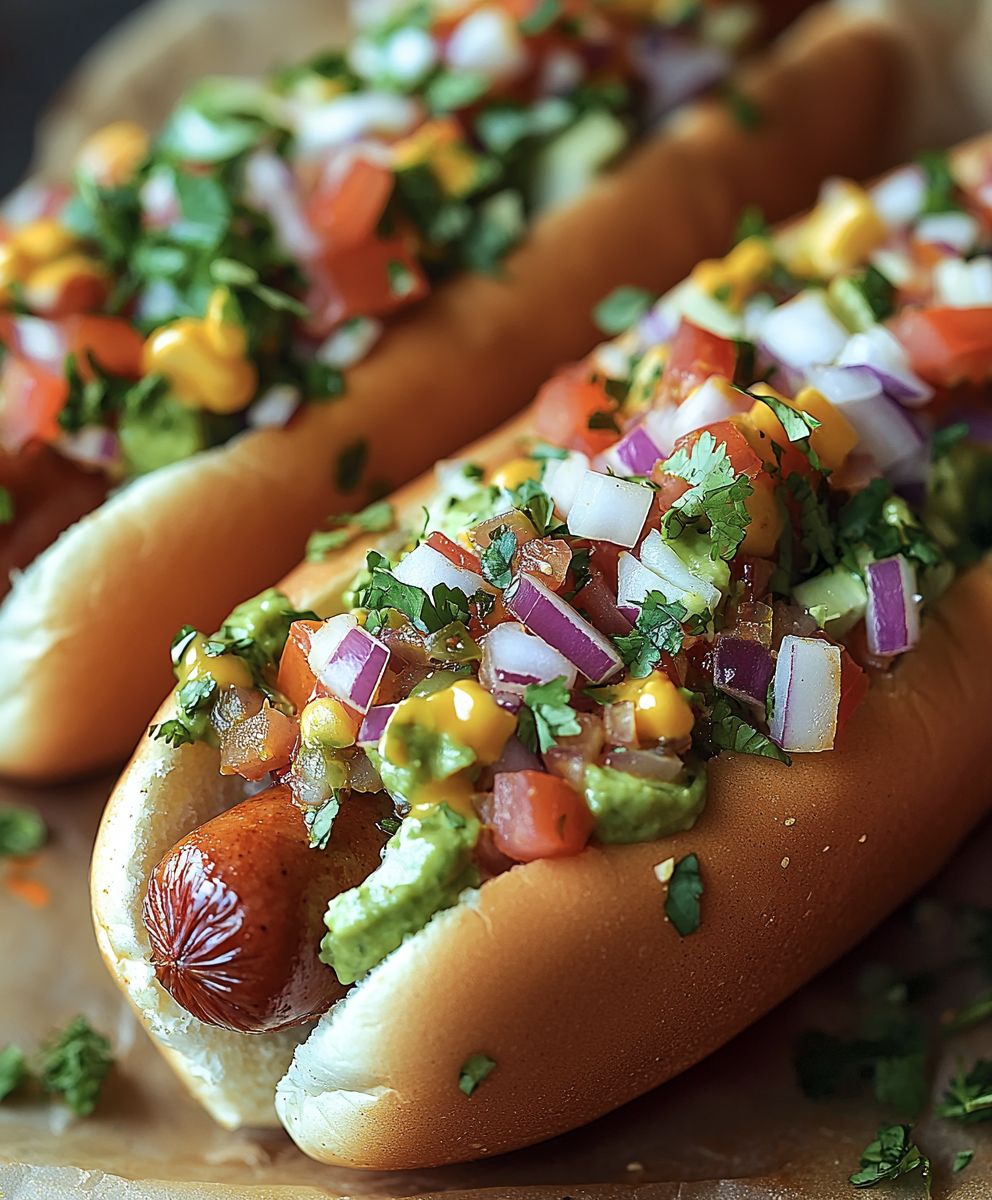
What makes these Tex Mex Hot Dogs so irresistible? It’s the explosion of textures and tastes! Imagine biting into a juicy, perfectly grilled hot dog nestled in a warm bun, topped with creamy avocado, tangy salsa, spicy jalapeños, and a sprinkle of cotija cheese. The combination of savory, spicy, and fresh is simply divine. Plus, they’re incredibly easy to make, perfect for a quick weeknight dinner or a crowd-pleasing party snack. Get ready to experience hot dogs like never before!

Ingredients:
- For the Hot Dogs:
- 8 all-beef hot dogs
- 8 hot dog buns
- 1 tablespoon olive oil
- For the Chili:
- 1 pound ground beef
- 1 medium onion, chopped
- 2 cloves garlic, minced
- 1 green bell pepper, chopped
- 1 red bell pepper, chopped
- 1 (15 ounce) can kidney beans, rinsed and drained
- 1 (15 ounce) can black beans, rinsed and drained
- 1 (15 ounce) can diced tomatoes, undrained
- 1 (8 ounce) can tomato sauce
- 1 cup beef broth
- 2 tablespoons chili powder
- 1 tablespoon cumin
- 1 teaspoon smoked paprika
- 1/2 teaspoon cayenne pepper (or more, to taste)
- 1/2 teaspoon dried oregano
- Salt and pepper to taste
- For the Toppings:
- 1 cup shredded cheddar cheese
- 1/2 cup sour cream
- 1/4 cup pickled jalapeños, sliced
- 1/4 cup chopped red onion
- 1 avocado, diced
- Fresh cilantro, chopped (optional)
Preparing the Chili:
- Brown the Ground Beef: In a large skillet or Dutch oven, heat the olive oil over medium-high heat. Add the ground beef and cook, breaking it up with a spoon, until browned. Drain off any excess grease. It’s important to get a good sear on the beef for maximum flavor, so don’t overcrowd the pan. If necessary, brown the beef in batches.
- Sauté the Vegetables: Add the chopped onion, garlic, green bell pepper, and red bell pepper to the skillet with the browned beef. Cook, stirring occasionally, until the vegetables are softened, about 5-7 minutes. Make sure to scrape up any browned bits from the bottom of the pan that’s where a lot of the flavor is!
- Add the Beans and Tomatoes: Stir in the kidney beans, black beans, diced tomatoes (with their juice), and tomato sauce. Give everything a good stir to combine.
- Add the Broth and Spices: Pour in the beef broth and add the chili powder, cumin, smoked paprika, cayenne pepper, and dried oregano. Season with salt and pepper to taste. Remember, you can always add more spice later, so start with a smaller amount of cayenne pepper and adjust as needed.
- Simmer the Chili: Bring the chili to a simmer, then reduce the heat to low, cover, and cook for at least 30 minutes, or up to 1 hour, stirring occasionally. The longer it simmers, the more the flavors will meld together. If the chili becomes too thick, add a little more beef broth. I usually let mine simmer for the full hour for the best flavor.
Preparing the Hot Dogs:
- Grill, Boil, or Pan-Fry the Hot Dogs: You can cook the hot dogs using your preferred method.
- Grilling: Preheat your grill to medium heat. Grill the hot dogs for 5-7 minutes, turning occasionally, until heated through and slightly charred.
- Boiling: Bring a pot of water to a boil. Add the hot dogs and cook for 5-7 minutes, until heated through.
- Pan-Frying: Heat a skillet over medium heat. Add the hot dogs and cook for 5-7 minutes, turning occasionally, until heated through and slightly browned.
- Warm the Buns: While the hot dogs are cooking, you can warm the hot dog buns. You can do this by:
- Steaming: Place the buns in a steamer basket over simmering water for a few minutes until softened.
- Toasting: Lightly toast the buns in a toaster or under the broiler for a minute or two. Be careful not to burn them!
- Pan-Frying: Lightly butter the inside of the buns and toast them in a skillet over medium heat for a minute or two until golden brown.
Assembling the Tex Mex Hot Dogs:
- Place the Hot Dogs in the Buns: Place one hot dog in each bun. Make sure the hot dog is centered in the bun for even topping distribution.
- Top with Chili: Spoon a generous amount of the chili over each hot dog. Don’t be shy the chili is the star of the show!
- Add the Cheese: Sprinkle shredded cheddar cheese over the chili. The warmth of the chili will melt the cheese slightly, creating a gooey and delicious topping.
- Add the Sour Cream: Dollop a spoonful of sour cream on top of the cheese. The sour cream adds a cool and tangy contrast to the spicy chili.
- Add the Jalapeños: Add sliced pickled jalapeños to taste. If you like a lot of heat, add more! If you’re sensitive to spice, use fewer or omit them altogether.
- Add the Red Onion: Sprinkle chopped red onion over the jalapeños. The red onion adds a sharp and pungent flavor that complements the other toppings.
- Add the Avocado: Top with diced avocado. The avocado adds a creamy and rich texture that balances the spice and acidity of the other ingredients.
- Garnish with Cilantro (Optional): If desired, garnish with fresh chopped cilantro. Cilantro adds a fresh and herbaceous flavor that brightens up the dish. I love the fresh flavor it adds, but I know some people aren’t fans!
- Serve Immediately: Serve the Tex Mex hot dogs immediately and enjoy! These are best eaten fresh, while the hot dogs are still warm and the toppings are at their best.
Tips and Variations:
- Spice Level: Adjust the amount of cayenne pepper in the chili to control the spice level. You can also add a dash of hot sauce to each hot dog for extra heat.
- Bean Variations: Feel free to use different types of beans in the chili, such as pinto beans or great northern beans.
- Vegetarian Option: Substitute the ground beef with plant-based ground beef or lentils for a vegetarian version.
- Cheese Variations: Try using different types of cheese, such as Monterey Jack, pepper jack, or queso fresco.
- Topping Variations: Get creative with your toppings! Some other great options include:
- Corn salsa
- Guacamole
- Pico de gallo
- Crushed tortilla chips
- A drizzle of your favorite hot sauce
- Make-Ahead Tip: The chili can be made ahead of time and stored in the refrigerator for up to 3 days. This is a great way to save time when you’re ready to assemble the hot dogs.
- Freezing Tip: The chili can also be frozen for up to 2 months. Thaw it in the refrigerator overnight before reheating.
Serving Suggestions:
These Tex Mex hot dogs are a complete meal on their own, but you can also serve them with some side dishes, such as:
- Coleslaw
- Potato salad
- Corn on the cob
- Tortilla chips and salsa
- A simple green salad
Nutritional Information (Approximate, per hot dog):
Please note that the nutritional information is an estimate and may vary depending on the specific ingredients used.
- Calories: 600-800
- Protein: 30-40g
- Fat: 40-50g
- Carbohydrates: 40-50g
Enjoy your delicious and flavorful Tex Mex Hot Dogs! I hope you love them as much as I do!
Conclusion:
So there you have it! These Tex Mex Hot Dogs are truly a flavor explosion you won’t want to miss. From the smoky char of the grilled dog to the vibrant kick of the toppings, every bite is a mini fiesta in your mouth. I genuinely believe this recipe elevates the humble hot dog to a whole new level of deliciousness, making it a perfect choice for a casual weeknight dinner, a backyard barbecue, or even a fun and unexpected party appetizer. Why are these Tex Mex Hot Dogs a must-try? Because they’re incredibly easy to make, bursting with flavor, and completely customizable to your preferences. Forget boring, plain hot dogs this recipe is all about adding layers of texture and taste that will have everyone asking for seconds (and the recipe!). The combination of the creamy avocado, the tangy salsa, the crunchy tortilla strips, and the spicy jalapeños creates a symphony of sensations that will tantalize your taste buds. Plus, it’s a fantastic way to use up leftover ingredients from other Tex-Mex meals, making it both delicious and economical. But the fun doesn’t stop there! Feel free to get creative with your toppings and make these Tex Mex Hot Dogs your own.Serving Suggestions and Variations:
* Go Vegetarian: Swap out the beef hot dogs for veggie dogs for a delicious and satisfying vegetarian option. * Spice It Up: Add a dash of hot sauce or a sprinkle of cayenne pepper to the chili for an extra kick. * Cool It Down: If you’re not a fan of spice, omit the jalapeños or use a milder salsa. A dollop of sour cream or Mexican crema can also help to cool things down. * Cheese, Please!: A sprinkle of shredded cheddar cheese, Monterey Jack, or even crumbled queso fresco would be a welcome addition. * Bun Alternatives: While a classic hot dog bun is perfect, you could also try using a toasted baguette or even a soft tortilla for a unique twist. * Side Dish Sensations: Serve these Tex Mex Hot Dogs with a side of Mexican street corn salad, black beans and rice, or a simple green salad for a complete and satisfying meal. * Make it a Bowl: Skip the bun altogether and create a Tex-Mex hot dog bowl! Layer the chili, toppings, and chopped hot dog over a bed of rice or quinoa. I’m confident that once you try this recipe, it will become a regular in your rotation. It’s a crowd-pleaser that’s perfect for any occasion, and it’s so much more exciting than your average hot dog. The beauty of this recipe lies in its simplicity and adaptability. You can easily adjust the ingredients to suit your taste and dietary needs. Don’t be afraid to experiment and find your perfect combination of toppings. So, what are you waiting for? Gather your ingredients, fire up the grill (or stovetop!), and get ready to experience the ultimate Tex Mex Hot Dog. I can’t wait to hear what you think! I truly hope you enjoy making and eating these Tex Mex Hot Dogs as much as I do. Please, don’t hesitate to leave a comment below and share your experience. Let me know what variations you tried, what toppings you loved, and any tips or tricks you discovered along the way. Your feedback is invaluable, and I’m always eager to learn from my readers. Happy cooking! PrintTex Mex Hot Dogs: The Ultimate Guide to Flavor-Packed Dogs

Spice up your hot dog game with these Tex Mex Chili Cheese Hot Dogs! Topped with homemade chili, cheddar cheese, sour cream, jalapeños, red onion, and avocado, these are a flavor explosion in every bite.
- Prep Time: 20 minutes
- Cook Time: 45 minutes
- Total Time: 65 minutes
- Yield: 8 servings 1x
Ingredients
- 8 all-beef hot dogs
- 8 hot dog buns
- 1 tablespoon olive oil
- 1 pound ground beef
- 1 medium onion, chopped
- 2 cloves garlic, minced
- 1 green bell pepper, chopped
- 1 red bell pepper, chopped
- 1 (15 ounce) can kidney beans, rinsed and drained
- 1 (15 ounce) can black beans, rinsed and drained
- 1 (15 ounce) can diced tomatoes, undrained
- 1 (8 ounce) can tomato sauce
- 1 cup beef broth
- 2 tablespoons chili powder
- 1 tablespoon cumin
- 1 teaspoon smoked paprika
- 1/2 teaspoon cayenne pepper (or more, to taste)
- 1/2 teaspoon dried oregano
- Salt and pepper to taste
- 1 cup shredded cheddar cheese
- 1/2 cup sour cream
- 1/4 cup pickled jalapeños, sliced
- 1/4 cup chopped red onion
- 1 avocado, diced
- Fresh cilantro, chopped (optional)
Instructions
- In a large skillet or Dutch oven, heat the olive oil over medium-high heat. Add the ground beef and cook, breaking it up with a spoon, until browned. Drain off any excess grease.
- Add the chopped onion, garlic, green bell pepper, and red bell pepper to the skillet with the browned beef. Cook, stirring occasionally, until the vegetables are softened, about 5-7 minutes.
- Stir in the kidney beans, black beans, diced tomatoes (with their juice), and tomato sauce.
- Pour in the beef broth and add the chili powder, cumin, smoked paprika, cayenne pepper, and dried oregano. Season with salt and pepper to taste.
- Bring the chili to a simmer, then reduce the heat to low, cover, and cook for at least 30 minutes, or up to 1 hour, stirring occasionally. If the chili becomes too thick, add a little more beef broth.
- Cook the hot dogs using your preferred method: grilling, boiling, or pan-frying.
- Grilling: Preheat your grill to medium heat. Grill the hot dogs for 5-7 minutes, turning occasionally, until heated through and slightly charred.
- Boiling: Bring a pot of water to a boil. Add the hot dogs and cook for 5-7 minutes, until heated through.
- Pan-Frying: Heat a skillet over medium heat. Add the hot dogs and cook for 5-7 minutes, turning occasionally, until heated through and slightly browned.
- Warm the hot dog buns by steaming, toasting, or pan-frying.
- Steaming: Place the buns in a steamer basket over simmering water for a few minutes until softened.
- Toasting: Lightly toast the buns in a toaster or under the broiler for a minute or two.
- Pan-Frying: Lightly butter the inside of the buns and toast them in a skillet over medium heat for a minute or two until golden brown.
- Place one hot dog in each bun.
- Spoon a generous amount of the chili over each hot dog.
- Sprinkle shredded cheddar cheese over the chili.
- Dollop a spoonful of sour cream on top of the cheese.
- Add sliced pickled jalapeños to taste.
- Sprinkle chopped red onion over the jalapeños.
- Top with diced avocado.
- Garnish with fresh chopped cilantro, if desired.
- Serve immediately.
Notes
- Spice Level: Adjust the amount of cayenne pepper in the chili to control the spice level. You can also add a dash of hot sauce to each hot dog for extra heat.
- Bean Variations: Feel free to use different types of beans in the chili, such as pinto beans or great northern beans.
- Vegetarian Option: Substitute the ground beef with plant-based ground beef or lentils for a vegetarian version.
- Cheese Variations: Try using different types of cheese, such as Monterey Jack, pepper jack, or queso fresco.
- Topping Variations: Get creative with your toppings! Some other great options include:
Corn salsa
Guacamole
Pico de gallo
Crushed tortilla chips
A drizzle of your favorite hot sauce - Make-Ahead Tip: The chili can be made ahead of time and stored in the refrigerator for up to 3 days.
- Freezing Tip: The chili can also be frozen for up to 2 months. Thaw it in the refrigerator overnight before reheating.


Leave a Comment