
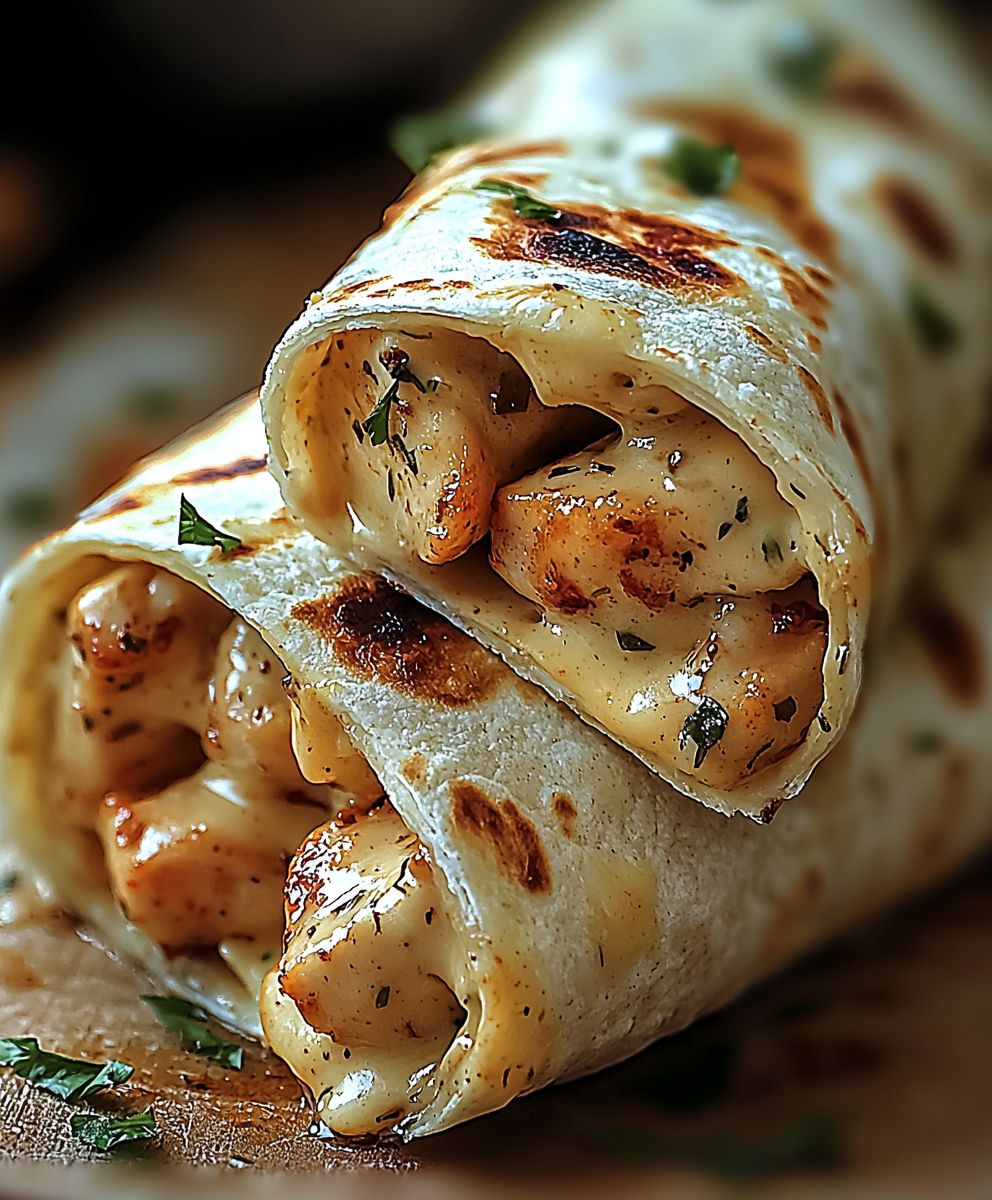
Cheesy Garlic Chicken Wraps: Prepare to be amazed! Imagine sinking your teeth into a warm, toasted wrap bursting with juicy, garlic-infused chicken and rivers of melted cheese. This isn’t just lunch; it’s a flavor explosion that will have you craving more. I’ve been making these wraps for years, and they’re always a hit, whether it’s a quick weeknight dinner or a fun weekend gathering.
While the exact origins of the chicken wrap are debated, the concept of wrapping savory fillings in flatbreads has existed for centuries across various cultures. Think of the Middle Eastern shawarma, the Mexican burrito, or even the humble sandwich all variations on the same delicious theme. What makes these Cheesy Garlic Chicken Wraps special is the perfect balance of savory, cheesy, and garlicky goodness, all conveniently packaged in a portable and satisfying meal.
People adore these wraps for so many reasons! The taste is undeniably addictive the garlic-infused chicken is incredibly flavorful, and the melted cheese adds a creamy, comforting element. The texture is also fantastic, with the slight crispness of the toasted wrap contrasting beautifully with the tender chicken and gooey cheese. But perhaps the biggest draw is the convenience. They’re quick to make, easy to customize, and perfect for on-the-go eating. So, if you’re looking for a delicious, satisfying, and incredibly easy meal, look no further. Let’s get started!

Ingredients:
- For the Chicken:
- 2 large boneless, skinless chicken breasts (about 1.5 lbs total)
- 1 tablespoon olive oil
- 1 teaspoon garlic powder
- 1 teaspoon onion powder
- 1/2 teaspoon smoked paprika
- 1/4 teaspoon black pepper
- 1/4 teaspoon salt (or to taste)
- For the Garlic Sauce:
- 1/2 cup mayonnaise
- 2 cloves garlic, minced
- 1 tablespoon lemon juice
- 1 tablespoon grated Parmesan cheese
- 1/2 teaspoon dried parsley
- 1/4 teaspoon black pepper
- Pinch of salt (or to taste)
- For the Wraps:
- 4 large flour tortillas (10-12 inch diameter)
- 1 cup shredded mozzarella cheese
- 1/2 cup shredded cheddar cheese
- 1/4 cup chopped fresh cilantro (optional)
- 1/4 cup sun-dried tomatoes, oil-packed, drained and chopped (optional)
- 1/2 cup chopped red onion (optional)
- 1 cup baby spinach or mixed greens
Preparing the Chicken:
- Pound the Chicken: Place each chicken breast between two sheets of plastic wrap or in a resealable bag. Use a meat mallet or rolling pin to pound the chicken to an even thickness of about 1/2 inch. This helps the chicken cook evenly and quickly. Don’t skip this step!
- Season the Chicken: In a small bowl, combine the garlic powder, onion powder, smoked paprika, black pepper, and salt. Sprinkle this mixture evenly over both sides of the flattened chicken breasts, pressing lightly to adhere. Make sure every part of the chicken is covered with the spices for maximum flavor.
- Cook the Chicken: Heat the olive oil in a large skillet over medium-high heat. Once the oil is shimmering, carefully add the seasoned chicken breasts to the skillet. Cook for about 5-7 minutes per side, or until the chicken is cooked through and the internal temperature reaches 165°F (74°C). Use a meat thermometer to ensure accuracy. Avoid overcrowding the pan; cook in batches if necessary.
- Rest and Slice the Chicken: Once the chicken is cooked, remove it from the skillet and place it on a cutting board. Let it rest for about 5 minutes before slicing it into thin strips. This allows the juices to redistribute, resulting in more tender and flavorful chicken.
Making the Garlic Sauce:
- Combine Ingredients: In a medium bowl, whisk together the mayonnaise, minced garlic, lemon juice, grated Parmesan cheese, dried parsley, black pepper, and salt. Taste and adjust the seasonings as needed. I sometimes add a tiny pinch of cayenne pepper for a little kick!
- Mix Well: Ensure all the ingredients are thoroughly combined and the sauce is smooth and creamy. If the sauce is too thick, you can add a teaspoon of water or milk to thin it out slightly.
- Refrigerate (Optional): For best flavor, cover the garlic sauce and refrigerate it for at least 30 minutes to allow the flavors to meld. However, this step is optional if you’re short on time.
Assembling the Cheesy Garlic Chicken Wraps:
- Warm the Tortillas (Optional): Lightly warm the tortillas in a dry skillet or microwave for a few seconds to make them more pliable and easier to roll. This prevents them from cracking or tearing.
- Spread the Garlic Sauce: Spread a generous amount of the garlic sauce evenly over each tortilla, leaving a small border around the edges. Don’t be shy with the sauce it’s what makes these wraps so delicious!
- Add the Cheese: Sprinkle a mixture of mozzarella and cheddar cheese over the garlic sauce on each tortilla. Use a generous amount of cheese for that extra cheesy goodness.
- Layer the Chicken: Arrange the sliced chicken strips evenly over the cheese on each tortilla. Distribute the chicken so that each bite is packed with flavor.
- Add Optional Toppings: If desired, sprinkle chopped cilantro, sun-dried tomatoes, and red onion over the chicken. These toppings add extra flavor and texture to the wraps.
- Add Greens: Top with baby spinach or mixed greens. This adds a fresh element to the wraps.
- Fold the Wraps: Fold in the sides of the tortilla towards the center, then tightly roll up the wrap from the bottom. Secure the wrap with a toothpick if needed.
Cooking the Wraps (Optional):
This step is optional, but it adds a nice crispy texture and melts the cheese even more.
- Heat a Skillet: Heat a large skillet over medium heat.
- Cook the Wraps: Place the assembled wraps in the skillet, seam-side down. Cook for about 2-3 minutes per side, or until the tortillas are golden brown and crispy and the cheese is melted and gooey.
- Serve Immediately: Remove the wraps from the skillet and serve immediately. Cut them in half for easier handling.
Tips and Variations:
- Spice it Up: Add a pinch of cayenne pepper to the garlic sauce or use a spicier cheese blend for a kick.
- Add Vegetables: Feel free to add other vegetables like bell peppers, mushrooms, or zucchini to the wraps. Sauté them before adding them to the wraps.
- Use Different Cheese: Experiment with different cheese blends like Monterey Jack, pepper jack, or provolone.
- Make it Vegetarian: Substitute the chicken with grilled halloumi cheese or seasoned tofu for a vegetarian option.
- Make it Ahead: You can prepare the chicken and garlic sauce ahead of time and store them in the refrigerator until ready to assemble the wraps.
- Serving Suggestions: Serve these wraps with a side of salsa, guacamole, or sour cream for dipping. They also pair well with a simple salad or some tortilla chips.
- Storage: Leftover wraps can be stored in the refrigerator for up to 2 days. Reheat them in a skillet or microwave before serving.
- Chicken Cooking Method: If you don’t want to pan-fry the chicken, you can bake it in the oven at 375°F (190°C) for about 20-25 minutes, or until cooked through. You can also grill the chicken for a smoky flavor.
- Garlic Sauce Variation: For a richer garlic sauce, use roasted garlic instead of minced garlic. Roasting the garlic mellows out the flavor and adds a sweetness.
- Tortilla Options: You can use whole wheat tortillas, spinach tortillas, or gluten-free tortillas depending on your dietary preferences.
Enjoy your Cheesy Garlic Chicken Wraps!
Conclusion:
This isn’t just another recipe; it’s a flavor explosion waiting to happen! These Cheesy Garlic Chicken Wraps are a guaranteed crowd-pleaser, perfect for a quick weeknight dinner, a fun lunch, or even a casual get-together. The combination of juicy, garlicky chicken, melted cheese, and your favorite toppings all nestled in a warm, soft tortilla is simply irresistible. I’ve made these countless times, and they disappear faster than I can make them! But what truly makes these wraps a must-try is their incredible versatility. Feel free to get creative and adapt the recipe to your own tastes. Not a fan of cheddar? Try Monterey Jack, pepper jack, or even a smoky gouda for a different flavor profile. Want to add some heat? A sprinkle of red pepper flakes or a drizzle of your favorite hot sauce will do the trick.Serving Suggestions and Variations:
* Spice it up: Add some diced jalapeños or a dash of cayenne pepper to the chicken mixture for an extra kick. * Veggie boost: Load up your wraps with fresh veggies like bell peppers, onions, spinach, or tomatoes. * Saucy goodness: Experiment with different sauces like ranch dressing, BBQ sauce, or a creamy avocado sauce. * Make it a salad: Skip the tortilla and serve the chicken mixture over a bed of lettuce for a lighter, low-carb option. * Party perfect: Cut the wraps into smaller pieces and serve them as appetizers at your next party. * Grilled to perfection: After assembling the wraps, grill them for a few minutes on each side for a crispy, golden-brown exterior. * Breakfast twist: Add scrambled eggs and bacon to the chicken mixture for a hearty breakfast wrap. * Mediterranean flair: Incorporate ingredients like feta cheese, olives, and sun-dried tomatoes for a Mediterranean-inspired wrap. * Make it ahead: Prepare the chicken mixture in advance and store it in the refrigerator for a quick and easy meal later in the week. * Dip it: Serve the wraps with a side of sour cream, guacamole, or salsa for dipping. I truly believe that once you try these Cheesy Garlic Chicken Wraps, they’ll become a staple in your recipe rotation. They’re easy to make, incredibly delicious, and endlessly customizable. The garlicky chicken is so flavorful, and the melted cheese just brings everything together in perfect harmony. Plus, they’re a great way to use up leftover chicken or rotisserie chicken. So, what are you waiting for? Gather your ingredients, fire up your stove, and get ready to experience the magic of these amazing wraps. I’m confident that you and your family will absolutely love them. And now, for the most important part: I want to hear about your experience! Did you try the recipe? Did you make any variations? What were your favorite toppings? Share your thoughts, photos, and tips in the comments below. I can’t wait to see your creations and hear how much you enjoyed these Cheesy Garlic Chicken Wraps. Happy cooking! PrintCheesy Garlic Chicken Wraps: The Ultimate Recipe for a Quick & Delicious Meal

Easy Cheesy Garlic Chicken Wraps filled with tender chicken, creamy garlic sauce, melted cheese, and your favorite toppings. Perfect for a quick lunch or dinner!
- Prep Time: 20 minutes
- Cook Time: 20 minutes
- Total Time: 40 minutes
- Yield: 4 wraps 1x
Ingredients
- 2 large boneless, skinless chicken breasts (about 1.5 lbs total)
- 1 tablespoon olive oil
- 1 teaspoon garlic powder
- 1 teaspoon onion powder
- 1/2 teaspoon smoked paprika
- 1/4 teaspoon black pepper
- 1/4 teaspoon salt (or to taste)
- 1/2 cup mayonnaise
- 2 cloves garlic, minced
- 1 tablespoon lemon juice
- 1 tablespoon grated Parmesan cheese
- 1/2 teaspoon dried parsley
- 1/4 teaspoon black pepper
- Pinch of salt (or to taste)
- 4 large flour tortillas (10–12 inch diameter)
- 1 cup shredded mozzarella cheese
- 1/2 cup shredded cheddar cheese
- 1/4 cup chopped fresh cilantro (optional)
- 1/4 cup sun-dried tomatoes, oil-packed, drained and chopped (optional)
- 1/2 cup chopped red onion (optional)
- 1 cup baby spinach or mixed greens
Instructions
- Prepare the Chicken: Place each chicken breast between two sheets of plastic wrap or in a resealable bag. Use a meat mallet or rolling pin to pound the chicken to an even thickness of about 1/2 inch.
- In a small bowl, combine the garlic powder, onion powder, smoked paprika, black pepper, and salt. Sprinkle this mixture evenly over both sides of the flattened chicken breasts, pressing lightly to adhere.
- Heat the olive oil in a large skillet over medium-high heat. Once the oil is shimmering, carefully add the seasoned chicken breasts to the skillet. Cook for about 5-7 minutes per side, or until the chicken is cooked through and the internal temperature reaches 165°F (74°C). Remove from skillet and let rest for 5 minutes, then slice into thin strips.
- Make the Garlic Sauce: In a medium bowl, whisk together the mayonnaise, minced garlic, lemon juice, grated Parmesan cheese, dried parsley, black pepper, and salt. Taste and adjust the seasonings as needed. Refrigerate for at least 30 minutes for best flavor.
- Assemble the Wraps: Lightly warm the tortillas in a dry skillet or microwave for a few seconds to make them more pliable.
- Spread a generous amount of the garlic sauce evenly over each tortilla, leaving a small border around the edges.
- Sprinkle a mixture of mozzarella and cheddar cheese over the garlic sauce on each tortilla.
- Arrange the sliced chicken strips evenly over the cheese on each tortilla.
- If desired, sprinkle chopped cilantro, sun-dried tomatoes, and red onion over the chicken.
- Top with baby spinach or mixed greens.
- Fold in the sides of the tortilla towards the center, then tightly roll up the wrap from the bottom. Secure the wrap with a toothpick if needed.
- Cook the Wraps (Optional): Heat a large skillet over medium heat. Place the assembled wraps in the skillet, seam-side down. Cook for about 2-3 minutes per side, or until the tortillas are golden brown and crispy and the cheese is melted and gooey.
- Remove the wraps from the skillet and serve immediately. Cut them in half for easier handling.
Notes
- Spice it Up: Add a pinch of cayenne pepper to the garlic sauce or use a spicier cheese blend for a kick.
- Add Vegetables: Feel free to add other vegetables like bell peppers, mushrooms, or zucchini to the wraps. Sauté them before adding them to the wraps.
- Use Different Cheese: Experiment with different cheese blends like Monterey Jack, pepper jack, or provolone.
- Make it Vegetarian: Substitute the chicken with grilled halloumi cheese or seasoned tofu for a vegetarian option.
- Make it Ahead: You can prepare the chicken and garlic sauce ahead of time and store them in the refrigerator until ready to assemble the wraps.
- Serving Suggestions: Serve these wraps with a side of salsa, guacamole, or sour cream for dipping. They also pair well with a simple salad or some tortilla chips.
- Storage: Leftover wraps can be stored in the refrigerator for up to 2 days. Reheat them in a skillet or microwave before serving.
- Chicken Cooking Method: If you don’t want to pan-fry the chicken, you can bake it in the oven at 375°F (190°C) for about 20-25 minutes, or until cooked through. You can also grill the chicken for a smoky flavor.
- Garlic Sauce Variation: For a richer garlic sauce, use roasted garlic instead of minced garlic. Roasting the garlic mellows out the flavor and adds a sweetness.
- Tortilla Options: You can use whole wheat tortillas, spinach tortillas, or gluten-free tortillas depending on your dietary preferences.
Leave a Comment