
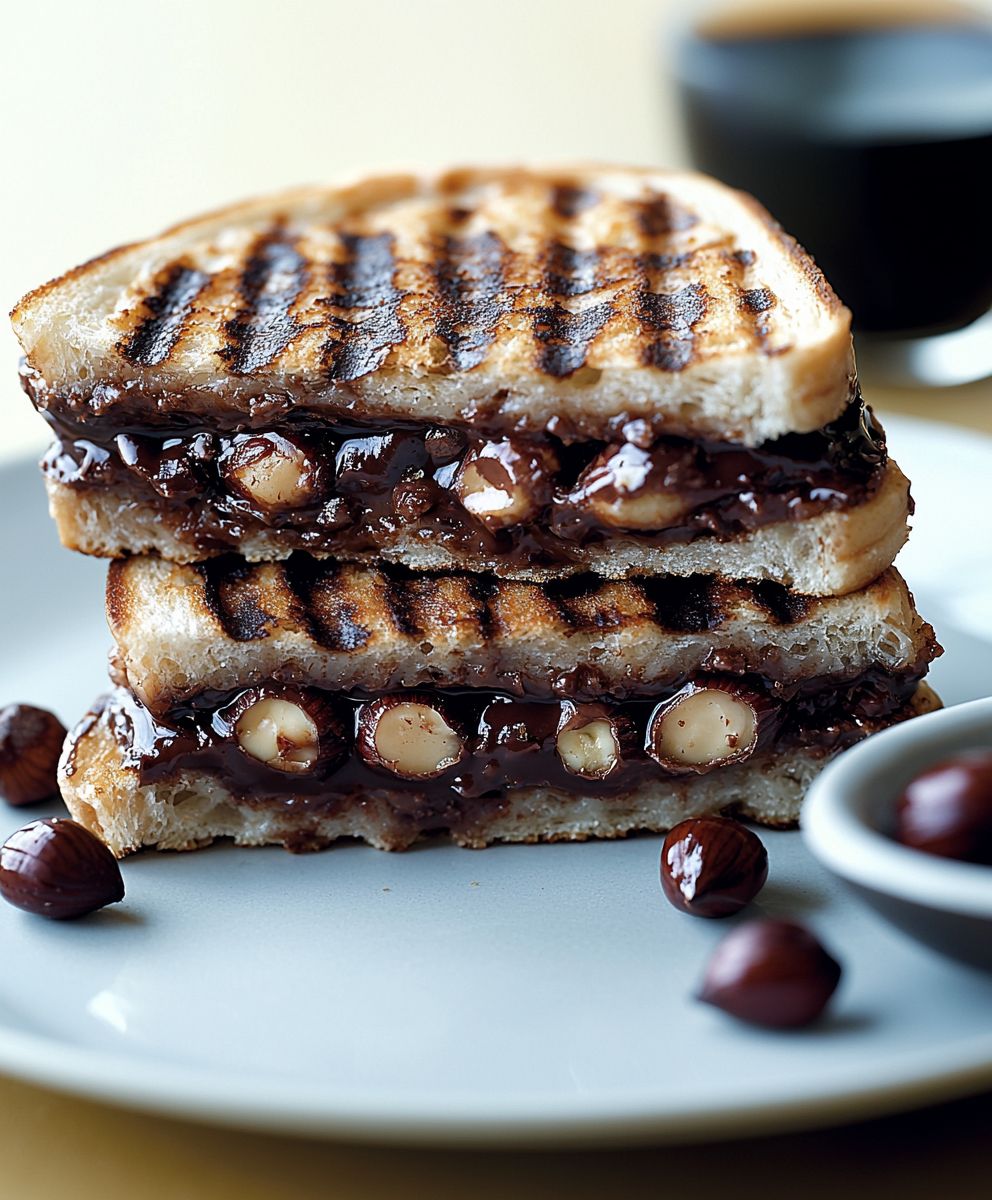
Chocolate Hazelnut Panini: Prepare to embark on a culinary journey that will redefine your definition of “deliciously simple.” Imagine biting into warm, toasted bread, yielding to a molten river of rich chocolate hazelnut spread. It’s not just a sandwich; it’s an experience, a symphony of textures and flavors that dance on your palate.
The concept of a panini, a grilled sandwich, has ancient roots, tracing back to various cultures that toasted bread with fillings. However, the modern panini as we know it gained popularity in Italy, particularly in Milan, in the 1970s and 1980s. While traditionally savory, the sweet panini, like our decadent Chocolate Hazelnut Panini, offers a delightful twist on this classic. It’s a testament to the versatility of simple ingredients and the enduring appeal of comfort food.
What makes this particular panini so irresistible? It’s the perfect marriage of textures the crisp, golden-brown exterior of the bread giving way to the smooth, creamy, and intensely flavorful chocolate hazelnut filling. The warmth enhances the nutty notes of the hazelnut and intensifies the chocolate’s richness. Plus, it’s incredibly quick and easy to make, making it the ideal treat for a cozy afternoon, a quick dessert, or even a special breakfast. Who can resist the allure of warm, gooey chocolate hazelnut goodness nestled between slices of perfectly toasted bread? I know I can’t!

Ingredients:
- 4 slices of your favorite bread (I prefer brioche or challah for extra richness)
- 4 tablespoons Nutella (or your preferred hazelnut spread)
- 2 tablespoons butter, softened
- 1/4 cup chopped hazelnuts, toasted
- 2 ounces dark chocolate, roughly chopped (optional, but highly recommended!)
- Powdered sugar, for dusting (optional)
- Vanilla ice cream, for serving (optional, but makes it extra decadent!)
Preparing the Panini
Alright, let’s get started on making these incredibly delicious Chocolate Hazelnut Paninis! This recipe is super simple, but the result is a warm, gooey, and satisfying treat that’s perfect for a quick dessert or a special breakfast.
- Toast the Hazelnuts (if using untoasted): If you bought raw hazelnuts, you’ll want to toast them to bring out their nutty flavor. Preheat your oven to 350°F (175°C). Spread the hazelnuts in a single layer on a baking sheet. Toast for 10-12 minutes, or until the skins start to crack and the nuts are fragrant. Keep a close eye on them, as they can burn easily. Once toasted, let them cool slightly, then rub them in a clean kitchen towel to remove as much of the skins as possible. Roughly chop the toasted hazelnuts.
- Prepare the Bread: Lay out your bread slices on a clean work surface. I like to use brioche or challah because they’re soft and buttery, but any bread you enjoy will work. Just make sure it’s sturdy enough to hold the filling without falling apart.
- Spread the Nutella: Generously spread about 2 tablespoons of Nutella (or your hazelnut spread of choice) on one side of each slice of bread. Make sure to spread it evenly, covering the entire surface. Don’t be shy we want that delicious hazelnut flavor in every bite!
- Add the Chocolate (Optional): If you’re using dark chocolate (and I highly recommend it!), sprinkle the chopped chocolate evenly over the Nutella on two of the bread slices. The dark chocolate adds a lovely depth of flavor that complements the sweetness of the Nutella perfectly.
- Sprinkle with Hazelnuts: Now, sprinkle the toasted and chopped hazelnuts over the Nutella (and chocolate, if using) on the same two slices of bread. Press them lightly into the Nutella to help them adhere.
- Assemble the Paninis: Carefully place the remaining two slices of bread on top of the Nutella-covered slices, Nutella-side down, to create two sandwiches.
- Butter the Outside of the Paninis: Spread a thin layer of softened butter on the outside of each panini. This will help them get golden brown and crispy when they’re grilled. Make sure to butter both sides!
Cooking the Panini
Now comes the fun part cooking the paninis! You have a few options here, depending on what equipment you have available. I’ll cover using a panini press, a skillet, and even an oven.
- Using a Panini Press: If you have a panini press, this is the easiest and most efficient way to cook these paninis. Preheat your panini press according to the manufacturer’s instructions. Once it’s hot, carefully place the paninis in the press, making sure they’re centered. Close the lid and press down gently. Cook for 3-5 minutes, or until the bread is golden brown and the Nutella is melted and gooey. Keep an eye on them, as cooking times can vary depending on your panini press.
- Using a Skillet: If you don’t have a panini press, don’t worry! You can easily make these paninis in a skillet. Heat a large skillet over medium heat. Once the skillet is hot, carefully place the paninis in the skillet. Cook for 2-3 minutes per side, or until the bread is golden brown and the Nutella is melted. To help the paninis cook evenly and get nicely pressed, you can place a heavy skillet or pot on top of them while they’re cooking. This will mimic the pressure of a panini press.
- Using an Oven (Alternative Method): While not the traditional method, you can also bake these in the oven. Preheat your oven to 375°F (190°C). Place the buttered paninis on a baking sheet lined with parchment paper. Bake for 8-10 minutes, or until the bread is golden brown and the Nutella is melted. For a more “panini-pressed” look, you can place another baking sheet on top of the paninis while they’re baking to apply some pressure.
Serving and Enjoying
Once your paninis are cooked to golden-brown perfection, it’s time to serve them and enjoy! Be careful when removing them from the panini press or skillet, as the Nutella will be very hot.
- Remove from Heat: Carefully remove the cooked paninis from the panini press, skillet, or oven. Let them cool for a minute or two before slicing.
- Slice and Serve: Use a sharp knife to slice each panini in half diagonally. This makes them easier to handle and eat.
- Dust with Powdered Sugar (Optional): For an extra touch of elegance, dust the paninis with powdered sugar before serving. This adds a subtle sweetness and makes them look even more appealing.
- Serve with Ice Cream (Optional): For the ultimate indulgence, serve the warm Chocolate Hazelnut Paninis with a scoop of vanilla ice cream. The cold ice cream melts slightly against the warm panini, creating a heavenly combination of textures and temperatures.
- Enjoy Immediately: These paninis are best enjoyed immediately while they’re still warm and gooey. The melted Nutella, toasted hazelnuts, and crispy bread are a match made in heaven.
Tips and Variations:
- Different Breads: Experiment with different types of bread to find your favorite. Sourdough, whole wheat, or even croissants would be delicious.
- Different Spreads: If you’re not a fan of Nutella, you can use other hazelnut spreads, almond butter, or even peanut butter.
- Add Fruit: Sliced bananas, strawberries, or raspberries would be a delicious addition to these paninis.
- White Chocolate: Substitute the dark chocolate with white chocolate for a sweeter variation.
- Espresso Powder: Add a teaspoon of espresso powder to the Nutella for a mocha-flavored panini.
- Savory Option: For a savory twist, try using pesto and mozzarella cheese instead of Nutella and chocolate.
I hope you enjoy making and eating these Chocolate Hazelnut Paninis as much as I do! They’re a simple yet satisfying treat that’s sure to become a favorite.
Conclusion:
And there you have it! This Chocolate Hazelnut Panini recipe is more than just a sandwich; it’s a warm, gooey hug on a plate, a decadent treat that’s surprisingly easy to whip up. I truly believe this is a must-try recipe for anyone who loves the combination of chocolate and hazelnut, or simply craves a comforting and satisfying dessert. The crispy, golden-brown bread, the melty chocolate, and the nutty hazelnut spread create a symphony of flavors and textures that will leave you wanting more.
But why is this panini so special? It’s the perfect balance of simplicity and indulgence. You don’t need to be a master chef to create this masterpiece. The ingredients are readily available, and the steps are straightforward. Yet, the result is something truly extraordinary. It’s the kind of treat that can brighten up a gloomy day, impress your friends and family, or simply satisfy your sweet tooth after a long week.
Looking for serving suggestions? This panini is fantastic on its own, but you can also elevate it with a few simple additions. A scoop of vanilla ice cream on top transforms it into a truly decadent dessert. A dusting of powdered sugar adds a touch of elegance. Or, for a more sophisticated flavor profile, try pairing it with a glass of dessert wine or a cup of strong coffee.
And don’t be afraid to experiment with variations! If you’re feeling adventurous, try adding a layer of sliced bananas or strawberries for a fruity twist. You could also swap out the hazelnut spread for another nut butter, such as almond or peanut butter. For a richer flavor, use dark chocolate instead of milk chocolate. The possibilities are endless! You can even use different types of bread, like brioche or challah, for a unique texture and flavor. Consider adding a sprinkle of sea salt on top for a sweet and salty contrast that will tantalize your taste buds.
I’ve made this Chocolate Hazelnut Panini countless times, and it’s always a hit. It’s the perfect quick and easy dessert for any occasion, from a casual weeknight treat to a more formal gathering. It’s also a great way to use up leftover bread or chocolate.
I’m so confident that you’ll love this recipe that I urge you to give it a try. Don’t be intimidated by the simplicity; the flavor is anything but ordinary. Gather your ingredients, fire up your panini press (or skillet!), and get ready to experience a taste of heaven.
Once you’ve made this delicious panini, I would absolutely love to hear about your experience! Did you make any variations? What did you think of the flavor? Did you serve it with anything special? Share your photos and stories in the comments below. Your feedback is invaluable, and it helps me to create even better recipes in the future. So, go ahead, indulge in this delightful treat, and let me know what you think! Happy panini-making! I hope this recipe becomes a staple in your kitchen, just as it has in mine. Enjoy!
Chocolate Hazelnut Panini: A Delicious & Easy Recipe
Warm, gooey, and decadent chocolate hazelnut paninis, perfect for a quick dessert or special breakfast.
Ingredients
- 4 slices of your favorite bread (brioche or challah recommended)
- 4 tablespoons Nutella (or preferred hazelnut spread)
- 2 tablespoons butter, softened
- 1/4 cup chopped hazelnuts, toasted
- 2 ounces dark chocolate, roughly chopped (optional)
- Powdered sugar, for dusting (optional)
- Vanilla ice cream, for serving (optional)
Instructions
- Toast Hazelnuts (if using untoasted): Preheat oven to 350°F (175°C). Spread hazelnuts on a baking sheet and toast for 10-12 minutes, until skins crack and nuts are fragrant. Cool slightly, then rub in a towel to remove skins. Roughly chop.
- Prepare Bread: Lay out bread slices.
- Spread Nutella: Spread 2 tablespoons of Nutella on one side of each slice.
- Add Chocolate (Optional): Sprinkle chopped dark chocolate over Nutella on two slices.
- Sprinkle with Hazelnuts: Sprinkle toasted hazelnuts over Nutella (and chocolate, if using) on the same two slices. Press lightly.
- Assemble Paninis: Place remaining bread slices on top, Nutella-side down.
- Butter the Outside: Spread a thin layer of softened butter on the outside of each panini.
- Panini Press: Preheat press. Place paninis in press and cook for 3-5 minutes, or until golden brown and Nutella is melted.
- Skillet: Heat skillet over medium heat. Cook paninis for 2-3 minutes per side, until golden brown and Nutella is melted. Place a heavy skillet or pot on top to press.
- Oven (Alternative): Preheat oven to 375°F (190°C). Place buttered paninis on a baking sheet lined with parchment paper. Bake for 8-10 minutes, until golden brown and Nutella is melted. Place another baking sheet on top to apply some pressure.
- Remove from Heat: Carefully remove cooked paninis. Let cool for a minute or two before slicing.
- Slice and Serve: Slice each panini in half diagonally.
- Dust with Powdered Sugar (Optional): Dust with powdered sugar.
- Serve with Ice Cream (Optional): Serve with a scoop of vanilla ice cream.
- Enjoy Immediately: Serve immediately while warm and gooey.
Notes
- Experiment with different breads like sourdough or croissants.
- Try other spreads like almond butter or peanut butter.
- Add sliced bananas, strawberries, or raspberries.
- Substitute dark chocolate with white chocolate.
- Add a teaspoon of espresso powder to the Nutella for a mocha flavor.
- For a savory option, use pesto and mozzarella cheese.

Leave a Comment