
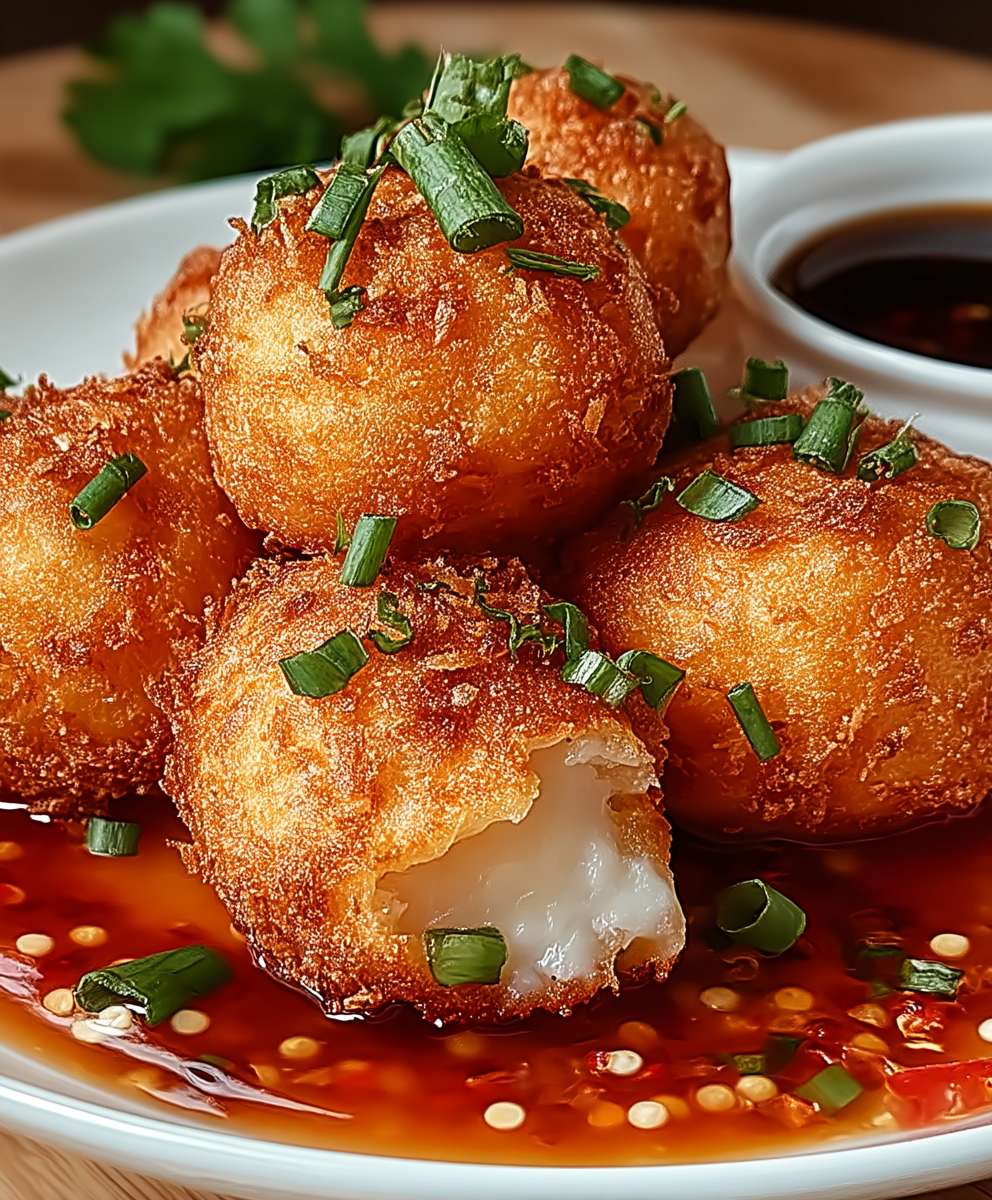
Shrimp balls chili sauce: get ready to dive into a flavor explosion! Imagine perfectly cooked, succulent shrimp balls, each bite bursting with a delicate sweetness, now elevated to a whole new level with a vibrant, tangy, and slightly spicy chili sauce. This isn’t just a recipe; it’s an experience that will tantalize your taste buds and leave you craving more.
While the exact origins of combining shrimp balls with chili sauce are a bit hazy, the concept draws inspiration from various Asian culinary traditions where seafood and spicy sauces are a match made in heaven. Think of the fiery Szechuan cuisine or the bold flavors of Thai cooking the combination is a testament to the universal appeal of balancing sweet, savory, and spicy elements.
What makes shrimp balls chili sauce so irresistible? It’s the delightful contrast of textures the tender, bouncy shrimp balls against the smooth, rich sauce. It’s the symphony of flavors the sweetness of the shrimp, the umami depth, and the invigorating kick of chili. And let’s not forget the convenience! This dish is surprisingly easy to prepare, making it perfect for a quick weeknight dinner or an impressive appetizer for your next gathering. Trust me, once you try this, it will become a staple in your recipe repertoire!

Ingredients:
- 1 pound large shrimp, peeled and deveined
- 1/2 cup panko breadcrumbs
- 1/4 cup finely chopped green onions
- 2 cloves garlic, minced
- 1 tablespoon grated ginger
- 1 large egg, lightly beaten
- 1 tablespoon soy sauce
- 1 teaspoon sesame oil
- 1/2 teaspoon white pepper
- 1/4 teaspoon salt (or to taste)
- Vegetable oil, for frying
Chili Sauce:
- 1/4 cup chili garlic sauce (such as Sriracha or Sambal Oelek)
- 2 tablespoons rice vinegar
- 1 tablespoon soy sauce
- 1 tablespoon honey (or maple syrup)
- 1 teaspoon sesame oil
- 1/2 teaspoon cornstarch
- 2 tablespoons water
Garnish (Optional):
- Sesame seeds
- Chopped green onions
Preparing the Shrimp Balls:
- Prepare the Shrimp: First, make sure your shrimp is peeled, deveined, and thoroughly dried. Pat them dry with paper towels. This is crucial for getting a good texture and preventing the shrimp balls from being soggy.
- Chop the Shrimp: Now, roughly chop the shrimp into smaller pieces. You can use a knife or a food processor. If using a food processor, pulse it a few times until the shrimp is coarsely ground. Be careful not to over-process it into a paste. We want some texture!
- Combine Ingredients: In a medium-sized bowl, combine the chopped shrimp, panko breadcrumbs, finely chopped green onions, minced garlic, grated ginger, beaten egg, soy sauce, sesame oil, white pepper, and salt.
- Mix Well: Gently mix all the ingredients together until they are well combined. Avoid overmixing, as this can make the shrimp balls tough. I like to use my hands for this step to ensure everything is evenly distributed.
- Chill the Mixture: Cover the bowl with plastic wrap and refrigerate the shrimp mixture for at least 30 minutes. This will help the shrimp balls hold their shape better during frying. Chilling also allows the flavors to meld together beautifully.
- Shape the Shrimp Balls: After chilling, take the shrimp mixture out of the refrigerator. Using your hands or a small cookie scoop, form the mixture into small, even-sized balls, about 1-inch in diameter. I usually get around 20-25 shrimp balls from this recipe.
Preparing the Chili Sauce:
- Combine Sauce Ingredients: In a small saucepan, whisk together the chili garlic sauce, rice vinegar, soy sauce, honey (or maple syrup), sesame oil, cornstarch, and water. Make sure the cornstarch is fully dissolved to avoid any lumps in your sauce.
- Cook the Sauce: Place the saucepan over medium heat and bring the sauce to a simmer, stirring constantly.
- Thicken the Sauce: Continue to simmer the sauce for 2-3 minutes, or until it has thickened to your desired consistency. The cornstarch will help the sauce thicken up nicely.
- Taste and Adjust: Taste the sauce and adjust the seasonings as needed. If you prefer a sweeter sauce, add a little more honey. For a spicier sauce, add a pinch of red pepper flakes or a dash more chili garlic sauce.
- Keep Warm: Once the sauce is ready, remove it from the heat and keep it warm until the shrimp balls are ready. You can cover the saucepan to prevent the sauce from drying out.
Cooking the Shrimp Balls:
- Heat the Oil: Pour about 2-3 inches of vegetable oil into a deep pot or frying pan. Heat the oil over medium-high heat until it reaches a temperature of 350°F (175°C). You can use a deep-fry thermometer to monitor the oil temperature. If you don’t have a thermometer, you can test the oil by dropping a small piece of bread into it. If the bread turns golden brown in about 30 seconds, the oil is ready.
- Fry the Shrimp Balls: Carefully add the shrimp balls to the hot oil in batches, being careful not to overcrowd the pan. Overcrowding the pan will lower the oil temperature and result in soggy shrimp balls.
- Cook Until Golden Brown: Fry the shrimp balls for about 3-4 minutes per batch, turning them occasionally, until they are golden brown and cooked through. The internal temperature of the shrimp balls should reach 145°F (63°C).
- Remove and Drain: Use a slotted spoon or spider to remove the shrimp balls from the oil and place them on a wire rack lined with paper towels to drain off any excess oil. This will help keep them crispy.
Assembling and Serving:
- Toss with Sauce: In a large bowl, gently toss the fried shrimp balls with the prepared chili sauce until they are evenly coated.
- Garnish (Optional): Transfer the shrimp balls to a serving platter and garnish with sesame seeds and chopped green onions, if desired.
- Serve Immediately: Serve the shrimp balls immediately while they are still hot and crispy. They are best enjoyed fresh!
Tips and Variations:
- Air Fryer Option: For a healthier alternative, you can air fry the shrimp balls instead of deep-frying them. Preheat your air fryer to 375°F (190°C). Lightly spray the shrimp balls with cooking oil and air fry them for 8-10 minutes, flipping them halfway through, until they are golden brown and cooked through.
- Baking Option: You can also bake the shrimp balls in the oven. Preheat your oven to 400°F (200°C). Place the shrimp balls on a baking sheet lined with parchment paper. Lightly spray them with cooking oil and bake for 12-15 minutes, flipping them halfway through, until they are golden brown and cooked through.
- Spice Level: Adjust the amount of chili garlic sauce in the chili sauce to control the spice level. If you prefer a milder sauce, use less chili garlic sauce or substitute it with a milder chili sauce.
- Sweetness: Adjust the amount of honey (or maple syrup) in the chili sauce to control the sweetness. If you prefer a less sweet sauce, use less honey or substitute it with a sugar-free sweetener.
- Gluten-Free Option: To make this recipe gluten-free, use gluten-free panko breadcrumbs and gluten-free soy sauce.
- Add Vegetables: You can add finely chopped vegetables to the shrimp mixture, such as carrots, celery, or bell peppers, for added flavor and nutrition.
- Dipping Sauce: Serve the shrimp balls with extra chili sauce or other dipping sauces, such as sweet chili sauce, plum sauce, or teriyaki sauce.
- Serving Suggestions: These shrimp balls are delicious as an appetizer, snack, or main course. Serve them with rice, noodles, or a salad for a complete meal.
Storage Instructions:
- Refrigerating: Store leftover shrimp balls in an airtight container in the refrigerator for up to 3 days.
- Reheating: Reheat the shrimp balls in the oven, air fryer, or microwave until heated through. They may not be as crispy as when they were freshly made, but they will still be delicious.
- Freezing: You can freeze the shrimp balls before or after cooking. To freeze uncooked shrimp balls, place them on a baking sheet lined with parchment paper and freeze for 1-2 hours, or until solid. Then, transfer them to a freezer-safe bag or container and freeze for up to 2 months. To freeze cooked shrimp balls, let them cool completely before transferring them to a freezer-safe bag or container and freezing for up to 2 months.
- Reheating from Frozen: To reheat frozen shrimp balls, bake them in the oven at 350°F (175°C) for 15-20 minutes, or until heated through. You can also air fry them for 8-10 minutes, or microwave them for 1-2 minutes.
Enjoy your delicious homemade shrimp balls with chili sauce! I hope you find this recipe easy to follow and that it becomes a new favorite in your kitchen. Happy cooking!
Conclusion:
So there you have it! These Shrimp Balls with Chili Sauce are truly a must-try. The delightful combination of succulent shrimp, perfectly seasoned and formed into bite-sized balls, paired with the sweet and spicy kick of the chili sauce, creates an explosion of flavor that will leave you wanting more. It’s a dish that’s surprisingly easy to make, yet impressive enough to serve at your next gathering or enjoy as a satisfying weeknight meal. I promise, once you taste these, you’ll be adding them to your regular rotation!
But the beauty of this recipe lies not only in its simplicity and deliciousness but also in its versatility. Feel free to get creative and adapt it to your own preferences. For a lighter option, try baking the shrimp balls instead of frying them. Simply preheat your oven to 375°F (190°C), place the shrimp balls on a baking sheet lined with parchment paper, and bake for about 15-20 minutes, or until they are cooked through and lightly golden brown.
Looking for some serving suggestions? These shrimp balls are fantastic as an appetizer, served with toothpicks for easy dipping. They also make a wonderful addition to noodle bowls or stir-fries. Imagine them tossed with some rice noodles, crisp vegetables, and a drizzle of extra chili sauce pure heaven! Another great idea is to serve them over a bed of fluffy rice, drizzled with the chili sauce and garnished with some chopped green onions and sesame seeds.
And don’t be afraid to experiment with the chili sauce itself! If you prefer a milder flavor, use a less spicy chili sauce or add a touch of honey or brown sugar to sweeten it up. For those who like it hot, hot, hot, feel free to add a pinch of red pepper flakes or a dash of your favorite hot sauce. You can even make your own chili sauce from scratch using fresh chilies, garlic, ginger, and other aromatic ingredients. The possibilities are endless!
Variations to Explore:
* Coconut Shrimp Balls: Add shredded coconut to the shrimp mixture for a tropical twist.
* Spicy Sriracha Shrimp Balls: Incorporate a tablespoon or two of Sriracha into the shrimp mixture for an extra kick.
* Garlic Parmesan Shrimp Balls: Mix in some grated Parmesan cheese and minced garlic for a savory and cheesy flavor.
* Sweet and Sour Shrimp Balls: Serve the shrimp balls with a classic sweet and sour sauce instead of the chili sauce.
I truly believe that this shrimp balls chili sauce recipe is a winner. It’s quick, easy, delicious, and adaptable to your own taste. So, what are you waiting for? Head to the kitchen, gather your ingredients, and give it a try! I’m confident that you’ll be delighted with the results.
And most importantly, I’d love to hear about your experience! Did you try the recipe as is, or did you make any modifications? What did you serve it with? What did your family and friends think? Share your thoughts, photos, and tips in the comments below. I’m always eager to learn from your culinary adventures and see how you’ve made this recipe your own. Happy cooking!
Shrimp Balls Chili Sauce: A Delicious & Easy Recipe
Crispy, golden-brown shrimp balls coated in a sweet and spicy homemade chili sauce. A delicious appetizer or snack that's easy to make and perfect for any occasion.
Ingredients
- 1 pound large shrimp, peeled and deveined
- 1/2 cup panko breadcrumbs
- 1/4 cup finely chopped green onions
- 2 cloves garlic, minced
- 1 tablespoon grated ginger
- 1 large egg, lightly beaten
- 1 tablespoon soy sauce
- 1 teaspoon sesame oil
- 1/2 teaspoon white pepper
- 1/4 teaspoon salt (or to taste)
- Vegetable oil, for frying
- 1/4 cup chili garlic sauce (such as Sriracha or Sambal Oelek)
- 2 tablespoons rice vinegar
- 1 tablespoon soy sauce
- 1 tablespoon honey (or maple syrup)
- 1 teaspoon sesame oil
- 1/2 teaspoon cornstarch
- 2 tablespoons water
- Sesame seeds
- Chopped green onions
Instructions
- Prepare the Shrimp: Pat the shrimp dry with paper towels. Roughly chop the shrimp into smaller pieces using a knife or food processor (pulse until coarsely ground).
- Combine Ingredients: In a medium bowl, combine the chopped shrimp, panko breadcrumbs, green onions, garlic, ginger, egg, soy sauce, sesame oil, white pepper, and salt.
- Mix Well: Gently mix until well combined, being careful not to overmix.
- Chill the Mixture: Cover and refrigerate for at least 30 minutes.
- Shape the Shrimp Balls: Form the mixture into small, even-sized balls (about 1-inch in diameter).
- Combine Sauce Ingredients: In a small saucepan, whisk together the chili garlic sauce, rice vinegar, soy sauce, honey (or maple syrup), sesame oil, cornstarch, and water.
- Cook the Sauce: Bring the sauce to a simmer over medium heat, stirring constantly.
- Thicken the Sauce: Simmer for 2-3 minutes, or until thickened.
- Taste and Adjust: Adjust seasonings to taste. Keep warm.
- Heat the Oil: Pour 2-3 inches of vegetable oil into a deep pot or frying pan. Heat to 350°F (175°C).
- Fry the Shrimp Balls: Carefully add the shrimp balls in batches, being careful not to overcrowd the pan.
- Cook Until Golden Brown: Fry for 3-4 minutes per batch, turning occasionally, until golden brown and cooked through (internal temperature of 145°F/63°C).
- Remove and Drain: Remove with a slotted spoon and drain on a wire rack lined with paper towels.
- Toss with Sauce: Gently toss the fried shrimp balls with the chili sauce.
- Garnish (Optional): Garnish with sesame seeds and green onions.
- Serve Immediately: Serve hot and crispy.
Notes
- Air Fryer Option: Preheat air fryer to 375°F (190°C). Spray shrimp balls with oil and air fry for 8-10 minutes, flipping halfway through.
- Baking Option: Preheat oven to 400°F (200°C). Place shrimp balls on a baking sheet lined with parchment paper. Lightly spray them with cooking oil and bake for 12-15 minutes, flipping them halfway through, until they are golden brown and cooked through.
- Adjust spice level and sweetness of the chili sauce to your preference.
- Use gluten-free panko and soy sauce for a gluten-free version.
- Add finely chopped vegetables to the shrimp mixture.
- Serve with extra chili sauce or other dipping sauces.
- Store leftovers in the refrigerator for up to 3 days. Reheat in the oven, air fryer, or microwave.
- Freeze uncooked or cooked shrimp balls for up to 2 months. Reheat from frozen in the oven, air fryer, or microwave.

Leave a Comment