
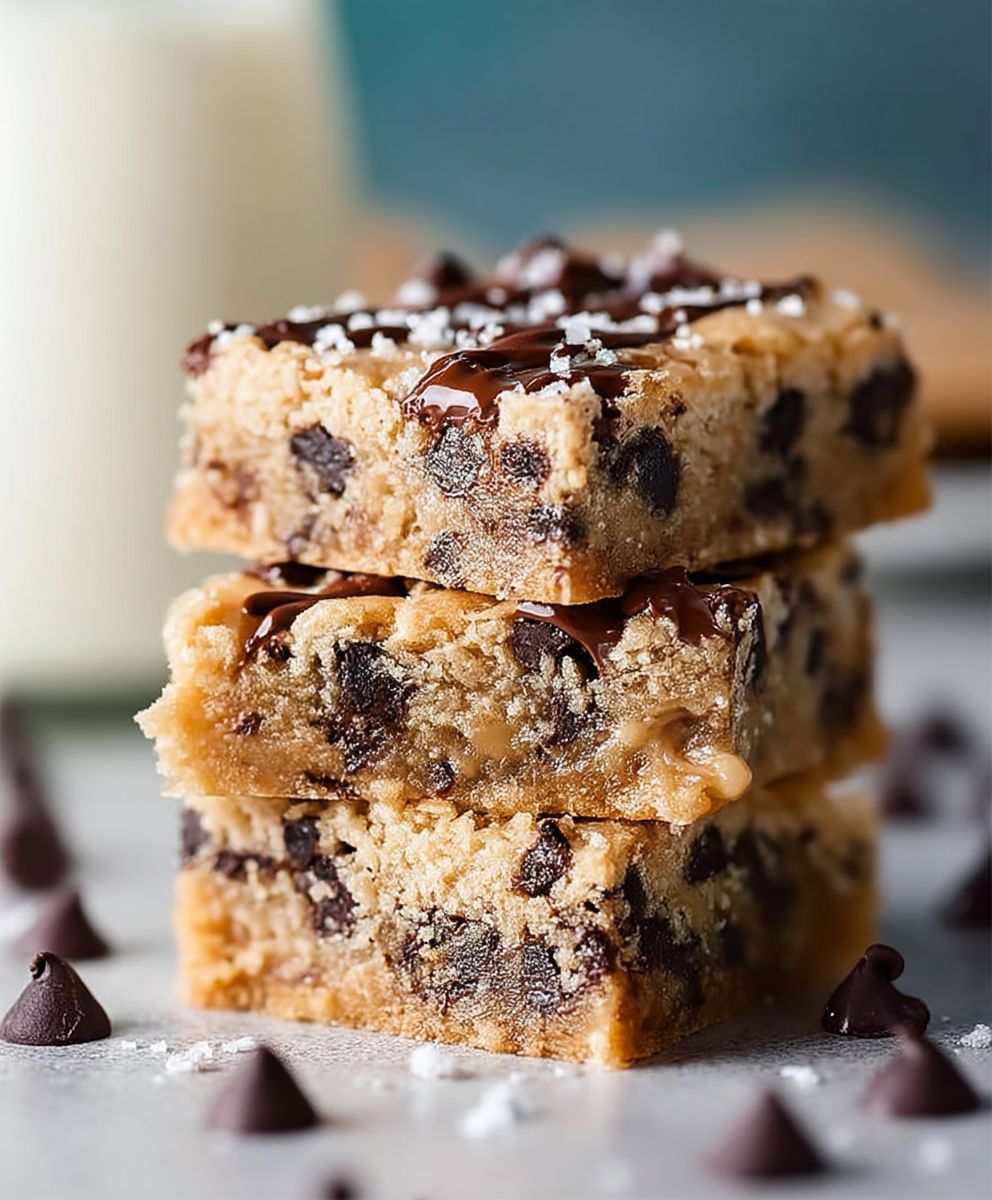
Chocolate chip cookie bars: Prepare to meet your new favorite dessert! Imagine sinking your teeth into a thick, chewy, and utterly irresistible treat that combines the comforting familiarity of chocolate chip cookies with the ease of a bar. Forget meticulously scooping individual cookies; these bars deliver all the warm, gooey goodness with minimal effort.
While the exact origins of cookie bars are somewhat hazy, they likely emerged as a convenient adaptation of the classic chocolate chip cookie, a beloved American invention dating back to the 1930s. Ruth Wakefield, of the Toll House Inn, is credited with accidentally creating the first chocolate chip cookie, and the rest, as they say, is history! Cookie bars take that legacy of deliciousness and streamline it for the modern baker.
What’s not to love? People adore chocolate chip cookie bars for their incredible taste and texture that perfect balance of soft, chewy center and slightly crisp edges. They’re also incredibly convenient. Whether you’re baking for a crowd, need a quick dessert for a weeknight treat, or simply want a fuss-free baking experience, these bars are the answer. Plus, they’re endlessly customizable! Add nuts, sprinkles, or different types of chocolate to create your own signature version. Get ready to experience cookie bliss in bar form!

Ingredients:
- 1 cup (2 sticks) unsalted butter, softened
- 1 cup granulated sugar
- 1 cup packed light brown sugar
- 2 large eggs
- 1 tablespoon vanilla extract
- 3 cups all-purpose flour
- 1 teaspoon baking soda
- 1 teaspoon salt
- 2 cups chocolate chips (milk chocolate, semi-sweet, or a combination)
- 1 cup chopped walnuts or pecans (optional)
Preparing the Dough:
- Cream the butter and sugars: In a large bowl, or the bowl of your stand mixer, cream together the softened butter, granulated sugar, and brown sugar until light and fluffy. This usually takes about 3-5 minutes. Make sure to scrape down the sides of the bowl occasionally to ensure everything is evenly mixed. The mixture should be pale and airy, which is key for a good cookie bar texture.
- Incorporate the eggs and vanilla: Beat in the eggs one at a time, mixing well after each addition. Then, stir in the vanilla extract. Don’t overmix at this stage; just combine until the eggs are fully incorporated. Overmixing can lead to tough cookie bars.
- Combine dry ingredients: In a separate medium bowl, whisk together the flour, baking soda, and salt. Whisking ensures that the baking soda and salt are evenly distributed throughout the flour, which is important for proper leavening and flavor.
- Gradually add dry ingredients to wet ingredients: Gradually add the dry ingredients to the wet ingredients, mixing on low speed until just combined. Be careful not to overmix. Overmixing develops the gluten in the flour, which can result in tough cookie bars. Stop mixing as soon as the flour is incorporated. A few streaks of flour are okay at this point.
- Fold in the chocolate chips and nuts (if using): Gently fold in the chocolate chips and chopped nuts (if using) until they are evenly distributed throughout the dough. Use a spatula to fold, rather than the mixer, to avoid overmixing.
Baking the Cookie Bars:
- Prepare the baking pan: Preheat your oven to 350°F (175°C). Grease and flour a 9×13 inch baking pan. Alternatively, you can line the pan with parchment paper, leaving an overhang on the sides for easy removal. This is my preferred method, as it makes it super easy to lift the cookie bars out of the pan after baking.
- Press the dough into the pan: Press the cookie dough evenly into the prepared baking pan. You can use your hands or the back of a spoon to spread the dough. Make sure the dough is evenly distributed so that the cookie bars bake evenly.
- Bake the cookie bars: Bake for 25-30 minutes, or until the edges are golden brown and a toothpick inserted into the center comes out with a few moist crumbs attached. The baking time may vary depending on your oven, so keep an eye on them. Start checking for doneness around 25 minutes.
- Cool completely: Let the cookie bars cool completely in the pan before cutting into squares. This is important because the cookie bars will continue to set as they cool. If you try to cut them while they are still warm, they will be too soft and may fall apart. Cooling them completely also makes them easier to cut cleanly.
Cutting and Serving:
- Cut into squares: Once the cookie bars are completely cool, cut them into squares. The size of the squares is up to you. I usually cut them into 24 squares, but you can make them larger or smaller depending on your preference.
- Serve and enjoy: Serve the cookie bars and enjoy! They are delicious on their own, or you can serve them with a scoop of ice cream or a glass of milk.
Tips and Variations:
- Use high-quality chocolate chips: The quality of the chocolate chips will affect the flavor of the cookie bars. I recommend using high-quality chocolate chips for the best results.
- Add different mix-ins: You can add other mix-ins to the cookie bars, such as M&Ms, peanut butter chips, or dried fruit.
- Make them gluten-free: To make these cookie bars gluten-free, simply substitute the all-purpose flour with a gluten-free all-purpose flour blend. Make sure the blend contains xanthan gum for best results.
- Store the cookie bars properly: Store the cookie bars in an airtight container at room temperature for up to 3 days. You can also freeze them for up to 2 months. To freeze, wrap the cookie bars individually in plastic wrap and then place them in a freezer bag.
- Don’t overbake: Overbaking will result in dry, crumbly cookie bars. Be sure to check for doneness around 25 minutes and remove them from the oven when they are golden brown around the edges and a toothpick inserted into the center comes out with a few moist crumbs attached.
- Soften the butter properly: Make sure your butter is properly softened before creaming it with the sugars. The butter should be soft enough to easily cream, but not melted. If the butter is too soft, the cookie bars may spread too much during baking.
- Use a combination of chocolate chips: For a more complex flavor, use a combination of milk chocolate, semi-sweet, and dark chocolate chips.
- Add a sprinkle of sea salt: A sprinkle of sea salt on top of the cookie bars before baking will enhance the sweetness and add a nice salty-sweet contrast.
- Make them chewy: For chewier cookie bars, use more brown sugar than granulated sugar. Brown sugar contains molasses, which helps to create a chewier texture.
- Make them cakey: For cakey cookie bars, use less butter and more flour. You can also add a tablespoon of cornstarch to the dry ingredients.
Troubleshooting:
- Cookie bars are too dry: This could be due to overbaking or using too much flour. Make sure to measure the flour accurately and don’t overbake the cookie bars.
- Cookie bars are too greasy: This could be due to using too much butter. Make sure to measure the butter accurately and don’t use melted butter.
- Cookie bars are too flat: This could be due to using butter that is too soft or not chilling the dough before baking. Make sure the butter is softened but not melted and chill the dough for at least 30 minutes before baking.
- Cookie bars are too hard: This could be due to overmixing the dough or overbaking the cookie bars. Be careful not to overmix the dough and don’t overbake the cookie bars.
- Cookie bars are not spreading: This could be due to using too much flour or not enough butter. Make sure to measure the flour accurately and use the correct amount of butter.
Serving Suggestions:
- Serve warm with a scoop of vanilla ice cream.
- Drizzle with melted chocolate or caramel sauce.
- Serve with a glass of cold milk or a cup of hot coffee.
- Cut into smaller squares and serve as part of a dessert platter.
- Pack them in lunchboxes for a sweet treat.
- Bring them to a potluck or bake sale.
- Give them as a homemade gift.
Nutritional Information (approximate, per serving):
- Calories: 250-300
- Fat: 15-20g
- Saturated Fat: 9-12g
- Cholesterol: 40-50mg
- Sodium: 150-200mg
- Carbohydrates: 30-35g
- Sugar: 20-25g
- Protein: 3-4g
Note: Nutritional information is an estimate and may vary depending on the specific ingredients used and portion sizes.
Conclusion:
And there you have it! These chocolate chip cookie bars are more than just a dessert; they’re a shortcut to happiness, a guaranteed crowd-pleaser, and a ridiculously easy way to satisfy your sweet tooth. I truly believe this recipe is a must-try for anyone who loves the comforting taste of chocolate chip cookies but doesn’t want the fuss of scooping and baking individual cookies.
Why is it a must-try, you ask? Well, beyond the sheer simplicity, the texture is divine. You get that chewy, slightly gooey center that everyone craves, combined with perfectly crisp edges. Plus, the ratio of chocolate chips to dough is, in my humble opinion, spot on. Every bite is bursting with chocolatey goodness! It’s the ultimate comfort food, perfect for a cozy night in, a potluck gathering, or a quick and easy treat for the kids (and let’s be honest, for yourself too!).
But the best part? The versatility! While these chocolate chip cookie bars are amazing as is, feel free to get creative. Want to add some nuts? Go for it! Walnuts, pecans, or even macadamia nuts would be fantastic. Craving something a little more decadent? Throw in some chopped toffee or caramel candies. For a truly indulgent experience, swirl in some Nutella or peanut butter before baking. The possibilities are endless!
Serving suggestions? Oh, let me count the ways! Warm, straight from the oven, with a scoop of vanilla ice cream is a classic for a reason. But they’re also delicious at room temperature, perfect for packing in lunchboxes or taking on picnics. Cut them into squares for easy serving, or get fancy and use cookie cutters for fun shapes. You can even crumble them over yogurt or ice cream for a delightful topping. And if you’re feeling extra ambitious, try making an ice cream sandwich with them!
I’ve made these chocolate chip cookie bars countless times, and they always disappear in a flash. They’re a guaranteed hit, and I’m confident you’ll love them just as much as I do. The ease of preparation makes them perfect for even the most novice baker, and the delicious results will impress even the most discerning palate.
So, what are you waiting for? Preheat that oven, gather your ingredients, and get ready to bake up a batch of these irresistible chocolate chip cookie bars. I promise you won’t regret it!
And most importantly, I want to hear about your experience! Did you try the recipe? Did you make any variations? What did you think? Share your photos and stories in the comments below. I can’t wait to see your creations and hear how much you enjoyed these delightful treats. Happy baking! Let me know if you have any questions, and I’ll do my best to answer them. I hope this recipe brings as much joy to your kitchen as it has to mine. Enjoy!
Chocolate Chip Cookie Bars: The Ultimate Guide to Baking Perfection
Easy and delicious chocolate chip cookie bars, perfect for a crowd! Soft, chewy, and loaded with chocolate chips, these bars are a guaranteed hit.
Ingredients
- 1 cup (2 sticks) unsalted butter, softened
- 1 cup granulated sugar
- 1 cup packed light brown sugar
- 2 large eggs
- 1 tablespoon vanilla extract
- 3 cups all-purpose flour
- 1 teaspoon baking soda
- 1 teaspoon salt
- 2 cups chocolate chips (milk chocolate, semi-sweet, or a combination)
- 1 cup chopped walnuts or pecans (optional)
Instructions
- Cream the butter and sugars: In a large bowl, or the bowl of your stand mixer, cream together the softened butter, granulated sugar, and brown sugar until light and fluffy. This usually takes about 3-5 minutes. Scrape down the sides of the bowl occasionally.
- Incorporate the eggs and vanilla: Beat in the eggs one at a time, mixing well after each addition. Then, stir in the vanilla extract. Don’t overmix.
- Combine dry ingredients: In a separate medium bowl, whisk together the flour, baking soda, and salt.
- Gradually add dry ingredients to wet ingredients: Gradually add the dry ingredients to the wet ingredients, mixing on low speed until just combined. Be careful not to overmix. Stop mixing as soon as the flour is incorporated. A few streaks of flour are okay.
- Fold in the chocolate chips and nuts (if using): Gently fold in the chocolate chips and chopped nuts (if using) until they are evenly distributed throughout the dough.
- Prepare the baking pan: Preheat your oven to 350°F (175°C). Grease and flour a 9×13 inch baking pan or line with parchment paper.
- Press the dough into the pan: Press the cookie dough evenly into the prepared baking pan.
- Bake the cookie bars: Bake for 25-30 minutes, or until the edges are golden brown and a toothpick inserted into the center comes out with a few moist crumbs attached.
- Cool completely: Let the cookie bars cool completely in the pan before cutting into squares.
- Cut into squares: Once the cookie bars are completely cool, cut them into squares.
- Serve and enjoy: Serve the cookie bars and enjoy!
Notes
- Use high-quality chocolate chips for the best flavor.
- Add different mix-ins like M&Ms, peanut butter chips, or dried fruit.
- To make gluten-free, substitute all-purpose flour with a gluten-free all-purpose flour blend.
- Store in an airtight container at room temperature for up to 3 days or freeze for up to 2 months.
- Don’t overbake for moist bars.
- Soften the butter properly.
- Use a combination of chocolate chips for a more complex flavor.
- Add a sprinkle of sea salt on top before baking.
- For chewier bars, use more brown sugar than granulated sugar.
- For cakey bars, use less butter and more flour.

Leave a Comment