
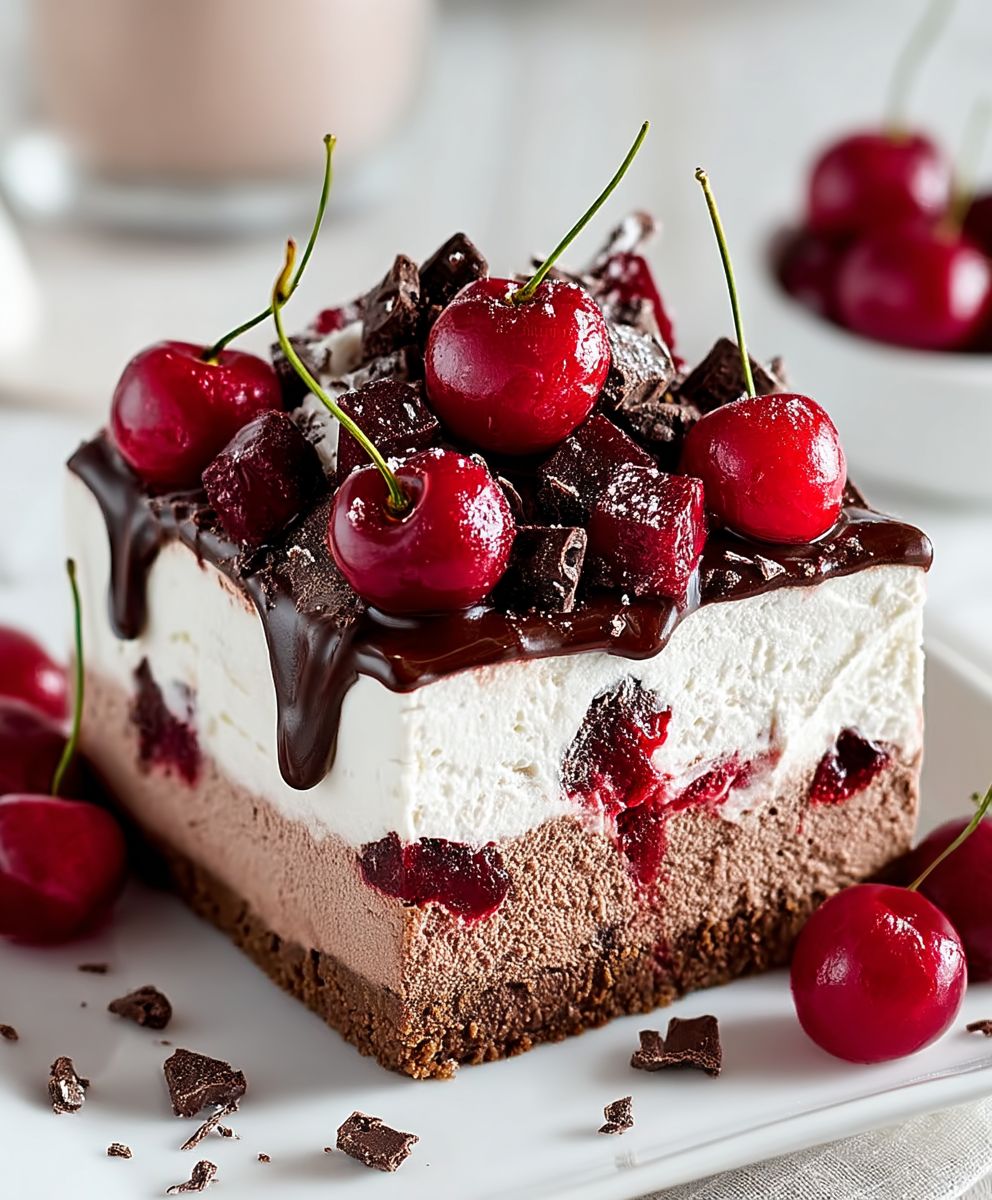
Cherry Chocolate Ice Cream Cake: Prepare to be transported to dessert heaven with this decadent and surprisingly easy-to-make treat! Imagine layers of rich, fudgy chocolate cake embracing creamy, cherry-infused ice cream, all topped with a luscious chocolate ganache. It’s a symphony of flavors and textures that will leave you craving more.
While the exact origins of ice cream cake are debated, its popularity soared in the mid-20th century, becoming a staple at birthday parties and celebrations. It’s a dessert that evokes feelings of nostalgia and pure joy. This particular version, the Cherry Chocolate Ice Cream Cake, elevates the classic with the delightful combination of sweet cherries and intense chocolate a pairing that has been beloved for generations.
What makes this dessert so irresistible? It’s the perfect balance of warm and cold, soft and firm. The slight tang of the cherries cuts through the richness of the chocolate, creating a harmonious flavor profile that’s not overly sweet. Plus, let’s be honest, who can resist the allure of ice cream and cake in one glorious creation? This recipe is also incredibly convenient. You can prepare the cake layers and ice cream ahead of time, making it the perfect make-ahead dessert for any occasion. Get ready to impress your friends and family with this show-stopping, yet surprisingly simple, Cherry Chocolate Ice Cream Cake!

Ingredients:
- For the Chocolate Cake Layers:
- 2 cups all-purpose flour
- 2 cups granulated sugar
- ¾ cup unsweetened cocoa powder
- 1 ½ teaspoons baking powder
- 1 ½ teaspoons baking soda
- 1 teaspoon salt
- 1 cup buttermilk
- ½ cup vegetable oil
- 2 large eggs
- 2 teaspoons vanilla extract
- 1 cup boiling water
- For the Cherry Ice Cream Filling:
- 1 quart (4 cups) high-quality vanilla ice cream, softened
- 1 (10-ounce) jar maraschino cherries, drained and chopped
- ¼ cup maraschino cherry juice (reserved from the jar)
- For the Chocolate Ganache:
- 1 cup heavy cream
- 12 ounces semi-sweet chocolate chips
- Optional Garnishes:
- Fresh cherries
- Chocolate shavings
- Whipped cream
Preparing the Chocolate Cake Layers:
- Preheat and Prepare: First things first, preheat your oven to 350°F (175°C). Grease and flour two 9-inch round cake pans. I like to use baking spray with flour already in it it makes things so much easier! Make sure you get into all the nooks and crannies of the pan to prevent sticking.
- Combine Dry Ingredients: In a large bowl, whisk together the flour, sugar, cocoa powder, baking powder, baking soda, and salt. Whisking is key here to ensure everything is evenly distributed. You don’t want pockets of baking soda in your cake!
- Combine Wet Ingredients: In a separate bowl, whisk together the buttermilk, oil, eggs, and vanilla extract. Make sure your eggs are at room temperature they’ll incorporate better.
- Combine Wet and Dry: Gradually add the wet ingredients to the dry ingredients, mixing on low speed until just combined. Be careful not to overmix! Overmixing develops the gluten in the flour, which can lead to a tough cake.
- Add Boiling Water: Slowly pour in the boiling water, mixing until the batter is smooth and thin. Don’t be alarmed by the thin consistency this is what gives the cake its moistness. The batter will be quite liquidy, but that’s perfectly normal.
- Divide and Bake: Divide the batter evenly between the prepared cake pans. Bake for 30-35 minutes, or until a toothpick inserted into the center comes out clean. Keep a close eye on them ovens can vary!
- Cool Completely: Let the cakes cool in the pans for 10 minutes before inverting them onto a wire rack to cool completely. This is crucial! If you try to frost them while they’re still warm, the frosting will melt.
Preparing the Cherry Ice Cream Filling:
- Soften the Ice Cream: Allow the vanilla ice cream to soften at room temperature for about 15-20 minutes, or until it’s easily spreadable but not completely melted. You want it to be soft enough to work with, but not so soft that it’s soupy.
- Prepare the Cherries: Drain the maraschino cherries, reserving ¼ cup of the cherry juice. Chop the cherries into small pieces. I like to pat them dry with a paper towel after chopping to remove excess moisture.
- Combine Ice Cream and Cherries: In a large bowl, gently fold the chopped cherries and reserved cherry juice into the softened ice cream. Be careful not to overmix, as this can cause the ice cream to melt too much.
- Freeze the Filling: Line one of the cooled cake pans with plastic wrap, leaving some overhang. This will make it easier to remove the frozen ice cream layer later. Pour the cherry ice cream mixture into the lined cake pan and spread it evenly. Freeze for at least 4 hours, or preferably overnight, until solid. This step is essential to ensure the ice cream layer holds its shape.
Assembling the Ice Cream Cake:
- Level the Cake Layers (Optional): If your cake layers are uneven, use a serrated knife to level the tops. This will create a more even and professional-looking cake.
- Place First Cake Layer: Place one of the chocolate cake layers on a serving plate or cake stand.
- Remove Ice Cream Layer: Carefully remove the frozen cherry ice cream layer from the cake pan using the plastic wrap overhang. Invert it onto the first cake layer. Peel off the plastic wrap. Work quickly here to prevent the ice cream from melting too much.
- Place Second Cake Layer: Gently place the second chocolate cake layer on top of the ice cream layer.
- Freeze Briefly: Wrap the assembled cake in plastic wrap and freeze for at least 30 minutes to allow the layers to meld together. This will make it easier to frost the cake.
Making the Chocolate Ganache:
- Heat the Cream: In a saucepan, heat the heavy cream over medium heat until it just begins to simmer. Do not boil!
- Pour Over Chocolate: Place the chocolate chips in a heatproof bowl. Pour the hot cream over the chocolate chips.
- Let Sit: Let the mixture sit for 1 minute to allow the heat to melt the chocolate.
- Stir Until Smooth: Gently stir the mixture until the chocolate is completely melted and the ganache is smooth and glossy. If there are still some unmelted chocolate pieces, you can microwave the mixture in 15-second intervals, stirring in between, until smooth.
- Cool Slightly: Allow the ganache to cool slightly for about 10-15 minutes, or until it thickens to a spreadable consistency. This will prevent it from running off the cake.
Frosting and Decorating:
- Frost the Cake: Remove the cake from the freezer. Spread the chocolate ganache evenly over the top and sides of the cake. You can use an offset spatula to create a smooth finish or a textured design.
- Add Garnishes (Optional): Decorate the cake with fresh cherries, chocolate shavings, and whipped cream, if desired. Get creative and have fun with it!
- Freeze Again: Freeze the cake for at least 1 hour to allow the ganache to set. This will make it easier to slice and serve.
- Serve: Remove the cake from the freezer about 15-20 minutes before serving to allow it to soften slightly. Slice and enjoy!
Conclusion:
This Cherry Chocolate Ice Cream Cake isn’t just a dessert; it’s a celebration waiting to happen! From the rich, decadent chocolate base to the burst of sweet and tart cherries nestled within creamy vanilla ice cream, every bite is an explosion of flavor and texture. It’s the kind of treat that makes you close your eyes and savor the moment, and honestly, who doesn’t need more of those moments in their life?
I know what you might be thinking: “Ice cream cake? Sounds complicated!” But trust me, this recipe is surprisingly simple to put together. The beauty lies in its ease of assembly, allowing you to create a show-stopping dessert without spending hours in the kitchen. It’s perfect for birthdays, holidays, or even just a spontaneous weeknight treat when you’re craving something truly special.
And the best part? It’s incredibly versatile! Feel free to get creative with your toppings. A drizzle of hot fudge sauce is always a welcome addition, or you could sprinkle on some chopped nuts for extra crunch. For a more sophisticated touch, consider adding a dusting of cocoa powder or a few fresh cherries on top. If you’re feeling adventurous, you could even experiment with different flavors of ice cream. Chocolate ice cream would amplify the chocolatey goodness, while a scoop of pistachio would add a unique and unexpected twist.
Serving suggestions are endless! A simple slice on its own is divine, but you could also pair it with a dollop of whipped cream or a scoop of extra ice cream. For a truly indulgent experience, try serving it with a warm brownie or a slice of chocolate cake. And don’t forget the drinks! A glass of cold milk, a cup of hot coffee, or even a sparkling wine would all complement the flavors of the cake perfectly.
But the real magic of this Cherry Chocolate Ice Cream Cake lies in its ability to bring people together. It’s the kind of dessert that sparks conversation, creates memories, and leaves everyone feeling happy and satisfied. Imagine the smiles on your loved ones’ faces as you present this stunning creation at your next gathering. It’s a guaranteed crowd-pleaser that will have everyone asking for seconds (and the recipe!).
I truly believe that this recipe is a must-try for anyone who loves chocolate, cherries, and ice cream (and let’s be honest, who doesn’t?). It’s a simple yet elegant dessert that’s perfect for any occasion. So, what are you waiting for? Gather your ingredients, preheat your oven (just for the chocolate base!), and get ready to create a dessert masterpiece.
I’m so excited for you to try this recipe and experience the joy of making (and eating!) your own Cherry Chocolate Ice Cream Cake. Once you’ve given it a go, I’d love to hear about your experience! Share your photos and stories in the comments below. Did you make any variations? What were your favorite toppings? What did your friends and family think? I can’t wait to see what you create! Happy baking (or rather, assembling)!
Cherry Chocolate Ice Cream Cake: A Delicious Summer Treat
Chocolate cake layers with cherry ice cream filling, enrobed in rich chocolate ganache. Perfect for celebrations!
Ingredients
- 2 cups all-purpose flour
- 2 cups granulated sugar
- ¾ cup unsweetened cocoa powder
- 1 ½ teaspoons baking powder
- 1 ½ teaspoons baking soda
- 1 teaspoon salt
- 1 cup buttermilk
- ½ cup vegetable oil
- 2 large eggs
- 2 teaspoons vanilla extract
- 1 cup boiling water
- 1 quart (4 cups) high-quality vanilla ice cream, softened
- 1 (10-ounce) jar maraschino cherries, drained and chopped
- ¼ cup maraschino cherry juice (reserved from the jar)
- 1 cup heavy cream
- 12 ounces semi-sweet chocolate chips
- Fresh cherries
- Chocolate shavings
- Whipped cream
Instructions
- Preheat oven to 350°F (175°C). Grease and flour two 9-inch round cake pans.
- In a large bowl, whisk together the flour, sugar, cocoa powder, baking powder, baking soda, and salt.
- In a separate bowl, whisk together the buttermilk, oil, eggs, and vanilla extract.
- Gradually add the wet ingredients to the dry ingredients, mixing on low speed until just combined.
- Slowly pour in the boiling water, mixing until the batter is smooth and thin.
- Divide the batter evenly between the prepared cake pans. Bake for 30-35 minutes, or until a toothpick inserted into the center comes out clean.
- Let the cakes cool in the pans for 10 minutes before inverting them onto a wire rack to cool completely.
- Allow the vanilla ice cream to soften at room temperature for about 15-20 minutes, or until it’s easily spreadable but not completely melted.
- Drain the maraschino cherries, reserving ¼ cup of the cherry juice. Chop the cherries into small pieces.
- In a large bowl, gently fold the chopped cherries and reserved cherry juice into the softened ice cream.
- Line one of the cooled cake pans with plastic wrap, leaving some overhang. Pour the cherry ice cream mixture into the lined cake pan and spread it evenly. Freeze for at least 4 hours, or preferably overnight, until solid.
- If your cake layers are uneven, use a serrated knife to level the tops.
- Place one of the chocolate cake layers on a serving plate or cake stand.
- Carefully remove the frozen cherry ice cream layer from the cake pan using the plastic wrap overhang. Invert it onto the first cake layer. Peel off the plastic wrap.
- Gently place the second chocolate cake layer on top of the ice cream layer.
- Wrap the assembled cake in plastic wrap and freeze for at least 30 minutes to allow the layers to meld together.
- In a saucepan, heat the heavy cream over medium heat until it just begins to simmer. Do not boil!
- Place the chocolate chips in a heatproof bowl. Pour the hot cream over the chocolate chips.
- Let the mixture sit for 1 minute to allow the heat to melt the chocolate.
- Gently stir the mixture until the chocolate is completely melted and the ganache is smooth and glossy.
- Allow the ganache to cool slightly for about 10-15 minutes, or until it thickens to a spreadable consistency.
- Remove the cake from the freezer. Spread the chocolate ganache evenly over the top and sides of the cake.
- Decorate the cake with fresh cherries, chocolate shavings, and whipped cream, if desired.
- Freeze the cake for at least 1 hour to allow the ganache to set.
- Remove the cake from the freezer about 15-20 minutes before serving to allow it to soften slightly. Slice and enjoy!
Notes
- For best results, use high-quality vanilla ice cream.
- Make sure your eggs are at room temperature for the cake batter.
- Don’t overmix the cake batter, as this can result in a tough cake.
- The cake layers can be made a day in advance and stored at room temperature, wrapped tightly in plastic wrap.
- The ice cream filling needs to freeze for at least 4 hours, but preferably overnight.
- The assembled cake can be frozen for up to 3 days.
- If the ganache is too thick, add a tablespoon of warm milk or cream at a time until it reaches the desired consistency.
- If the ganache is too thin, let it sit at room temperature for a bit longer to thicken up.
Leave a Comment