
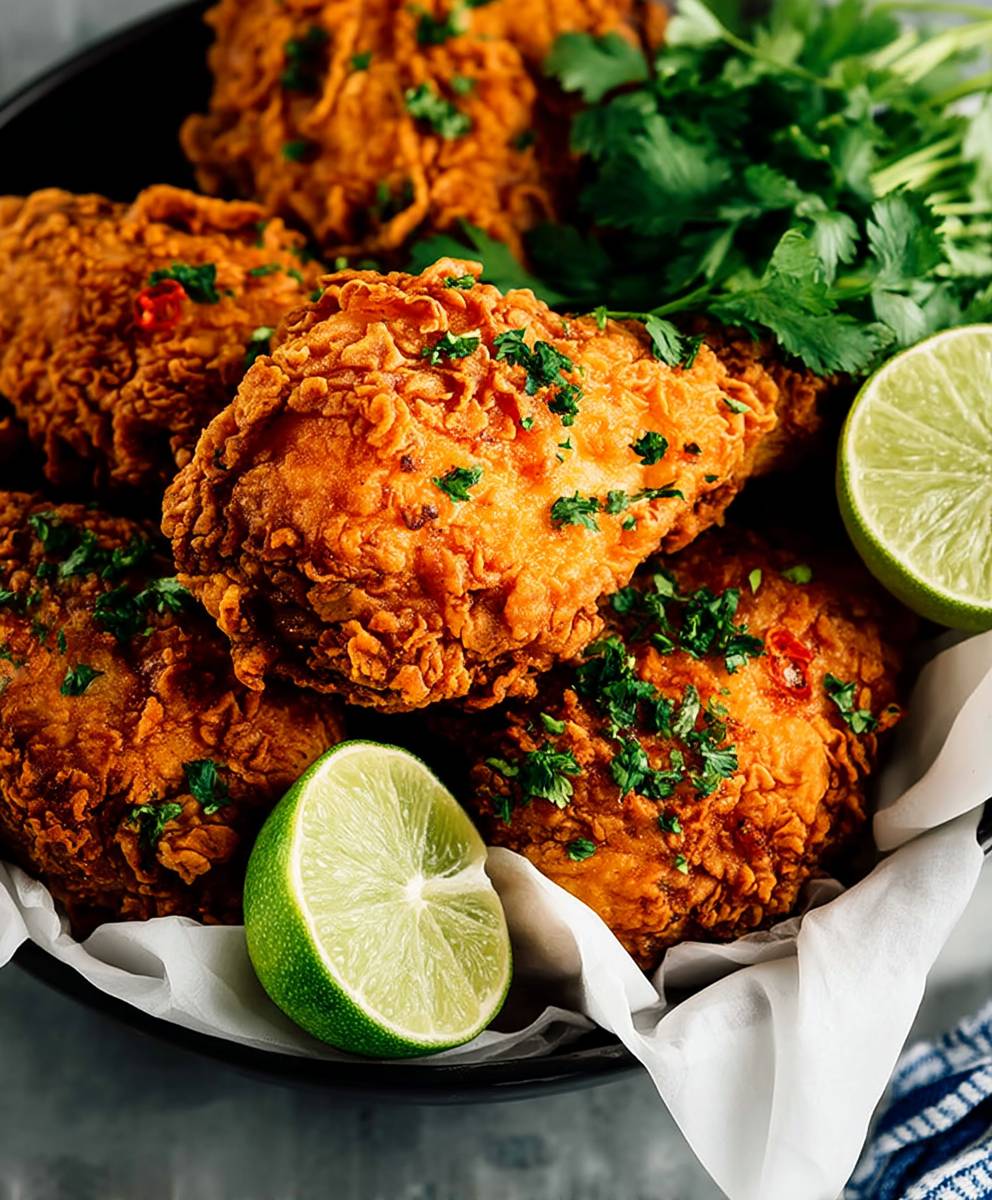
Buttermilk Fried Chicken: just the name conjures up images of crispy, golden-brown perfection, doesn’t it? Forget the drive-through we’re about to embark on a culinary adventure that will bring the best, most flavorful fried chicken right to your very own kitchen. Get ready to experience a symphony of textures and tastes that will have everyone begging for seconds!
Fried chicken, in its various forms, has a rich and fascinating history, particularly in the American South. While the concept of frying chicken dates back centuries, the unique combination of buttermilk and seasoned flour is a distinctly Southern innovation. It’s a dish deeply intertwined with cultural traditions and family gatherings, often passed down through generations.
So, what makes buttermilk fried chicken so irresistible? It’s the perfect marriage of crispy, crunchy skin and incredibly juicy, tender meat. The buttermilk marinade works its magic, tenderizing the chicken and adding a subtle tang that complements the savory spices. People adore this dish because it’s comforting, satisfying, and undeniably delicious. Plus, while it might seem intimidating, with a few simple steps, you can achieve restaurant-quality results at home. Let’s get frying!

Ingredients:
- For the Brine:
- 4 cups cold water
- 1/2 cup kosher salt
- 1/4 cup granulated sugar
- 4 cloves garlic, smashed
- 1 tablespoon black peppercorns, crushed
- 1 teaspoon dried thyme
- 1/2 teaspoon red pepper flakes (optional, for a little heat)
- For the Buttermilk Soak:
- 4 cups buttermilk
- 2 tablespoons hot sauce (such as Frank’s RedHot)
- 1 teaspoon black pepper
- 1 teaspoon garlic powder
- 1 teaspoon onion powder
- For the Dredge:
- 4 cups all-purpose flour
- 1 cup cornstarch
- 2 tablespoons paprika
- 2 tablespoons garlic powder
- 2 tablespoons onion powder
- 2 tablespoons dried oregano
- 1 tablespoon dried thyme
- 1 tablespoon ground black pepper
- 1 tablespoon kosher salt
- 1 teaspoon cayenne pepper (optional, for extra heat)
- For Frying:
- 4-6 cups vegetable oil or peanut oil (for frying)
- Chicken:
- 3-4 lbs chicken pieces (bone-in, skin-on thighs, drumsticks, and wings work best)
Preparing the Chicken: Brining and Buttermilk Soak
Okay, let’s get started! The secret to truly amazing fried chicken is all in the preparation. We’re going to brine the chicken first, then give it a good soak in buttermilk. Trust me, these steps are worth it!
- Make the Brine: In a large bowl or container (make sure it’s non-reactive, like glass or plastic), combine the cold water, salt, sugar, smashed garlic, black peppercorns, dried thyme, and red pepper flakes (if using). Stir until the salt and sugar are completely dissolved. This is crucial you don’t want any gritty bits!
- Brine the Chicken: Add the chicken pieces to the brine, making sure they are fully submerged. If needed, you can place a plate or bowl on top to weigh them down. Cover the container and refrigerate for at least 4 hours, or preferably overnight (up to 12 hours). Don’t brine for longer than 12 hours, or the chicken can become too salty.
- Prepare the Buttermilk Soak: In a separate large bowl, whisk together the buttermilk, hot sauce, black pepper, garlic powder, and onion powder. This is going to tenderize the chicken and give it that classic tangy flavor.
- Soak the Chicken: Remove the chicken pieces from the brine and rinse them thoroughly under cold water. This is important to remove excess salt. Pat the chicken dry with paper towels. Place the chicken in the buttermilk mixture, ensuring it’s fully submerged. Cover and refrigerate for at least 2 hours, or up to 4 hours.
Preparing the Dredge
While the chicken is soaking in buttermilk, let’s get the dredge ready. This is where all the flavor and crispy goodness comes from!
- Combine Dry Ingredients: In a large, shallow dish (like a baking dish or a large pie plate), whisk together the flour, cornstarch, paprika, garlic powder, onion powder, dried oregano, dried thyme, black pepper, salt, and cayenne pepper (if using). Make sure everything is evenly distributed. The cornstarch helps create a lighter, crispier crust.
Dredging the Chicken
Now for the fun part! This is where we coat the chicken in that flavorful dredge, getting it ready for the hot oil.
- Remove Chicken from Buttermilk: Take the chicken pieces out of the buttermilk, letting any excess drip off. You don’t want it dripping wet, but a little moisture is good for helping the dredge adhere.
- Dredge the Chicken: Place a few pieces of chicken at a time into the flour mixture. Use your hands to press the flour mixture firmly onto the chicken, making sure it’s completely coated on all sides. Really pack it on there!
- Double Dredge (Optional, but Recommended!): For an extra crispy crust, you can double dredge the chicken. After the first dredge, dip the chicken back into the buttermilk mixture (just for a quick dip!), then back into the flour mixture for a second coating. Again, press the flour firmly onto the chicken.
- Rest the Dredged Chicken: Place the dredged chicken pieces on a wire rack lined with parchment paper. Let them rest for about 15-20 minutes. This allows the coating to adhere better and helps prevent it from falling off during frying.
Frying the Chicken
Alright, time to fry! This is where the magic happens. Make sure you have a good thermometer to monitor the oil temperature. Safety first!
- Heat the Oil: Pour the vegetable oil or peanut oil into a large, heavy-bottomed pot or Dutch oven. You want enough oil so that the chicken will be mostly submerged. Heat the oil over medium-high heat to 325-350°F (160-175°C). Use a deep-fry thermometer to monitor the temperature. It’s crucial to maintain this temperature for even cooking and crispy results. If the oil is too hot, the chicken will burn on the outside before it’s cooked through. If it’s too cold, the chicken will be greasy.
- Fry the Chicken: Carefully place a few pieces of chicken into the hot oil, making sure not to overcrowd the pot. Overcrowding will lower the oil temperature and result in greasy chicken. Fry the chicken for about 6-8 minutes per side, or until it’s golden brown and cooked through. The internal temperature of the chicken should reach 165°F (74°C). Use a meat thermometer to check the temperature. Insert it into the thickest part of the chicken, avoiding the bone.
- Maintain Oil Temperature: Monitor the oil temperature closely and adjust the heat as needed to maintain a consistent 325-350°F (160-175°C). If the oil temperature drops too low, wait for it to come back up to temperature before adding more chicken.
- Remove and Drain: Once the chicken is cooked through and golden brown, carefully remove it from the oil using tongs or a slotted spoon. Place the fried chicken on a wire rack lined with paper towels to drain excess oil. This will help keep the chicken crispy.
- Repeat: Repeat the frying process with the remaining chicken pieces, making sure to maintain the oil temperature.
Serving and Enjoying
Your buttermilk fried chicken is ready! Let it cool slightly before serving. It’s delicious on its own, or with your favorite sides like mashed potatoes, coleslaw, biscuits, or corn on the cob.
Tips for Success:
- Don’t overcrowd the pot: Fry the chicken in batches to maintain the oil temperature.
- Use a thermometer: A deep-fry thermometer is essential for monitoring the oil temperature. A meat thermometer is crucial for ensuring the chicken is cooked through.
- Let the chicken rest: Allowing the dredged chicken to rest before frying helps the coating adhere better.
- Don’t be afraid to adjust the heat: Monitor the oil temperature and adjust the heat as needed to maintain a consistent temperature.
- Season generously: Don’t be shy with the seasonings in the brine, buttermilk soak, and dredge. This is what gives the chicken its flavor.
Enjoy your homemade buttermilk fried chicken! I hope you love it as much as I do!
Conclusion:
And there you have it! Our Buttermilk Fried Chicken recipe, a symphony of crispy, golden perfection and juicy, flavorful tenderness, is truly a must-try. I know, I know, there are a million fried chicken recipes out there, but trust me on this one. The buttermilk marinade is the secret weapon, tenderizing the chicken and infusing it with a subtle tang that perfectly complements the savory spices. The double dredge ensures an unbelievably crispy crust that will have you reaching for seconds (and thirds!).
But why is this particular recipe so special? It’s the perfect balance of simplicity and technique. We’ve broken down each step to make it approachable for even novice cooks, while still delivering restaurant-quality results. It’s about more than just frying chicken; it’s about creating an experience, a moment of pure culinary joy. Its about that first bite, the satisfying crunch, and the explosion of flavor that follows. It’s about sharing that experience with loved ones and creating memories around the dinner table.
This Buttermilk Fried Chicken is more than just a meal; it’s an event!
Now, let’s talk serving suggestions. Of course, classic sides like creamy mashed potatoes, buttery corn on the cob, and tangy coleslaw are always a winning combination. But don’t be afraid to get creative! How about pairing it with a refreshing watermelon salad for a summery twist? Or serving it alongside sweet potato fries and a spicy aioli for a more modern take? For a truly decadent experience, try it with mac and cheese the ultimate comfort food pairing.
And the variations! Oh, the possibilities are endless! Want to kick up the heat? Add a pinch of cayenne pepper or a dash of hot sauce to the spice blend. Prefer a sweeter flavor profile? A touch of brown sugar or honey in the marinade will do the trick. You could even experiment with different herbs and spices rosemary, thyme, paprika, garlic powder, onion powder the choice is yours! Feel free to adjust the recipe to suit your own taste preferences and dietary needs. For a gluten-free version, simply substitute the all-purpose flour with a gluten-free blend.
Don’t be afraid to experiment and make this Buttermilk Fried Chicken recipe your own!
I truly believe that this recipe will become a staple in your kitchen. It’s perfect for weeknight dinners, weekend gatherings, or any occasion that calls for a little bit of comfort and indulgence. It’s a crowd-pleaser that’s guaranteed to impress.
So, what are you waiting for? Gather your ingredients, put on your apron, and get ready to create some culinary magic. I’m confident that you’ll absolutely love this Buttermilk Fried Chicken recipe.
And most importantly, I want to hear about your experience! Did you try the recipe? What variations did you make? What sides did you serve it with? Share your photos, your stories, and your feedback in the comments below. I can’t wait to see what you create! Let’s spread the joy of delicious, homemade Buttermilk Fried Chicken together! Happy cooking!
Buttermilk Fried Chicken: The Ultimate Crispy Recipe
Crispy, juicy buttermilk fried chicken with a seasoned crust. Brined for tenderness and soaked in buttermilk for tangy flavor.
Ingredients
- 4 cups cold water
- 1/2 cup kosher salt
- 1/4 cup granulated sugar
- 4 cloves garlic, smashed
- 1 tablespoon black peppercorns, crushed
- 1 teaspoon dried thyme
- 1/2 teaspoon red pepper flakes (optional, for a little heat)
- 4 cups buttermilk
- 2 tablespoons hot sauce (such as Frank’s RedHot)
- 1 teaspoon black pepper
- 1 teaspoon garlic powder
- 1 teaspoon onion powder
- 4 cups all-purpose flour
- 1 cup cornstarch
- 2 tablespoons paprika
- 2 tablespoons garlic powder
- 2 tablespoons onion powder
- 2 tablespoons dried oregano
- 1 tablespoon dried thyme
- 1 tablespoon ground black pepper
- 1 tablespoon kosher salt
- 1 teaspoon cayenne pepper (optional, for extra heat)
- 4-6 cups vegetable oil or peanut oil (for frying)
- 3-4 lbs chicken pieces (bone-in, skin-on thighs, drumsticks, and wings work best)
Instructions
- **Make the Brine:** In a large, non-reactive bowl or container, combine the cold water, salt, sugar, smashed garlic, black peppercorns, dried thyme, and red pepper flakes (if using). Stir until the salt and sugar are completely dissolved.
- **Brine the Chicken:** Add the chicken pieces to the brine, ensuring they are fully submerged. Cover and refrigerate for at least 4 hours, or preferably overnight (up to 12 hours).
- **Prepare the Buttermilk Soak:** In a separate large bowl, whisk together the buttermilk, hot sauce, black pepper, garlic powder, and onion powder.
- **Soak the Chicken:** Remove the chicken pieces from the brine and rinse them thoroughly under cold water. Pat the chicken dry with paper towels. Place the chicken in the buttermilk mixture, ensuring it’s fully submerged. Cover and refrigerate for at least 2 hours, or up to 4 hours.
- **Combine Dry Ingredients (Dredge):** In a large, shallow dish, whisk together the flour, cornstarch, paprika, garlic powder, onion powder, dried oregano, dried thyme, black pepper, salt, and cayenne pepper (if using).
- **Remove Chicken from Buttermilk:** Take the chicken pieces out of the buttermilk, letting any excess drip off.
- **Dredge the Chicken:** Place a few pieces of chicken at a time into the flour mixture. Use your hands to press the flour mixture firmly onto the chicken, making sure it’s completely coated on all sides.
- **Double Dredge (Optional):** For an extra crispy crust, dip the chicken back into the buttermilk mixture (just for a quick dip!), then back into the flour mixture for a second coating. Again, press the flour firmly onto the chicken.
- **Rest the Dredged Chicken:** Place the dredged chicken pieces on a wire rack lined with parchment paper. Let them rest for about 15-20 minutes.
- **Heat the Oil:** Pour the vegetable oil or peanut oil into a large, heavy-bottomed pot or Dutch oven. Heat the oil over medium-high heat to 325-350°F (160-175°C). Use a deep-fry thermometer to monitor the temperature.
- **Fry the Chicken:** Carefully place a few pieces of chicken into the hot oil, making sure not to overcrowd the pot. Fry the chicken for about 6-8 minutes per side, or until it’s golden brown and cooked through. The internal temperature of the chicken should reach 165°F (74°C).
- **Maintain Oil Temperature:** Monitor the oil temperature closely and adjust the heat as needed to maintain a consistent 325-350°F (160-175°C).
- **Remove and Drain:** Once the chicken is cooked through and golden brown, carefully remove it from the oil using tongs or a slotted spoon. Place the fried chicken on a wire rack lined with paper towels to drain excess oil.
- **Repeat:** Repeat the frying process with the remaining chicken pieces, making sure to maintain the oil temperature.
- **Serve:** Let it cool slightly before serving.
Notes
- Don’t brine the chicken for longer than 12 hours, or it can become too salty.
- Rinsing the chicken after brining is important to remove excess salt.
- Cornstarch in the dredge helps create a lighter, crispier crust.
- Letting the dredged chicken rest before frying helps the coating adhere better.
- Use a deep-fry thermometer to monitor the oil temperature.
- Use a meat thermometer to ensure the chicken is cooked through.
- Don’t overcrowd the pot when frying.
- Season generously in the brine, buttermilk soak, and dredge.
Leave a Comment