
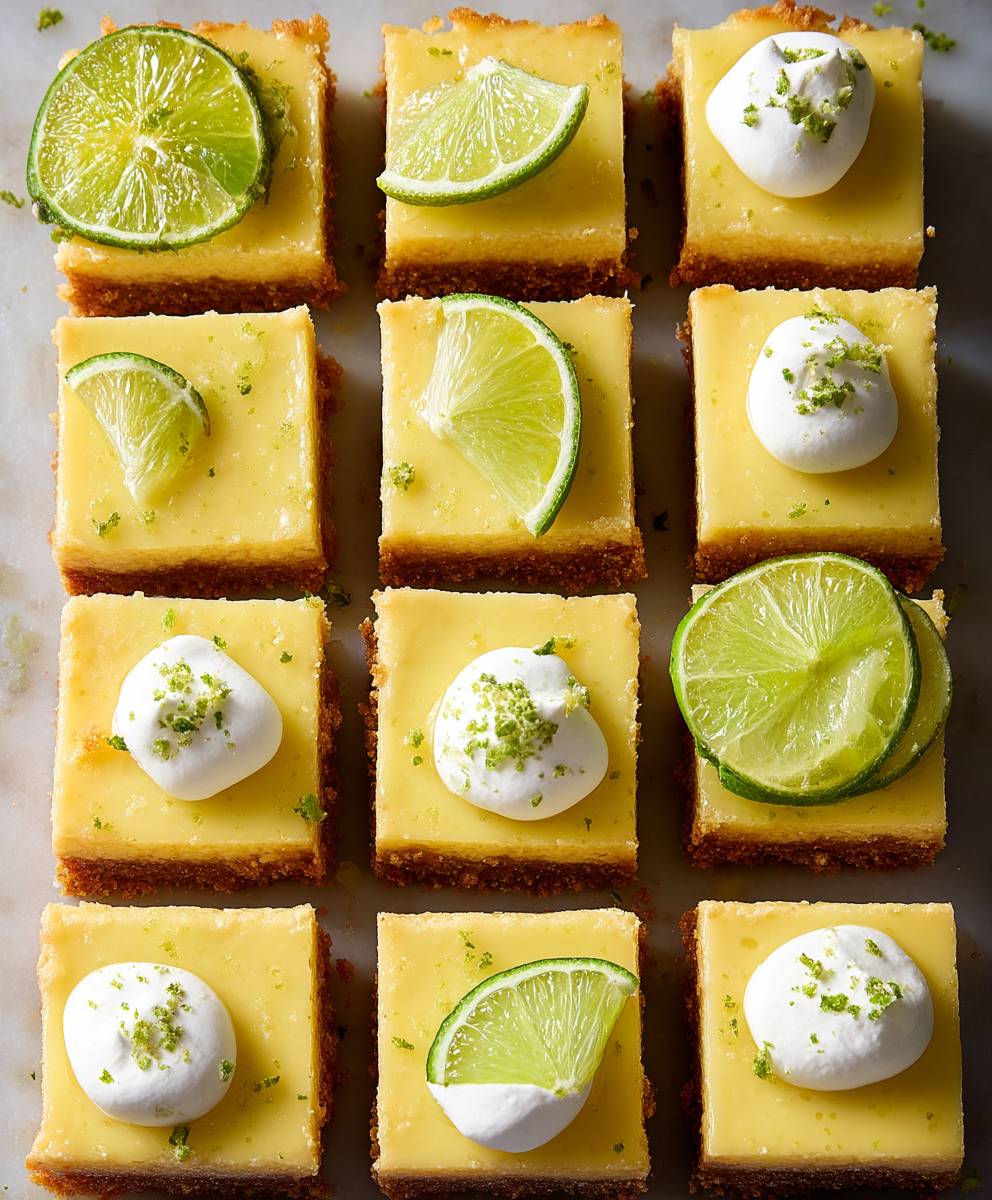
Key Lime Bars: Prepare to be transported to a sun-drenched paradise with every single bite! Imagine a creamy, tangy filling nestled atop a buttery, crumbly crust that’s the magic of these delightful treats. I’m thrilled to share my foolproof recipe for Key Lime Bars, a dessert that’s guaranteed to brighten your day and impress your friends and family.
While the exact origins are debated, Key Lime pie (the bar’s predecessor) is believed to have originated in Key West, Florida, in the late 19th century. The abundance of Key limes, coupled with the availability of sweetened condensed milk (a shelf-stable ingredient perfect for the Florida Keys’ climate), led to the creation of this iconic dessert. Over time, variations emerged, including the convenient and equally delicious Key Lime Bars we’re making today.
What makes these Key Lime Bars so irresistible? It’s the perfect balance of sweet and tart, the smooth, melt-in-your-mouth texture, and the satisfying crunch of the graham cracker crust. Plus, they’re surprisingly easy to make, requiring minimal baking time and simple ingredients. Whether you’re looking for a refreshing summer dessert or a crowd-pleasing treat for any occasion, these bars are sure to be a hit. Get ready to experience a taste of sunshine!

Ingredients:
- For the Crust:
- 1 ½ cups graham cracker crumbs (about 12 full graham crackers)
- ? cup granulated sugar
- 6 tablespoons (3 ounces) unsalted butter, melted
- ¼ teaspoon salt
- For the Filling:
- 1 (14 ounce) can sweetened condensed milk
- ½ cup Key lime juice (freshly squeezed is best! About 15-20 Key limes)
- 2 large egg yolks
- 1 teaspoon Key lime zest
- Optional Topping:
- Whipped cream or meringue
- Key lime slices or zest for garnish
Preparing the Graham Cracker Crust:
- Preheat your oven: I like to start by preheating my oven to 350°F (175°C). This ensures the oven is ready when the crust is prepared.
- Combine dry ingredients: In a medium bowl, whisk together the graham cracker crumbs, granulated sugar, and salt. Make sure everything is evenly distributed. This step is crucial for a uniformly flavored crust.
- Add melted butter: Pour the melted butter into the dry ingredients. Stir until the mixture is evenly moistened and resembles wet sand. Don’t overmix, just ensure all the crumbs are coated with butter.
- Press into the pan: Press the graham cracker mixture firmly and evenly into the bottom of an 8×8 inch baking pan. I find using the bottom of a measuring cup helps to create a smooth and compact crust. Make sure to press firmly into the corners as well.
- Bake the crust: Bake the crust in the preheated oven for 8-10 minutes, or until lightly golden brown. Keep a close eye on it to prevent burning. The baking time can vary slightly depending on your oven.
- Cool the crust: Remove the crust from the oven and let it cool completely while you prepare the filling. This is important because adding the filling to a hot crust can affect its texture.
Making the Key Lime Filling:
- Whisk the egg yolks: In a medium bowl, whisk the egg yolks until they are light and slightly thickened. This helps to incorporate air and create a smoother filling.
- Add sweetened condensed milk: Pour the sweetened condensed milk into the bowl with the egg yolks. Whisk until well combined and smooth. Make sure there are no lumps.
- Incorporate Key lime juice: Gradually add the Key lime juice to the mixture, whisking constantly. The mixture will thicken as the lime juice reacts with the sweetened condensed milk. Don’t add all the juice at once, as this can cause the mixture to curdle.
- Add Key lime zest: Stir in the Key lime zest. This adds a burst of fresh lime flavor and aroma to the filling.
- Check for consistency: The filling should be smooth and slightly thickened. If it appears curdled, don’t worry, it will still bake up nicely.
Baking the Key Lime Bars:
- Pour the filling: Pour the Key lime filling evenly over the cooled graham cracker crust.
- Bake the bars: Bake in the preheated oven for 15-20 minutes, or until the filling is set but still slightly jiggly in the center. The edges should be set and the center should have a slight wobble.
- Cool completely: Remove the bars from the oven and let them cool completely at room temperature. This is crucial for the filling to set properly.
- Chill in the refrigerator: Once cooled, cover the bars with plastic wrap and chill in the refrigerator for at least 2 hours, or preferably overnight. This allows the filling to firm up completely and makes them easier to cut.
Cutting and Serving:
- Cut into bars: Once the bars are thoroughly chilled, cut them into squares or rectangles using a sharp knife. For clean cuts, you can run the knife under hot water and wipe it dry between each cut.
- Optional Topping: Top the bars with whipped cream or meringue, if desired. You can also garnish with Key lime slices or zest for an extra touch of flavor and visual appeal.
- Serve and enjoy: Serve the Key lime bars chilled and enjoy! They are best enjoyed within a few days of baking.
Tips for the Perfect Key Lime Bars:
- Use fresh Key lime juice: While bottled Key lime juice can be used in a pinch, freshly squeezed Key lime juice will give you the best flavor. It’s worth the extra effort!
- Don’t overbake: Overbaking the bars can result in a dry and cracked filling. Bake them just until the filling is set but still slightly jiggly in the center.
- Chill thoroughly: Chilling the bars for at least 2 hours, or preferably overnight, is essential for the filling to set properly and for easy cutting.
- Use a good quality graham cracker: The quality of the graham crackers will affect the taste and texture of the crust. I recommend using a brand that you enjoy.
- Adjust sweetness to taste: If you prefer a less sweet filling, you can reduce the amount of sweetened condensed milk slightly.
- Add a pinch of salt to the filling: A pinch of salt in the filling can help to balance the sweetness and enhance the lime flavor.
- For a smoother crust: Pulse the graham crackers in a food processor until they are finely ground. This will result in a smoother and more even crust.
- Prevent a soggy crust: Baking the crust before adding the filling helps to prevent it from becoming soggy.
- Store properly: Store leftover Key lime bars in an airtight container in the refrigerator for up to 3 days.
- Variations: You can add a layer of cream cheese to the filling for a richer and creamier texture. You can also add a sprinkle of toasted coconut to the crust for a tropical twist.
Troubleshooting:
- Crust is too crumbly: If your crust is too crumbly, you may not have used enough butter. Add a tablespoon or two more of melted butter until the mixture holds together when pressed.
- Filling is curdled: If your filling appears curdled, it may be due to adding the lime juice too quickly. Add the lime juice gradually, whisking constantly.
- Bars are too tart: If your bars are too tart, you can add a tablespoon or two of granulated sugar to the filling.
- Bars are too sweet: If your bars are too sweet, you can reduce the amount of sweetened condensed milk slightly.
- Bars are not setting: If your bars are not setting, you may need to bake them for a few more minutes. Make sure the filling is set but still slightly jiggly in the center.
Key Lime vs. Lime:
You might be wondering, what’s the big deal about Key limes anyway? Can’t I just use regular limes? Well, while you *can* use regular limes, Key limes have a distinct flavor that’s more floral and aromatic, and less acidic than regular limes. They’re also smaller and have more seeds, which can make juicing them a bit of a pain, but trust me, the flavor is worth it! If you absolutely can’t find Key limes, you can substitute with regular lime juice, but be prepared for a slightly different taste.
Why This Recipe Works:
This recipe is a classic for a reason. The combination of the buttery graham cracker crust, the tangy Key lime filling, and the optional whipped cream topping is simply irresistible. The sweetened condensed milk provides the perfect amount of sweetness and creaminess, while the Key lime juice adds a refreshing tartness. The baking process is simple and straightforward, and the results are always delicious. Plus, these bars are perfect for any occasion, from a casual get-together to a fancy dinner party.
Make Ahead Tips:
These Key lime bars are a great make-ahead dessert. You can prepare the crust and filling up to 2 days in advance and store them separately in the refrigerator. When you’re ready to bake, simply pour the filling over the crust and bake as directed. You can also bake the bars completely and store them in the refrigerator for up to 3 days. Just be sure to cover them tightly with plastic wrap to prevent them from drying out.
Serving Suggestions:
These Key lime bars are delicious on their own, but they’re even better with a few simple accompaniments. Here are a few serving suggestions
Conclusion:
And there you have it! These Key Lime Bars are truly a slice of sunshine on a plate, and I wholeheartedly believe they deserve a spot in your regular baking rotation. From the tangy, vibrant filling to the buttery, crumbly crust, every element works in perfect harmony to create a dessert that’s both refreshing and deeply satisfying. I know I’m biased, but I genuinely think this is the best Key Lime Bars recipe you’ll find.
But why are these bars a must-try? It’s simple: they’re incredibly easy to make, even for novice bakers. The ingredients are readily available, and the steps are straightforward. Plus, the bright, citrusy flavor is a welcome change from heavier, more decadent desserts. They’re perfect for potlucks, picnics, or simply enjoying on a warm afternoon with a cup of coffee or tea. Honestly, they’re a guaranteed crowd-pleaser!
Looking for serving suggestions? I love to dust them with a light coating of powdered sugar just before serving for an extra touch of sweetness and elegance. A dollop of freshly whipped cream or a scoop of vanilla ice cream also complements the tartness of the lime beautifully. For a truly decadent experience, try drizzling them with a homemade raspberry sauce. The combination of tart lime and sweet raspberry is simply divine.
And don’t be afraid to experiment with variations! If you’re feeling adventurous, try adding a pinch of cardamom or ginger to the crust for a warm, spicy twist. You could also substitute the traditional graham cracker crust with a shortbread crust for a richer, more buttery flavor. For a vegan version, use a vegan butter substitute and a flax egg in the crust, and replace the condensed milk in the filling with a vegan condensed milk alternative. The possibilities are endless!
Serving Suggestions:
- Dust with powdered sugar.
- Top with whipped cream or vanilla ice cream.
- Drizzle with raspberry sauce.
Variations:
- Add cardamom or ginger to the crust.
- Use a shortbread crust.
- Make it vegan!
I’m so excited for you to try this recipe and experience the joy of homemade Key Lime Bars for yourself. I’ve poured my heart and soul into perfecting this recipe, and I truly believe you’ll love it as much as I do.
So, what are you waiting for? Gather your ingredients, preheat your oven, and get ready to bake up a batch of these irresistible treats. And most importantly, don’t forget to share your creations with me! I’d love to see your photos and hear about your experiences. Tag me on social media using #MyKeyLimeBars or leave a comment below to let me know how they turned out. I can’t wait to hear from you! Happy baking! I am confident that you will find this recipe for Key Lime Bars to be a new favorite.
Key Lime Bars: The Ultimate Guide to Baking Perfection
Tangy and refreshing Key lime bars with a buttery graham cracker crust. A perfect balance of sweet and tart, these bars are easy to make and a crowd-pleaser.
Ingredients
- 1 ½ cups graham cracker crumbs (about 12 full graham crackers)
- ? cup granulated sugar
- 6 tablespoons (3 ounces) unsalted butter, melted
- ¼ teaspoon salt
- 1 (14 ounce) can sweetened condensed milk
- ½ cup Key lime juice (freshly squeezed is best! About 15-20 Key limes)
- 2 large egg yolks
- 1 teaspoon Key lime zest
- Whipped cream or meringue
- Key lime slices or zest for garnish
Instructions
- Preheat your oven: Preheat your oven to 350°F (175°C).
- Combine dry ingredients: In a medium bowl, whisk together the graham cracker crumbs, granulated sugar, and salt.
- Add melted butter: Pour the melted butter into the dry ingredients. Stir until the mixture is evenly moistened and resembles wet sand.
- Press into the pan: Press the graham cracker mixture firmly and evenly into the bottom of an 8×8 inch baking pan.
- Bake the crust: Bake the crust in the preheated oven for 8-10 minutes, or until lightly golden brown.
- Cool the crust: Remove the crust from the oven and let it cool completely while you prepare the filling.
- Whisk the egg yolks: In a medium bowl, whisk the egg yolks until they are light and slightly thickened.
- Add sweetened condensed milk: Pour the sweetened condensed milk into the bowl with the egg yolks. Whisk until well combined and smooth.
- Incorporate Key lime juice: Gradually add the Key lime juice to the mixture, whisking constantly. The mixture will thicken as the lime juice reacts with the sweetened condensed milk.
- Add Key lime zest: Stir in the Key lime zest.
- Check for consistency: The filling should be smooth and slightly thickened.
- Pour the filling: Pour the Key lime filling evenly over the cooled graham cracker crust.
- Bake the bars: Bake in the preheated oven for 15-20 minutes, or until the filling is set but still slightly jiggly in the center.
- Cool completely: Remove the bars from the oven and let them cool completely at room temperature.
- Chill in the refrigerator: Once cooled, cover the bars with plastic wrap and chill in the refrigerator for at least 2 hours, or preferably overnight.
- Cut into bars: Once the bars are thoroughly chilled, cut them into squares or rectangles using a sharp knife.
- Optional Topping: Top the bars with whipped cream or meringue, if desired. You can also garnish with Key lime slices or zest.
- Serve and enjoy: Serve the Key lime bars chilled and enjoy!
Notes
- Use fresh Key lime juice for the best flavor.
- Don’t overbake the bars.
- Chill thoroughly for easy cutting.
- Store leftover bars in an airtight container in the refrigerator for up to 3 days.

Leave a Comment