
Decorated chaos cakes are the dessert trend that’s taking the internet by storm, and for good reason! Forget perfectly smooth frosting and meticulously placed decorations. We’re embracing the beauty of imperfection with these delightfully whimsical and surprisingly easy-to-create cakes. Have you ever felt intimidated by the pressure to create a flawless cake? Well, those days are over!
While the exact origins of the “chaos cake” are a bit murky, the spirit of playful, unfussy baking has always been present in home kitchens. Think of it as the rebellious cousin of the meticulously crafted wedding cake. It’s a celebration of creativity and a reminder that baking should be fun, not stressful. This style draws inspiration from abstract art and the “perfectly imperfect” aesthetic that’s so popular right now.
What makes decorated chaos cakes so appealing? It’s a combination of factors. First, they’re incredibly forgiving. A smudge here, a drip there it all adds to the charm! Second, they’re a fantastic way to express your personality. You can use any colors, sprinkles, and candies you like. Finally, and perhaps most importantly, they taste amazing! Because you’re focusing less on perfect aesthetics, you can dedicate more time to creating a delicious cake base and flavorful frosting. So, ditch the stress and embrace the chaos! Let’s get baking!

Ingredients:
- For the Cake:
- 3 cups all-purpose flour
- 1 tablespoon baking powder
- 1 teaspoon baking soda
- 1 teaspoon salt
- 1 cup (2 sticks) unsalted butter, softened
- 2 cups granulated sugar
- 4 large eggs
- 1 teaspoon vanilla extract
- 1 1/2 cups buttermilk
- For the Buttercream Frosting:
- 1 cup (2 sticks) unsalted butter, softened
- 4 cups powdered sugar
- 1/2 cup heavy cream
- 2 teaspoons vanilla extract
- Pinch of salt
- For the Chocolate Ganache Drip:
- 8 ounces semi-sweet chocolate, finely chopped
- 1/2 cup heavy cream
- For the Decorations (Get Creative!):
- Assorted candies (M&Ms, Skittles, gummy bears, etc.)
- Sprinkles (various colors and shapes)
- Chocolate shavings
- Mini marshmallows
- Pretzels (broken into pieces)
- Cookies (crushed or whole)
- Fresh berries (strawberries, raspberries, blueberries)
- Edible glitter
- Wafer cookies
- Lollipops
Preparing the Cake Layers:
- Preheat and Prepare: First things first, preheat your oven to 350°F (175°C). Grease and flour two 9-inch round cake pans. You can also line the bottoms with parchment paper for extra insurance against sticking. I always do this, just to be safe!
- Dry Ingredients: In a large bowl, whisk together the flour, baking powder, baking soda, and salt. Whisking ensures everything is evenly distributed, which is key for a good rise.
- Cream Butter and Sugar: In a separate large bowl (or the bowl of your stand mixer), cream together the softened butter and granulated sugar until light and fluffy. This usually takes about 3-5 minutes. Don’t rush this step; it’s important for incorporating air into the batter.
- Add Eggs: Beat in the eggs one at a time, making sure each egg is fully incorporated before adding the next. Then, stir in the vanilla extract.
- Alternate Wet and Dry: Gradually add the dry ingredients to the wet ingredients, alternating with the buttermilk. Begin and end with the dry ingredients. So, add about a third of the dry ingredients, then half of the buttermilk, then another third of the dry ingredients, the remaining buttermilk, and finally the last of the dry ingredients. Mix until just combined. Be careful not to overmix, as this can lead to a tough cake.
- Divide and Bake: Divide the batter evenly between the prepared cake pans. Bake for 30-35 minutes, or until a toothpick inserted into the center comes out clean.
- Cool Completely: Let the cakes cool in the pans for 10 minutes before inverting them onto a wire rack to cool completely. This is crucial! Trying to frost a warm cake is a recipe for disaster (pun intended!).
Making the Buttercream Frosting:
- Cream the Butter: In a large bowl (or the bowl of your stand mixer), beat the softened butter until smooth and creamy. This usually takes about 2-3 minutes.
- Add Powdered Sugar: Gradually add the powdered sugar, one cup at a time, beating well after each addition. Start on low speed to prevent a powdered sugar cloud!
- Add Wet Ingredients: Add the heavy cream, vanilla extract, and salt. Beat until the frosting is light and fluffy. You may need to add a little more heavy cream if the frosting is too thick, or a little more powdered sugar if it’s too thin.
- Adjust Consistency: The consistency should be smooth and spreadable. If you want a stiffer frosting for piping, use less heavy cream. If you want a thinner frosting for a smoother finish, use more heavy cream.
Preparing the Chocolate Ganache Drip:
- Heat the Cream: Place the finely chopped chocolate in a heatproof bowl. In a small saucepan, heat the heavy cream over medium heat until it just begins to simmer. Do not boil!
- Pour Over Chocolate: Pour the hot cream over the chocolate. Let it sit for 1 minute to allow the heat to melt the chocolate.
- Stir Until Smooth: Gently stir the mixture until the chocolate is completely melted and the ganache is smooth and glossy. If there are any unmelted chocolate pieces, you can microwave the mixture in 15-second intervals, stirring in between, until smooth.
- Cool Slightly: Let the ganache cool slightly before using it to drip down the sides of the cake. If it’s too hot, it will be too runny. If it’s too cold, it will be too thick. You want it to be a pourable consistency.
Assembling and Decorating the Chaos Cake:
- Level the Cakes (Optional): If your cake layers are uneven, use a serrated knife to level them. This will help create a more stable and visually appealing cake.
- Frost the First Layer: Place one cake layer on a serving plate or cake stand. Spread a generous layer of buttercream frosting evenly over the top.
- Add the Second Layer: Carefully place the second cake layer on top of the frosting.
- Crumb Coat: Apply a thin layer of buttercream frosting over the entire cake. This is called a crumb coat, and it helps to seal in any loose crumbs. Refrigerate the cake for 15-20 minutes to allow the crumb coat to set.
- Final Frosting: Apply a final, thicker layer of buttercream frosting over the entire cake, smoothing it out as much as possible. Don’t worry about perfection; this is a chaos cake, after all!
- Drip the Ganache: Pour the slightly cooled chocolate ganache around the edges of the cake, allowing it to drip down the sides. You can use a spoon or a piping bag to control the drips.
- Decorate with Abandon: This is where the fun begins! Now, unleash your inner child and decorate the cake with all the candies, sprinkles, chocolate shavings, marshmallows, pretzels, cookies, berries, and edible glitter you can find. There are no rules here! Just pile it on and have fun.
- Arrange Decorations: Start by placing larger items like cookies, lollipops, or wafer cookies strategically around the cake. Then, fill in the gaps with smaller candies, sprinkles, and chocolate shavings.
- Add Texture: Use different textures to create visual interest. For example, you can use crushed cookies for a sandy effect, or mini marshmallows for a fluffy effect.
- Fresh Elements: If using fresh berries, arrange them artfully on top of the cake. They add a pop of color and freshness.
- Edible Glitter: Sprinkle edible glitter over the cake for a touch of sparkle.
- Refrigerate (Optional): Refrigerate the cake for at least 30 minutes before serving to allow the frosting and ganache to set. This will also make it easier to slice.
- Serve and Enjoy: Slice the cake and serve. Prepare for a sugar rush! This cake is guaranteed to bring a smile to everyone’s face.
Tips and Tricks for the Perfect Chaos Cake:
- Don’t be afraid to get messy! The whole point of a chaos cake is that it’s not perfect. Embrace the mess and have fun with it.
- Use a variety of decorations. The more variety, the better!
- Consider a theme. If you’re making the cake for a specific occasion, you can choose decorations that match the theme. For example, for a birthday party, you could use birthday-themed candies and sprinkles.
- Get the kids involved! This is a great activity to do with kids. They’ll love decorating the cake with all their favorite candies.
- Make it ahead of time. You can bake the cake layers and make the frosting and ganache a day or two in advance. Just store them separately in the refrigerator until you’re ready to assemble the cake.
- Store leftovers in the refrigerator. The cake will keep in the refrigerator for up to 3 days.
- Experiment with different flavors. You can use different flavors of cake, frosting, and
Conclusion:
So there you have it! This recipe for Decorated Chaos Cakes is more than just a dessert; it’s an invitation to embrace imperfection and unleash your inner artist. I truly believe this is a must-try recipe for anyone looking to add a little fun and whimsy to their baking repertoire. It’s incredibly forgiving, surprisingly delicious, and guaranteed to be a conversation starter. Forget striving for picture-perfect pastries; these cakes celebrate the beauty of the unexpected, the joy of experimentation, and the sheer delight of creating something unique.
Why is it a must-try? Because it’s liberating! In a world obsessed with flawless presentation, these cakes offer a refreshing escape. They’re a reminder that baking should be enjoyable, not stressful. Plus, the flavor combination is simply divine. The moist cake base, coupled with the creamy frosting and the explosion of colorful decorations, creates a symphony of textures and tastes that will tantalize your taste buds.
But the best part? The possibilities are endless! Feel free to experiment with different cake flavors. Chocolate, vanilla, lemon, or even a spiced cake would work beautifully. And when it comes to frosting, don’t be afraid to get creative. Try a tangy cream cheese frosting, a rich chocolate ganache, or even a simple buttercream tinted with your favorite colors.
Serving Suggestions and Variations:
* Mini Chaos Cakes: Bake the batter in muffin tins for adorable individual servings. Perfect for parties or lunchbox treats!
* Themed Chaos Cakes: Tailor the decorations to a specific theme, like birthdays, holidays, or even your favorite sports team.
* Adult Chaos Cakes: Add a splash of liqueur to the frosting or cake batter for a sophisticated twist.
* Ice Cream Chaos Cake: Serve a slice of warm cake with a scoop of your favorite ice cream for an extra indulgent dessert.
* Chaos Cake Parfaits: Crumble the cake and layer it with frosting, berries, and whipped cream in a glass for a delightful parfait.
* Gluten-Free Chaos Cakes: Substitute the all-purpose flour with a gluten-free blend to accommodate dietary restrictions.Don’t limit yourself to the decorations I’ve suggested. Raid your pantry and get creative! Sprinkles, candies, chocolate shavings, edible glitter, fresh fruit the sky’s the limit. The more chaotic, the better! Remember, there are no rules when it comes to decorated chaos cakes.
I’m so excited for you to try this recipe and experience the joy of creating your own unique masterpiece. I promise, it’s a baking adventure you won’t soon forget. It’s a fantastic way to get kids involved in the kitchen, too, as they’ll absolutely love decorating these whimsical cakes.
So, what are you waiting for? Gather your ingredients, preheat your oven, and prepare to embrace the chaos! I can’t wait to see what you create.
And please, don’t be shy! Share your creations with me. Post pictures of your decorated chaos cakes on social media and tag me. I’d love to see your interpretations and hear about your experience. Let’s spread the joy of imperfect baking together! Happy baking, and remember, embrace the mess! I am confident that you will love this recipe and it will become a staple in your baking rotation. Let me know what you think!
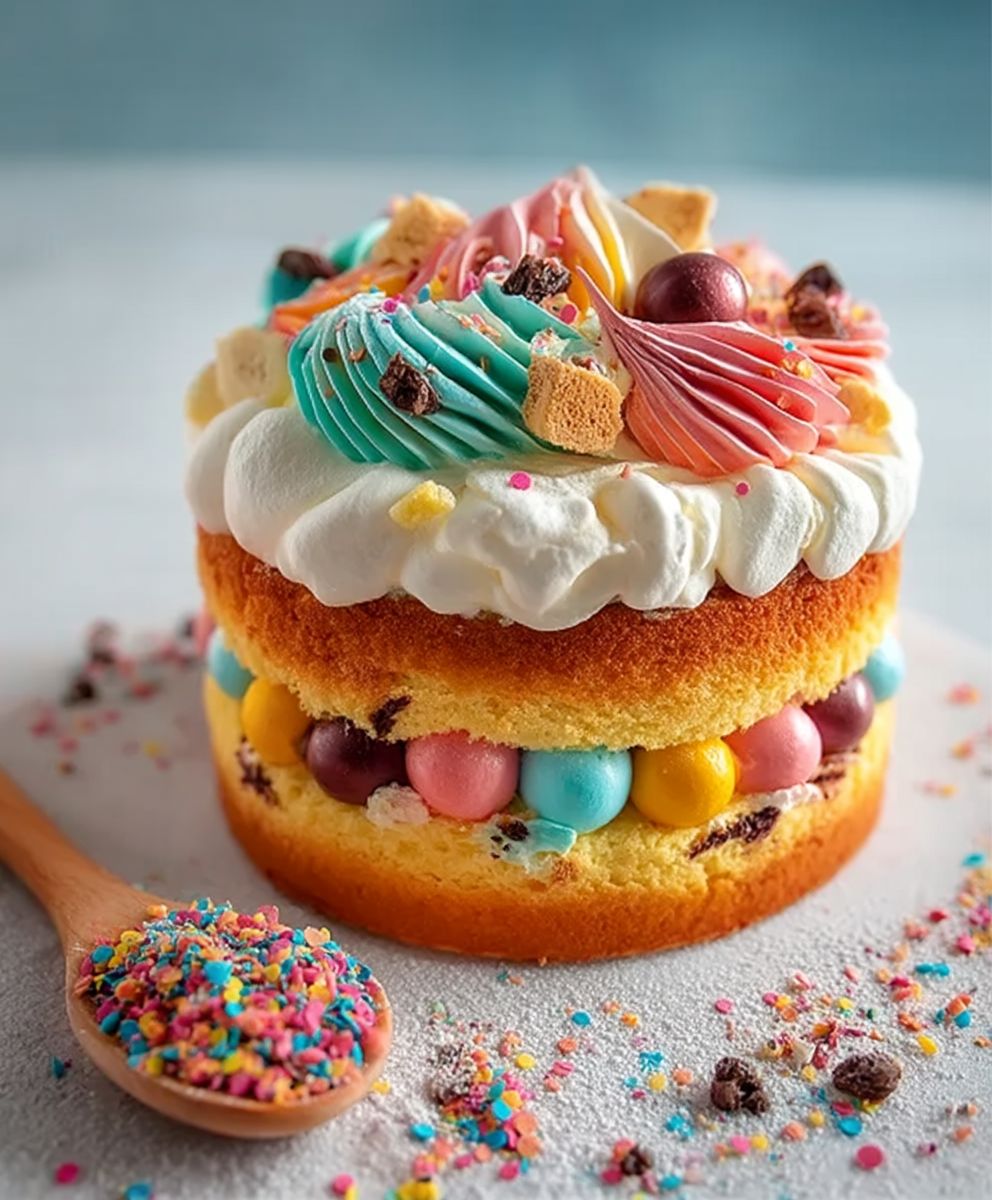
Decorated Chaos Cakes: How to Make Stunningly Messy Cakes
Layers of moist cake, creamy buttercream, chocolate ganache drip, and a mountain of candies and sprinkles. A fun, customizable masterpiece!
Ingredients
- 3 cups all-purpose flour
- 1 tablespoon baking powder
- 1 teaspoon baking soda
- 1 teaspoon salt
- 1 cup (2 sticks) unsalted butter, softened
- 2 cups granulated sugar
- 4 large eggs
- 1 teaspoon vanilla extract
- 1 1/2 cups buttermilk
- 1 cup (2 sticks) unsalted butter, softened
- 4 cups powdered sugar
- 1/2 cup heavy cream
- 2 teaspoons vanilla extract
- Pinch of salt
- 8 ounces semi-sweet chocolate, finely chopped
- 1/2 cup heavy cream
- Assorted candies (M&Ms, Skittles, gummy bears, etc.)
- Sprinkles (various colors and shapes)
- Chocolate shavings
- Mini marshmallows
- Pretzels (broken into pieces)
- Cookies (crushed or whole)
- Fresh berries (strawberries, raspberries, blueberries)
- Edible glitter
- Wafer cookies
- Lollipops
Instructions
- Preheat your oven to 350°F (175°C). Grease and flour two 9-inch round cake pans. Line the bottoms with parchment paper.
- In a large bowl, whisk together the flour, baking powder, baking soda, and salt.
- In a separate large bowl (or the bowl of your stand mixer), cream together the softened butter and granulated sugar until light and fluffy (3-5 minutes).
- Beat in the eggs one at a time, making sure each egg is fully incorporated before adding the next. Then, stir in the vanilla extract.
- Gradually add the dry ingredients to the wet ingredients, alternating with the buttermilk. Begin and end with the dry ingredients. Mix until just combined. Be careful not to overmix.
- Divide the batter evenly between the prepared cake pans. Bake for 30-35 minutes, or until a toothpick inserted into the center comes out clean.
- Let the cakes cool in the pans for 10 minutes before inverting them onto a wire rack to cool completely.
- In a large bowl (or the bowl of your stand mixer), beat the softened butter until smooth and creamy (2-3 minutes).
- Gradually add the powdered sugar, one cup at a time, beating well after each addition. Start on low speed.
- Add the heavy cream, vanilla extract, and salt. Beat until the frosting is light and fluffy. Adjust consistency with more cream or powdered sugar as needed.
- The consistency should be smooth and spreadable. If you want a stiffer frosting for piping, use less heavy cream. If you want a thinner frosting for a smoother finish, use more heavy cream.
- Place the finely chopped chocolate in a heatproof bowl. In a small saucepan, heat the heavy cream over medium heat until it just begins to simmer. Do not boil!
- Pour the hot cream over the chocolate. Let it sit for 1 minute to allow the heat to melt the chocolate.
- Gently stir the mixture until the chocolate is completely melted and the ganache is smooth and glossy. Microwave in 15-second intervals if needed.
- Let the ganache cool slightly before using it to drip down the sides of the cake.
- If your cake layers are uneven, use a serrated knife to level them.
- Place one cake layer on a serving plate or cake stand. Spread a generous layer of buttercream frosting evenly over the top.
- Carefully place the second cake layer on top of the frosting.
- Apply a thin layer of buttercream frosting over the entire cake. Refrigerate the cake for 15-20 minutes to allow the crumb coat to set.
- Apply a final, thicker layer of buttercream frosting over the entire cake, smoothing it out as much as possible.
- Pour the slightly cooled chocolate ganache around the edges of the cake, allowing it to drip down the sides.
- Decorate the cake with all the candies, sprinkles, chocolate shavings, marshmallows, pretzels, cookies, berries, and edible glitter you can find.
- Start by placing larger items like cookies, lollipops, or wafer cookies strategically around the cake. Then, fill in the gaps with smaller candies, sprinkles, and chocolate shavings.
- Use different textures to create visual interest. For example, you can use crushed cookies for a sandy effect, or mini marshmallows for a fluffy effect.
- If using fresh berries, arrange them artfully on top of the cake. They add a pop of color and freshness.
- Sprinkle edible glitter over the cake for a touch of sparkle.
- Refrigerate the cake for at least 30 minutes before serving to allow the frosting and ganache to set. This will also make it easier to slice.
- Slice the cake and serve.
Notes
- Don’t be afraid to get messy! The whole point of a chaos cake is that it’s not perfect. Embrace the mess and have fun with it.
- Use a variety of decorations. The more variety, the better!
- Consider a theme. If you’re making the cake for a specific occasion, you can choose decorations that match the theme. For example, for a birthday party, you could use birthday-themed candies and sprinkles.
- Get the kids involved! This is a great activity to do with kids. They’ll love decorating the cake with all their favorite candies.
- Make it ahead of time. You can bake the cake layers and make the frosting and ganache a day or two in advance. Just store them separately in the refrigerator until you’re ready to assemble the cake.
- Store leftovers in the refrigerator. The cake will keep in the refrigerator for up to 3 days.
- Experiment with different flavors. You can use different flavors of cake, frosting, and ganache to create your own unique chaos cake.

Leave a Comment