
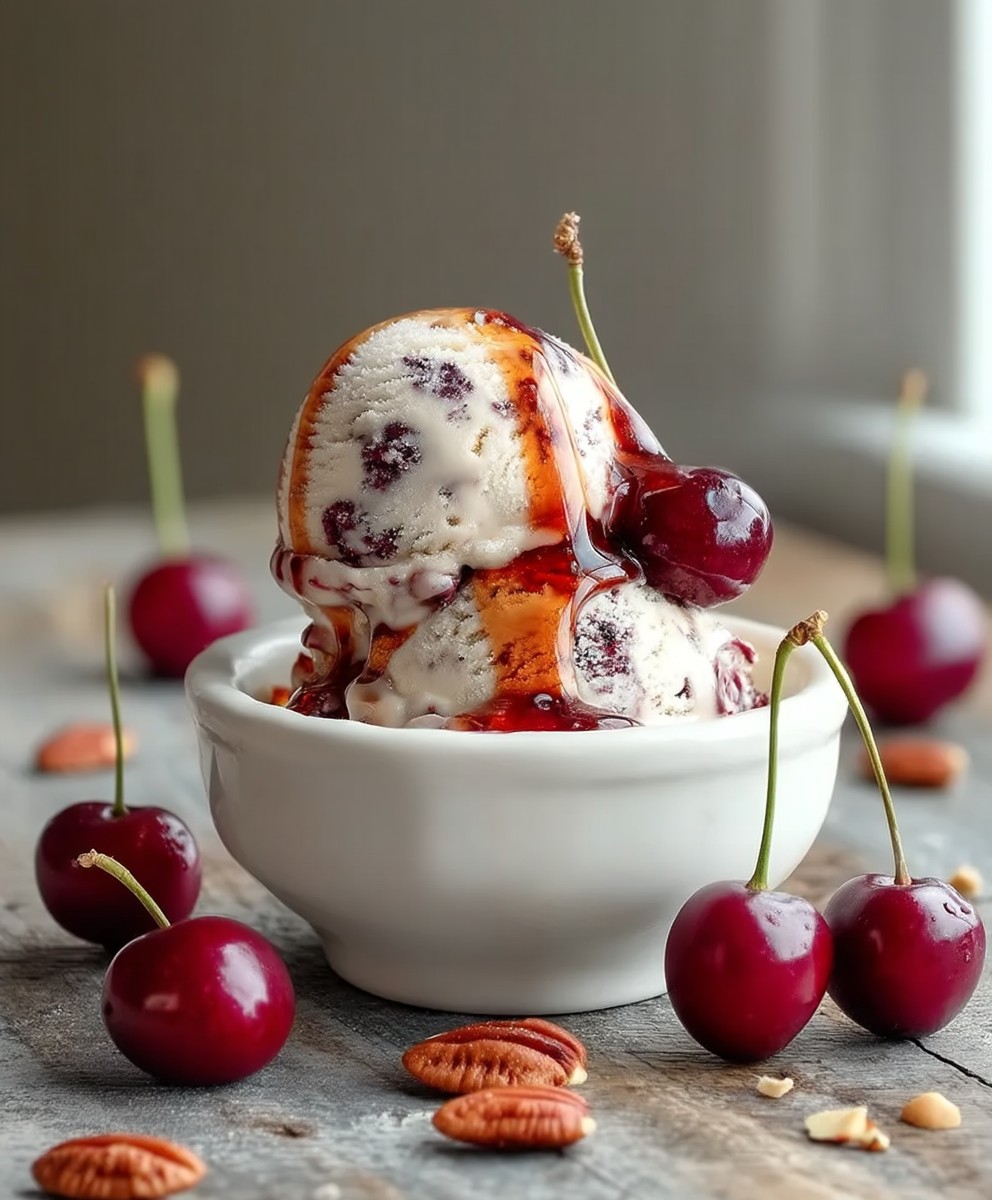
Tart Cherry Nut Ice Cream: Prepare to embark on a frozen adventure that will tantalize your taste buds and leave you craving more! Imagine the perfect marriage of sweet and tart, creamy and crunchy that’s precisely what awaits you with this delightful homemade ice cream. Forget the store-bought versions; we’re diving headfirst into a world of fresh, vibrant flavors that you can create right in your own kitchen.
While the exact origins of combining cherries and nuts in desserts are somewhat shrouded in culinary history, the pairing itself is a classic. Cherries, with their bright, slightly acidic notes, have long been a favorite in pies, jams, and other sweet treats. Nuts, on the other hand, provide a satisfying textural contrast and a subtle earthy flavor that complements the fruit beautifully. This combination has been enjoyed across cultures for generations, often appearing in festive desserts and celebratory meals.
What makes Tart Cherry Nut Ice Cream so irresistible? It’s the symphony of sensations! The initial burst of tart cherry flavor awakens your palate, followed by the rich, creamy texture of the ice cream. Then comes the delightful crunch of the nuts, adding another layer of complexity. It’s a truly satisfying experience. Plus, making your own ice cream allows you to control the ingredients, ensuring a fresh, high-quality treat free from artificial flavors and preservatives. It’s the perfect dessert for a hot summer day or any time you’re craving a little bit of indulgence.

Ingredients:
- 1 1/2 cups heavy cream
- 1 1/2 cups whole milk
- 3/4 cup granulated sugar
- 1/4 teaspoon salt
- 1 vanilla bean, split lengthwise and seeds scraped (or 1 teaspoon vanilla extract)
- 1 cup pitted tart cherries, fresh or frozen (if frozen, thaw slightly)
- 1/4 cup Kirsch (cherry liqueur), optional
- 1/2 cup chopped walnuts, toasted
- 1/4 cup chopped pecans, toasted
Preparing the Cherry Base:
Okay, let’s get started! The first thing we’re going to do is create a fantastic cherry base that will give our ice cream that signature tart and fruity flavor. This step is crucial, so pay close attention to the details.
- Prepare the Cherries: If you’re using fresh tart cherries, make sure they are thoroughly washed and pitted. Pitting cherries can be a bit tedious, but it’s absolutely worth it for the final result. If you’re using frozen cherries, let them thaw slightly, but not completely. You want them to still be a little icy. This will help prevent them from becoming too mushy during the cooking process.
- Combine Cherries and Kirsch (Optional): In a medium saucepan, combine the pitted tart cherries and Kirsch (if using). The Kirsch adds a lovely depth of flavor that complements the tartness of the cherries beautifully. If you prefer not to use alcohol, you can skip this step and simply add a tablespoon of lemon juice to enhance the cherry flavor.
- Cook the Cherry Mixture: Place the saucepan over medium heat and bring the cherry mixture to a simmer. Cook for about 8-10 minutes, or until the cherries have softened and released their juices. Stir occasionally to prevent sticking. You’ll notice the mixture thickening slightly as it cooks.
- Puree the Cherry Mixture: Remove the saucepan from the heat and let the cherry mixture cool slightly. Once it’s cool enough to handle, transfer it to a blender or food processor. Puree until smooth. If you prefer a slightly chunkier ice cream, you can leave a few small pieces of cherry intact.
- Strain the Cherry Puree (Optional): For an ultra-smooth ice cream, you can strain the cherry puree through a fine-mesh sieve. This will remove any remaining cherry skins or seeds. However, this step is optional, and you can skip it if you don’t mind a little texture in your ice cream.
- Chill the Cherry Base: Transfer the cherry puree to an airtight container and refrigerate for at least 2 hours, or preferably overnight. This allows the flavors to meld together and the mixture to cool completely, which is essential for proper ice cream churning.
Preparing the Custard Base:
Now that our cherry base is chilling, let’s move on to the custard base. This is the foundation of our ice cream, and it’s what gives it that rich, creamy texture. Don’t be intimidated by the term “custard” it’s actually quite simple to make!
- Combine Cream, Milk, Sugar, and Salt: In a medium saucepan, combine the heavy cream, whole milk, granulated sugar, and salt. The salt might seem like a strange ingredient, but it actually enhances the sweetness and other flavors in the ice cream.
- Add Vanilla: Split the vanilla bean lengthwise and scrape out the seeds. Add the vanilla seeds and the pod to the saucepan. If you don’t have a vanilla bean, you can use 1 teaspoon of vanilla extract instead. Add the extract after the mixture has cooled slightly.
- Heat the Mixture: Place the saucepan over medium heat and stir constantly until the sugar is completely dissolved. Be careful not to let the mixture boil. We just want it to be heated through and the sugar to be dissolved.
- Infuse the Vanilla Flavor: Once the sugar is dissolved, remove the saucepan from the heat, cover it, and let it steep for 30 minutes. This allows the vanilla flavor to infuse into the cream and milk. If you’re using vanilla extract, skip this step.
- Remove the Vanilla Bean (If Used): After 30 minutes, remove the vanilla bean from the saucepan. Scrape any remaining vanilla seeds from the pod back into the mixture.
- Chill the Custard Base: Transfer the custard base to an airtight container and refrigerate for at least 4 hours, or preferably overnight. This is crucial for proper ice cream churning. The colder the base, the smoother and creamier the ice cream will be.
Churning and Assembling the Ice Cream:
We’re almost there! Now comes the fun part churning the ice cream and adding our toasted nuts. This is where all our hard work pays off!
- Prepare Your Ice Cream Maker: Follow the manufacturer’s instructions for your ice cream maker. Most ice cream makers require you to freeze the bowl for at least 24 hours before use. Make sure your bowl is completely frozen before you start churning.
- Combine the Cherry Base and Custard Base: Remove the cherry base and custard base from the refrigerator. Pour the cherry base into the custard base and stir to combine.
- Churn the Ice Cream: Pour the combined mixture into your ice cream maker and churn according to the manufacturer’s instructions. This usually takes about 20-30 minutes. The ice cream is ready when it has a soft-serve consistency.
- Add the Toasted Nuts: While the ice cream is churning, prepare your toasted nuts. I like to use a combination of walnuts and pecans, but you can use any nuts you prefer. Toast the nuts in a dry skillet over medium heat until they are fragrant and lightly browned. Be careful not to burn them! Let the nuts cool slightly and then chop them into small pieces.
- Fold in the Nuts: Once the ice cream has reached a soft-serve consistency, add the toasted nuts to the ice cream maker and churn for another minute or two to distribute them evenly.
- Harden the Ice Cream: Transfer the ice cream to an airtight container and freeze for at least 2-3 hours, or preferably overnight, to harden. This will give it a more scoopable consistency.
Serving and Storage:
Finally, it’s time to enjoy our homemade Tart Cherry Nut Ice Cream! Here are a few tips for serving and storing your delicious creation.
- Scooping the Ice Cream: Let the ice cream sit at room temperature for a few minutes before scooping to soften it slightly. This will make it easier to scoop and will also enhance the flavors.
- Serving Suggestions: Serve the ice cream in bowls or cones. You can also top it with extra toasted nuts, whipped cream, or a drizzle of cherry syrup.
- Storage: Store the ice cream in an airtight container in the freezer for up to 2 weeks. After that, it may start to develop ice crystals and lose its creamy texture.
Tips and Variations:
- Adjusting Sweetness: If you prefer a less sweet ice cream, you can reduce the amount of sugar in the custard base. Start with 1/2 cup of sugar and adjust to taste.
- Adding Other Fruits: You can also add other fruits to the ice cream, such as raspberries, blueberries, or blackberries. Add the fruits along with the tart cherries in the cherry base.
- Using Different Nuts: Feel free to experiment with different types of nuts, such as almonds, pistachios, or macadamia nuts.
- Making it Vegan: To make this ice cream vegan, you can substitute the heavy cream and whole milk with coconut cream and almond milk. You will also need to use a vegan sugar substitute.
- Adding Chocolate: For a chocolatey twist, add 1/4 cup of cocoa powder to the custard base.
Enjoy!
I hope you enjoy this recipe for Tart Cherry Nut Ice Cream as much as I do! It’s a perfect treat for a hot summer day or any time you’re craving something sweet and refreshing. Don’t be afraid to experiment with different flavors and ingredients to create your own unique version of this classic dessert. Happy ice cream making!
Conclusion:
This Tart Cherry Nut Ice Cream isn’t just another frozen dessert; it’s a symphony of flavors and textures that will tantalize your taste buds and leave you craving more. The bright, tangy cherries perfectly complement the rich, creamy base, while the crunchy nuts provide a delightful contrast that elevates the entire experience. Trust me, once you’ve tasted this homemade ice cream, you’ll never want to go back to store-bought again!
Why is this recipe a must-try? Because it’s incredibly easy to make, even if you’ve never made ice cream before. The ingredients are simple and readily available, and the process is straightforward. Plus, the satisfaction of creating something so delicious from scratch is truly rewarding. But beyond the ease of preparation, it’s the unparalleled flavor that truly sets this recipe apart. The combination of tart cherries, crunchy nuts, and creamy ice cream is simply irresistible. It’s the perfect balance of sweet, tart, and nutty, making it a crowd-pleaser for any occasion.
Looking for serving suggestions? A scoop of this Tart Cherry Nut Ice Cream is divine on its own, but it also pairs beautifully with other desserts. Try serving it alongside a warm slice of cherry pie for an extra decadent treat. Or, top a brownie sundae with a generous scoop for a truly unforgettable dessert experience. For a lighter option, serve it with fresh berries or a drizzle of honey. The possibilities are endless!
And if you’re feeling adventurous, why not try some variations? For a vegan option, simply substitute the dairy milk and cream with coconut milk and coconut cream. You can also experiment with different types of nuts, such as pecans, walnuts, or almonds. Or, add a touch of spice with a pinch of cinnamon or nutmeg. You could even swirl in some dark chocolate chunks for an extra layer of indulgence. Don’t be afraid to get creative and make it your own!
I truly believe that this Tart Cherry Nut Ice Cream recipe is a winner. It’s a guaranteed crowd-pleaser that’s perfect for summer barbecues, holiday gatherings, or simply a sweet treat on a warm evening. It’s a recipe that you’ll want to make again and again.
So, what are you waiting for? Gather your ingredients, dust off your ice cream maker (or use the no-churn method!), and get ready to embark on a culinary adventure. I promise you won’t be disappointed.
I’m so excited for you to try this recipe and experience the magic of homemade ice cream. Once you’ve made it, I’d love to hear about your experience! Share your photos and comments on social media using #TartCherryNutIceCream and let me know what you think. Did you make any variations? What was your favorite part? I can’t wait to see your creations and hear your feedback. Happy ice cream making! Let me know if you have any questions, and I’ll be happy to help. Enjoy!
Tart Cherry Nut Ice Cream: A Delicious & Healthy Dessert Recipe
Rich and creamy homemade tart cherry ice cream with toasted walnuts and pecans. A perfect balance of sweet, tart, and nutty flavors.
Ingredients
- 1 1/2 cups heavy cream
- 1 1/2 cups whole milk
- 3/4 cup granulated sugar
- 1/4 teaspoon salt
- 1 vanilla bean, split lengthwise and seeds scraped (or 1 teaspoon vanilla extract)
- 1 cup pitted tart cherries, fresh or frozen (if frozen, thaw slightly)
- 1/4 cup Kirsch (cherry liqueur), optional
- 1/2 cup chopped walnuts, toasted
- 1/4 cup chopped pecans, toasted
Instructions
- If using fresh cherries, wash and pit them. If using frozen, thaw slightly.
- In a medium saucepan, combine the pitted tart cherries and Kirsch (if using).
- Place the saucepan over medium heat and bring the cherry mixture to a simmer. Cook for about 8-10 minutes, or until the cherries have softened and released their juices. Stir occasionally to prevent sticking.
- Remove the saucepan from the heat and let the cherry mixture cool slightly. Once it’s cool enough to handle, transfer it to a blender or food processor. Puree until smooth.
- For an ultra-smooth ice cream, you can strain the cherry puree through a fine-mesh sieve.
- Transfer the cherry puree to an airtight container and refrigerate for at least 2 hours, or preferably overnight.
- In a medium saucepan, combine the heavy cream, whole milk, granulated sugar, and salt.
- Split the vanilla bean lengthwise and scrape out the seeds. Add the vanilla seeds and the pod to the saucepan. If you don’t have a vanilla bean, you can use 1 teaspoon of vanilla extract instead. Add the extract after the mixture has cooled slightly.
- Place the saucepan over medium heat and stir constantly until the sugar is completely dissolved. Be careful not to let the mixture boil.
- Once the sugar is dissolved, remove the saucepan from the heat, cover it, and let it steep for 30 minutes. If you’re using vanilla extract, skip this step.
- After 30 minutes, remove the vanilla bean from the saucepan. Scrape any remaining vanilla seeds from the pod back into the mixture.
- Transfer the custard base to an airtight container and refrigerate for at least 4 hours, or preferably overnight.
- Follow the manufacturer’s instructions for your ice cream maker.
- Remove the cherry base and custard base from the refrigerator. Pour the cherry base into the custard base and stir to combine.
- Pour the combined mixture into your ice cream maker and churn according to the manufacturer’s instructions. This usually takes about 20-30 minutes.
- Once the ice cream has reached a soft-serve consistency, add the toasted nuts to the ice cream maker and churn for another minute or two to distribute them evenly.
- Transfer the ice cream to an airtight container and freeze for at least 2-3 hours, or preferably overnight, to harden.
Notes
- Adjust sweetness by reducing sugar.
- Add other fruits like raspberries or blueberries.
- Experiment with different nuts like almonds or pistachios.
- Make it vegan by substituting dairy with coconut cream and almond milk, and using a vegan sugar substitute.
- Add 1/4 cup cocoa powder for a chocolatey twist.
- If you prefer not to use alcohol, you can skip the Kirsch and simply add a tablespoon of lemon juice to enhance the cherry flavor.


Leave a Comment