
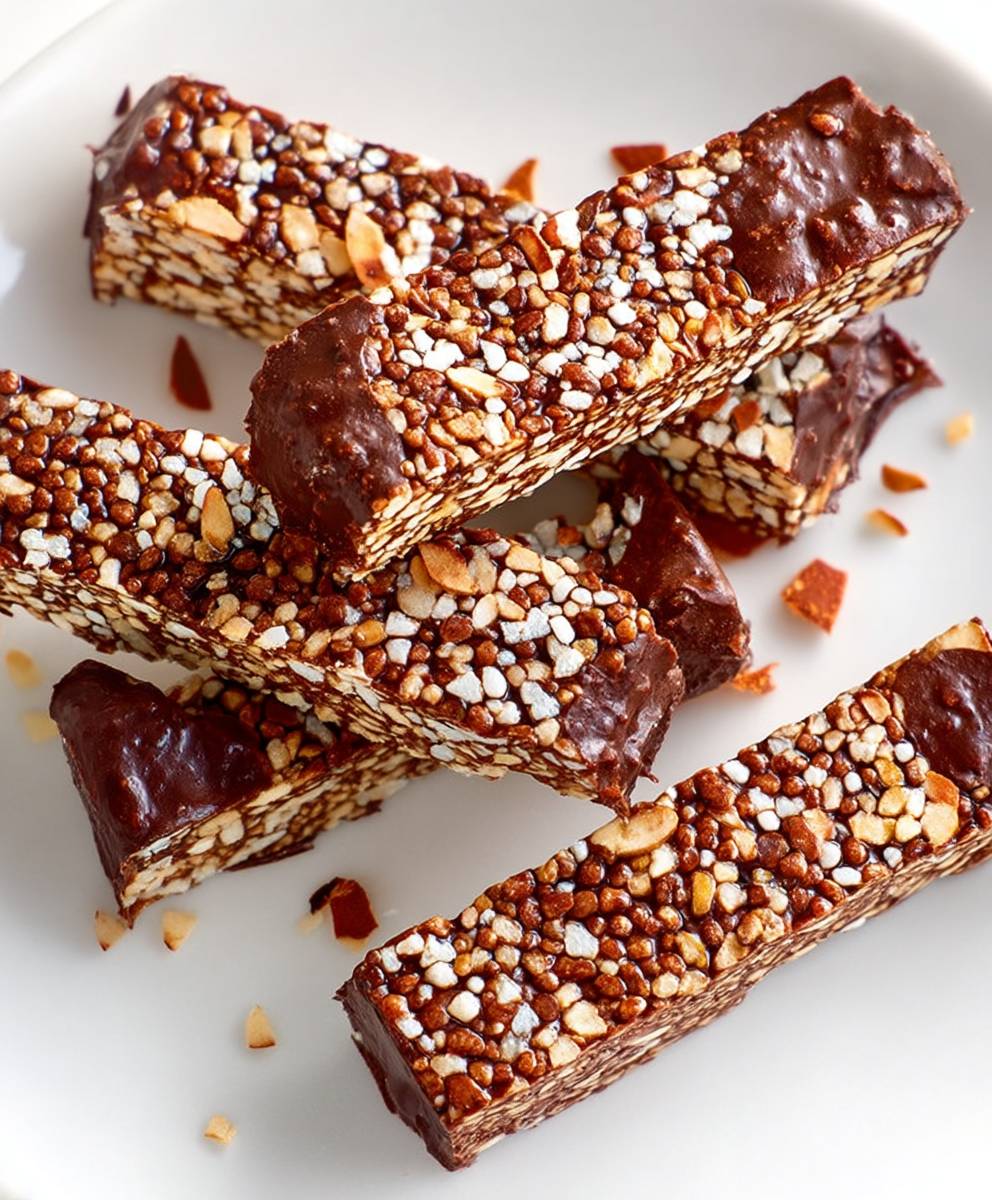
Healthy Crunch Bars: the snack revolution you’ve been waiting for! Are you tired of processed snacks that leave you feeling sluggish and guilty? Do you crave something delicious, satisfying, and genuinely good for you? Then prepare to be amazed! These aren’t your average granola bars; they’re a powerhouse of flavor and nutrition, perfectly crafted to fuel your body and delight your taste buds.
While the concept of a “crunch bar” might conjure images of sugary treats, our Healthy Crunch Bars are a modern twist on a classic idea. Think of them as the evolved descendant of the humble energy bar, borrowing the best aspects of traditional recipes while ditching the unnecessary additives and refined sugars. They represent a growing movement towards mindful eating, where we prioritize wholesome ingredients and homemade goodness.
What makes these bars so irresistible? It’s the perfect combination of textures the satisfying crunch of nuts and seeds, the chewy sweetness of dried fruit, and the subtle binding of natural sweeteners. People love them because they’re incredibly versatile. They’re perfect for a quick breakfast on the go, a post-workout refuel, or an afternoon pick-me-up. Plus, knowing exactly what goes into them gives you complete control over your diet. Get ready to experience a snack that’s both delicious and empowering!

Ingredients:
- 1 cup rolled oats (old-fashioned)
- 1/2 cup unsweetened shredded coconut
- 1/2 cup chopped nuts (almonds, walnuts, or pecans your choice!)
- 1/4 cup chia seeds
- 1/4 cup flax seeds (ground)
- 1/4 cup pumpkin seeds (pepitas)
- 1/4 cup sunflower seeds
- 1/2 cup dried cranberries (or other dried fruit, chopped)
- 1/4 cup peanut butter (or almond butter, sunflower seed butter)
- 1/4 cup honey (or maple syrup)
- 2 tablespoons coconut oil, melted
- 1 teaspoon vanilla extract
- 1/4 teaspoon sea salt
- Optional: 1/4 cup dark chocolate chips (or cacao nibs)
Preparing the Dry Ingredients:
- First, let’s get all our dry ingredients ready. In a large bowl, combine the 1 cup of rolled oats, 1/2 cup of unsweetened shredded coconut, and 1/2 cup of your favorite chopped nuts. I usually go for a mix of almonds and walnuts, but feel free to experiment!
- Next, add the superfood powerhouses: 1/4 cup of chia seeds, 1/4 cup of ground flax seeds, 1/4 cup of pumpkin seeds (pepitas), and 1/4 cup of sunflower seeds. These seeds are packed with nutrients and add a great texture to the bars.
- Now, for a touch of sweetness and chewiness, stir in 1/2 cup of dried cranberries (or any other dried fruit you like chopped apricots or raisins work well too). Make sure they are chopped into smaller pieces so they distribute evenly throughout the bars.
- Finally, add 1/4 teaspoon of sea salt to balance the sweetness and enhance the flavors. Give everything a good mix with a large spoon or spatula until all the dry ingredients are evenly distributed. This ensures that every bite is packed with goodness!
Combining the Wet Ingredients:
- Now, let’s move on to the wet ingredients. In a separate, smaller bowl, combine 1/4 cup of peanut butter (or your preferred nut butter almond butter is a great alternative), 1/4 cup of honey (or maple syrup for a vegan option), and 2 tablespoons of melted coconut oil.
- Add 1 teaspoon of vanilla extract to the wet ingredients. The vanilla extract adds a lovely aroma and enhances the overall flavor of the bars.
- Whisk all the wet ingredients together until they are smooth and well combined. The melted coconut oil helps to bind everything together, while the honey (or maple syrup) provides sweetness and helps the bars stick together.
Mixing Wet and Dry:
- Pour the wet ingredients over the dry ingredients in the large bowl.
- Using a spatula or large spoon, gently but thoroughly mix the wet and dry ingredients together. Make sure that all the dry ingredients are coated evenly with the wet mixture. This is crucial for ensuring that the bars hold together properly.
- Continue mixing until the mixture is sticky and well combined. It should resemble a slightly clumpy, but cohesive mixture. If the mixture seems too dry, you can add a tablespoon or two more of melted coconut oil or honey. If it seems too wet, add a tablespoon or two more of rolled oats.
- If you’re adding dark chocolate chips or cacao nibs (optional), now is the time to gently fold them into the mixture. Be careful not to overmix, as this can cause the chocolate chips to melt slightly.
Pressing and Setting:
- Line an 8×8 inch baking pan with parchment paper. Make sure the parchment paper overhangs the sides of the pan, as this will make it easier to lift the bars out later.
- Transfer the mixture to the prepared baking pan.
- Using your hands or the back of a spatula, firmly press the mixture into the pan, ensuring that it is evenly distributed and tightly packed. The tighter you pack the mixture, the better the bars will hold together.
- For an extra smooth top, you can place a piece of parchment paper over the mixture and use a rolling pin to press down firmly.
- Once the mixture is firmly pressed, cover the pan with plastic wrap or another piece of parchment paper.
- Refrigerate the pan for at least 2 hours, or preferably overnight, to allow the bars to set completely. This is important for ensuring that they are firm enough to cut into bars.
Cutting and Storing:
- Once the bars are fully set, remove them from the refrigerator.
- Using the overhanging parchment paper, lift the bars out of the baking pan.
- Place the bars on a cutting board.
- Using a sharp knife, cut the bars into your desired size and shape. I usually cut them into 12-16 bars, depending on how large I want them to be.
- Store the bars in an airtight container in the refrigerator for up to 1 week, or in the freezer for up to 2 months. If storing in the freezer, wrap each bar individually in plastic wrap to prevent freezer burn.
Tips and Variations:
- Nut Butter Options: Feel free to experiment with different nut butters, such as almond butter, cashew butter, or sunflower seed butter. Each nut butter will impart a slightly different flavor to the bars.
- Dried Fruit Variations: Get creative with your dried fruit! Try using chopped apricots, raisins, dried cherries, or even dried mango.
- Sweetener Alternatives: If you’re looking for a lower-sugar option, you can use a sugar-free syrup or a natural sweetener like stevia. Just be sure to adjust the amount to your liking.
- Add-Ins: Consider adding other ingredients to customize your bars, such as chopped dates, shredded carrots, or even a sprinkle of cinnamon or nutmeg.
- Vegan Option: To make these bars vegan, simply substitute the honey with maple syrup or agave nectar.
- Baking for a Chewier Texture: For a slightly chewier texture, you can bake the bars in a preheated oven at 350°F (175°C) for 10-15 minutes after pressing them into the pan. Let them cool completely before cutting.
- No-Bake Option: If you prefer a completely no-bake option, you can skip the baking step and simply refrigerate the bars until they are firm.
- Chocolate Drizzle: For an extra touch of indulgence, you can drizzle melted dark chocolate over the bars after they have been cut. Let the chocolate set before serving.
- Seed Cycling: If you’re practicing seed cycling, you can adjust the types of seeds you use in the bars according to the phase of your cycle. For example, during the follicular phase, you can use more pumpkin and flax seeds, and during the luteal phase, you can use more sunflower and sesame seeds.
- Make it a Meal Replacement: Add a scoop of protein powder to the dry ingredients for a more substantial bar that can serve as a meal replacement.
Conclusion:
So, there you have it! These Healthy Crunch Bars are more than just a snack; they’re a powerhouse of flavor and nutrition, perfectly crafted to satisfy your cravings without derailing your healthy lifestyle. I truly believe this recipe is a must-try for anyone looking for a convenient, delicious, and guilt-free treat.
Why is it a must-try, you ask? Well, beyond the incredible taste and satisfying crunch, these bars are incredibly versatile. They’re perfect for a quick breakfast on the go, a mid-afternoon energy boost, or even a post-workout recovery snack. Plus, knowing exactly what goes into them means you can avoid all those hidden sugars and artificial ingredients found in store-bought bars. You’re in complete control!
But the best part? The possibilities are endless! Feel free to experiment with different nuts and seeds. Try adding dried cranberries, chopped dates, or even a sprinkle of dark chocolate chips for an extra touch of indulgence. If you’re feeling adventurous, a dash of cinnamon or nutmeg can add a warm and comforting flavor. For a vegan option, simply substitute the honey with maple syrup or agave nectar. The key is to make these bars your own and tailor them to your specific taste preferences.
Serving Suggestions and Variations:
* Breakfast on the Go: Wrap a bar in parchment paper for a quick and easy breakfast you can take anywhere.
* Post-Workout Fuel: Enjoy a bar within 30 minutes of your workout to replenish energy stores.
* Lunchbox Treat: Pack a bar in your child’s lunchbox for a healthy and satisfying snack.
* Dessert Alternative: Cut the bars into smaller squares and serve as a guilt-free dessert option.
* Nut-Free Version: Replace the nuts with sunflower seeds, pumpkin seeds, or hemp seeds for a nut-free alternative.
* Chocolate Lover’s Delight: Add a tablespoon or two of cocoa powder to the mixture for a chocolatey twist. You can also drizzle melted dark chocolate over the finished bars.
* Spice It Up: A pinch of cayenne pepper can add a subtle kick to your bars.
* Tropical Twist: Incorporate shredded coconut and dried pineapple for a tropical flavor.
I’m genuinely excited for you to try this recipe and discover just how easy and rewarding it is to make your own Healthy Crunch Bars. It’s a game-changer, I promise!
So, what are you waiting for? Gather your ingredients, preheat your oven, and get ready to create a batch of these delicious and nutritious bars. I’m confident that you’ll love them as much as I do.
And most importantly, I’d love to hear about your experience! Did you try any variations? What were your favorite ingredients? Share your photos and comments with me I’m eager to see your creations and learn from your experiences. Let’s build a community of healthy snack enthusiasts together! Happy baking, and enjoy your homemade Healthy Crunch Bars! I can’t wait to hear what you think!
Healthy Crunch Bars: The Ultimate Guide to Delicious and Nutritious Snacking
Easy and delicious no-bake energy bars packed with oats, nuts, seeds, dried fruit, and a touch of sweetness. Perfect for a quick breakfast, snack, or pre/post-workout fuel!
Ingredients
- 1 cup rolled oats (old-fashioned)
- 1/2 cup unsweetened shredded coconut
- 1/2 cup chopped nuts (almonds, walnuts, or pecans your choice!)
- 1/4 cup chia seeds
- 1/4 cup flax seeds (ground)
- 1/4 cup pumpkin seeds (pepitas)
- 1/4 cup sunflower seeds
- 1/2 cup dried cranberries (or other dried fruit, chopped)
- 1/4 cup peanut butter (or almond butter, sunflower seed butter)
- 1/4 cup honey (or maple syrup)
- 2 tablespoons coconut oil, melted
- 1 teaspoon vanilla extract
- 1/4 teaspoon sea salt
- Optional: 1/4 cup dark chocolate chips (or cacao nibs)
Instructions
- In a large bowl, combine rolled oats, shredded coconut, chopped nuts, chia seeds, ground flax seeds, pumpkin seeds, sunflower seeds, dried cranberries, and sea salt. Mix well.
- In a separate bowl, combine peanut butter, honey, melted coconut oil, and vanilla extract. Whisk until smooth.
- Pour the wet ingredients over the dry ingredients. Mix thoroughly until all dry ingredients are evenly coated. The mixture should be sticky and cohesive. If too dry, add more melted coconut oil or honey. If too wet, add more rolled oats. Fold in chocolate chips (if using).
- Line an 8×8 inch baking pan with parchment paper, leaving an overhang. Transfer the mixture to the pan and press firmly and evenly. Cover with plastic wrap or parchment paper and refrigerate for at least 2 hours, or preferably overnight, to set.
- Once set, lift the bars out of the pan using the parchment paper overhang. Cut into desired size bars. Store in an airtight container in the refrigerator for up to 1 week, or in the freezer for up to 2 months.
Notes
- Nut Butter Options: Experiment with different nut butters like almond, cashew, or sunflower seed butter.
- Dried Fruit Variations: Use chopped apricots, raisins, dried cherries, or dried mango.
- Sweetener Alternatives: Use sugar-free syrup or stevia for a lower-sugar option.
- Add-Ins: Add chopped dates, shredded carrots, cinnamon, or nutmeg.
- Vegan Option: Substitute honey with maple syrup or agave nectar.
- Baking for a Chewier Texture: Bake at 350°F (175°C) for 10-15 minutes after pressing. Cool completely before cutting.
- No-Bake Option: Skip baking and refrigerate until firm.
- Chocolate Drizzle: Drizzle melted dark chocolate over the bars after cutting.
- Seed Cycling: Adjust seed types based on your cycle phase.
- Meal Replacement: Add protein powder to the dry ingredients.

Leave a Comment