
No Bake Cookies: the name alone conjures up images of childhood, of sweet treats whipped up in a flash, and of pure, unadulterated chocolatey bliss. Forget slaving over a hot oven; these cookies are all about instant gratification and deliciousness. Have you ever craved a cookie but lacked the time or energy for a full-blown baking session? That’s where these gems shine!
While the exact origins of no bake cookies are a bit murky, they likely emerged as a practical solution during times when ovens were less common or when cooks sought quick and easy dessert options. They represent a resourceful approach to baking, utilizing readily available ingredients and simple techniques. Think of them as the original “convenience cookie,” a testament to the ingenuity of home cooks throughout history.
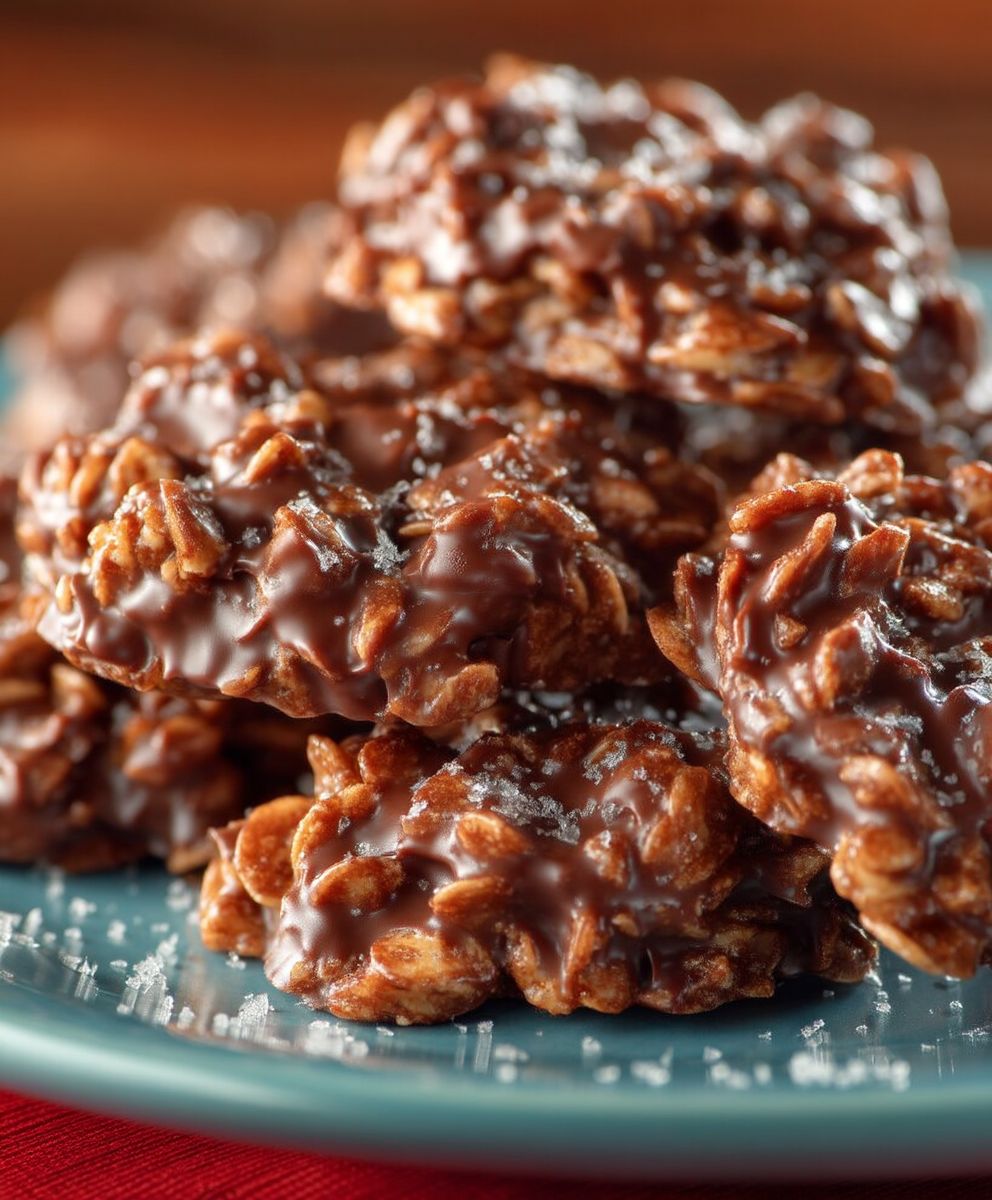
But beyond their ease of preparation, what truly makes these cookies a beloved classic? It’s the irresistible combination of textures and flavors. The creamy, fudgy base, often made with oats, peanut butter, and cocoa, is perfectly balanced by the slightly chewy texture of the oats. The rich chocolate flavor is a guaranteed crowd-pleaser, and the subtle hint of peanut butter adds a delightful nutty complexity. Whether you’re a seasoned baker or a kitchen novice, these cookies are a guaranteed success. So, let’s dive in and discover how to make these delightful treats!

Ingredients:
- 2 cups granulated sugar
- ½ cup (1 stick) unsalted butter
- ½ cup milk (any kind works!)
- 4 tablespoons unsweetened cocoa powder
- ½ teaspoon salt
- 3 cups quick-cooking oats (not instant!)
- ½ cup peanut butter (creamy or chunky, your choice!)
- 1 teaspoon vanilla extract
Preparing the Cookie Base:
- In a medium saucepan, combine the granulated sugar, butter, milk, cocoa powder, and salt. Make sure you use a saucepan that’s large enough, as the mixture will bubble up when it boils. I usually go for a 3-quart saucepan just to be safe.
- Place the saucepan over medium heat. Stir constantly until the butter is melted and the sugar is dissolved. This usually takes about 5-7 minutes. Don’t stop stirring, or the sugar might burn on the bottom!
- Once the mixture is smooth and everything is dissolved, bring it to a rolling boil. A rolling boil means the mixture is bubbling vigorously all over the surface, even when you stir it.
- This is crucial! Once it reaches a rolling boil, set a timer for exactly 1 minute. Continue stirring constantly during this minute. This step is essential for the cookies to set properly. If you don’t boil it long enough, they’ll be too soft and sticky. If you boil it too long, they’ll be dry and crumbly.
- After the 1 minute of boiling, remove the saucepan from the heat immediately.
Adding the Oats and Peanut Butter:
- Now, quickly stir in the quick-cooking oats, peanut butter, and vanilla extract. Make sure everything is well combined. The mixture will thicken up pretty quickly, so work fast!
- Keep stirring until the oats are evenly distributed and the peanut butter is completely incorporated. You don’t want any streaks of peanut butter left.
Dropping and Setting the Cookies:
- Line a baking sheet with parchment paper or wax paper. This will prevent the cookies from sticking and make cleanup a breeze.
- Using a spoon or a cookie scoop (about 1.5-2 tablespoons), drop rounded spoonfuls of the cookie mixture onto the prepared baking sheet. Try to keep them roughly the same size so they set evenly.
- Let the cookies cool completely at room temperature. This usually takes about 30-45 minutes, but it can take longer depending on the humidity in your kitchen. You’ll know they’re ready when they’re firm to the touch.
- If you’re in a hurry, you can speed up the setting process by placing the baking sheet in the refrigerator for about 15-20 minutes. Just make sure they’re not stacked on top of each other.
Tips and Variations:
- Type of Oats: It’s important to use quick-cooking oats for this recipe. Old-fashioned oats will make the cookies too chewy, and instant oats will make them too mushy.
- Peanut Butter Alternatives: If you’re allergic to peanuts or just don’t like peanut butter, you can substitute it with almond butter, cashew butter, or sunflower seed butter. The flavor will be slightly different, but the cookies will still be delicious.
- Chocolate Chips: For extra chocolatey cookies, stir in ½ cup of chocolate chips (milk chocolate, semi-sweet, or dark chocolate) along with the oats and peanut butter.
- Nuts: Add ½ cup of chopped nuts (such as walnuts, pecans, or almonds) for added crunch and flavor. Stir them in along with the oats and peanut butter.
- Coconut: Stir in ½ cup of shredded coconut for a tropical twist.
- Marshmallows: Mini marshmallows can be added for a s’mores-like flavor. Add about 1 cup of mini marshmallows after you remove the mixture from the heat, stirring gently to combine.
- Espresso Powder: A teaspoon of espresso powder can enhance the chocolate flavor. Add it to the saucepan along with the cocoa powder.
- Storage: Store the cookies in an airtight container at room temperature for up to 3 days. They can also be stored in the refrigerator for up to a week.
- Troubleshooting: If your cookies are too soft, it’s likely that you didn’t boil the sugar mixture for long enough. If your cookies are too dry, you may have boiled it for too long. Unfortunately, there’s not much you can do to fix them once they’re made, but you can adjust the boiling time next time you make them.
- High Altitude Adjustments: If you live at a high altitude, you may need to adjust the boiling time. Start by boiling the mixture for 45 seconds instead of 1 minute, and see how the cookies turn out. You may need to experiment a bit to find the perfect boiling time for your altitude.
Detailed Explanation of Key Steps:
Why the 1-Minute Boil is So Important:
I can’t stress enough how important that 1-minute boil is! It’s the key to getting the right texture for these cookies. During that minute, the sugar mixture reaches a specific temperature that allows the cookies to set properly. If you don’t boil it long enough, the cookies will be too soft and sticky because there’s too much liquid. If you boil it too long, the cookies will be dry and crumbly because too much liquid has evaporated. So, set that timer and don’t skip this step!
Choosing the Right Oats:
Using the correct type of oats is also crucial. Quick-cooking oats are partially cooked and rolled thinner than old-fashioned oats. This allows them to absorb the liquid in the cookie mixture more quickly and evenly, resulting in a tender cookie. Old-fashioned oats will make the cookies too chewy and dense, while instant oats will turn to mush and make the cookies too soft.
Peanut Butter Considerations:
You can use either creamy or chunky peanut butter for this recipe, depending on your preference. Creamy peanut butter will give you a smoother cookie, while chunky peanut butter will add some extra texture. I personally prefer creamy peanut butter, but my kids love it with chunky peanut butter. You can even experiment with different flavors of peanut butter, such as honey roasted or chocolate peanut butter, for a unique twist.
Cooling and Setting:
Allowing the cookies to cool completely at room temperature is important for them to set properly. As they cool, the oats absorb the remaining liquid and the cookies firm up. If you try to eat them too soon, they’ll be soft and sticky. If you’re impatient, you can put them in the refrigerator to speed up the process, but be sure to let them cool completely before storing them.
Making Ahead and Storing:
These no-bake cookies are great for making ahead of time. You can make them a day or two in advance and store them in an airtight container at room temperature. They’ll stay fresh for up to 3 days. If you want to store them for longer, you can keep them in the refrigerator for up to a week. Just be sure to bring them to room temperature before serving, as they can be a bit hard when cold.
Why No-Bake Cookies are a Classic:
No-bake cookies are a classic for a reason. They’re easy to make, require no baking, and are absolutely delicious. They’re perfect for a quick and easy dessert, a potluck, or a bake sale. Plus, they’re a great way to get the kids involved in the kitchen. My kids love helping me make these cookies, and they always disappear quickly!
Variations for Dietary Needs:
This recipe can be easily adapted to meet various dietary needs. For a gluten-free version, make sure to use certified gluten-free oats. For a dairy-free version, use a dairy-free milk alternative, such as almond milk, soy milk, or oat milk. You can also use a dairy-free butter substitute. For a vegan version, use a dairy-free milk alternative and a vegan butter substitute. You can also substitute the peanut butter with another nut butter or sunflower seed butter for those with peanut allergies.
Experimenting with Flavors:
Don’t be afraid to experiment with different flavors and add-ins to create your own unique version of these no-bake cookies. Try adding different extracts, such as almond extract or peppermint extract, for a different flavor profile. You can also add spices, such as cinnamon or nutmeg, for a warm and comforting flavor. The possibilities are endless!
Serving Suggestions:
These no-bake cookies are delicious on their own, but they can also be served with a scoop of ice
Conclusion:
Okay, friends, let’s be honest: you’ve made it this far, and that means you’re seriously considering whipping up a batch of these incredible No Bake Cookies. And trust me, you absolutely should! This isn’t just another cookie recipe; it’s a shortcut to pure, unadulterated chocolate-peanut butter bliss. The fudgy texture, the satisfying chew of the oats, and the sheer simplicity of the process make it a winner every single time. Forget slaving over a hot oven these cookies are ready in minutes, perfect for those moments when a sweet craving hits hard and fast.
But the best part? The versatility! While the classic recipe is divine on its own, feel free to get creative. Craving a little extra crunch? Add a handful of chopped walnuts or pecans. Want to dial up the chocolate intensity? Stir in some dark chocolate chips. For a festive twist, sprinkle the finished cookies with sea salt or crushed peppermint candies during the holidays. And if you’re feeling particularly adventurous, try using different types of nut butter almond butter or cashew butter would add a unique and delicious flavor profile. You could even experiment with different extracts, like vanilla, almond, or even a hint of coffee extract, to elevate the taste.
Serving suggestions are endless, too. These cookies are fantastic on their own, of course, but they also pair beautifully with a cold glass of milk, a scoop of vanilla ice cream, or even a warm cup of coffee. Pack them in lunchboxes for a sweet treat, bring them to potlucks to impress your friends, or simply keep a batch on hand for those inevitable late-night cravings. They’re also a fantastic option for bake sales or holiday cookie exchanges everyone loves a classic, and these No Bake Cookies are guaranteed to be a crowd-pleaser.
I truly believe that this recipe is a must-try for anyone who loves easy, delicious desserts. It’s a foolproof way to satisfy your sweet tooth without spending hours in the kitchen. Plus, it’s a great recipe to make with kids they’ll love helping to stir and drop the cookies onto the parchment paper. It’s a fun and rewarding activity that the whole family can enjoy.
So, what are you waiting for? Gather your ingredients, put on your favorite music, and get ready to experience the joy of homemade No Bake Cookies. I’m confident that you’ll love them as much as I do.
And now, for the most important part: I want to hear about your experience! Did you try the recipe? Did you make any variations? What did your family and friends think? Share your photos, tips, and stories in the comments below. I can’t wait to see your creations and hear all about your baking adventures. Happy baking (or, in this case, no-baking)! Let me know if you have any questions, and I’ll do my best to help. Enjoy!
No Bake Cookies: The Easiest Recipe You'll Ever Make
A quick, easy, and delicious treat made with oats, peanut butter, cocoa, and a few simple ingredients. Perfect for a no-oven dessert!
Ingredients
- 2 cups granulated sugar
- ½ cup (1 stick) unsalted butter
- ½ cup milk (any kind works!)
- 4 tablespoons unsweetened cocoa powder
- ½ teaspoon salt
- 3 cups quick-cooking oats (not instant!)
- ½ cup peanut butter (creamy or chunky, your choice!)
- 1 teaspoon vanilla extract
Instructions
- Prepare the Cookie Base: In a medium saucepan, combine sugar, butter, milk, cocoa powder, and salt.
- Place the saucepan over medium heat. Stir constantly until the butter is melted and the sugar is dissolved (5-7 minutes).
- Bring the mixture to a rolling boil (bubbling vigorously all over).
- Crucial Step: Set a timer for exactly 1 minute. Continue stirring constantly during this minute.
- Remove the saucepan from the heat immediately.
- Add Oats and Peanut Butter: Quickly stir in the quick-cooking oats, peanut butter, and vanilla extract.
- Keep stirring until the oats are evenly distributed and the peanut butter is completely incorporated.
- Drop and Set the Cookies: Line a baking sheet with parchment paper or wax paper.
- Using a spoon or cookie scoop, drop rounded spoonfuls of the cookie mixture onto the prepared baking sheet.
- Let the cookies cool completely at room temperature (30-45 minutes) until firm. You can refrigerate for 15-20 minutes to speed up the process.
Notes
- Oats: Use quick-cooking oats only. Old-fashioned oats will be too chewy, and instant oats will be too mushy.
- Peanut Butter: Creamy or chunky peanut butter can be used.
- Boiling Time: The 1-minute boil is crucial for the right texture. Too short = soft cookies; too long = dry cookies.
- Variations:
- Add ½ cup chocolate chips.
- Add ½ cup chopped nuts.
- Add ½ cup shredded coconut.
- Add 1 cup mini marshmallows.
- Add 1 teaspoon espresso powder.
- Storage: Store in an airtight container at room temperature for up to 3 days or in the refrigerator for up to a week.
- High Altitude: Reduce boiling time to 45 seconds and adjust as needed.
- Peanut Butter Alternatives: Almond butter, cashew butter, or sunflower seed butter can be substituted.
- Dietary Needs: Use certified gluten-free oats for gluten-free, dairy-free milk and butter for dairy-free, and vegan alternatives for vegan.
Leave a Comment