
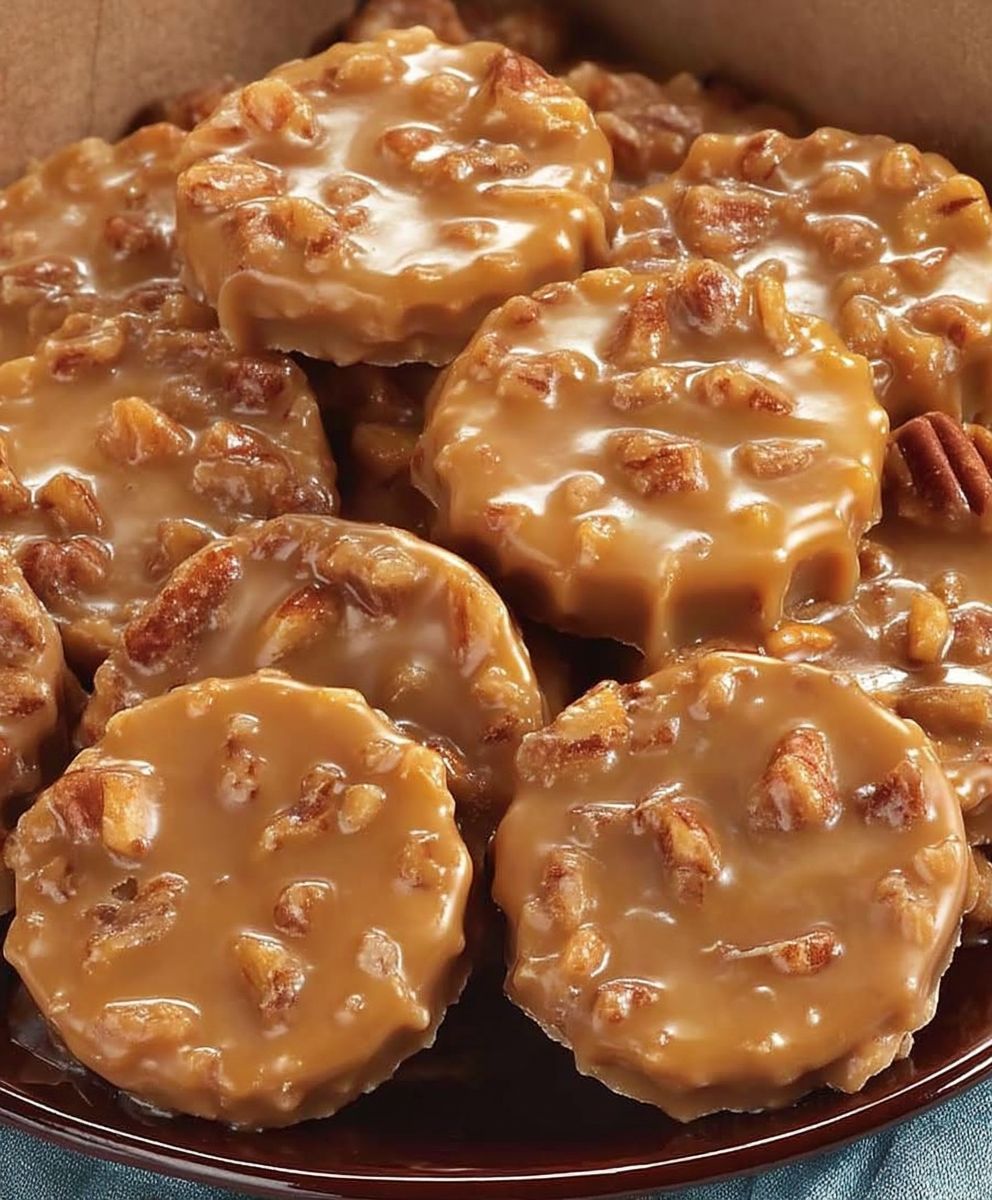
Creamy Southern Pralines, those melt-in-your-mouth morsels of sugary, nutty goodness, are more than just a candy; they’re a taste of Southern history and hospitality. Have you ever wondered how something so simple could evoke such strong feelings of comfort and nostalgia? I know I have! From the moment that first bite dissolves on your tongue, releasing a wave of buttery sweetness and the satisfying crunch of pecans, you’re transported to a place of warmth and tradition.
The story of pralines begins in 17th-century France, but it was in New Orleans that they truly found their identity. Ursuline nuns, skilled in confectionery, adapted the original recipe using readily available Louisiana pecans and cream, creating the iconic treat we know and love today. These Creamy Southern Pralines quickly became a staple, sold by street vendors and cherished in homes across the South.
What makes pralines so irresistible? It’s the perfect balance of textures the smooth, creamy base contrasted with the delightful crunch of pecans. It’s the rich, buttery flavor that lingers long after the last bite. And perhaps most importantly, it’s the feeling of connection to a culinary heritage that has been passed down through generations. Whether you’re making them for a special occasion or simply craving a sweet treat, these pralines are sure to bring a smile to your face. So, let’s get started and create some Southern magic in your own kitchen!

Ingredients:
- 2 cups granulated sugar
- 1 cup packed light brown sugar
- 1 cup (2 sticks) unsalted butter, cut into pieces
- 1 cup heavy cream
- 1/2 cup whole milk
- 1 teaspoon vanilla extract
- 1/2 teaspoon sea salt
- 3 cups pecan halves, toasted
Preparing the Praline Base:
- In a heavy-bottomed 3-quart saucepan, combine the granulated sugar, brown sugar, butter, heavy cream, and milk. Make sure your saucepan is heavy-bottomed to prevent scorching! I’ve learned this the hard way.
- Place the saucepan over medium heat and stir constantly with a wooden spoon until the sugars are dissolved. This is crucial for a smooth praline, so don’t rush it. You should see no sugar granules clinging to the bottom or sides of the pan.
- Once the sugars are dissolved, bring the mixture to a boil, stirring occasionally. A candy thermometer is your best friend here! Clip it to the side of the pan, making sure it doesn’t touch the bottom.
- Continue to cook, without stirring, until the mixture reaches the soft-ball stage, which is 235-240°F (113-116°C). This is the most important step for achieving the right texture. If you don’t have a candy thermometer, you can test the soft-ball stage by dropping a small amount of the hot syrup into a bowl of ice water. It should form a soft, pliable ball that you can easily flatten between your fingers.
- Once the mixture reaches the soft-ball stage, remove the saucepan from the heat. This is where the magic happens!
The Cooling and Crystallization Process:
- Add the vanilla extract and salt to the hot mixture. Stir gently to combine.
- Now, here’s the key: Let the mixture cool undisturbed for about 10-15 minutes. Do not stir! This allows the mixture to cool slightly and begin the crystallization process, which is essential for the praline’s characteristic texture.
- After the cooling period, the mixture should have a slightly thickened appearance. Now, using a wooden spoon, begin to beat the mixture vigorously until it thickens and loses its glossy sheen. This can take anywhere from 5-10 minutes, so be patient and keep stirring. You’ll notice the color lightening and the texture becoming more opaque.
- The mixture is ready when it becomes thick enough to hold its shape when dropped from a spoon. It should look like a thick, creamy fudge. If you over-beat it and it becomes too stiff, you can add a tablespoon or two of hot milk to loosen it up.
Incorporating the Pecans and Forming the Pralines:
- Once the praline mixture has reached the right consistency, gently fold in the toasted pecan halves. Make sure the pecans are evenly distributed throughout the mixture.
- Drop spoonfuls of the praline mixture onto parchment paper-lined baking sheets. I usually use a large spoon to scoop the mixture and then use another spoon to help shape the pralines into round or oval shapes.
- Work quickly, as the pralines will start to set up as they cool. If the mixture becomes too stiff to work with, you can gently warm it over low heat for a few seconds to loosen it up.
- Let the pralines cool completely on the parchment paper before serving. This usually takes about 30 minutes to an hour.
Tips for Perfect Pralines:
- Use a heavy-bottomed saucepan: This will prevent the sugar from scorching and ensure even cooking.
- Use a candy thermometer: This is the most accurate way to ensure that the mixture reaches the soft-ball stage.
- Don’t stir while cooking: Stirring can cause sugar crystals to form, resulting in a grainy texture.
- Cool the mixture before beating: This allows the crystallization process to begin, which is essential for the praline’s texture.
- Beat the mixture vigorously: This helps to create the creamy, fudge-like texture.
- Work quickly: The pralines will start to set up as they cool, so you need to work quickly to form them.
- Toast the pecans: Toasting the pecans enhances their flavor and adds a nice crunch to the pralines. To toast them, spread them in a single layer on a baking sheet and bake at 350°F (175°C) for 5-7 minutes, or until they are fragrant and lightly browned. Watch them carefully, as they can burn easily.
- Storage: Store the pralines in an airtight container at room temperature for up to a week. They can also be frozen for longer storage.
Troubleshooting:
- Pralines are too grainy: This is usually caused by stirring the mixture while it’s cooking or not allowing it to cool properly before beating. Make sure to follow the instructions carefully and avoid stirring the mixture while it’s cooking.
- Pralines are too hard: This is usually caused by cooking the mixture to too high of a temperature. Make sure to use a candy thermometer and cook the mixture to the soft-ball stage (235-240°F).
- Pralines are too soft: This is usually caused by not cooking the mixture to a high enough temperature or not beating it enough. Make sure to use a candy thermometer and cook the mixture to the soft-ball stage. Also, make sure to beat the mixture vigorously until it thickens and loses its glossy sheen.
- Pralines are too sticky: This can be caused by high humidity. If it’s a humid day, you may need to cook the mixture to a slightly higher temperature.
Variations:
- Chocolate Pralines: Add 1/2 cup of unsweetened cocoa powder to the mixture along with the sugars.
- Bourbon Pralines: Add 2 tablespoons of bourbon to the mixture along with the vanilla extract.
- Maple Pralines: Substitute maple syrup for some of the granulated sugar.
- Spiced Pralines: Add a pinch of cinnamon, nutmeg, or cloves to the mixture along with the vanilla extract.
Enjoy your homemade Creamy Southern Pralines! They’re perfect for gifting or enjoying as a sweet treat.
Conclusion:
And there you have it! These Creamy Southern Pralines are more than just a candy; they’re a taste of Southern hospitality, a sweet embrace that melts in your mouth, and a guaranteed crowd-pleaser. I truly believe this recipe is a must-try for anyone who appreciates a classic, comforting treat. The combination of buttery richness, the satisfying crunch of pecans, and that smooth, melt-away texture is simply irresistible. It’s the kind of dessert that evokes memories of grandmothers, holiday gatherings, and pure, unadulterated joy.
But why should you make these pralines, specifically? Well, beyond the incredible flavor, this recipe is surprisingly straightforward. I’ve broken down each step to ensure even novice candy makers can achieve perfect results. No fancy equipment is needed, just a little patience and attention to detail. Plus, the ingredients are readily available, making it an accessible indulgence any time you crave a little Southern charm.
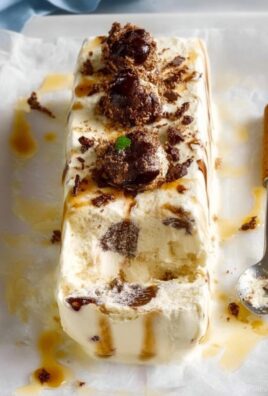
Now, let’s talk about serving suggestions and variations because, let’s be honest, even perfection can be tweaked to suit your personal preferences! These pralines are divine on their own, of course, but consider crumbling them over vanilla ice cream for an extra decadent dessert. They also make a wonderful addition to a cheese board, providing a sweet counterpoint to savory cheeses. For a truly Southern experience, pair them with a strong cup of coffee or sweet tea.
Feeling adventurous? Try adding a pinch of sea salt to the mixture for a salted caramel effect. Or, for a festive twist, incorporate a teaspoon of cinnamon or nutmeg during the cooking process. If you’re a chocolate lover (and who isn’t?), drizzle melted dark chocolate over the cooled pralines for an extra layer of indulgence. You could even experiment with different nuts, like walnuts or macadamia nuts, although pecans are the traditional choice for a reason!
These Creamy Southern Pralines also make fantastic gifts. Package them in a pretty tin or cellophane bag, and you’ll have a homemade present that’s sure to impress. They’re perfect for holidays, birthdays, or just a thoughtful gesture to show someone you care. Imagine the delight on their faces when they taste these little bites of heaven!
I’m so excited for you to try this recipe and experience the magic of homemade pralines for yourself. Don’t be intimidated by the candy-making process; just follow the instructions carefully, and you’ll be rewarded with a batch of incredibly delicious treats.
Once you’ve made your own batch of these delectable pralines, I’d absolutely love to hear about your experience! Did you make any variations? What did you think of the texture and flavor? Did you share them with friends and family? Please, share your thoughts and photos in the comments below. Your feedback is invaluable, and it helps me continue to create recipes that you’ll love. So, go ahead, gather your ingredients, put on some music, and get ready to embark on a sweet Southern adventure. Happy candy making! I can’t wait to hear all about your Creamy Southern Pralines success!
Creamy Southern Pralines: The Ultimate Guide to Making Perfect Pralines
Creamy, melt-in-your-mouth Southern pralines packed with toasted pecans. A classic sweet treat perfect for gifting or enjoying yourself!
Ingredients
- 2 cups granulated sugar
- 1 cup packed light brown sugar
- 1 cup (2 sticks) unsalted butter, cut into pieces
- 1 cup heavy cream
- 1/2 cup whole milk
- 1 teaspoon vanilla extract
- 1/2 teaspoon sea salt
- 3 cups pecan halves, toasted
Instructions
- In a heavy-bottomed 3-quart saucepan, combine the granulated sugar, brown sugar, butter, heavy cream, and milk.
- Place the saucepan over medium heat and stir constantly with a wooden spoon until the sugars are dissolved.
- Once the sugars are dissolved, bring the mixture to a boil, stirring occasionally. Clip a candy thermometer to the side of the pan, making sure it doesn’t touch the bottom.
- Continue to cook, without stirring, until the mixture reaches the soft-ball stage, which is 235-240°F (113-116°C).
- Once the mixture reaches the soft-ball stage, remove the saucepan from the heat.
- Add the vanilla extract and salt to the hot mixture. Stir gently to combine.
- Let the mixture cool undisturbed for about 10-15 minutes. Do not stir!
- After the cooling period, using a wooden spoon, begin to beat the mixture vigorously until it thickens and loses its glossy sheen. This can take anywhere from 5-10 minutes.
- The mixture is ready when it becomes thick enough to hold its shape when dropped from a spoon. If you over-beat it and it becomes too stiff, you can add a tablespoon or two of hot milk to loosen it up.
- Once the praline mixture has reached the right consistency, gently fold in the toasted pecan halves.
- Drop spoonfuls of the praline mixture onto parchment paper-lined baking sheets.
- Work quickly, as the pralines will start to set up as they cool. If the mixture becomes too stiff to work with, you can gently warm it over low heat for a few seconds to loosen it up.
- Let the pralines cool completely on the parchment paper before serving. This usually takes about 30 minutes to an hour.
Notes
- Use a heavy-bottomed saucepan to prevent scorching.
- A candy thermometer is highly recommended for accurate temperature control.
- Do not stir the mixture while it’s cooking to prevent grainy pralines.
- Cool the mixture before beating to allow for proper crystallization.
- Beat the mixture vigorously to achieve a creamy, fudge-like texture.
- Work quickly when forming the pralines as they set up fast.
- Toast the pecans to enhance their flavor.
- Store pralines in an airtight container at room temperature for up to a week or freeze for longer storage.


Leave a Comment