
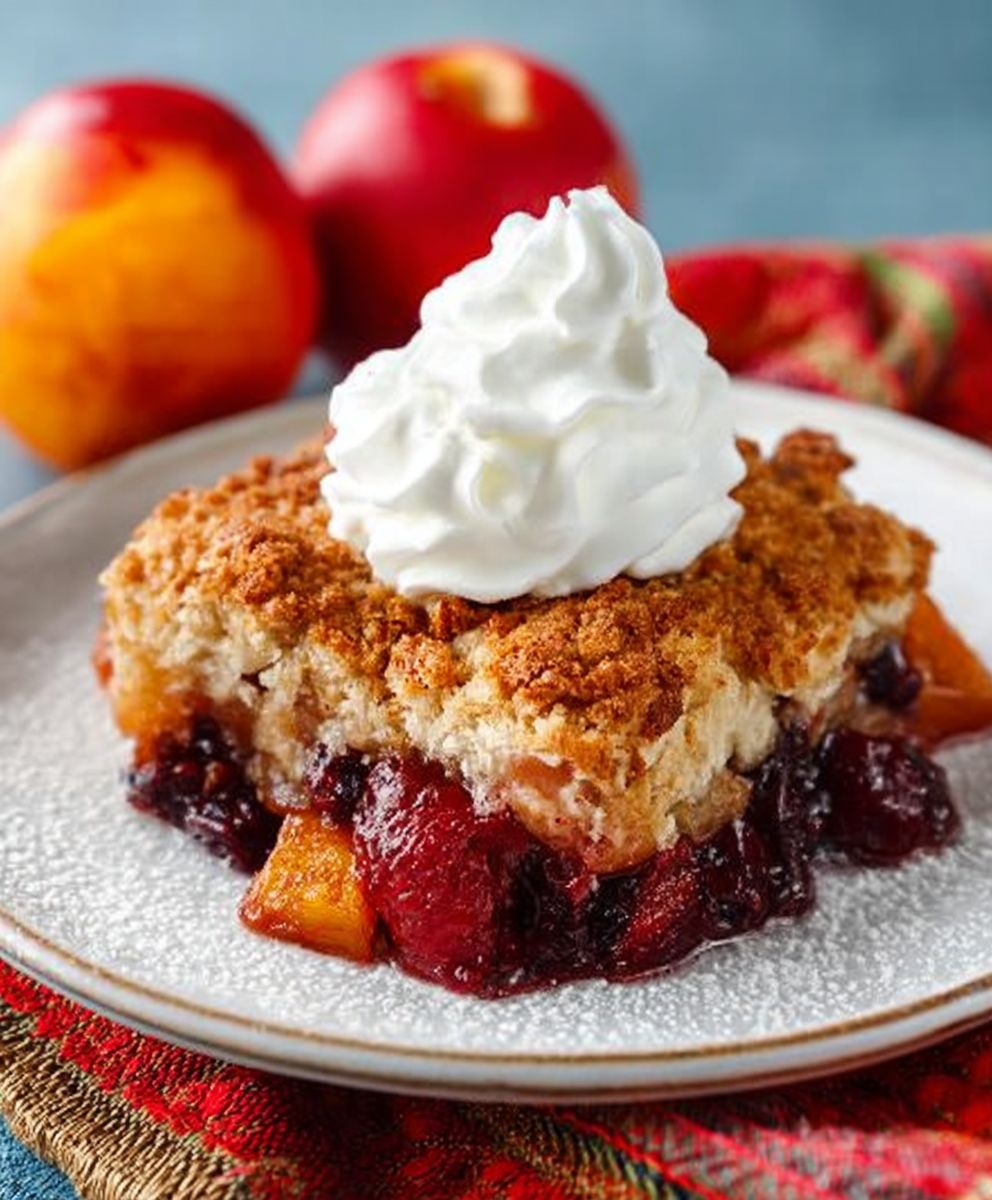
Summer fruit cobbler, a dessert that sings of sunshine and lazy afternoons, is more than just a sweet treat; it’s a warm hug in a bowl. Imagine sinking your spoon into a bubbly, golden-brown crust, releasing a burst of juicy, perfectly softened summer fruits. The aroma alone is enough to transport you to a simpler time, perhaps to your grandmother’s kitchen, where the air was always filled with the comforting scent of baking.
While the exact origins of cobbler are debated, it’s widely believed to have emerged from early American kitchens, born out of necessity and ingenuity. Colonists, missing the familiar pies of their homeland, adapted their recipes using readily available ingredients and simpler baking methods. The result? A rustic, fruit-filled delight that quickly became a beloved staple.
What makes summer fruit cobbler so irresistible? It’s the delightful combination of textures the tender, yielding fruit nestled beneath a slightly crisp, biscuit-like topping. The sweetness of the fruit, often a medley of berries, peaches, and plums, is perfectly balanced by the buttery, slightly tangy crust. And let’s not forget the convenience! Cobblers are incredibly easy to make, requiring minimal fuss and readily adaptable to whatever fruits are in season. Whether you’re a seasoned baker or a kitchen novice, this recipe is guaranteed to bring a smile to your face and a satisfied sigh to your belly.

Ingredients:
- For the Fruit Filling:
- 6 cups mixed summer fruits (peaches, nectarines, plums, berries use what’s in season!), pitted and sliced or chopped
- 1/2 cup granulated sugar (adjust to taste depending on fruit sweetness)
- 2 tablespoons cornstarch
- 1 tablespoon lemon juice
- 1/2 teaspoon ground cinnamon
- Pinch of salt
- For the Cobbler Topping:
- 1 1/2 cups all-purpose flour
- 1/4 cup granulated sugar
- 2 teaspoons baking powder
- 1/2 teaspoon salt
- 6 tablespoons (3 ounces) cold unsalted butter, cut into small cubes
- 3/4 cup milk (or buttermilk for a tangier flavor)
- 1 teaspoon vanilla extract
- 2 tablespoons coarse sugar (for sprinkling on top, optional)
Preparing the Fruit Filling:
- In a large bowl, gently combine the sliced or chopped summer fruits, granulated sugar, cornstarch, lemon juice, cinnamon, and salt. Make sure the cornstarch is evenly distributed to avoid clumps. I like to use my hands for this, but a large spoon works too!
- Let the fruit mixture sit for about 15-20 minutes. This allows the juices to release and the cornstarch to thicken them slightly. You’ll notice a beautiful, syrupy liquid forming at the bottom of the bowl. This is exactly what we want!
- While the fruit is macerating, preheat your oven to 375°F (190°C). Make sure your oven rack is in the center position for even baking.
- Pour the fruit mixture into a 9×13 inch baking dish. You can also use a deep-dish pie plate or a cast-iron skillet. Just make sure the dish is oven-safe! Spread the fruit evenly across the bottom of the dish.
Making the Cobbler Topping:
- In a separate large bowl, whisk together the all-purpose flour, granulated sugar, baking powder, and salt. This ensures that the baking powder is evenly distributed, which is crucial for a light and fluffy topping.
- Cut in the cold butter using a pastry blender or your fingertips. The goal is to create a mixture that resembles coarse crumbs. The colder the butter, the better! Cold butter creates pockets of steam in the oven, resulting in a tender and flaky topping. If you don’t have a pastry blender, you can use two knives to cut the butter into the flour mixture.
- In a separate small bowl, whisk together the milk (or buttermilk) and vanilla extract.
- Pour the wet ingredients into the dry ingredients and stir until just combined. Be careful not to overmix! Overmixing will develop the gluten in the flour, resulting in a tough topping. A few lumps are perfectly fine.
Assembling and Baking the Cobbler:
- Drop spoonfuls of the cobbler topping evenly over the fruit filling. You can use a spoon or an ice cream scoop for this. Don’t worry about covering the entire surface of the fruit; some gaps are perfectly fine. These gaps will allow the fruit juices to bubble up and create a beautiful, rustic look.
- Sprinkle the coarse sugar (if using) over the top of the cobbler topping. This will add a touch of sweetness and a lovely crunchy texture.
- Bake in the preheated oven for 35-45 minutes, or until the topping is golden brown and the fruit filling is bubbly. The exact baking time will depend on your oven, so keep an eye on it. If the topping starts to brown too quickly, you can loosely tent the cobbler with aluminum foil.
- Let the cobbler cool for at least 15-20 minutes before serving. This will allow the fruit filling to thicken slightly and prevent it from being too runny.
Serving Suggestions:
Summer fruit cobbler is delicious served warm with a scoop of vanilla ice cream, a dollop of whipped cream, or a drizzle of heavy cream. It’s also great on its own! I personally love it with a sprinkle of fresh mint or basil for a touch of freshness. You can also add a sprinkle of toasted nuts for extra crunch. Leftovers can be stored in the refrigerator for up to 3 days. Reheat gently in the oven or microwave before serving.
Tips and Variations:
- Fruit Combinations: Feel free to experiment with different fruit combinations! Peaches and blueberries, raspberries and blackberries, or plums and apricots are all delicious options. You can also use frozen fruit if fresh fruit is not available. Just be sure to thaw the frozen fruit completely and drain off any excess liquid before using.
- Spice Variations: Try adding a pinch of nutmeg, ginger, or cardamom to the fruit filling for a different flavor profile. You can also add a splash of almond extract to the cobbler topping.
- Nutty Topping: Add 1/2 cup of chopped nuts (such as pecans, walnuts, or almonds) to the cobbler topping for extra flavor and texture.
- Citrus Zest: Add the zest of one lemon or orange to the fruit filling for a bright and zesty flavor.
- Brown Sugar: Substitute brown sugar for granulated sugar in the cobbler topping for a richer, more caramel-like flavor.
- Gluten-Free Option: Use a gluten-free all-purpose flour blend in the cobbler topping to make it gluten-free. Be sure to use a blend that contains xanthan gum for best results.
- Vegan Option: Use a plant-based butter alternative and plant-based milk in the cobbler topping to make it vegan.
- Individual Cobblers: Divide the fruit filling and cobbler topping among individual ramekins for individual servings. Reduce the baking time accordingly.
- Make Ahead: You can prepare the fruit filling and cobbler topping ahead of time and store them separately in the refrigerator. Assemble the cobbler just before baking.
Troubleshooting:
- Topping is too dry: If the cobbler topping is too dry, add a little more milk, one tablespoon at a time, until it reaches the desired consistency.
- Topping is too wet: If the cobbler topping is too wet, add a little more flour, one tablespoon at a time, until it reaches the desired consistency.
- Fruit filling is too runny: If the fruit filling is too runny, increase the amount of cornstarch slightly.
- Topping is browning too quickly: If the topping is browning too quickly, loosely tent the cobbler with aluminum foil.
- Fruit is not cooked through: If the fruit is not cooked through, continue baking the cobbler for a few more minutes, or until the fruit is tender.
Enjoy your delicious summer fruit cobbler!
Conclusion:
This summer fruit cobbler is more than just a dessert; it’s a celebration of the season’s bounty, a warm hug on a cool evening, and a guaranteed crowd-pleaser all rolled into one delicious package. I truly believe this recipe is a must-try for anyone who appreciates simple, honest flavors and the joy of baking. The combination of juicy, ripe summer fruits bubbling beneath a golden, slightly crisp topping is simply irresistible. The sweetness of the fruit is perfectly balanced by the buttery, slightly tangy biscuit topping, creating a symphony of textures and tastes that will leave you wanting more.
But what truly sets this cobbler apart is its versatility. Feel free to experiment with different fruit combinations depending on what’s in season and what you have on hand. Peaches and blueberries are a classic pairing, but don’t be afraid to try nectarines and raspberries, or even a mix of cherries, plums, and blackberries. If you’re feeling adventurous, a touch of lemon zest or a sprinkle of cinnamon can add a delightful twist to the fruit filling.
And the serving suggestions are endless! A scoop of vanilla ice cream is the obvious choice, but a dollop of freshly whipped cream or a drizzle of crème fraîche would also be divine. For a truly decadent experience, try serving it warm with a scoop of salted caramel ice cream the salty-sweet combination is simply heavenly. You could even get creative and crumble some toasted nuts over the top for added crunch and flavor.
Beyond the classic toppings, consider these variations to make it your own. For a slightly healthier version, you can substitute some of the all-purpose flour in the topping with whole wheat flour. This will add a nutty flavor and a bit more fiber. If you’re looking for a gluten-free option, use a gluten-free flour blend specifically designed for baking. Just be sure to add a little xanthan gum to help bind the ingredients together.
Another fun variation is to make individual cobblers in ramekins. This is a great way to control portion sizes and makes for a beautiful presentation. Simply divide the fruit filling and topping among the ramekins and bake until golden brown.
I’ve poured my heart and soul into perfecting this recipe, and I’m confident that you’ll love it as much as I do. It’s the perfect dessert for a summer barbecue, a family gathering, or simply a cozy night in. It’s also surprisingly easy to make, even for novice bakers. The recipe is straightforward, the ingredients are readily available, and the results are always impressive.
So, what are you waiting for? Gather your ingredients, preheat your oven, and get ready to bake a truly unforgettable summer fruit cobbler. I promise you won’t regret it. And once you’ve tried it, I’d love to hear about your experience! Share your photos and comments on social media using [Your Hashtag Here] I can’t wait to see your creations and hear about your favorite fruit combinations and serving suggestions. Happy baking! I am sure that this will become a staple in your home, just as it has in mine. Enjoy!
Summer Fruit Cobbler: The Ultimate Guide & Delicious Recipe
A simple and delicious summer fruit cobbler bursting with fresh, seasonal fruits and topped with a golden, buttery cobbler crust.
Ingredients
- 6 cups mixed summer fruits (peaches, nectarines, plums, berries use what’s in season!), pitted and sliced or chopped
- 1/2 cup granulated sugar (adjust to taste depending on fruit sweetness)
- 2 tablespoons cornstarch
- 1 tablespoon lemon juice
- 1/2 teaspoon ground cinnamon
- Pinch of salt
- 1 1/2 cups all-purpose flour
- 1/4 cup granulated sugar
- 2 teaspoons baking powder
- 1/2 teaspoon salt
- 6 tablespoons (3 ounces) cold unsalted butter, cut into small cubes
- 3/4 cup milk (or buttermilk for a tangier flavor)
- 1 teaspoon vanilla extract
- 2 tablespoons coarse sugar (for sprinkling on top, optional)
Instructions
- Prepare the Fruit Filling: In a large bowl, gently combine the sliced or chopped summer fruits, granulated sugar, cornstarch, lemon juice, cinnamon, and salt. Ensure the cornstarch is evenly distributed. Let the fruit mixture sit for 15-20 minutes to macerate.
- Preheat your oven to 375°F (190°C) with the rack in the center position.
- Pour the fruit mixture into a 9×13 inch baking dish (or deep-dish pie plate/cast-iron skillet). Spread the fruit evenly.
- Make the Cobbler Topping: In a separate large bowl, whisk together the all-purpose flour, granulated sugar, baking powder, and salt.
- Cut in the cold butter using a pastry blender or your fingertips until the mixture resembles coarse crumbs.
- In a separate small bowl, whisk together the milk (or buttermilk) and vanilla extract.
- Pour the wet ingredients into the dry ingredients and stir until just combined. Be careful not to overmix; a few lumps are fine.
- Assemble and Bake: Drop spoonfuls of the cobbler topping evenly over the fruit filling.
- Sprinkle the coarse sugar (if using) over the top of the cobbler topping.
- Bake in the preheated oven for 35-45 minutes, or until the topping is golden brown and the fruit filling is bubbly. If the topping browns too quickly, tent with aluminum foil.
- Let the cobbler cool for at least 15-20 minutes before serving.
Notes
- Serve warm with vanilla ice cream, whipped cream, or heavy cream.
- Leftovers can be stored in the refrigerator for up to 3 days. Reheat gently.
- Fruit Combinations: Experiment with different fruit combinations like peaches and blueberries, raspberries and blackberries, or plums and apricots. Use frozen fruit if fresh is unavailable (thaw and drain excess liquid first).
- Spice Variations: Add a pinch of nutmeg, ginger, or cardamom to the fruit filling or a splash of almond extract to the cobbler topping.
- Nutty Topping: Add 1/2 cup of chopped nuts to the cobbler topping.
- Citrus Zest: Add the zest of one lemon or orange to the fruit filling.
- Brown Sugar: Substitute brown sugar for granulated sugar in the cobbler topping.
- Gluten-Free Option: Use a gluten-free all-purpose flour blend in the cobbler topping.
- Vegan Option: Use a plant-based butter alternative and plant-based milk in the cobbler topping.
- Individual Cobblers: Divide the fruit filling and cobbler topping among individual ramekins for individual servings. Reduce the baking time accordingly.
- Make Ahead: You can prepare the fruit filling and cobbler topping ahead of time and store them separately in the refrigerator. Assemble the cobbler just before baking.
- Troubleshooting:
- Topping is too dry: Add a little more milk, one tablespoon at a time.
- Topping is too wet: Add a little more flour, one tablespoon at a time.
- Fruit filling is too runny: Increase the amount of cornstarch slightly.
- Topping is browning too quickly: Loosely tent the cobbler with aluminum foil.
- Fruit is not cooked through: Continue baking the cobbler for a few more minutes, or until the fruit is tender.

Leave a Comment