
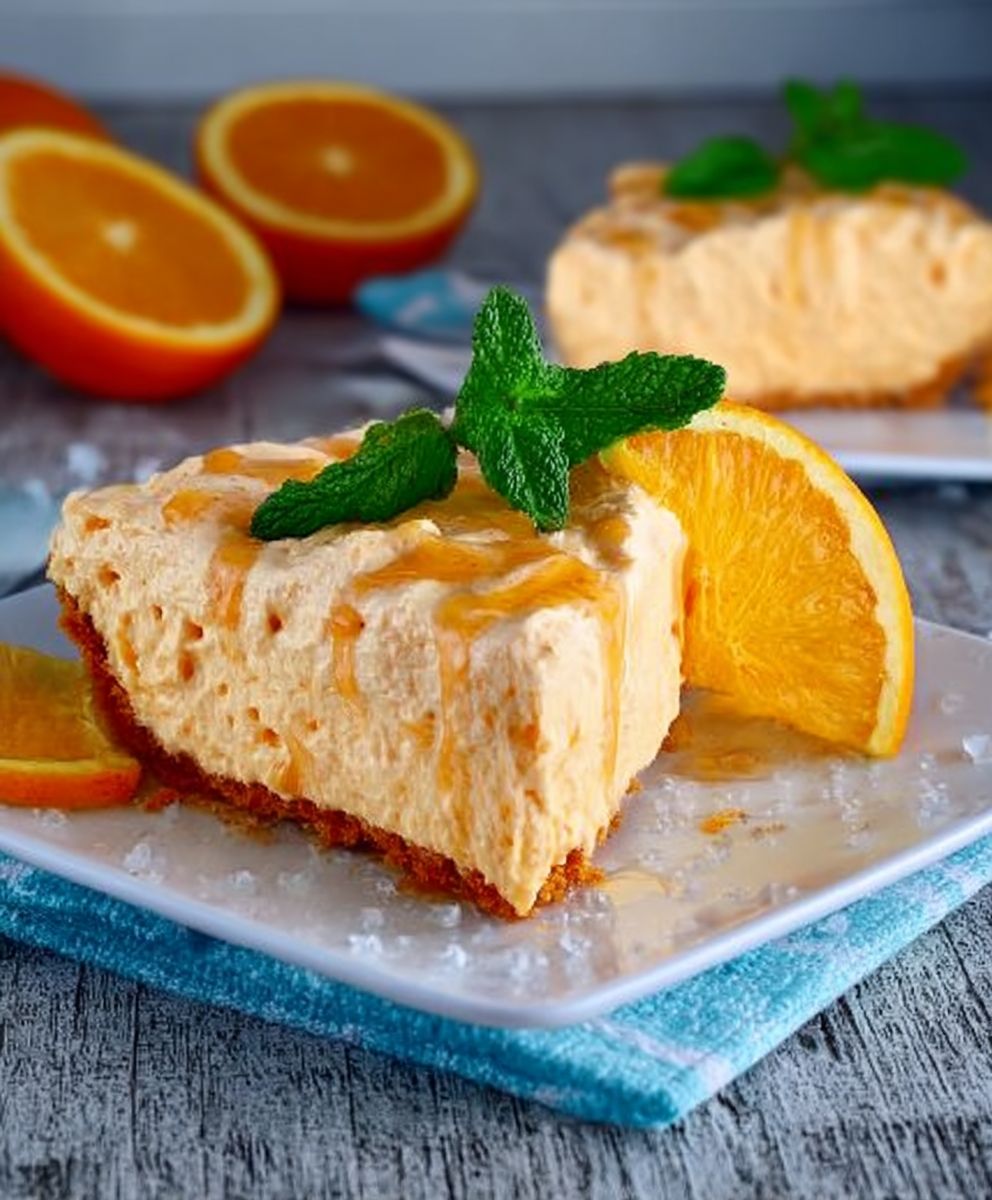
Orange Dream Whip Pie: Just the name conjures up images of sunshine, creamy clouds, and pure dessert bliss, doesn’t it? This isn’t just a pie; it’s a nostalgic trip back to carefree summer days, a taste of childhood joy in every single bite. Imagine a dessert so light, so airy, it practically floats off your spoon, leaving behind a vibrant citrusy tang that dances on your tongue.
While the exact origins of this delightful pie are a bit hazy, its popularity soared in the mid-20th century, a time when convenience and vibrant flavors were all the rage. It perfectly embodies the era’s love for easy-to-make desserts that didn’t compromise on taste. Think potlucks, family gatherings, and neighborhood picnics the Orange Dream Whip Pie was a star at them all!
But what makes this pie so universally loved? It’s the perfect combination of textures: a crisp, buttery crust (whether homemade or store-bought, we won’t judge!), a smooth, creamy filling that melts in your mouth, and that bright, zesty orange flavor that cuts through the richness. It’s incredibly easy to make, requiring minimal baking time and readily available ingredients. Plus, who can resist that beautiful, vibrant orange hue? Get ready to experience a slice of heaven with this classic dessert!

Ingredients:
- For the Crust:
- 1 ½ cups graham cracker crumbs
- ? cup granulated sugar
- 6 tablespoons (3 ounces) unsalted butter, melted
- For the Orange Dream Filling:
- 1 (8 ounce) package cream cheese, softened
- 1 (14 ounce) can sweetened condensed milk
- 1 (6 ounce) can frozen orange juice concentrate, thawed
- 1 teaspoon vanilla extract
- 1 (8 ounce) container frozen whipped topping, thawed
- Orange zest, for garnish (optional)
Preparing the Graham Cracker Crust:
- Combine the Dry Ingredients: In a medium bowl, thoroughly mix together the graham cracker crumbs and granulated sugar. Make sure there are no large clumps of crumbs. A whisk works well for this.
- Add the Melted Butter: Pour the melted butter into the graham cracker crumb mixture. Stir until the crumbs are evenly moistened. The mixture should resemble wet sand. If it seems too dry, add a tablespoon of melted butter at a time until the desired consistency is achieved.
- Press into the Pie Plate: Transfer the graham cracker crumb mixture to a 9-inch pie plate. Use the bottom of a measuring cup or your fingers to firmly press the crumbs evenly across the bottom and up the sides of the pie plate. Make sure the crust is compact and uniform in thickness. This will help it hold its shape and prevent it from crumbling when you slice the pie.
- Bake the Crust (Optional): For a firmer crust, bake in a preheated oven at 350°F (175°C) for 8-10 minutes. This step is optional, but it helps to set the crust and prevent it from becoming soggy. If you choose to bake the crust, let it cool completely before adding the filling. If you prefer a no-bake crust, simply chill the crust in the refrigerator for at least 30 minutes to allow it to firm up.
Making the Orange Dream Filling:
- Beat the Cream Cheese: In a large bowl, beat the softened cream cheese with an electric mixer until it is smooth and creamy. This is a crucial step to ensure a lump-free filling. If the cream cheese is not softened enough, it will be difficult to beat smooth.
- Add Sweetened Condensed Milk: Gradually add the sweetened condensed milk to the cream cheese, beating on low speed until well combined. Be sure to scrape down the sides of the bowl occasionally to ensure that all ingredients are fully incorporated.
- Incorporate Orange Juice Concentrate and Vanilla: Add the thawed orange juice concentrate and vanilla extract to the cream cheese mixture. Beat until smooth and well combined. The mixture will thicken slightly as the orange juice concentrate is added.
- Fold in Whipped Topping: Gently fold in the thawed whipped topping until just combined. Be careful not to overmix, as this can deflate the whipped topping and result in a less airy filling. Use a spatula to gently fold the whipped topping in, lifting from the bottom of the bowl and folding over the top.
Assembling the Orange Dream Whip Pie:
- Pour Filling into Crust: Pour the orange dream filling into the prepared graham cracker crust. Spread the filling evenly to the edges of the crust.
- Chill the Pie: Cover the pie with plastic wrap and refrigerate for at least 4 hours, or preferably overnight, to allow the filling to set completely. This chilling time is essential for the pie to hold its shape when sliced.
- Garnish (Optional): Before serving, garnish the pie with orange zest, if desired. You can also add a dollop of whipped cream or a few orange slices for an extra touch of elegance.
- Slice and Serve: Slice the pie into wedges and serve chilled. Enjoy the creamy, dreamy orange flavor!
Tips for Success:
- Softened Cream Cheese is Key: Make sure your cream cheese is fully softened before starting. This will ensure a smooth and lump-free filling. Leave it at room temperature for at least an hour, or microwave it in 15-second intervals until softened, being careful not to melt it.
- Don’t Overmix: When folding in the whipped topping, be gentle and avoid overmixing. Overmixing can deflate the whipped topping and result in a less airy filling.
- Chill Time is Important: Allow the pie to chill for at least 4 hours, or preferably overnight, to allow the filling to set completely. This will make it easier to slice and serve.
- Variations: Feel free to experiment with different flavors. You can substitute the orange juice concentrate with other fruit juice concentrates, such as lemon, lime, or pineapple. You can also add a layer of chocolate shavings or chopped nuts to the crust for added flavor and texture.
- Make Ahead: This pie can be made ahead of time and stored in the refrigerator for up to 3 days. Just be sure to cover it tightly with plastic wrap to prevent it from drying out.
Serving Suggestions:
- Serve chilled as a refreshing dessert on a warm day.
- Pair with a scoop of vanilla ice cream or a dollop of whipped cream.
- Garnish with fresh orange slices or berries.
- Enjoy with a cup of coffee or tea.
Storage Instructions:
- Store leftover pie in the refrigerator, covered tightly with plastic wrap, for up to 3 days.
- The pie can also be frozen for longer storage. Wrap it tightly in plastic wrap and then in aluminum foil. It can be frozen for up to 2 months. Thaw in the refrigerator overnight before serving.
Nutritional Information (Approximate, per slice):
- Calories: 350-400
- Fat: 20-25g
- Saturated Fat: 12-15g
- Cholesterol: 60-70mg
- Sodium: 200-250mg
- Carbohydrates: 35-40g
- Sugar: 25-30g
- Protein: 4-5g
Note: Nutritional information is approximate and may vary depending on the specific ingredients used.
Conclusion:
This Orange Dream Whip Pie isn’t just a dessert; it’s a burst of sunshine on a plate, a nostalgic trip back to carefree summer days, and a guaranteed crowd-pleaser all rolled into one! I truly believe this recipe is a must-try for anyone looking for a simple, yet utterly delightful treat. The creamy, dreamy texture combined with the bright, zesty orange flavor is simply irresistible. It’s the kind of dessert that disappears in minutes, leaving everyone wanting more.
But why is it a must-try? Because it’s incredibly easy to make! Seriously, you don’t need to be a seasoned baker to whip this up. The ingredient list is short and sweet, and the steps are straightforward. Plus, it requires no baking! That’s right, no oven required, making it the perfect dessert for those hot summer months or any time you want a quick and refreshing treat without heating up your kitchen.
Beyond its simplicity and deliciousness, this Orange Dream Whip Pie is also incredibly versatile. Feel free to get creative with your serving suggestions and variations! For a truly decadent experience, top each slice with a dollop of freshly whipped cream and a sprinkle of orange zest. You could also add a few segments of fresh orange for an extra burst of citrus flavor.
Looking for variations? Consider using a different type of crust. A graham cracker crust is classic, but a shortbread crust or even a chocolate cookie crust would also be fantastic. For a richer flavor, you could add a layer of melted chocolate to the bottom of the crust before adding the filling.
Another fun variation is to incorporate other citrus fruits. A combination of orange and grapefruit would be incredibly refreshing, or you could try adding a touch of lime for a more complex flavor profile. You could even swirl in some raspberry jam for a beautiful and delicious twist.
If you’re feeling adventurous, try adding a splash of orange liqueur to the filling for an extra kick. Just be sure to adjust the amount of sugar accordingly. And for a truly unique presentation, consider making individual mini pies in small ramekins or muffin tins.
The possibilities are endless! The beauty of this recipe is that it’s a blank canvas for your creativity. Don’t be afraid to experiment and make it your own. I encourage you to try this Orange Dream Whip Pie recipe and discover just how easy and delicious it is.
I’m confident that you’ll love it as much as I do. It’s the perfect dessert for any occasion, from a casual family gathering to a more formal dinner party. It’s also a great recipe to make with kids, as they’ll love helping to mix the ingredients and decorate the finished pie.
So, what are you waiting for? Gather your ingredients, put on some music, and get ready to create a little bit of sunshine in your kitchen. And most importantly, have fun!
Once you’ve tried this recipe, I’d love to hear about your experience. Did you make any variations? What did your family and friends think? Share your photos and comments below! I can’t wait to see what you create. Happy baking (or rather, no-baking)! Let me know how your Orange Dream Whip Pie turns out!
Orange Dream Whip Pie: A Deliciously Easy Recipe
Creamy, no-bake Orange Dream Whip Pie with a graham cracker crust. A refreshing and easy dessert perfect for any occasion!
Ingredients
- 1 ½ cups graham cracker crumbs
- ? cup granulated sugar
- 6 tablespoons (3 ounces) unsalted butter, melted
- 1 (8 ounce) package cream cheese, softened
- 1 (14 ounce) can sweetened condensed milk
- 1 (6 ounce) can frozen orange juice concentrate, thawed
- 1 teaspoon vanilla extract
- 1 (8 ounce) container frozen whipped topping, thawed
- Orange zest, for garnish (optional)
Instructions
- Combine the Dry Ingredients: In a medium bowl, thoroughly mix together the graham cracker crumbs and granulated sugar. Make sure there are no large clumps of crumbs. A whisk works well for this.
- Add the Melted Butter: Pour the melted butter into the graham cracker crumb mixture. Stir until the crumbs are evenly moistened. The mixture should resemble wet sand. If it seems too dry, add a tablespoon of melted butter at a time until the desired consistency is achieved.
- Press into the Pie Plate: Transfer the graham cracker crumb mixture to a 9-inch pie plate. Use the bottom of a measuring cup or your fingers to firmly press the crumbs evenly across the bottom and up the sides of the pie plate. Make sure the crust is compact and uniform in thickness. This will help it hold its shape and prevent it from crumbling when you slice the pie.
- Bake the Crust (Optional): For a firmer crust, bake in a preheated oven at 350°F (175°C) for 8-10 minutes. This step is optional, but it helps to set the crust and prevent it from becoming soggy. If you choose to bake the crust, let it cool completely before adding the filling. If you prefer a no-bake crust, simply chill the crust in the refrigerator for at least 30 minutes to allow it to firm up.
- Beat the Cream Cheese: In a large bowl, beat the softened cream cheese with an electric mixer until it is smooth and creamy. This is a crucial step to ensure a lump-free filling. If the cream cheese is not softened enough, it will be difficult to beat smooth.
- Add Sweetened Condensed Milk: Gradually add the sweetened condensed milk to the cream cheese, beating on low speed until well combined. Be sure to scrape down the sides of the bowl occasionally to ensure that all ingredients are fully incorporated.
- Incorporate Orange Juice Concentrate and Vanilla: Add the thawed orange juice concentrate and vanilla extract to the cream cheese mixture. Beat until smooth and well combined. The mixture will thicken slightly as the orange juice concentrate is added.
- Fold in Whipped Topping: Gently fold in the thawed whipped topping until just combined. Be careful not to overmix, as this can deflate the whipped topping and result in a less airy filling. Use a spatula to gently fold the whipped topping in, lifting from the bottom of the bowl and folding over the top.
- Pour Filling into Crust: Pour the orange dream filling into the prepared graham cracker crust. Spread the filling evenly to the edges of the crust.
- Chill the Pie: Cover the pie with plastic wrap and refrigerate for at least 4 hours, or preferably overnight, to allow the filling to set completely. This chilling time is essential for the pie to hold its shape when sliced.
- Garnish (Optional): Before serving, garnish the pie with orange zest, if desired. You can also add a dollop of whipped cream or a few orange slices for an extra touch of elegance.
- Slice and Serve: Slice the pie into wedges and serve chilled. Enjoy the creamy, dreamy orange flavor!
Notes
- Softened Cream Cheese is Key: Make sure your cream cheese is fully softened before starting. This will ensure a smooth and lump-free filling. Leave it at room temperature for at least an hour, or microwave it in 15-second intervals until softened, being careful not to melt it.
- Don’t Overmix: When folding in the whipped topping, be gentle and avoid overmixing. Overmixing can deflate the whipped topping and result in a less airy filling.
- Chill Time is Important: Allow the pie to chill for at least 4 hours, or preferably overnight, to allow the filling to set completely. This will make it easier to slice and serve.
- Variations: Feel free to experiment with different flavors. You can substitute the orange juice concentrate with other fruit juice concentrates, such as lemon, lime, or pineapple. You can also add a layer of chocolate shavings or chopped nuts to the crust for added flavor and texture.
- Make Ahead: This pie can be made ahead of time and stored in the refrigerator for up to 3 days. Just be sure to cover it tightly with plastic wrap to prevent it from drying out.


Leave a Comment