
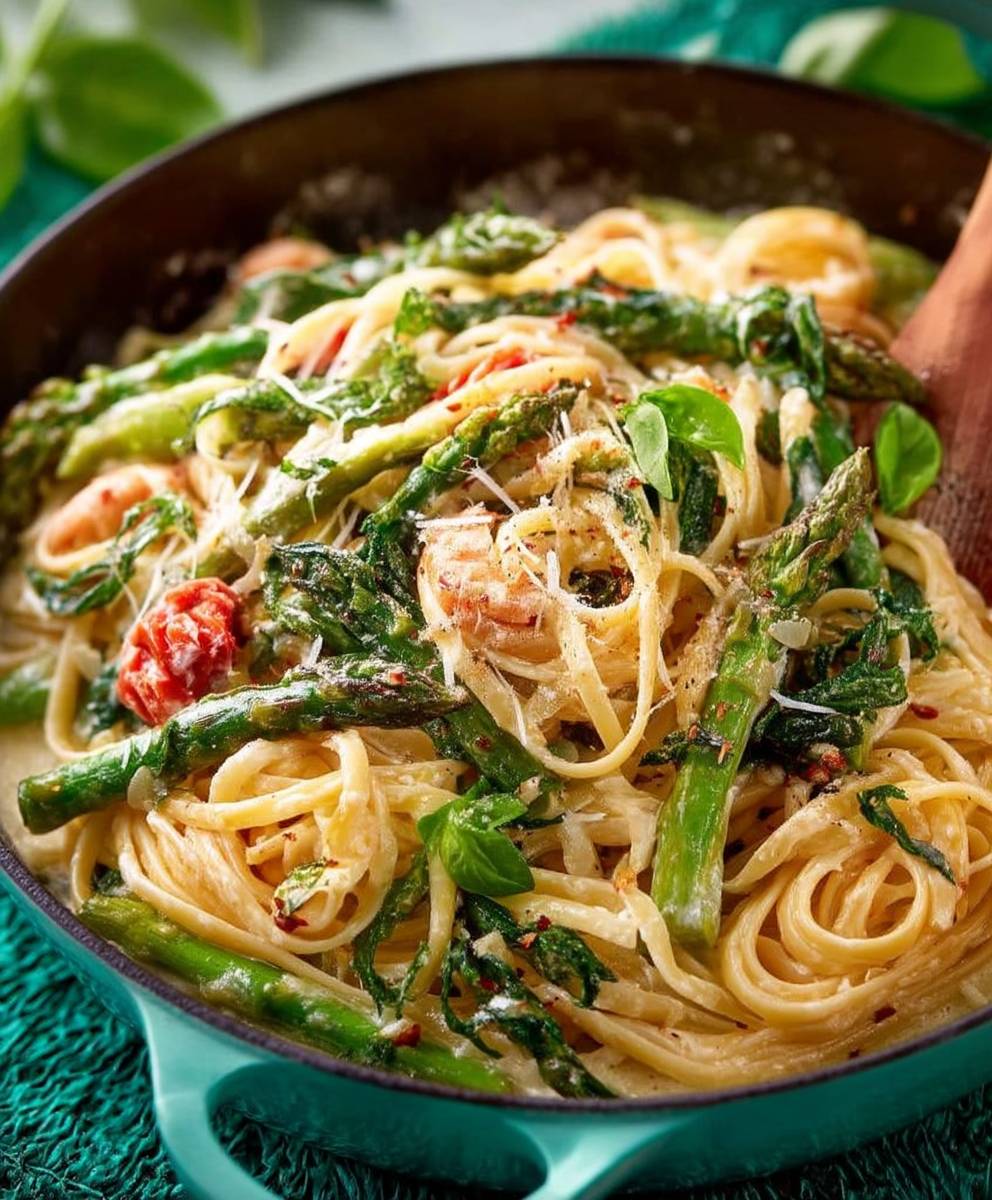
Pasta Primavera, a vibrant celebration of spring on a plate, is more than just a meal; it’s an edible ode to fresh, seasonal vegetables. Imagine twirling your fork around perfectly al dente pasta, each strand coated in a light, creamy sauce and studded with tender-crisp asparagus, sweet peas, and colorful bell peppers. Doesn’t that sound divine?
While the exact origins are debated, Pasta Primavera is widely credited to Sirio Maccioni, owner of the legendary Le Cirque restaurant in New York City. In the 1970s, he sought to create a dish that showcased the beauty and bounty of spring vegetables. The result was an instant classic, quickly becoming a favorite among food enthusiasts and home cooks alike.
What makes this dish so universally appealing? It’s the perfect balance of flavors and textures. The sweetness of the vegetables complements the richness of the sauce, while the slight bite of the pasta provides a satisfying contrast. Plus, it’s incredibly versatile! You can easily customize it with your favorite vegetables, making it a healthy and delicious option for any occasion. Whether you’re looking for a quick weeknight dinner or an elegant dish to impress your guests, Pasta Primavera is sure to delight.

Ingredients:
- 1 pound pasta (such as penne, farfalle, or fusilli)
- 1 tablespoon olive oil
- 1 onion, chopped
- 2 cloves garlic, minced
- 1 red bell pepper, seeded and chopped
- 1 yellow bell pepper, seeded and chopped
- 1 cup broccoli florets
- 1 cup asparagus, cut into 1-inch pieces
- 1 cup sugar snap peas, trimmed
- 1 cup cherry tomatoes, halved
- 1/2 cup vegetable broth
- 1/4 cup heavy cream (optional, for extra richness)
- 1/4 cup grated Parmesan cheese, plus more for serving
- 2 tablespoons chopped fresh basil
- 2 tablespoons chopped fresh parsley
- Salt and freshly ground black pepper to taste
- Red pepper flakes (optional, for a little heat)
Preparing the Vegetables:
Before we even think about the pasta, let’s get our vibrant veggies ready. This step is crucial because we want them perfectly cooked tender-crisp, not mushy!
- Wash and chop all the vegetables. This includes the onion, garlic, bell peppers (both red and yellow), broccoli florets, asparagus, sugar snap peas, and cherry tomatoes. Make sure everything is roughly the same size for even cooking. I like to halve the cherry tomatoes, but you can quarter them if they’re particularly large.
- Prepare an ice bath. Fill a large bowl with ice and water. This is for shocking the vegetables after blanching, which will stop the cooking process and preserve their bright colors and crisp texture.
- Blanch the broccoli and asparagus. Bring a large pot of salted water to a boil. Add the broccoli florets and asparagus pieces and cook for 2-3 minutes, or until they turn bright green and are slightly tender.
- Immediately transfer the blanched vegetables to the ice bath. Let them cool completely in the ice bath, about 5 minutes. This is key to preventing them from overcooking.
- Drain the blanched vegetables well. Once they’re cool, drain them thoroughly and set them aside.
Cooking the Pasta:
While the vegetables are getting their spa treatment (the ice bath!), let’s get the pasta cooking. Remember to salt your pasta water it’s the only chance you have to season the pasta itself!
- Bring a large pot of salted water to a boil. Use plenty of water at least 6 quarts for a pound of pasta. The salt should be generous; it should taste like the sea!
- Add the pasta and cook according to package directions. Cook until al dente, which means “to the tooth” in Italian. It should be firm but not crunchy. I usually start checking for doneness a minute or two before the package suggests.
- Reserve about 1 cup of pasta water before draining. This starchy water is liquid gold! We’ll use it later to help create a creamy sauce that clings beautifully to the pasta and vegetables.
- Drain the pasta well. Don’t rinse it unless you’re not planning to use it right away. Rinsing removes the starch that helps the sauce adhere.
Sautéing the Aromatics and Vegetables:
Now for the fun part building the flavor base! We’ll start by sautéing the aromatics and then add the remaining vegetables, creating a symphony of tastes and textures.
- Heat the olive oil in a large skillet or Dutch oven over medium heat. Make sure the skillet is large enough to accommodate all the pasta and vegetables later.
- Add the chopped onion and cook until softened and translucent, about 5 minutes. Stir occasionally to prevent burning.
- Add the minced garlic and cook for another minute, until fragrant. Be careful not to burn the garlic, as it can become bitter.
- Add the chopped bell peppers (red and yellow) and cook until slightly softened, about 5 minutes. They should still have a bit of a bite to them.
- Add the sugar snap peas and cherry tomatoes and cook for another 2-3 minutes, until the sugar snap peas are bright green and the cherry tomatoes are slightly softened.
Bringing it All Together:
This is where the magic happens! We’ll combine the pasta, vegetables, and sauce to create a dish that’s both satisfying and visually stunning.
- Add the cooked pasta to the skillet with the vegetables. Toss to combine.
- Pour in the vegetable broth and stir well. This will help deglaze the pan and create a light sauce.
- If using, stir in the heavy cream. This will add richness and creaminess to the sauce. If you’re skipping the cream, you can add a little extra vegetable broth or pasta water for moisture.
- Add the blanched broccoli and asparagus. Gently toss to combine.
- Stir in the grated Parmesan cheese, fresh basil, and fresh parsley. The Parmesan will melt into the sauce, adding a salty, savory flavor.
- Season with salt, freshly ground black pepper, and red pepper flakes (if using) to taste. Be sure to taste and adjust the seasonings as needed.
- If the sauce is too thick, add a little of the reserved pasta water until it reaches your desired consistency. The pasta water will help the sauce cling to the pasta and vegetables.
- Cook for another 1-2 minutes, until everything is heated through and the sauce has thickened slightly.
Serving:
Now it’s time to enjoy the fruits (and vegetables!) of your labor. Serve this Pasta Primavera immediately for the best flavor and texture.
- Serve the Pasta Primavera hot.
- Garnish with extra grated Parmesan cheese, fresh basil, and a drizzle of olive oil, if desired.
- Serve with a side of crusty bread for soaking up the delicious sauce.
Tips and Variations:
Pasta Primavera is a very versatile dish, so feel free to experiment with different vegetables and flavors. Here are a few ideas:
- Use different vegetables. Other great additions include zucchini, yellow squash, mushrooms, peas, and spinach.
- Add protein. Grilled chicken, shrimp, or sausage would be delicious additions.
- Use a different type of cheese. Pecorino Romano or Asiago would be great alternatives to Parmesan.
- Add lemon zest and juice. This will brighten up the flavors and add a touch of acidity.
- Make it vegan. Skip the Parmesan cheese and use a plant-based cream alternative.
Enjoy your homemade Pasta Primavera! I hope you love it as much as I do.
Conclusion:
So there you have it! These aren’t just any old rissoles; these chicken rissoles are a flavor explosion waiting to happen. From the juicy, perfectly seasoned chicken to the crispy, golden-brown exterior, every bite is a testament to simple ingredients transformed into something truly special. I genuinely believe this recipe is a must-try for anyone looking for a quick, easy, and incredibly satisfying meal.
But why is this recipe a must-try, you ask? Well, beyond the incredible taste, it’s the versatility that really seals the deal. It’s perfect for a weeknight dinner when you’re short on time but still craving something homemade and delicious. It’s also fantastic for meal prepping make a big batch on Sunday and enjoy them throughout the week in salads, sandwiches, or alongside your favorite sides. And let’s not forget the kid-friendly factor! Even the pickiest eaters will gobble these up, making it a win-win for everyone at the table.
Now, let’s talk serving suggestions and variations, because the possibilities are truly endless! For a classic pairing, serve these chicken rissoles with creamy mashed potatoes and a side of steamed green beans. A dollop of gravy adds an extra layer of richness and flavor. Alternatively, you could create a delicious rissoles burger by placing them on toasted buns with your favorite toppings like lettuce, tomato, onion, and a tangy sauce.
If you’re feeling adventurous, why not try some variations? For a spicier kick, add a pinch of chili flakes or a dash of hot sauce to the chicken mixture. You could also incorporate different herbs and spices to customize the flavor profile to your liking. Think fresh thyme, rosemary, or even a touch of smoked paprika. For a healthier twist, try baking the rissoles instead of frying them. Simply preheat your oven to 375°F (190°C), place the rissoles on a baking sheet lined with parchment paper, and bake for about 20-25 minutes, or until golden brown and cooked through.
Another fun variation is to add some finely chopped vegetables to the chicken mixture. Grated zucchini, carrots, or even some finely diced bell peppers can add extra nutrients and flavor. You could also experiment with different types of breadcrumbs. Panko breadcrumbs will give you an extra crispy coating, while whole wheat breadcrumbs will add a touch of nuttiness.
And don’t forget about the dipping sauces! These chicken rissoles are delicious on their own, but a flavorful dipping sauce can take them to the next level. Try serving them with a creamy garlic aioli, a sweet and tangy barbecue sauce, or even a simple honey mustard dip. The choice is yours!
I’m so excited for you to try this recipe and experience the deliciousness for yourself. I truly believe you’ll love these chicken rissoles as much as I do. So, gather your ingredients, put on your apron, and get ready to create something amazing!
Once you’ve made them, I would absolutely love to hear about your experience. Did you make any variations? What did you serve them with? What did your family think? Share your photos and stories in the comments below! I can’t wait to see what you create. Happy cooking!
Pasta Primavera: A Fresh and Vibrant Spring Pasta Recipe
Vibrant Pasta Primavera with fresh spring vegetables. Easily customizable and perfect for a light, satisfying meal.
Ingredients
- 1 pound pasta (such as penne, farfalle, or fusilli)
- 1 tablespoon olive oil
- 1 onion, chopped
- 2 cloves garlic, minced
- 1 red bell pepper, seeded and chopped
- 1 yellow bell pepper, seeded and chopped
- 1 cup broccoli florets
- 1 cup asparagus, cut into 1-inch pieces
- 1 cup sugar snap peas, trimmed
- 1 cup cherry tomatoes, halved
- 1/2 cup vegetable broth
- 1/4 cup heavy cream (optional, for extra richness)
- 1/4 cup grated Parmesan cheese, plus more for serving
- 2 tablespoons chopped fresh basil
- 2 tablespoons chopped fresh parsley
- Salt and freshly ground black pepper to taste
- Red pepper flakes (optional, for a little heat)
Instructions
- Prepare the Vegetables: Wash and chop all the vegetables. Prepare an ice bath. Blanch the broccoli and asparagus in boiling salted water for 2-3 minutes. Immediately transfer to the ice bath to cool, then drain well.
- Cook the Pasta: Bring a large pot of salted water to a boil. Add the pasta and cook according to package directions until al dente. Reserve 1 cup of pasta water before draining. Drain the pasta well.
- Sauté the Aromatics and Vegetables: Heat the olive oil in a large skillet or Dutch oven over medium heat. Add the chopped onion and cook until softened, about 5 minutes. Add the minced garlic and cook for another minute, until fragrant. Add the chopped bell peppers and cook until slightly softened, about 5 minutes. Add the sugar snap peas and cherry tomatoes and cook for another 2-3 minutes.
- Bring it All Together: Add the cooked pasta to the skillet with the vegetables. Toss to combine. Pour in the vegetable broth and stir well. If using, stir in the heavy cream. Add the blanched broccoli and asparagus. Gently toss to combine. Stir in the grated Parmesan cheese, fresh basil, and fresh parsley. Season with salt, pepper, and red pepper flakes (if using) to taste. If the sauce is too thick, add a little of the reserved pasta water until it reaches your desired consistency. Cook for another 1-2 minutes, until everything is heated through and the sauce has thickened slightly.
- Serving: Serve the Pasta Primavera hot. Garnish with extra grated Parmesan cheese, fresh basil, and a drizzle of olive oil, if desired. Serve with a side of crusty bread.
Notes
- Feel free to substitute your favorite vegetables. Zucchini, yellow squash, mushrooms, peas, and spinach are all great additions.
- Add protein such as grilled chicken, shrimp, or sausage for a heartier meal.
- For a vegan version, skip the Parmesan cheese and use a plant-based cream alternative.
- Add lemon zest and juice for a brighter flavor.

Leave a Comment