
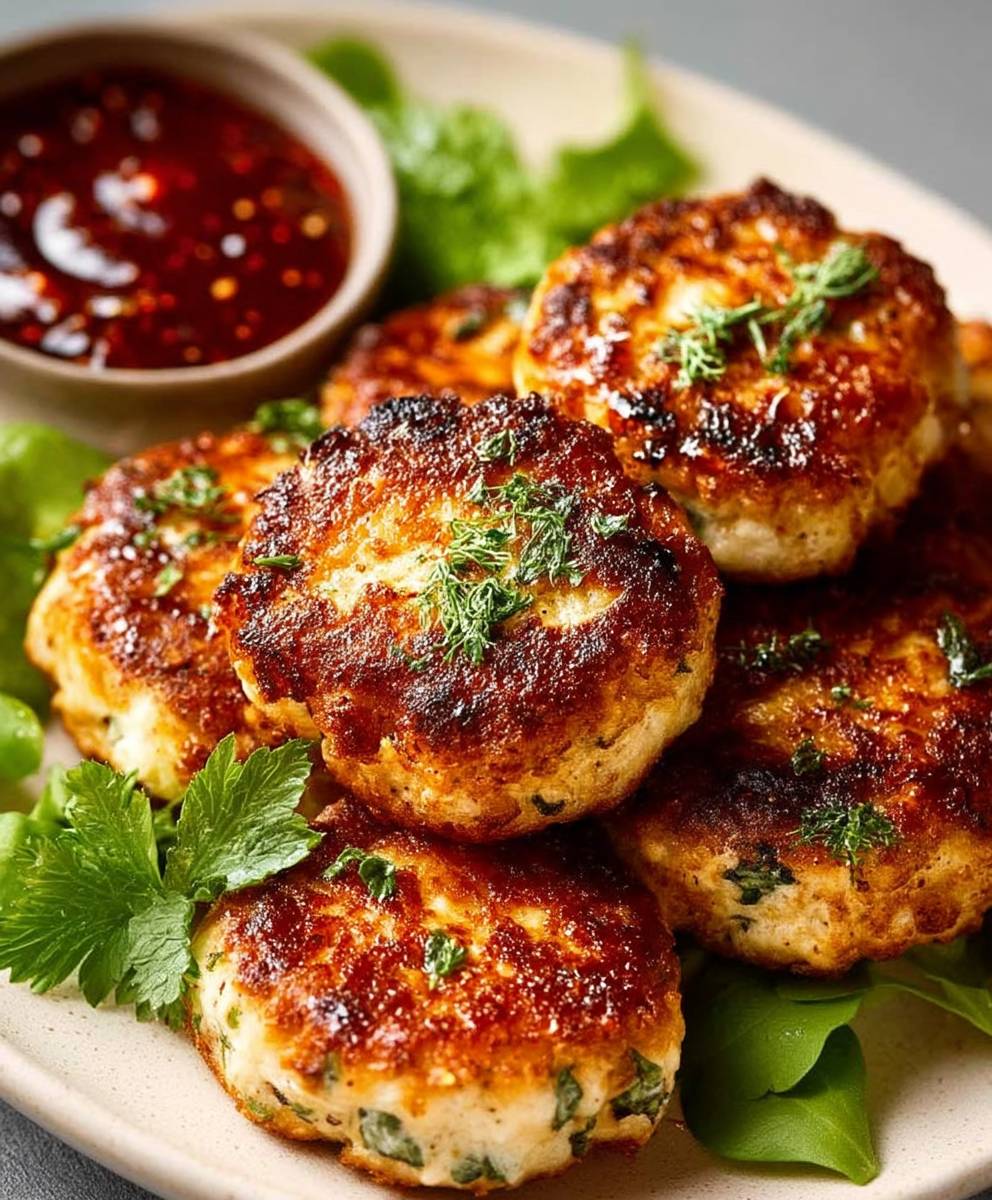
Chicken rissoles, those delightful little patties of savory goodness, are about to become your new weeknight dinner staple! Imagine sinking your teeth into a perfectly browned, crispy exterior, giving way to a juicy, flavorful chicken filling. Are you hungry yet? I know I am just thinking about them! This isn’t just a recipe; it’s a journey back to comforting, home-cooked meals.
While the exact origins of rissoles are debated, similar dishes have graced tables across Europe for centuries. Think of them as cousins to croquettes or even miniature meatloaves. They represent resourcefulness and deliciousness, transforming humble ingredients into something truly special. For generations, families have passed down their secret rissole recipes, each with its own unique twist.
What makes chicken rissoles so universally loved? It’s the perfect combination of textures and flavors. The crispy crust provides a satisfying crunch, while the tender chicken filling is bursting with savory herbs and spices. They are incredibly versatile, too! Serve them as an appetizer, a main course with a side salad, or even tucked into a sandwich for a satisfying lunch. Plus, they’re surprisingly easy to make, making them ideal for busy weeknights. So, let’s get cooking and create some culinary magic!

Ingredients:
- 1 kg minced chicken
- 1 large onion, finely chopped
- 2 cloves garlic, minced
- 1 cup breadcrumbs (fresh or dried)
- 1/2 cup milk
- 1 large egg, lightly beaten
- 2 tablespoons chopped fresh parsley
- 1 tablespoon Worcestershire sauce
- 1 teaspoon dried thyme
- 1/2 teaspoon paprika
- Salt and freshly ground black pepper to taste
- 2 tablespoons olive oil, for cooking
- Optional: 1/4 cup grated Parmesan cheese
- Optional: Pinch of red pepper flakes for a little heat
Preparing the Chicken Rissoles Mixture
- First, let’s get our onion and garlic ready. Finely chop the onion. You want it small enough that it cooks evenly and doesn’t overpower the rissoles. Mince the garlic as well. I like to use a garlic press, but finely chopping it with a knife works just as well.
- In a large mixing bowl, combine the minced chicken, chopped onion, and minced garlic. Make sure everything is evenly distributed. This is the foundation of our rissoles, so we want a good mix.
- Now, let’s add the breadcrumbs. If you’re using fresh breadcrumbs, they’ll add a lovely soft texture. Dried breadcrumbs will give a slightly firmer result. Either works great! Pour the breadcrumbs into the bowl with the chicken mixture.
- Next, pour in the milk. The milk helps to bind the ingredients together and keeps the rissoles nice and moist. Don’t skip this step!
- Add the lightly beaten egg. The egg acts as another binder, ensuring that the rissoles hold their shape during cooking. Just crack the egg into a small bowl, whisk it lightly with a fork, and then pour it into the chicken mixture.
- Time for the flavor boosters! Add the chopped fresh parsley, Worcestershire sauce, dried thyme, and paprika. The parsley adds a fresh, herbaceous note, the Worcestershire sauce gives a savory depth, the thyme adds an earthy aroma, and the paprika provides a subtle smoky sweetness.
- Season generously with salt and freshly ground black pepper. Don’t be shy with the seasoning! Taste the mixture (before adding the egg if you’re concerned about raw meat) and adjust the seasoning as needed. Remember, the flavors will mellow out a bit during cooking.
- Optional additions: If you’re feeling fancy, add the grated Parmesan cheese for a salty, umami kick. A pinch of red pepper flakes will add a touch of heat, if you like a little spice.
- Now, get your hands in there! Gently mix all the ingredients together until they are well combined. Be careful not to overmix, as this can make the rissoles tough. You want everything just incorporated.
- Once the mixture is combined, cover the bowl with plastic wrap and refrigerate for at least 30 minutes. This allows the flavors to meld together and helps the rissoles hold their shape better during cooking. You can even refrigerate it for a few hours or overnight for even better flavor.
Shaping and Cooking the Chicken Rissoles
- Remove the chicken mixture from the refrigerator. It should be slightly firmer now.
- Prepare a plate or baking sheet lined with parchment paper. This will prevent the rissoles from sticking.
- Take a small handful of the chicken mixture (about 1/4 cup) and shape it into a round or oval patty. You can make them any size you like, but I find that about 2-3 inches in diameter is a good size.
- Place the shaped rissole on the prepared plate or baking sheet. Repeat with the remaining chicken mixture, spacing the rissoles slightly apart.
- Heat the olive oil in a large skillet over medium heat. Make sure the skillet is hot before adding the rissoles.
- Carefully place the rissoles in the hot skillet, being careful not to overcrowd the pan. You may need to cook them in batches. Overcrowding the pan will lower the temperature and cause the rissoles to steam instead of brown.
- Cook the rissoles for about 5-7 minutes per side, or until they are golden brown and cooked through. The internal temperature should reach 165°F (74°C). Use a meat thermometer to check for doneness.
- If the rissoles are browning too quickly, reduce the heat slightly. If they are not browning enough, increase the heat slightly. You want a nice, even golden brown color.
- Once the rissoles are cooked through, remove them from the skillet and place them on a plate lined with paper towels to drain any excess oil.
- Repeat with the remaining rissoles, adding more olive oil to the skillet as needed.
Serving Suggestions
These chicken rissoles are incredibly versatile and can be served in a variety of ways. Here are a few of my favorite serving suggestions:
- As a main course: Serve the rissoles with mashed potatoes, roasted vegetables, or a fresh salad. A dollop of sour cream or a drizzle of gravy would be a delicious addition.
- In sandwiches or burgers: Use the rissoles as a patty in a sandwich or burger. Top with your favorite toppings, such as lettuce, tomato, onion, cheese, and sauce.
- As an appetizer: Serve the rissoles as an appetizer with a dipping sauce, such as sweet chili sauce, honey mustard, or ranch dressing.
- In a wrap: Wrap the rissoles in a tortilla with lettuce, tomato, and your favorite sauce for a quick and easy meal.
- With pasta: Serve the rissoles with your favorite pasta sauce and pasta. They would be delicious with a tomato-based sauce or a creamy Alfredo sauce.
Tips for Perfect Chicken Rissoles
- Don’t overmix the mixture: Overmixing can make the rissoles tough. Mix just until the ingredients are combined.
- Refrigerate the mixture: Refrigerating the mixture for at least 30 minutes helps the flavors meld together and makes the rissoles easier to shape.
- Don’t overcrowd the pan: Overcrowding the pan will lower the temperature and cause the rissoles to steam instead of brown. Cook them in batches.
- Use a meat thermometer: Use a meat thermometer to ensure that the rissoles are cooked through. The internal temperature should reach 165°F (74°C).
- Adjust the seasoning: Taste the mixture before cooking and adjust the seasoning as needed.
Variations
- Spicy Chicken Rissoles: Add more red pepper flakes or a pinch of cayenne pepper to the mixture for a spicier kick.
- Italian Chicken Rissoles: Add Italian seasoning, sun-dried tomatoes, and mozzarella cheese to the mixture for an Italian-inspired flavor.
- Greek Chicken Rissoles: Add feta cheese, olives, and oregano to the mixture for a Greek twist.
- Vegetarian Rissoles: Substitute the minced chicken with cooked lentils or chickpeas for a vegetarian option.
Storage Instructions
Leftover chicken rissoles can be stored in an airtight container in the refrigerator for up to 3-4 days. Reheat them in the microwave, oven, or skillet until heated through.
You can also freeze the cooked rissoles for up to 2-3 months. Wrap them individually in plastic wrap and then place them in a freezer bag. Thaw them in the refrigerator overnight before reheating.
Conclusion:
This whipped feta dip isn’t just another appetizer; it’s a flavor explosion waiting to happen, and trust me, you absolutely need it in your life! The creamy, tangy feta, perfectly balanced with the subtle sweetness of honey and the bright zest of lemon, creates a symphony of tastes that will have your guests (or just you no judgment here!) begging for the recipe. Its incredibly easy to make, requiring minimal effort for maximum impact, making it the ideal choice for everything from casual weeknight snacking to elegant dinner parties.
But why is this particular whipped feta dip a must-try? Beyond the incredible flavor profile, it’s the versatility that truly sets it apart. It’s not just a dip; it’s a blank canvas for your culinary creativity!
Serving Suggestions and Variations:
* Classic Crudités: Serve it with a colorful array of fresh vegetables like carrots, celery, bell peppers, cucumbers, and cherry tomatoes for a healthy and satisfying snack.
* Pita Perfection: Warm pita bread, either cut into wedges or served whole, is a fantastic accompaniment. The warm, soft bread perfectly complements the cool, creamy dip.
* Mediterranean Mezze Platter: Elevate your appetizer game by incorporating the whipped feta dip into a Mediterranean-inspired mezze platter. Add olives, hummus, dolmades, grilled halloumi, and some crusty bread for a truly impressive spread.
* Grilled Goodness: Spread it on grilled chicken or fish for a burst of flavor. The tanginess of the feta cuts through the richness of the grilled protein beautifully.
* Sandwich Savior: Use it as a spread in sandwiches or wraps for a creamy and flavorful alternative to mayonnaise. It’s especially delicious with roasted vegetables or grilled chicken.
* Spice it Up: For a little kick, add a pinch of red pepper flakes or a drizzle of chili oil to the dip.
* Herbaceous Delight: Experiment with different herbs like dill, mint, or oregano to customize the flavor to your liking.
* Sweet and Savory: Drizzle with balsamic glaze for a touch of sweetness and acidity.
* Nutty Crunch: Sprinkle with toasted pine nuts or chopped walnuts for added texture and flavor.
* Roasted Garlic Infusion: For a deeper, more complex flavor, roast a head of garlic and incorporate the cloves into the dip.
I’m genuinely excited for you to try this recipe. It’s one of those dishes that I find myself making again and again because it’s so simple, delicious, and adaptable. The possibilities are truly endless!
So, go ahead, gather your ingredients, and whip up a batch of this amazing whipped feta dip. I promise you won’t be disappointed. And most importantly, I’d love to hear about your experience! Did you try any of the variations I suggested? Did you come up with your own creative twist? Share your photos and comments below I can’t wait to see what you create! Happy dipping!
Chicken Rissoles: The Ultimate Guide to Making Perfect Rissoles
Savory and juicy chicken rissoles, packed with flavor from herbs, spices, and a touch of Worcestershire sauce. Perfect as a main course, in sandwiches, or as an appetizer!
Ingredients
- 1 kg minced chicken
- 1 large onion, finely chopped
- 2 cloves garlic, minced
- 1 cup breadcrumbs (fresh or dried)
- 1/2 cup milk
- 1 large egg, lightly beaten
- 2 tablespoons chopped fresh parsley
- 1 tablespoon Worcestershire sauce
- 1 teaspoon dried thyme
- 1/2 teaspoon paprika
- Salt and freshly ground black pepper to taste
- 2 tablespoons olive oil, for cooking
- Optional: 1/4 cup grated Parmesan cheese
- Optional: Pinch of red pepper flakes
Instructions
- Finely chop the onion and mince the garlic.
- In a large bowl, combine minced chicken, chopped onion, and minced garlic.
- Add breadcrumbs, milk, and lightly beaten egg to the bowl.
- Add chopped fresh parsley, Worcestershire sauce, dried thyme, and paprika.
- Season generously with salt and freshly ground black pepper.
- (Optional) Add grated Parmesan cheese and/or red pepper flakes.
- Gently mix all ingredients until well combined, being careful not to overmix.
- Cover the bowl with plastic wrap and refrigerate for at least 30 minutes (or longer for better flavor).
- Remove the chicken mixture from the refrigerator.
- Line a plate or baking sheet with parchment paper.
- Take a small handful (about 1/4 cup) of the mixture and shape it into a round or oval patty.
- Place the shaped rissole on the prepared plate and repeat with the remaining mixture.
- Heat olive oil in a large skillet over medium heat.
- Carefully place the rissoles in the hot skillet, being careful not to overcrowd the pan. Cook in batches if needed.
- Cook for about 5-7 minutes per side, or until golden brown and the internal temperature reaches 165°F (74°C).
- Remove from skillet and place on a plate lined with paper towels to drain excess oil.
- Repeat with remaining rissoles, adding more olive oil as needed.
- Enjoy as a main course, in sandwiches, as an appetizer, or with pasta.
Notes
- Don’t overmix the chicken mixture, as this can make the rissoles tough.
- Refrigerating the mixture helps the flavors meld and makes shaping easier.
- Don’t overcrowd the pan when cooking.
- Use a meat thermometer to ensure the rissoles are cooked through.
- Adjust seasoning to your preference.
- Variations:
- Spicy: Add more red pepper flakes or cayenne pepper.
- Italian: Add Italian seasoning, sun-dried tomatoes, and mozzarella cheese.
- Greek: Add feta cheese, olives, and oregano.
- Vegetarian: Substitute minced chicken with cooked lentils or chickpeas.
- Storage: Leftover rissoles can be stored in the refrigerator for 3-4 days or frozen for 2-3 months.


Leave a Comment