
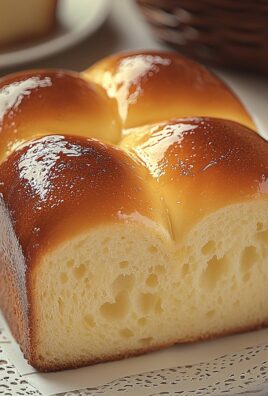
Dog cupcakes: the words alone conjure images of wagging tails and happy barks! But forget those bland, store-bought dog treats. We’re talking about something truly special a homemade delight that will have your furry friend doing zoomies of joy. Have you ever wanted to bake something special for your beloved canine companion, something that shows them just how much you care?
While the concept of “cupcakes” might seem purely human, the idea of crafting special, palatable treats for dogs has been around for ages. Historically, pet owners have always sought ways to nourish and reward their animals, often adapting human recipes with dog-safe ingredients. These dog cupcakes are a modern twist on that tradition, offering a fun and visually appealing way to spoil your pup.
What makes these cupcakes so irresistible to dogs? It’s all about the flavor and texture! Imagine a soft, moist cake base made with ingredients like peanut butter and pumpkin, topped with a creamy, dog-friendly frosting. The combination is simply irresistible. Plus, they’re incredibly convenient. Bake a batch on the weekend, and you’ll have a week’s worth of delicious and healthy treats ready to go. So, let’s get baking and create some tail-wagging happiness!

Ingredients:
- For the Cupcakes:
- 1 ½ cups whole wheat flour (or oat flour for sensitive dogs)
- 1 teaspoon baking powder
- ½ teaspoon baking soda
- ½ cup unsweetened applesauce
- ¼ cup peanut butter (make sure it’s xylitol-free!)
- 1 large egg
- ½ cup low-sodium chicken broth (or water)
- ¼ cup vegetable oil (or coconut oil)
- 1 teaspoon vanilla extract (optional)
- For the Frosting:
- 1 cup plain Greek yogurt (full-fat or low-fat)
- ¼ cup peanut butter (xylitol-free!)
- 1 tablespoon honey (optional, for added sweetness)
- Optional Decorations:
- Dog biscuits (small, for topping)
- Shredded carrots
- Chopped parsley
- Small pieces of apple
Preparing the Cupcake Batter:
- Preheat and Prep: First things first, preheat your oven to 350°F (175°C). While the oven is heating up, line a 12-cup muffin tin with cupcake liners. If you don’t have liners, you can grease the muffin tin really well to prevent sticking. I find liners make cleanup a breeze!
- Combine Dry Ingredients: In a large bowl, whisk together the whole wheat flour (or oat flour), baking powder, and baking soda. Make sure everything is well combined so the baking powder and soda are evenly distributed. This helps the cupcakes rise properly.
- Combine Wet Ingredients: In a separate bowl, whisk together the unsweetened applesauce, peanut butter, egg, chicken broth (or water), vegetable oil (or coconut oil), and vanilla extract (if using). Make sure the peanut butter is well incorporated and there are no lumps.
- Combine Wet and Dry: Gradually add the wet ingredients to the dry ingredients, mixing until just combined. Be careful not to overmix! Overmixing can lead to tough cupcakes. A few lumps are okay.
- Fill the Cupcake Liners: Fill each cupcake liner about two-thirds full. This will give the cupcakes room to rise without overflowing. I like to use an ice cream scoop to ensure even filling.
Baking the Cupcakes:
- Bake: Place the muffin tin in the preheated oven and bake for 18-20 minutes, or until a toothpick inserted into the center comes out clean. The baking time may vary depending on your oven, so keep an eye on them.
- Cool: Once the cupcakes are baked, remove them from the oven and let them cool in the muffin tin for a few minutes before transferring them to a wire rack to cool completely. It’s important to let them cool completely before frosting, or the frosting will melt.
Preparing the Frosting:
- Combine Ingredients: In a medium bowl, combine the plain Greek yogurt, peanut butter, and honey (if using). Mix until smooth and creamy. If the frosting is too thick, you can add a tablespoon of water or chicken broth to thin it out.
- Chill (Optional): For a firmer frosting, you can chill it in the refrigerator for about 30 minutes before frosting the cupcakes. This will make it easier to pipe or spread.
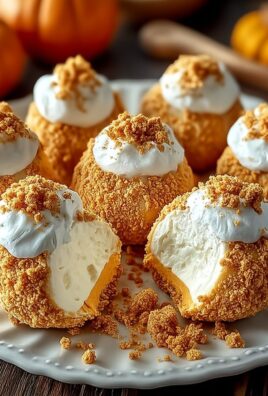
Frosting and Decorating:
- Frost the Cupcakes: Once the cupcakes are completely cool, frost them with the peanut butter Greek yogurt frosting. You can use a knife, spatula, or piping bag to frost them.
- Decorate (Optional): Decorate the cupcakes with dog biscuits, shredded carrots, chopped parsley, or small pieces of apple. Get creative! Just make sure all the decorations are dog-friendly and safe for your pup to eat.
Important Considerations:
- Xylitol is Toxic: Always double-check that the peanut butter you are using does NOT contain xylitol. Xylitol is extremely toxic to dogs.
- Allergies: Be aware of any allergies your dog may have before making these cupcakes. If your dog is allergic to wheat, use oat flour instead. If your dog is allergic to peanuts, you can substitute sunflower seed butter or another dog-safe nut butter.
- Moderation: These cupcakes are a treat and should be given in moderation. Don’t overfeed your dog!
- Storage: Store the cupcakes in an airtight container in the refrigerator for up to 3 days.
- Human Consumption: While these cupcakes are made with dog-friendly ingredients, they are not intended for human consumption. They may not taste very good to us!
Ingredient Substitutions and Variations:
Want to customize these cupcakes to better suit your dog’s preferences or dietary needs? Here are a few ideas:
- Flour: As mentioned before, you can substitute oat flour for whole wheat flour if your dog is sensitive to wheat. You can also use brown rice flour or a gluten-free flour blend.
- Peanut Butter: If your dog is allergic to peanuts, try sunflower seed butter (sunbutter) or almond butter (again, make sure it’s xylitol-free!).
- Applesauce: You can substitute mashed banana or pureed pumpkin for the applesauce. These will add a slightly different flavor and texture to the cupcakes.
- Chicken Broth: You can use water or bone broth instead of chicken broth. Bone broth is a great source of collagen and other nutrients.
- Vegetable Oil: Coconut oil is a healthy alternative to vegetable oil. It also adds a subtle coconut flavor to the cupcakes.
- Honey: If you want to avoid adding any extra sugar, you can omit the honey from the frosting. The peanut butter and Greek yogurt will still provide plenty of flavor.
- Add-ins: Get creative with add-ins! You can add shredded carrots, chopped zucchini, blueberries, or even cooked and mashed sweet potato to the batter. Just make sure the add-ins are dog-safe and in small pieces.
Troubleshooting:
Sometimes things don’t go exactly as planned in the kitchen. Here are a few common problems you might encounter when making these dog cupcakes and how to fix them:
- Cupcakes are too dry: If your cupcakes are too dry, try adding a little more applesauce or chicken broth to the batter next time. You can also try baking them for a shorter amount of time.
- Cupcakes are too dense: If your cupcakes are too dense, make sure you’re not overmixing the batter. Overmixing can develop the gluten in the flour, resulting in a tough cupcake. Also, make sure your baking powder and baking soda are fresh.
- Cupcakes are sticking to the liners: If your cupcakes are sticking to the liners, make sure you’re using good quality cupcake liners. You can also try spraying the liners with cooking spray before filling them.
- Frosting is too runny: If your frosting is too runny, try adding a little more peanut butter or chilling it in the refrigerator for a longer amount of time.
- Frosting is too thick: If your frosting is too thick, add a tablespoon of water or chicken broth to thin it out.
Serving Suggestions:
These dog cupcakes are a fun and delicious treat for your furry friend. Here are a few serving suggestions:
- Birthday Parties: These cupcakes are perfect for dog birthday parties! You can even make a whole batch and let all the dogs enjoy them.
- Training Rewards: Cut the cupcakes into small pieces and use them as high-value training rewards.
- Special Occasions: Celebrate special occasions with your dog by giving them a cupcake.
- Just Because: Sometimes you just want to spoil your dog! These cupcakes are a great way to show them how much you care.
Nutritional Information (Approximate):
Please note that the nutritional information is approximate and may vary depending on the specific ingredients you use.
- Calories: Approximately 150-200 per cupcake
- Protein: 5-7 grams
- Fat: 8-10 grams
- Carbohydrates: 15-20 grams
Remember to adjust the portion size based on your dog’s size, weight, and activity level. Always consult with your veterinarian if you have

Conclusion:
This isn’t just another fish recipe; it’s a culinary adventure waiting to happen! The Italian Crusted Sardines are a revelation a delightful combination of crispy, flavorful crust and the naturally rich taste of sardines. If you’ve ever been hesitant about sardines, this recipe is your chance to discover their potential. The vibrant Italian herbs and the satisfying crunch of the breadcrumb crust transform these little fish into a truly irresistible dish. Trust me, even sardine skeptics will be converted!
Why is this a must-try? Because it’s quick, easy, and packed with flavor. It’s a healthy and affordable way to incorporate more seafood into your diet. And most importantly, it’s absolutely delicious! The preparation is so simple that even a novice cook can achieve restaurant-quality results. The combination of garlic, parsley, Parmesan cheese, and lemon zest creates a symphony of flavors that perfectly complements the sardines. It’s a dish that’s both satisfying and sophisticated, perfect for a weeknight dinner or a casual gathering with friends.
But the best part? The versatility! These Italian Crusted Sardines are fantastic on their own as an appetizer, served with a squeeze of fresh lemon and a sprinkle of red pepper flakes for a little kick. You can also serve them as part of a larger antipasto platter, alongside olives, cheeses, and cured meats.
Looking for serving suggestions? Try these:
* On a bed of arugula: The peppery arugula provides a wonderful contrast to the richness of the sardines. Drizzle with a balsamic glaze for added sweetness.
* In a sandwich or wrap: Flake the sardines and combine them with a little mayonnaise, celery, and red onion for a delicious and healthy sandwich filling.
* As a topping for pasta: Toss the cooked sardines with your favorite pasta shape, some cherry tomatoes, and a sprinkle of Parmesan cheese for a quick and easy meal.
* Served with polenta: Creamy polenta is the perfect accompaniment to the crispy sardines. Add a dollop of pesto for extra flavor.
* As a salad topping: Add the sardines to a mixed green salad for a protein-packed and flavorful lunch.
Want to experiment with variations? Here are a few ideas:
* Add a touch of spice: Incorporate a pinch of red pepper flakes or a dash of hot sauce to the breadcrumb mixture for a spicy kick.
* Use different herbs: Experiment with different combinations of herbs, such as oregano, basil, or thyme.
* Add some lemon zest: A little lemon zest in the breadcrumb mixture adds a bright and zesty flavor.
* Use different types of cheese: Try using Pecorino Romano or Asiago cheese instead of Parmesan.
* Add some nuts: Incorporate some chopped walnuts or almonds into the breadcrumb mixture for added texture and flavor.
I am confident that you will love this recipe as much as I do. It’s a guaranteed crowd-pleaser and a fantastic way to enjoy the health benefits of sardines. So, what are you waiting for? Head to your local grocery store, grab some fresh sardines, and get cooking!
I can’t wait to hear about your experience with this recipe. Did you try any of the serving suggestions or variations? What did you think of the flavor? Share your photos and comments below! Let’s create a community of sardine lovers! Don’t forget to tag me in your photos so I can see your culinary creations. Happy cooking, and enjoy your delicious Italian Crusted Sardines!
Dog Cupcakes: The Ultimate Guide to Baking Treats for Your Pup
Spoil your pup with homemade dog cupcakes! Made with wholesome ingredients like whole wheat flour, applesauce, and peanut butter, these treats are perfect for birthdays or just showing some love. Don't forget the dog-friendly frosting and optional decorations!
Ingredients
- 1 ½ cups whole wheat flour (or oat flour for sensitive dogs)
- 1 teaspoon baking powder
- ½ teaspoon baking soda
- ½ cup unsweetened applesauce
- ¼ cup peanut butter (xylitol-free!)
- 1 large egg
- ½ cup low-sodium chicken broth (or water)
- ¼ cup vegetable oil (or coconut oil)
- 1 teaspoon vanilla extract (optional)
- 1 cup plain Greek yogurt (full-fat or low-fat)
- ¼ cup peanut butter (xylitol-free!)
- 1 tablespoon honey (optional, for added sweetness)
- Dog biscuits (small, for topping)
- Shredded carrots
- Chopped parsley
- Small pieces of apple
Instructions
- Preheat your oven to 350°F (175°C). Line a 12-cup muffin tin with cupcake liners or grease the muffin tin well.
- In a large bowl, whisk together the whole wheat flour (or oat flour), baking powder, and baking soda.
- In a separate bowl, whisk together the unsweetened applesauce, peanut butter, egg, chicken broth (or water), vegetable oil (or coconut oil), and vanilla extract (if using).
- Gradually add the wet ingredients to the dry ingredients, mixing until just combined. Be careful not to overmix.
- Fill each cupcake liner about two-thirds full.
- Place the muffin tin in the preheated oven and bake for 18-20 minutes, or until a toothpick inserted into the center comes out clean.
- Remove the cupcakes from the oven and let them cool in the muffin tin for a few minutes before transferring them to a wire rack to cool completely.
- In a medium bowl, combine the plain Greek yogurt, peanut butter, and honey (if using). Mix until smooth and creamy. If the frosting is too thick, add a tablespoon of water or chicken broth to thin it out.
- For a firmer frosting, chill it in the refrigerator for about 30 minutes before frosting the cupcakes.
- Once the cupcakes are completely cool, frost them with the peanut butter Greek yogurt frosting.
- Decorate the cupcakes with dog biscuits, shredded carrots, chopped parsley, or small pieces of apple.
Notes
- Xylitol is Toxic: Always double-check that the peanut butter you are using does NOT contain xylitol. Xylitol is extremely toxic to dogs.
- Allergies: Be aware of any allergies your dog may have before making these cupcakes. If your dog is allergic to wheat, use oat flour instead. If your dog is allergic to peanuts, you can substitute sunflower seed butter or another dog-safe nut butter.
- Moderation: These cupcakes are a treat and should be given in moderation. Don’t overfeed your dog!
- Storage: Store the cupcakes in an airtight container in the refrigerator for up to 3 days.
- Human Consumption: While these cupcakes are made with dog-friendly ingredients, they are not intended for human consumption. They may not taste very good to us!

Leave a Comment