
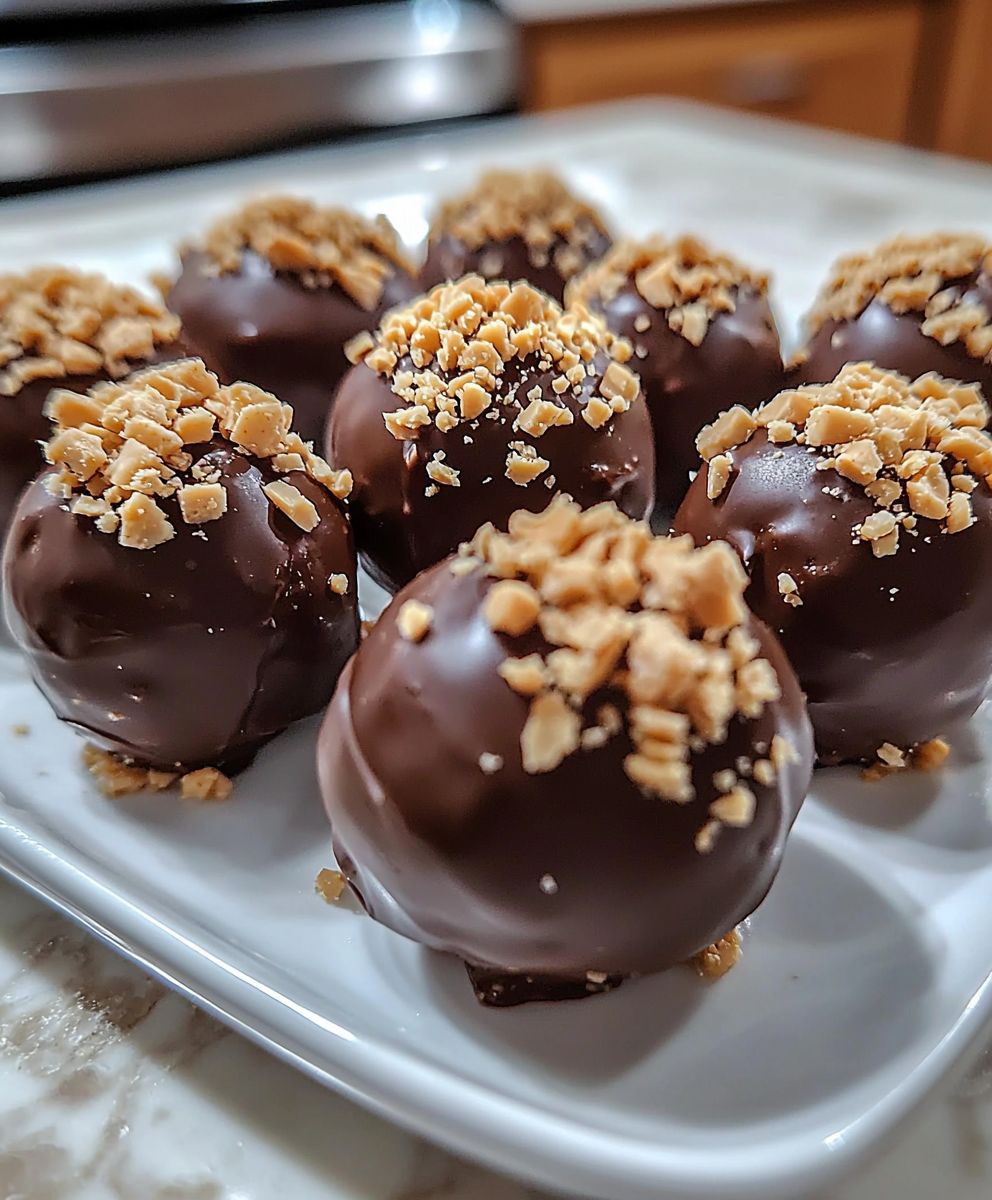
Peanut Butter Cheesecake Balls: Prepare to be amazed by the easiest, most decadent dessert you’ll make all year! Imagine biting into a creamy, dreamy sphere of peanut butter bliss, coated in rich chocolate and bursting with flavor. These no-bake treats are so simple to whip up, they’re perfect for last-minute gatherings, potlucks, or even just a satisfying personal indulgence.
While the exact origins of this particular confection are shrouded in mystery, the combination of peanut butter and chocolate is a classic pairing that has delighted taste buds for generations. Think of the iconic peanut butter cup, elevated to a new level of sophistication and ease. The beauty of these Peanut Butter Cheesecake Balls lies in their simplicity. No complicated baking techniques are required, just a few readily available ingredients and a little bit of patience while they chill.
People adore this dish for several reasons. First, the taste is simply irresistible. The creamy, tangy cheesecake filling perfectly complements the salty, nutty peanut butter, creating a symphony of flavors that dance on your tongue. Second, the texture is divine. The smooth, melt-in-your-mouth interior contrasts beautifully with the crisp chocolate coating. Finally, the convenience factor is a major draw. These little bites are easy to make ahead of time and store in the refrigerator, making them the ideal dessert for busy individuals or anyone who wants a sweet treat without the fuss.

Ingredients:
- 16 ounces cream cheese, softened
- 1 cup creamy peanut butter
- 1 cup powdered sugar
- 1 teaspoon vanilla extract
- 1/4 teaspoon salt
- 12 ounces chocolate candy coating (milk, dark, or white), melted
- Optional toppings: chopped peanuts, sprinkles, mini chocolate chips, sea salt
Preparing the Peanut Butter Cheesecake Filling
Okay, let’s get started! The heart of these delicious Peanut Butter Cheesecake Balls is, of course, the creamy, dreamy filling. It’s super easy to make, but the key is to make sure your cream cheese is properly softened. Trust me, it makes a world of difference in the final texture.
- Soften the Cream Cheese: This is crucial! Take your cream cheese out of the refrigerator at least an hour before you plan to start. You want it to be soft enough that you can easily mix it without any lumps. If you’re short on time, you can microwave it in 15-second intervals, checking after each interval, until it’s softened. Be careful not to melt it!
- Combine Cream Cheese and Peanut Butter: In a large mixing bowl, add the softened cream cheese and peanut butter. I prefer using creamy peanut butter for the smoothest texture, but you can definitely use chunky peanut butter if you like that extra bit of crunch.
- Mix Until Smooth: Using an electric mixer (either a stand mixer or a hand mixer), beat the cream cheese and peanut butter together until they are completely smooth and well combined. This usually takes about 2-3 minutes. Scrape down the sides of the bowl occasionally to ensure everything is evenly mixed. You don’t want any pockets of cream cheese or peanut butter hiding in there!
- Add Powdered Sugar: Gradually add the powdered sugar to the mixture, about 1/2 cup at a time. Be sure to mix on low speed to prevent a powdered sugar cloud from erupting in your kitchen! Mix until the powdered sugar is fully incorporated and the mixture is smooth.
- Incorporate Vanilla and Salt: Add the vanilla extract and salt to the mixture. The vanilla enhances the flavor, and the salt balances the sweetness. Mix until everything is well combined.
- Chill the Mixture: This is another important step! Cover the bowl with plastic wrap and refrigerate the mixture for at least 30 minutes, or even better, for an hour. Chilling the mixture makes it easier to roll into balls. If you skip this step, the mixture will be too sticky and difficult to handle.
Forming the Cheesecake Balls
Now that our filling is nice and chilled, we can move on to the fun part: rolling the cheesecake balls! This can get a little messy, but it’s totally worth it.
- Prepare Your Workspace: Line a baking sheet with parchment paper or wax paper. This will prevent the cheesecake balls from sticking to the sheet.
- Scoop the Filling: Using a small cookie scoop (about 1 tablespoon size) or a spoon, scoop out portions of the chilled peanut butter cheesecake mixture.
- Roll into Balls: Gently roll each portion between your palms to form a smooth, round ball. Don’t worry if they’re not perfectly round; they’ll still taste amazing! If the mixture starts to get too sticky, wash your hands and dry them thoroughly before continuing.
- Place on Baking Sheet: Place each rolled ball onto the prepared baking sheet.
- Freeze the Balls: Once all the balls are rolled, place the baking sheet in the freezer for at least 30 minutes. This will help them firm up even more, making them easier to dip in the chocolate. You can even freeze them for longer, up to a few hours, if you need to.
Dipping and Decorating
The final step is to dip those frozen peanut butter cheesecake balls in melted chocolate and add any toppings you desire! This is where you can really get creative and customize them to your liking.
- Melt the Chocolate: Place the chocolate candy coating in a microwave-safe bowl. Microwave in 30-second intervals, stirring after each interval, until the chocolate is completely melted and smooth. Be careful not to overheat the chocolate, as it can burn. You can also melt the chocolate using a double boiler on the stovetop.
- Prepare Your Toppings: If you’re using any toppings, such as chopped peanuts, sprinkles, or mini chocolate chips, have them ready in small bowls.
- Dip the Cheesecake Balls: Remove the frozen cheesecake balls from the freezer. Using a fork or dipping tools, dip each ball into the melted chocolate, making sure it’s completely coated.
- Remove Excess Chocolate: Gently tap the fork or dipping tool against the side of the bowl to remove any excess chocolate.
- Add Toppings: Immediately sprinkle the dipped cheesecake ball with your desired toppings before the chocolate sets.
- Place on Baking Sheet: Place the dipped and decorated cheesecake ball back onto the parchment-lined baking sheet.
- Repeat: Repeat steps 3-6 for all the remaining cheesecake balls.
- Chill to Set: Once all the cheesecake balls are dipped and decorated, place the baking sheet back in the refrigerator for at least 15-20 minutes, or until the chocolate is completely set.
Storage Instructions
These Peanut Butter Cheesecake Balls are best stored in the refrigerator in an airtight container. They will keep for up to a week. You can also freeze them for longer storage, up to a month. Just make sure they are well-sealed to prevent freezer burn.
Tips and Variations
- Type of Chocolate: Feel free to use any type of chocolate you like for dipping. Milk chocolate, dark chocolate, and white chocolate all work well. You can even use a combination of chocolates for a fun and festive look.
- Peanut Butter Variations: Experiment with different types of peanut butter. Try using honey roasted peanut butter, or even a flavored peanut butter like chocolate peanut butter.
- Topping Ideas: The possibilities are endless when it comes to toppings! Some other ideas include crushed pretzels, shredded coconut, toffee bits, and sea salt.
- Add a Crunch: For an extra bit of crunch, try adding some crushed graham crackers or finely chopped nuts to the peanut butter cheesecake mixture.
- Make Them Smaller: If you want to make smaller, bite-sized cheesecake balls, simply use a smaller cookie scoop.
- Use Different Extracts: Instead of vanilla extract, try using almond extract or peppermint extract for a different flavor profile.
- Add a Swirl: Before chilling the peanut butter cheesecake mixture, swirl in some melted chocolate or caramel sauce for a marbled effect.
Troubleshooting
- Cheesecake Balls are Too Sticky: If the peanut butter cheesecake mixture is too sticky to roll, it means it’s not cold enough. Place it back in the refrigerator or freezer for a longer period of time.
- Chocolate is Too Thick: If the melted chocolate is too thick to dip the cheesecake balls easily, add a teaspoon of vegetable oil or shortening to the chocolate and stir until smooth.
- Chocolate is Seizing: If the chocolate seizes up and becomes grainy, it means it has been overheated or has come into contact with water. Unfortunately, there’s not much you can do to fix seized chocolate. It’s best to start with a fresh batch.
- Toppings Aren’t Sticking: If the toppings aren’t sticking to the chocolate, it means the chocolate has already started to set. Work quickly and add the toppings immediately after dipping each cheesecake ball.
Nutritional Information (Approximate)
Please note that the nutritional information is an estimate and may vary depending on the specific ingredients used and portion sizes.
- Calories: Approximately 150-200 per ball
- Fat: 10-15 grams
- Saturated Fat: 6-8 grams
- Cholesterol: 20-30 mg
- Sodium: 50-75 mg
- Carbohydrates: 10-15 grams
- Sugar: 8-12 grams
- Protein: 2-3 grams
Enjoy your homemade Peanut Butter Cheesecake Balls! They’re the perfect treat for parties, holidays, or just a sweet snack any time of day.
Conclusion:
And there you have it! These Peanut Butter Cheesecake Balls are truly irresistible, and I’m confident they’ll become a new favorite in your household. Why are they a must-try? Well, let’s recap: they’re incredibly easy to make, requiring minimal baking (or even none at all, depending on your chilling preference!), they’re packed with that perfect sweet and salty peanut butter flavor we all crave, and they’re endlessly customizable. What more could you ask for in a dessert? Seriously, the simplicity of this recipe is a game-changer. No complicated techniques, no fancy equipment, just straightforward deliciousness. Plus, the fact that you can whip up a batch in under an hour (excluding chilling time, of course) makes them perfect for last-minute gatherings, potlucks, or even just a spontaneous sweet treat for yourself. I often find myself craving something sweet after dinner, and these little bites of heaven are the perfect solution. They satisfy my sweet tooth without being overly heavy or complicated. But the real magic lies in the flavor combination. The creamy cheesecake filling, infused with the rich, nutty goodness of peanut butter, is simply divine. And the coating? Oh, the possibilities! I’ve suggested chocolate chips, crushed pretzels, and chopped nuts, but don’t let that limit your imagination. Consider rolling them in sprinkles for a festive touch, dipping them in melted white chocolate for an extra layer of sweetness, or even coating them in crushed graham crackers for a cheesecake-inspired twist. Speaking of variations, feel free to experiment with different types of peanut butter. Creamy peanut butter will give you a smoother texture, while chunky peanut butter will add a delightful crunch. You could even try using flavored peanut butter, like chocolate peanut butter or honey roasted peanut butter, to create a truly unique flavor profile. And if you’re feeling adventurous, why not add a swirl of caramel or a sprinkle of sea salt to the filling for an extra layer of decadence? Serving suggestions are just as versatile. These Peanut Butter Cheesecake Balls are perfect as a standalone dessert, but they also make a fantastic addition to a dessert platter. Arrange them alongside other treats like brownies, cookies, and fruit for a visually appealing and delicious spread. You can also serve them with a scoop of vanilla ice cream or a dollop of whipped cream for an extra indulgent experience. For a more sophisticated presentation, try drizzling them with melted chocolate or caramel sauce and garnishing them with chopped nuts or fresh berries. I truly believe that everyone should experience the joy of these little peanut butter bombs. They’re the perfect combination of easy, delicious, and customizable, making them a winner in my book. So, I urge you to give this recipe a try. I promise you won’t be disappointed. And once you’ve made them, I’d love to hear about your experience! Did you try any variations? What was your favorite coating? Did you serve them at a party? Share your photos and stories in the comments below. I’m always eager to see how you make this recipe your own. Happy baking (or rather, chilling!) and enjoy every single bite of these delightful Peanut Butter Cheesecake Balls! I can’t wait to hear what you think! PrintPeanut Butter Cheesecake Balls: The Ultimate No-Bake Dessert Recipe
Creamy peanut butter cheesecake filling coated in chocolate and topped with your favorite sprinkles or nuts. These Peanut Butter Cheesecake Balls are an easy, no-bake dessert that’s perfect for any occasion!
- Prep Time: 20 minutes
- Cook Time: 5 minutes
- Total Time: 95 minutes
- Yield: 30–36 balls 1x
Ingredients
- 16 ounces cream cheese, softened
- 1 cup creamy peanut butter
- 1 cup powdered sugar
- 1 teaspoon vanilla extract
- 1/4 teaspoon salt
- 12 ounces chocolate candy coating (milk, dark, or white), melted
- Optional toppings: chopped peanuts, sprinkles, mini chocolate chips, sea salt
Instructions
- Soften the Cream Cheese: Take your cream cheese out of the refrigerator at least an hour before you plan to start.
- Combine Cream Cheese and Peanut Butter: In a large mixing bowl, add the softened cream cheese and peanut butter.
- Mix Until Smooth: Using an electric mixer, beat the cream cheese and peanut butter together until they are completely smooth and well combined. Scrape down the sides of the bowl occasionally.
- Add Powdered Sugar: Gradually add the powdered sugar to the mixture, about 1/2 cup at a time. Mix on low speed to prevent a powdered sugar cloud. Mix until the powdered sugar is fully incorporated and the mixture is smooth.
- Incorporate Vanilla and Salt: Add the vanilla extract and salt to the mixture. Mix until everything is well combined.
- Chill the Mixture: Cover the bowl with plastic wrap and refrigerate the mixture for at least 30 minutes, or even better, for an hour.
- Prepare Your Workspace: Line a baking sheet with parchment paper or wax paper.
- Scoop the Filling: Using a small cookie scoop (about 1 tablespoon size) or a spoon, scoop out portions of the chilled peanut butter cheesecake mixture.
- Roll into Balls: Gently roll each portion between your palms to form a smooth, round ball.
- Place on Baking Sheet: Place each rolled ball onto the prepared baking sheet.
- Freeze the Balls: Place the baking sheet in the freezer for at least 30 minutes.
- Melt the Chocolate: Place the chocolate candy coating in a microwave-safe bowl. Microwave in 30-second intervals, stirring after each interval, until the chocolate is completely melted and smooth.
- Prepare Your Toppings: If you’re using any toppings, such as chopped peanuts, sprinkles, or mini chocolate chips, have them ready in small bowls.
- Dip the Cheesecake Balls: Remove the frozen cheesecake balls from the freezer. Using a fork or dipping tools, dip each ball into the melted chocolate, making sure it’s completely coated.
- Remove Excess Chocolate: Gently tap the fork or dipping tool against the side of the bowl to remove any excess chocolate.
- Add Toppings: Immediately sprinkle the dipped cheesecake ball with your desired toppings before the chocolate sets.
- Place on Baking Sheet: Place the dipped and decorated cheesecake ball back onto the parchment-lined baking sheet.
- Repeat: Repeat steps 14-17 for all the remaining cheesecake balls.
- Chill to Set: Once all the cheesecake balls are dipped and decorated, place the baking sheet back in the refrigerator for at least 15-20 minutes, or until the chocolate is completely set.
Notes
- Storage: Store in the refrigerator in an airtight container for up to a week, or freeze for up to a month.
- Chocolate: Use any type of chocolate you like (milk, dark, white).
- Peanut Butter: Experiment with different types of peanut butter.
- Toppings: Get creative with toppings! Crushed pretzels, shredded coconut, toffee bits, and sea salt are great options.
- Troubleshooting: If the mixture is too sticky, chill longer. If the chocolate is too thick, add a teaspoon of vegetable oil or shortening.

Leave a Comment