
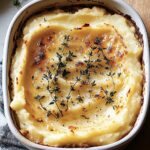
Baked Mashed Potatoes: Prepare to elevate your mashed potato game to a whole new level! Forget everything you thought you knew about this classic comfort food because we’re about to embark on a culinary journey that ends with a golden-brown, bubbly, and utterly irresistible masterpiece. Have you ever wondered how to transform humble mashed potatoes into a show-stopping side dish worthy of any holiday table or special occasion?
Mashed potatoes, in their simplest form, have been a staple in European and American cuisine for centuries, offering a creamy and comforting counterpoint to richer dishes. But the beauty of baked mashed potatoes lies in its ability to take this familiar favorite and add a touch of elegance and textural intrigue. The baking process creates a delightful contrast between the creamy, smooth interior and the slightly crispy, golden-brown top.
People adore this dish for so many reasons. Beyond the delightful textural contrast, the flavor deepens and intensifies during baking, creating a richer, more complex taste. Plus, it’s incredibly convenient! You can prepare the mashed potatoes ahead of time and simply pop them in the oven when you’re ready to serve. The result is a crowd-pleasing dish that’s both comforting and impressive a guaranteed hit at any gathering. So, let’s get started and discover the secrets to perfect baked mashed potatoes!

Ingredients:
- 5 lbs Russet Potatoes, peeled and quartered
- 1 cup Heavy Cream
- 8 oz Cream Cheese, softened
- 1/2 cup (1 stick) Unsalted Butter, softened
- 1/2 cup Sour Cream
- 1/4 cup Milk
- 2 cloves Garlic, minced
- 1 teaspoon Garlic Powder
- 1 teaspoon Onion Powder
- 1/2 teaspoon Paprika
- Salt and Black Pepper to taste
- 1 cup Shredded Cheddar Cheese, divided
- 1/2 cup Cooked Bacon, crumbled (optional)
- 2 tablespoons Fresh Chives, chopped (optional)
Preparing the Potatoes:
- Place the peeled and quartered potatoes in a large pot. Cover them with cold water, ensuring the water level is a couple of inches above the potatoes. This helps them cook evenly.
- Add a generous pinch of salt to the water. This seasons the potatoes from the inside out and enhances their flavor.
- Bring the water to a boil over high heat. Once boiling, reduce the heat to medium and let the potatoes simmer for about 15-20 minutes, or until they are fork-tender. You should be able to easily pierce them with a fork without much resistance.
- While the potatoes are cooking, prepare the other ingredients. This will save you time later and ensure everything is ready to go when the potatoes are done.
- Once the potatoes are cooked, drain them thoroughly in a colander. Make sure to get rid of as much water as possible, as excess water will make the mashed potatoes watery.
- Return the drained potatoes to the pot. Place the pot back on the stovetop over low heat for a minute or two. This will help to dry out any remaining moisture in the potatoes. Stir them constantly to prevent them from sticking to the bottom of the pot.
Mashing and Flavoring:
- Remove the pot from the heat. Add the softened cream cheese, softened butter, heavy cream, sour cream, milk, minced garlic, garlic powder, onion powder, and paprika to the potatoes.
- Using a potato masher or an electric mixer, begin mashing the potatoes. If using a masher, work in a circular motion, ensuring you break up all the lumps. If using an electric mixer, start on low speed to avoid splattering and gradually increase the speed until the potatoes are smooth and creamy.
- Continue mashing until the potatoes reach your desired consistency. I prefer mine to be smooth and creamy, but some people like them a little chunkier. It’s all about personal preference!
- Taste the mashed potatoes and season with salt and black pepper to taste. Be generous with the seasoning, as potatoes can absorb a lot of salt.
- Stir in 1/2 cup of the shredded cheddar cheese. This will add a cheesy flavor and help to bind the mashed potatoes together.
- If you’re using bacon, stir in about 3/4 of the crumbled bacon. Reserve the remaining bacon for topping.
- Similarly, if you’re using chives, stir in about 3/4 of the chopped chives. Reserve the remaining chives for topping.
Baking the Mashed Potatoes:
- Preheat your oven to 375°F (190°C).
- Grease a 9×13 inch baking dish with butter or cooking spray. This will prevent the mashed potatoes from sticking to the dish.
- Pour the mashed potato mixture into the prepared baking dish, spreading it evenly.
- Sprinkle the remaining 1/2 cup of shredded cheddar cheese evenly over the top of the mashed potatoes.
- If you reserved any bacon and chives, sprinkle them over the cheese as well.
- Bake in the preheated oven for 20-25 minutes, or until the cheese is melted and bubbly and the top is lightly golden brown.
- Keep a close eye on the mashed potatoes while they are baking to prevent the cheese from burning. If the cheese starts to brown too quickly, you can tent the baking dish with aluminum foil.
- Once the mashed potatoes are done baking, remove them from the oven and let them cool for a few minutes before serving. This will allow the flavors to meld together and prevent you from burning your mouth.
Serving Suggestions:
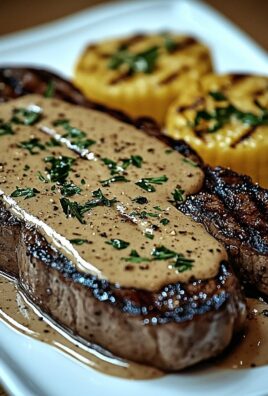
These baked mashed potatoes are a perfect side dish for any meal. They pair well with roasted chicken, grilled steak, or baked ham. You can also serve them as a vegetarian main course with a side salad.
Here are a few other serving suggestions:
- Top with a dollop of sour cream or Greek yogurt.
- Garnish with fresh parsley or cilantro.
- Serve with a side of gravy.
- Add a sprinkle of red pepper flakes for a little heat.
- Mix in some roasted vegetables, such as broccoli or cauliflower.
Tips and Tricks:
- For extra creamy mashed potatoes, use a ricer instead of a masher or electric mixer. A ricer will create a smoother texture and prevent the potatoes from becoming gluey.
- Don’t overmix the mashed potatoes, as this can make them tough. Mix just until they are smooth and creamy.
- If you don’t have heavy cream, you can use half-and-half or milk instead. However, the mashed potatoes will not be as rich and creamy.
- For a richer flavor, use brown butter instead of regular butter. To make brown butter, melt the butter in a saucepan over medium heat. Cook until the butter is golden brown and has a nutty aroma. Be careful not to burn the butter.
- You can make these mashed potatoes ahead of time and store them in the refrigerator for up to 2 days. When you’re ready to bake them, add a splash of milk or cream to loosen them up and bake as directed.
- To freeze these mashed potatoes, let them cool completely and then transfer them to a freezer-safe container. Freeze for up to 3 months. When you’re ready to bake them, thaw them overnight in the refrigerator and bake as directed.
- Experiment with different cheeses. Gruyere, Monterey Jack, or pepper jack would all be delicious in these mashed potatoes.
- Add some herbs to the mashed potatoes for extra flavor. Rosemary, thyme, or sage would all be great additions.
- For a spicier version, add a pinch of cayenne pepper or a dash of hot sauce to the mashed potatoes.
- If you don’t have time to bake the mashed potatoes, you can simply serve them as is. They will still be delicious!
Variations:
Here are a few variations on this baked mashed potato recipe:
- Garlic Parmesan Mashed Potatoes: Add 1/2 cup of grated Parmesan cheese and an extra clove of minced garlic to the mashed potatoes.
- Loaded Baked Potato Mashed Potatoes: Add 1 cup of shredded cheddar cheese, 1/2 cup of crumbled bacon, 1/4 cup of chopped green onions, and a dollop of sour cream to the mashed potatoes.
- Sweet Potato Mashed Potatoes: Substitute half of the Russet potatoes with sweet potatoes. Add a pinch of cinnamon and nutmeg to the mashed potatoes.
- Cauliflower Mashed Potatoes: Substitute half of the Russet potatoes with cooked cauliflower. This will create a lower-carb version of mashed potatoes.
- Jalapeño Cheddar Mashed Potatoes: Add 1/4 cup of chopped jalapeños and 1 cup of shredded cheddar cheese to the mashed potatoes.
Troubleshooting:
My mashed potatoes are too watery: This is usually caused by not draining the potatoes thoroughly enough. Next time, make sure to drain the potatoes well and dry them out in the pot over low heat before adding the other ingredients.
My mashed potatoes are too dry: This is usually caused by overmixing the potatoes or using too much starch. Next time, don’t overmix the potatoes and add a little more milk or cream to reach your desired consistency.
My mashed potatoes are lumpy: This is usually caused by not mashing the potatoes enough. Next time, use a potato ricer or an electric mixer to ensure the potatoes are smooth and creamy.
My mashed potatoes are bland: This is usually caused by not seasoning the potatoes enough. Next time, be generous with the salt and pepper and add other seasonings to taste.
My cheese is not melting: Make sure your oven is preheated to the correct temperature. Also, make sure the cheese is shredded and evenly distributed over the top of the mashed potatoes.
My mashed potatoes are burning: Keep a close eye on the mashed potatoes while they are baking to prevent the cheese from burning. If the cheese starts to brown too quickly, you can tent the baking dish with aluminum foil.
Conclusion:
And there you have it! This Baked Mashed Potatoes recipe isn’t just another side dish; it’s a creamy, dreamy, comforting experience that will elevate any meal. I truly believe this is a must-try recipe for anyone looking to add a touch of elegance and deliciousness to their dinner table. Forget the same old mashed potatoes this baked version takes everything to the next level with its golden-brown crust and unbelievably fluffy interior. Why is it a must-try? Well, beyond the incredible taste and texture, it’s surprisingly easy to make. You can even prepare the mashed potato base ahead of time and simply bake it when you’re ready to serve, making it perfect for busy weeknights or when you’re entertaining guests. Plus, the baking process adds a depth of flavor that you just can’t achieve with stovetop mashed potatoes. It’s a game-changer, trust me! But the best part? The versatility! You can easily customize this recipe to suit your own tastes and preferences. For a truly decadent experience, try adding a layer of shredded Gruyere or Parmesan cheese on top before baking. The cheese melts into a gooey, savory crust that’s simply irresistible. Or, if you’re looking for a lighter option, you can use low-fat milk or Greek yogurt instead of heavy cream. Here are a few more serving suggestions and variations to get your creative juices flowing:Serving Suggestions:
- Serve alongside roasted chicken, steak, or pork for a classic and comforting meal.
- Pair it with a vibrant green salad for a balanced and satisfying dinner.
- Use it as a topping for shepherd’s pie or cottage pie for an extra layer of flavor and texture.
- Scoop it into individual ramekins for a more elegant presentation.
Variations:
- Garlic Herb: Add roasted garlic and fresh herbs like rosemary, thyme, or chives to the mashed potato mixture before baking.
- Cheesy Bacon: Stir in crispy bacon bits and shredded cheddar cheese for a crowd-pleasing flavor combination.
- Spicy Chipotle: Add a touch of chipotle powder or diced chipotle peppers in adobo sauce for a smoky and spicy kick.
- Sweet Potato: Substitute half of the potatoes with sweet potatoes for a naturally sweet and vibrant twist.
Baked Mashed Potatoes: The Ultimate Guide to Creamy Perfection
Creamy, cheesy baked mashed potatoes loaded with garlic, bacon, and cheddar. A perfect comfort food side dish!
- Prep Time: 20 minutes
- Cook Time: 20-25 minutes
- Total Time: 65 minutes
- Yield: 8–10 servings 1x
Ingredients
- 5 lbs Russet Potatoes, peeled and quartered
- 1 cup Heavy Cream
- 8 oz Cream Cheese, softened
- 1/2 cup (1 stick) Unsalted Butter, softened
- 1/2 cup Sour Cream
- 1/4 cup Milk
- 2 cloves Garlic, minced
- 1 teaspoon Garlic Powder
- 1 teaspoon Onion Powder
- 1/2 teaspoon Paprika
- Salt and Black Pepper to taste
- 1 cup Shredded Cheddar Cheese, divided
- 1/2 cup Cooked Bacon, crumbled (optional)
- 2 tablespoons Fresh Chives, chopped (optional)
Instructions
- Prepare Potatoes: Place potatoes in a large pot, cover with cold water (2 inches above potatoes), and add a generous pinch of salt. Bring to a boil, then reduce heat and simmer for 15-20 minutes, or until fork-tender.
- Drain and Dry: Drain potatoes thoroughly in a colander. Return to the pot and place over low heat for 1-2 minutes to dry out any remaining moisture, stirring constantly.
- Mash and Flavor: Remove from heat. Add cream cheese, butter, heavy cream, sour cream, milk, garlic, garlic powder, onion powder, and paprika. Mash with a potato masher or electric mixer until smooth and creamy.
- Season and Add-ins: Season with salt and pepper to taste. Stir in 1/2 cup cheddar cheese, 3/4 of the bacon (if using), and 3/4 of the chives (if using).
- Bake: Preheat oven to 375°F (190°C). Grease a 9×13 inch baking dish. Pour mashed potato mixture into the dish, spreading evenly.
- Top and Bake: Sprinkle remaining 1/2 cup cheddar cheese, bacon, and chives over the top. Bake for 20-25 minutes, or until cheese is melted and bubbly and the top is lightly golden brown.
- Cool and Serve: Let cool for a few minutes before serving.
Notes
- For extra creamy mashed potatoes, use a ricer.
- Don’t overmix the mashed potatoes, as this can make them tough.
- If you don’t have heavy cream, you can use half-and-half or milk instead.
- For a richer flavor, use brown butter instead of regular butter.
- You can make these mashed potatoes ahead of time and store them in the refrigerator for up to 2 days.
- To freeze these mashed potatoes, let them cool completely and then transfer them to a freezer-safe container. Freeze for up to 3 months.
- Experiment with different cheeses. Gruyere, Monterey Jack, or pepper jack would all be delicious in these mashed potatoes.
- Add some herbs to the mashed potatoes for extra flavor. Rosemary, thyme, or sage would all be great additions.
- For a spicier version, add a pinch of cayenne pepper or a dash of hot sauce to the mashed potatoes.
- If you don’t have time to bake the mashed potatoes, you can simply serve them as is. They will still be delicious!


Leave a Comment