
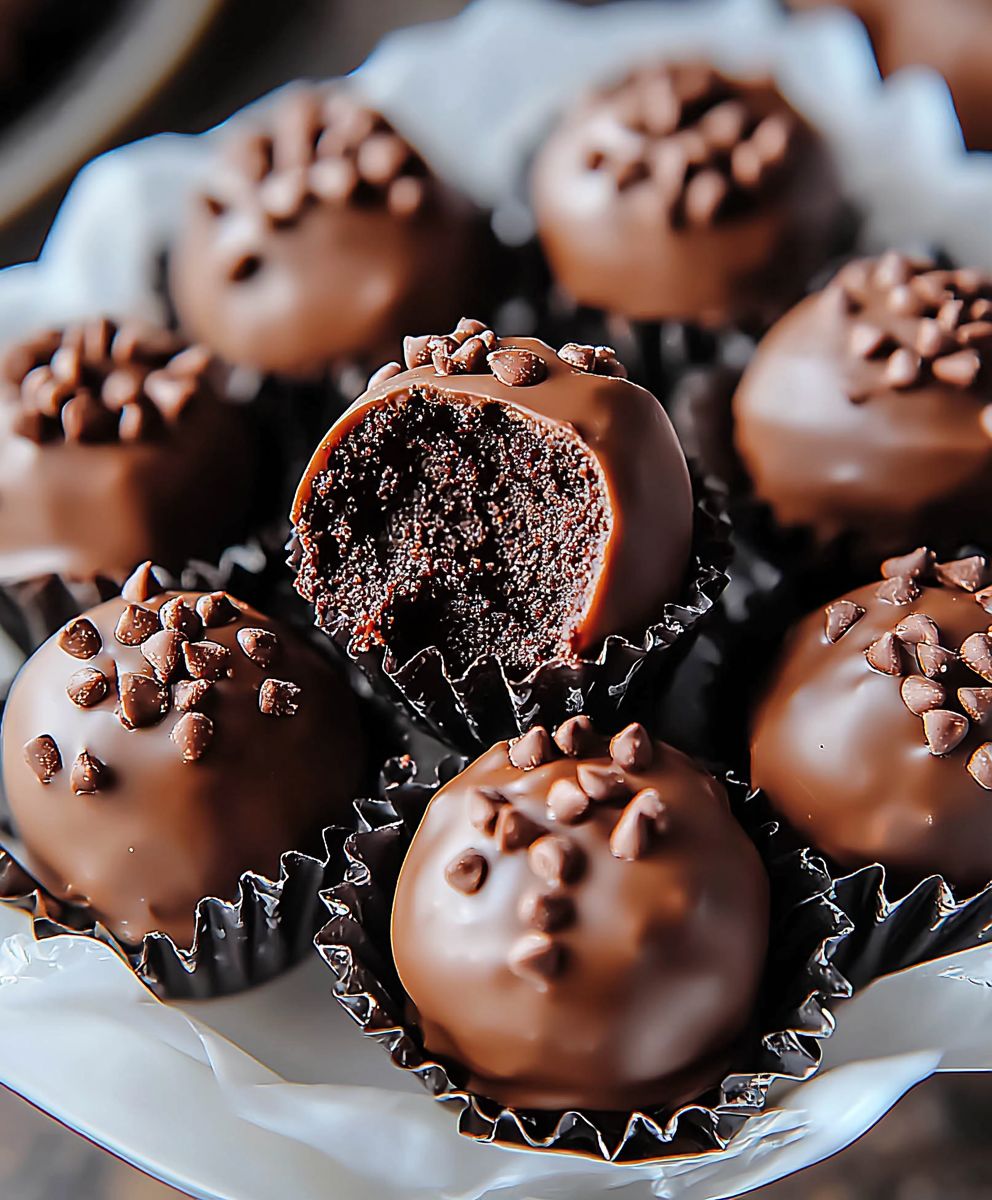
Brownie truffles easy to make and even easier to devour! Imagine sinking your teeth into a decadent, fudgy sphere of chocolate bliss, so rich and intensely flavored that it melts in your mouth. These aren’t just any truffles; they’re a bite-sized explosion of brownie goodness, perfect for satisfying your sweet cravings or impressing guests with minimal effort.
While the exact origins of the truffle are debated, these delightful chocolate confections have long been associated with luxury and indulgence. Our brownie truffles easy recipe takes that sophisticated treat and infuses it with the comforting, familiar taste of homemade brownies. It’s a delightful fusion of classic and contemporary, bringing together the best of both worlds.
What makes these brownie truffles so irresistible? It’s the perfect combination of textures a smooth, velvety exterior giving way to a dense, fudgy center. The rich chocolate flavor is undeniably addictive, and the fact that they’re so easy to make means you can whip up a batch whenever the craving strikes. Whether you’re looking for a simple dessert to share with loved ones, a homemade gift, or just a little something to brighten your day, these brownie truffles are guaranteed to be a hit. Get ready to experience chocolate heaven!

Ingredients:
- 1 (13×9 inch) pan of brownies, baked and cooled completely (homemade or store-bought I won’t judge!)
- 8 ounces cream cheese, softened
- 1/2 cup powdered sugar
- 1 teaspoon vanilla extract
- 12 ounces chocolate chips (milk, semi-sweet, or dark your choice!)
- 1 tablespoon vegetable shortening (or coconut oil)
- Optional toppings: sprinkles, chopped nuts, cocoa powder, sea salt, crushed Oreos, mini chocolate chips
Preparing the Brownie Mixture:
- Crumble the Brownies: This is where you get to unleash your inner child! Take your cooled brownies and crumble them into a large mixing bowl. Make sure there are no large chunks remaining. You want a fine, even crumb. I find using my hands is the easiest and most effective way to do this, but you can also use a fork if you prefer.
- Add Cream Cheese: Now, add the softened cream cheese to the bowl with the crumbled brownies. It’s crucial that the cream cheese is softened, otherwise it will be difficult to incorporate and you’ll end up with lumpy truffles. If you forgot to take it out of the fridge ahead of time, you can microwave it in 15-second intervals, checking and stirring each time, until it’s soft but not melted.
- Incorporate Powdered Sugar and Vanilla: Add the powdered sugar and vanilla extract to the bowl. The powdered sugar will add sweetness and help bind the mixture together, while the vanilla extract will enhance the chocolate flavor.
- Mix Thoroughly: Using an electric mixer (handheld or stand mixer), beat the mixture until it’s completely combined and smooth. This might take a few minutes, so be patient. You want to make sure there are no streaks of cream cheese remaining. The mixture should resemble a thick, fudgy dough. If you don’t have an electric mixer, you can use a sturdy spoon, but it will require some elbow grease!
Forming the Truffles:
- Chill the Mixture: Cover the bowl with plastic wrap and refrigerate the brownie mixture for at least 30 minutes, or even better, an hour. This chilling time is essential because it allows the mixture to firm up, making it much easier to roll into balls. If you skip this step, the mixture will be too sticky and messy to work with.
- Prepare Your Workspace: While the mixture is chilling, prepare your workspace. Line a baking sheet with parchment paper or wax paper. This will prevent the truffles from sticking. Also, gather any toppings you plan to use, such as sprinkles, chopped nuts, cocoa powder, or sea salt. Place them in small bowls for easy access.
- Roll into Balls: Once the brownie mixture is chilled, remove it from the refrigerator. Using a small cookie scoop or a spoon, scoop out portions of the mixture and roll them into 1-inch balls. I find that a cookie scoop helps to ensure that the truffles are all the same size. Place the rolled balls onto the prepared baking sheet.
- Return to the Fridge (Optional): If you find that the truffles are getting too soft while you’re rolling them, you can pop the baking sheet back into the refrigerator for a few minutes to firm them up again. This is especially helpful if you’re working in a warm kitchen.
Melting the Chocolate and Dipping:
- Melt the Chocolate: Place the chocolate chips and vegetable shortening (or coconut oil) in a microwave-safe bowl. The shortening helps to thin the chocolate, making it easier to dip the truffles and giving them a smoother, shinier finish.
- Microwave in Intervals: Microwave the chocolate in 30-second intervals, stirring after each interval, until the chocolate is completely melted and smooth. Be careful not to overheat the chocolate, as it can burn easily. If you prefer, you can melt the chocolate using a double boiler on the stovetop.
- Dip the Truffles: Using a fork or dipping tools, carefully dip each brownie ball into the melted chocolate, making sure it’s completely coated. Gently tap off any excess chocolate.
- Add Toppings (Immediately!): Immediately after dipping, place the truffle onto the prepared baking sheet and sprinkle with your desired toppings. The chocolate will set quickly, so you need to add the toppings right away.
- Chill to Set: Once all the truffles are dipped and topped, place the baking sheet in the refrigerator for at least 15-20 minutes, or until the chocolate is completely set. This will help the truffles hold their shape and prevent them from melting.
Tips and Variations:
- Brownie Base: Feel free to experiment with different brownie recipes. You can use a fudgy brownie, a cakey brownie, or even a brownie mix. Just make sure the brownies are baked and cooled completely before crumbling them.
- Chocolate Choice: The type of chocolate you use for dipping will greatly affect the flavor of the truffles. Milk chocolate will give you a sweeter truffle, while dark chocolate will provide a richer, more intense chocolate flavor. You can also use white chocolate for a completely different flavor profile.
- Flavor Extracts: Add a few drops of different extracts to the brownie mixture to change the flavor. Peppermint extract, almond extract, or even coffee extract would be delicious additions.
- Nut Butters: Stir in a tablespoon or two of your favorite nut butter (peanut butter, almond butter, cashew butter) to the brownie mixture for a nutty twist.
- Liquor Infusion: For an adult version, add a tablespoon of your favorite liqueur (such as rum, bourbon, or Irish cream) to the brownie mixture.
- Storage: Store the brownie truffles in an airtight container in the refrigerator for up to a week. They can also be frozen for up to a month. Just be sure to thaw them in the refrigerator before serving.
- Presentation: Arrange the truffles on a pretty platter or in a decorative box for a beautiful presentation. They make a great gift for friends and family.
Troubleshooting:
My brownie mixture is too sticky:
This usually happens if the cream cheese wasn’t softened enough or if the brownies were still slightly warm when you crumbled them. Try chilling the mixture for a longer period of time to firm it up.
My chocolate is seizing up:
This can happen if the chocolate gets overheated or if even a tiny drop of water gets into it. Be sure to microwave the chocolate in short intervals and stir frequently. If the chocolate seizes up, try adding a teaspoon of vegetable shortening and stirring vigorously. Sometimes this can help to smooth it out.
My toppings aren’t sticking to the chocolate:
Make sure you add the toppings immediately after dipping the truffles, while the chocolate is still wet. If the chocolate has already started to set, the toppings won’t adhere properly.
My truffles are melting:
This is usually due to the truffles not being chilled enough. Make sure you chill the brownie mixture before rolling it into balls and chill the finished truffles after dipping them in chocolate.
Conclusion:
So there you have it! These brownie truffles easy recipe is truly a game-changer. From the incredibly simple preparation to the decadent, melt-in-your-mouth experience, it’s a dessert that’s guaranteed to impress, whether you’re a seasoned baker or just starting out. Forget spending hours in the kitchen wrestling with complicated recipes; this one delivers maximum flavor with minimal effort. The rich, fudgy center, encased in a smooth chocolate shell, is an irresistible combination that will have everyone reaching for seconds (and maybe even thirds!). But the best part? The versatility! While these truffles are divine as is, there’s plenty of room to get creative and customize them to your liking. For a festive touch, roll them in crushed peppermint candies during the holidays. Or, if you’re a coffee lover, add a teaspoon of instant espresso powder to the brownie batter for a mocha-infused delight. Chopped nuts, like walnuts or pecans, provide a satisfying crunch, while a sprinkle of sea salt enhances the sweetness and adds a sophisticated touch.Serving Suggestions and Variations:
* Elegant Dessert Platter: Arrange the truffles on a beautiful platter alongside fresh berries and a dollop of whipped cream for an elegant dessert presentation. * Edible Gifts: Package the truffles in decorative boxes or tins to create thoughtful and delicious homemade gifts for friends and family. * Ice Cream Topping: Crumble the truffles over your favorite ice cream for an extra indulgent treat. * Boozy Brownie Truffles: Add a tablespoon of your favorite liqueur, such as rum or Irish cream, to the brownie batter for an adult twist. * White Chocolate Drizzle: Drizzle melted white chocolate over the finished truffles for a visually appealing and flavorful contrast. * Different Chocolate Coatings: Experiment with different types of chocolate for the coating, such as dark chocolate, milk chocolate, or even flavored chocolate like orange or mint. I truly believe that once you try this recipe, it will become a staple in your dessert repertoire. It’s perfect for parties, holidays, or simply satisfying a sweet craving. The ease of preparation makes it ideal for those times when you need a quick and impressive dessert without spending hours in the kitchen. Plus, the customizable nature of the recipe means you can adapt it to suit your own personal preferences and dietary needs. So, what are you waiting for? Gather your ingredients, preheat your oven, and get ready to embark on a truffle-making adventure! I’m confident that you’ll be delighted with the results. And most importantly, don’t forget to share your creations with me! I’d love to see your variations and hear about your experience making these brownie truffles easy. Tag me in your photos on social media, or leave a comment below to let me know how they turned out. Happy baking! I can’t wait to see what delicious creations you come up with! PrintBrownie Truffles Easy: The Ultimate Guide to Homemade Bliss

Rich brownie truffles made with crumbled brownies, cream cheese, and chocolate, then dipped in melted chocolate and finished with your favorite toppings.
- Prep Time: 20 minutes
- Cook Time: 5 minutes
- Total Time: 70 minutes
- Yield: 30–40 truffles 1x
Ingredients
- 1 (13×9 inch) pan of brownies, baked and cooled completely (homemade or store-bought)
- 8 ounces cream cheese, softened
- 1/2 cup powdered sugar
- 1 teaspoon vanilla extract
- 12 ounces chocolate chips (milk, semi-sweet, or dark)
- 1 tablespoon vegetable shortening (or coconut oil)
- Optional toppings: sprinkles, chopped nuts, cocoa powder, sea salt, crushed Oreos, mini chocolate chips
Instructions
- Crumble the Brownies: Crumble the cooled brownies into a large mixing bowl until there are no large chunks remaining.
- Add Cream Cheese: Add the softened cream cheese to the bowl with the crumbled brownies.
- Incorporate Powdered Sugar and Vanilla: Add the powdered sugar and vanilla extract to the bowl.
- Mix Thoroughly: Using an electric mixer, beat the mixture until it’s completely combined and smooth.
- Chill the Mixture: Cover the bowl with plastic wrap and refrigerate the brownie mixture for at least 30 minutes, or up to an hour.
- Prepare Your Workspace: Line a baking sheet with parchment paper or wax paper. Gather any toppings you plan to use.
- Roll into Balls: Once the brownie mixture is chilled, scoop out portions of the mixture and roll them into 1-inch balls. Place the rolled balls onto the prepared baking sheet.
- Return to the Fridge (Optional): If the truffles are getting too soft while you’re rolling them, you can pop the baking sheet back into the refrigerator for a few minutes to firm them up again.
- Melt the Chocolate: Place the chocolate chips and vegetable shortening (or coconut oil) in a microwave-safe bowl. Microwave in 30-second intervals, stirring after each interval, until the chocolate is completely melted and smooth.
- Dip the Truffles: Using a fork or dipping tools, carefully dip each brownie ball into the melted chocolate, making sure it’s completely coated. Gently tap off any excess chocolate.
- Add Toppings (Immediately!): Immediately after dipping, place the truffle onto the prepared baking sheet and sprinkle with your desired toppings.
- Chill to Set: Once all the truffles are dipped and topped, place the baking sheet in the refrigerator for at least 15-20 minutes, or until the chocolate is completely set.
Notes
- Brownie Base: Experiment with different brownie recipes.
- Chocolate Choice: The type of chocolate you use for dipping will greatly affect the flavor of the truffles.
- Flavor Extracts: Add a few drops of different extracts to the brownie mixture to change the flavor.
- Nut Butters: Stir in a tablespoon or two of your favorite nut butter to the brownie mixture for a nutty twist.
- Liquor Infusion: For an adult version, add a tablespoon of your favorite liqueur to the brownie mixture.
- Storage: Store the brownie truffles in an airtight container in the refrigerator for up to a week. They can also be frozen for up to a month. Just be sure to thaw them in the refrigerator before serving.
- Presentation: Arrange the truffles on a pretty platter or in a decorative box for a beautiful presentation.

Leave a Comment