
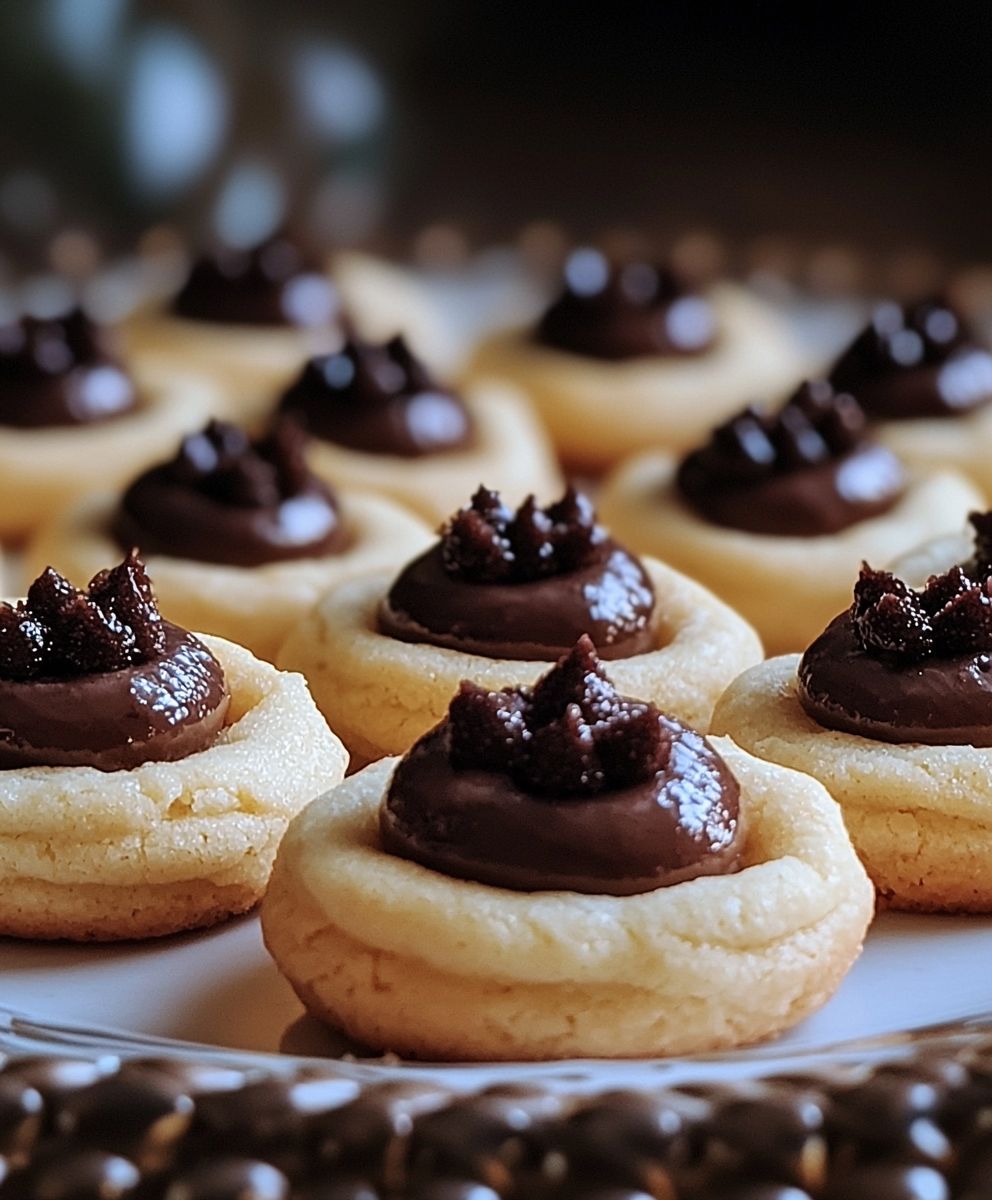
Cannoli Thumbprint Cookies: Prepare to be amazed! Imagine the creamy, sweet ricotta filling of a classic cannoli, nestled perfectly within a buttery, melt-in-your-mouth cookie. That’s exactly what you get with these delightful treats, and trust me, they are as addictive as they sound.
Cannoli, a beloved Sicilian pastry, has a rich history dating back centuries. Some believe it originated as a fertility symbol, while others say it was created by nuns in a convent. Regardless of its true origins, the cannoli has become a symbol of Italian-American culture, often enjoyed during celebrations and holidays. We’ve taken that iconic flavor profile and transformed it into a convenient and utterly irresistible cookie form.
What makes these Cannoli Thumbprint Cookies so special? It’s the perfect combination of textures and flavors. The crisp, tender cookie base provides a delightful contrast to the smooth, sweet ricotta filling, which is often enhanced with chocolate chips or candied fruit. People adore these cookies because they offer a taste of Italy in a single bite, and they’re surprisingly easy to make. Whether you’re a seasoned baker or a beginner, you’ll find this recipe straightforward and rewarding. Get ready to impress your friends and family with these unique and delicious cookies!

Ingredients:
- For the Cookie Dough:
- 2 1/4 cups (281g) all-purpose flour
- 1/2 teaspoon baking powder
- 1/4 teaspoon salt
- 1 cup (2 sticks or 226g) unsalted butter, softened
- 3/4 cup (150g) granulated sugar
- 1 large egg
- 1 teaspoon vanilla extract
- 1/2 teaspoon almond extract
- 1 tablespoon milk, if needed
- For the Cannoli Filling:
- 15 ounces (425g) whole milk ricotta cheese, drained very well
- 1/2 cup (60g) powdered sugar, sifted
- 1/4 cup (30g) mini chocolate chips
- 1/4 teaspoon ground cinnamon
- 1 teaspoon vanilla extract
- 1 tablespoon orange zest (optional)
- For Decoration:
- Powdered sugar, for dusting
- Chopped pistachios, for garnish (optional)
- Candied cherries, halved (optional)
Preparing the Cookie Dough
- Combine Dry Ingredients: In a medium bowl, whisk together the flour, baking powder, and salt. This ensures the baking powder and salt are evenly distributed throughout the flour, which is crucial for the cookie’s texture and rise.
- Cream Butter and Sugar: In a large bowl (or the bowl of a stand mixer), cream together the softened butter and granulated sugar until light and fluffy. This process incorporates air into the mixture, which contributes to the cookies’ tender crumb. Beat for at least 3-5 minutes on medium speed. Don’t rush this step!
- Add Egg and Extracts: Beat in the egg, vanilla extract, and almond extract until well combined. The almond extract adds a subtle, characteristic cannoli flavor, so don’t skip it!
- Gradually Add Dry Ingredients: Gradually add the dry ingredients to the wet ingredients, mixing on low speed until just combined. Be careful not to overmix, as this can develop the gluten in the flour and result in tough cookies. If the dough seems too dry, add the milk, one tablespoon at a time, until it comes together.
- Chill the Dough: Divide the dough in half, flatten each half into a disc, wrap tightly in plastic wrap, and refrigerate for at least 1 hour, or preferably 2 hours. Chilling the dough allows the gluten to relax, making it easier to handle and preventing the cookies from spreading too much in the oven. This is a very important step!
Shaping and Baking the Cookies
- Preheat Oven and Prepare Baking Sheets: Preheat your oven to 350°F (175°C). Line baking sheets with parchment paper or silicone baking mats. This prevents the cookies from sticking and makes cleanup a breeze.
- Shape the Cookies: Remove one disc of dough from the refrigerator at a time (keep the other one chilled). On a lightly floured surface, roll the dough out to about 1/4-inch thickness. Use a 2-inch round cookie cutter (or a glass) to cut out circles.
- Create Thumbprints: Place the cookie rounds onto the prepared baking sheets, leaving about 1 inch between each cookie. Use your thumb (or the back of a small spoon) to gently press an indentation in the center of each cookie. Be careful not to press all the way through the dough.
- Bake the Cookies: Bake for 8-10 minutes, or until the edges are lightly golden brown. The cookies should be set but still slightly soft in the center.
- Cool the Cookies: Remove the baking sheets from the oven and let the cookies cool on the baking sheets for a few minutes before transferring them to a wire rack to cool completely.
Preparing the Cannoli Filling
- Drain the Ricotta: This is the most important step for a good cannoli filling! Place the ricotta cheese in a fine-mesh sieve lined with cheesecloth (or a paper towel). Set the sieve over a bowl and let the ricotta drain in the refrigerator for at least 2 hours, or preferably overnight. This removes excess moisture, preventing the filling from being watery.
- Combine Filling Ingredients: In a medium bowl, combine the drained ricotta cheese, powdered sugar, mini chocolate chips, cinnamon, vanilla extract, and orange zest (if using). Mix until smooth and well combined.
- Chill the Filling: Cover the bowl with plastic wrap and refrigerate the filling for at least 30 minutes to allow the flavors to meld. This also helps the filling to firm up slightly, making it easier to pipe into the cookies.
Assembling the Cannoli Thumbprint Cookies
- Fill the Cookies: Once the cookies are completely cool and the filling is chilled, transfer the cannoli filling to a piping bag fitted with a small round tip (or use a zip-top bag with a corner snipped off). Pipe the filling into the thumbprint indentation of each cookie. You can also use a small spoon to fill the cookies if you don’t have a piping bag.
- Decorate the Cookies: Dust the filled cookies with powdered sugar. If desired, garnish with chopped pistachios and/or halved candied cherries. These additions not only enhance the flavor but also make the cookies look even more festive.
- Serve and Store: Serve the cannoli thumbprint cookies immediately, or store them in an airtight container in the refrigerator for up to 3 days. The cookies are best enjoyed within a day or two, as the filling can soften the cookies over time.
Conclusion:
And there you have it! These Cannoli Thumbprint Cookies are truly a must-try for anyone who loves the classic Italian dessert but wants a fun, easy-to-make twist. The combination of the buttery, melt-in-your-mouth cookie base with the sweet, creamy ricotta filling and a hint of citrus is simply divine. It’s a flavor explosion in every bite, and I promise you, these cookies will disappear faster than you can say “cannoli!” But what makes these cookies so special? It’s the perfect balance of textures and flavors. The cookie itself is tender and crumbly, providing a delightful contrast to the smooth, rich filling. The ricotta cheese adds a subtle tanginess that cuts through the sweetness, while the mini chocolate chips provide a delightful burst of chocolatey goodness. And let’s not forget the candied orange peel, which adds a touch of sophistication and a bright, citrusy aroma. These Cannoli Thumbprint Cookies are not only delicious but also incredibly versatile. They’re perfect for any occasion, from a casual afternoon tea to a festive holiday gathering. Imagine serving these at your next Christmas party they’re sure to be a hit! Or, package them up in a pretty box and give them as a homemade gift to your friends and family. They’ll be so impressed by your baking skills! Now, let’s talk about serving suggestions and variations. While these cookies are absolutely delicious on their own, you can also pair them with a scoop of vanilla ice cream or a dollop of whipped cream for an extra decadent treat. For a more sophisticated presentation, dust them with powdered sugar or drizzle them with melted chocolate. If you’re feeling adventurous, you can also experiment with different fillings. Try using mascarpone cheese instead of ricotta for a richer, creamier filling. Or, add a splash of almond extract or vanilla extract to the filling for a more intense flavor. You could even incorporate chopped pistachios or other nuts into the filling for added texture and flavor. Another fun variation is to use different types of chocolate chips, such as white chocolate or dark chocolate. The possibilities are endless! Don’t be afraid to get creative and put your own spin on this recipe. After all, baking is all about having fun and experimenting with different flavors and textures. And who knows, you might just discover your new favorite cookie recipe! I truly believe that these Cannoli Thumbprint Cookies are something special. They’re easy to make, incredibly delicious, and perfect for any occasion. So, what are you waiting for? Grab your ingredients, preheat your oven, and get baking! I promise you won’t be disappointed. I’m so excited for you to try this recipe and experience the magic of these cookies for yourself. Once you’ve made them, I would absolutely love to hear about your experience. Did you make any variations? What did your friends and family think? Share your photos and stories in the comments below. I can’t wait to see what you create! Happy baking! PrintCannoli Thumbprint Cookies: A Delicious Twist on a Classic

Buttery thumbprint cookies filled with a creamy, sweet ricotta filling, flavored with chocolate chips and cinnamon, and dusted with powdered sugar. A delightful twist on classic cannoli.
- Prep Time: 45 minutes
- Cook Time: 8 minutes
- Total Time: 165 minutes
- Yield: 24 cookies 1x
Ingredients
- 2 1/4 cups (281g) all-purpose flour
- 1/2 teaspoon baking powder
- 1/4 teaspoon salt
- 1 cup (2 sticks or 226g) unsalted butter, softened
- 3/4 cup (150g) granulated sugar
- 1 large egg
- 1 teaspoon vanilla extract
- 1/2 teaspoon almond extract
- 1 tablespoon milk, if needed
- 15 ounces (425g) whole milk ricotta cheese, drained very well
- 1/2 cup (60g) powdered sugar, sifted
- 1/4 cup (30g) mini chocolate chips
- 1/4 teaspoon ground cinnamon
- 1 teaspoon vanilla extract
- 1 tablespoon orange zest (optional)
- Powdered sugar, for dusting
- Chopped pistachios, for garnish (optional)
- Candied cherries, halved (optional)
Instructions
- Combine Dry Ingredients: In a medium bowl, whisk together the flour, baking powder, and salt.
- Cream Butter and Sugar: In a large bowl (or the bowl of a stand mixer), cream together the softened butter and granulated sugar until light and fluffy. Beat for at least 3-5 minutes on medium speed.
- Add Egg and Extracts: Beat in the egg, vanilla extract, and almond extract until well combined.
- Gradually Add Dry Ingredients: Gradually add the dry ingredients to the wet ingredients, mixing on low speed until just combined. If the dough seems too dry, add the milk, one tablespoon at a time, until it comes together.
- Chill the Dough: Divide the dough in half, flatten each half into a disc, wrap tightly in plastic wrap, and refrigerate for at least 1 hour, or preferably 2 hours.
- Preheat Oven and Prepare Baking Sheets: Preheat your oven to 350°F (175°C). Line baking sheets with parchment paper or silicone baking mats.
- Shape the Cookies: Remove one disc of dough from the refrigerator at a time (keep the other one chilled). On a lightly floured surface, roll the dough out to about 1/4-inch thickness. Use a 2-inch round cookie cutter (or a glass) to cut out circles.
- Create Thumbprints: Place the cookie rounds onto the prepared baking sheets, leaving about 1 inch between each cookie. Use your thumb (or the back of a small spoon) to gently press an indentation in the center of each cookie.
- Bake the Cookies: Bake for 8-10 minutes, or until the edges are lightly golden brown.
- Cool the Cookies: Remove the baking sheets from the oven and let the cookies cool on the baking sheets for a few minutes before transferring them to a wire rack to cool completely.
- Drain the Ricotta: Place the ricotta cheese in a fine-mesh sieve lined with cheesecloth (or a paper towel). Set the sieve over a bowl and let the ricotta drain in the refrigerator for at least 2 hours, or preferably overnight.
- Combine Filling Ingredients: In a medium bowl, combine the drained ricotta cheese, powdered sugar, mini chocolate chips, cinnamon, vanilla extract, and orange zest (if using). Mix until smooth and well combined.
- Chill the Filling: Cover the bowl with plastic wrap and refrigerate the filling for at least 30 minutes to allow the flavors to meld.
- Fill the Cookies: Once the cookies are completely cool and the filling is chilled, transfer the cannoli filling to a piping bag fitted with a small round tip (or use a zip-top bag with a corner snipped off). Pipe the filling into the thumbprint indentation of each cookie. You can also use a small spoon to fill the cookies if you don’t have a piping bag.
- Decorate the Cookies: Dust the filled cookies with powdered sugar. If desired, garnish with chopped pistachios and/or halved candied cherries.
- Serve and Store: Serve the cannoli thumbprint cookies immediately, or store them in an airtight container in the refrigerator for up to 3 days. The cookies are best enjoyed within a day or two, as the filling can soften the cookies over time.
Notes
- Draining the ricotta cheese is crucial for a non-watery filling. Don’t skip this step!
- Chilling the cookie dough prevents excessive spreading during baking.
- Almond extract adds a characteristic cannoli flavor to the cookies.
- Be careful not to overmix the cookie dough, as this can result in tough cookies.
- The cookies are best enjoyed within a day or two of assembly to maintain their texture.


Leave a Comment