
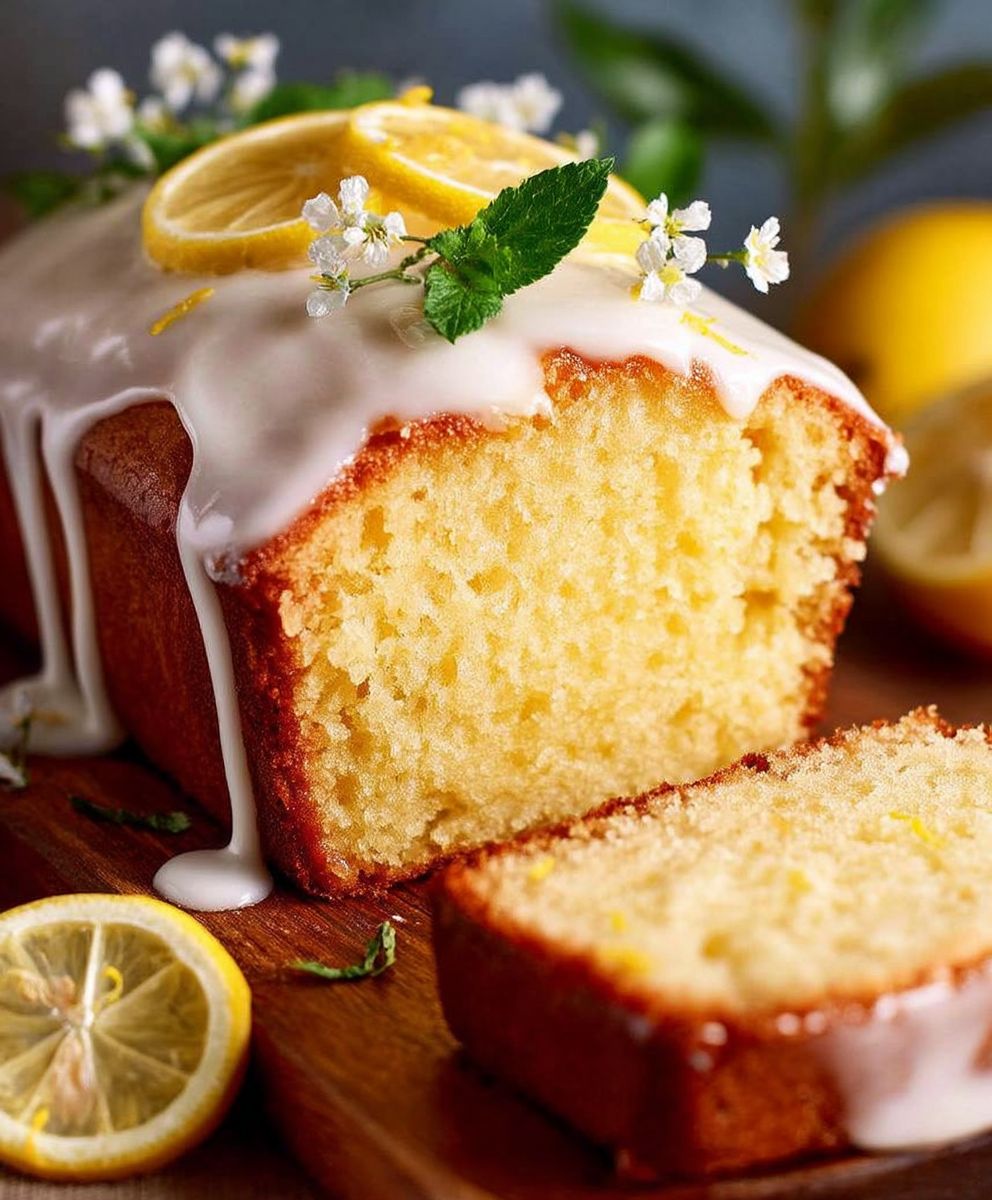
Glazed lemon loaf: just the name conjures images of sunshine streaming through the kitchen window, doesn’t it? I’m thrilled to share this recipe with you, because it’s more than just a cake; it’s a slice of pure, citrusy bliss. Imagine sinking your teeth into a moist, tender crumb, bursting with bright lemon flavor, all topped with a shimmering, sweet glaze. It’s the kind of treat that instantly lifts your spirits, perfect for a cozy afternoon tea or a celebratory brunch.
Lemon cakes, in various forms, have been enjoyed for centuries, with roots tracing back to ancient Mediterranean cultures where lemons were first cultivated. Over time, they’ve evolved into countless variations, each reflecting the unique culinary traditions of different regions. This particular glazed lemon loaf recipe draws inspiration from classic baking techniques, but with a few tweaks to ensure maximum flavor and that perfect, melt-in-your-mouth texture.
What makes this loaf so irresistible? It’s the perfect balance of sweet and tart, the incredibly moist crumb, and the satisfyingly sticky glaze that seals in all that lemony goodness. Plus, it’s surprisingly easy to make! Whether you’re a seasoned baker or just starting out, this recipe is guaranteed to impress. Get ready to fill your kitchen with the delightful aroma of lemons and bake a loaf that everyone will rave about!

Ingredients:
- For the Loaf:
- 2 1/2 cups (300g) all-purpose flour
- 1 teaspoon baking powder
- 1/2 teaspoon baking soda
- 1/4 teaspoon salt
- 1 cup (2 sticks or 226g) unsalted butter, softened
- 1 3/4 cups (350g) granulated sugar
- 2 large eggs
- 1 teaspoon vanilla extract
- 1 cup (240ml) buttermilk
- 1/4 cup (60ml) lemon juice, freshly squeezed
- 2 tablespoons lemon zest, finely grated
- For the Glaze:
- 2 cups (240g) powdered sugar
- 1/4 cup (60ml) lemon juice, freshly squeezed (plus more, if needed)
- 1 tablespoon lemon zest, finely grated
Preparing the Lemon Loaf Batter
- Preheat and Prepare: First things first, let’s get our oven ready! Preheat your oven to 350°F (175°C). While the oven is heating up, grease and flour a 9×5 inch loaf pan. This will prevent the loaf from sticking and ensure it comes out cleanly. I like to use a baking spray that contains flour for extra insurance.
- Combine Dry Ingredients: In a medium bowl, whisk together the flour, baking powder, baking soda, and salt. Whisking is important to evenly distribute the leavening agents and salt throughout the flour. This ensures a light and airy loaf. Set this bowl aside for now.
- Cream Butter and Sugar: In a large bowl (or the bowl of your stand mixer), cream together the softened butter and granulated sugar until light and fluffy. This usually takes about 3-5 minutes on medium speed. The mixture should be noticeably lighter in color and texture. This step is crucial for incorporating air into the batter, which contributes to the loaf’s tenderness.
- Add Eggs and Vanilla: Beat in the eggs one at a time, making sure each egg is fully incorporated before adding the next. Then, stir in the vanilla extract. The vanilla enhances the lemon flavor and adds a touch of warmth to the loaf.
- Alternate Wet and Dry Ingredients: Gradually add the dry ingredients to the wet ingredients, alternating with the buttermilk. Begin and end with the dry ingredients. I usually add about 1/3 of the dry ingredients, then 1/2 of the buttermilk, then another 1/3 of the dry ingredients, the remaining buttermilk, and finally the last 1/3 of the dry ingredients. This method helps prevent overmixing and ensures a smooth batter. Mix until just combined; be careful not to overmix, as this can result in a tough loaf.
- Add Lemon Juice and Zest: Stir in the lemon juice and lemon zest. The lemon juice adds a tangy flavor, while the zest provides a concentrated burst of lemon aroma. Make sure the zest is finely grated to avoid any bitter pieces in the loaf. Gently fold these ingredients into the batter until evenly distributed.
- Pour into Pan: Pour the batter into the prepared loaf pan and spread it evenly.
Baking the Lemon Loaf
- Bake: Bake in the preheated oven for 55-65 minutes, or until a wooden skewer inserted into the center comes out clean. Start checking for doneness around 55 minutes. If the top of the loaf is browning too quickly, you can loosely tent it with aluminum foil.
- Cool in Pan: Let the loaf cool in the pan for 10-15 minutes before inverting it onto a wire rack to cool completely. This prevents the loaf from sticking to the pan and allows it to cool evenly.
Preparing the Lemon Glaze
- Whisk Glaze Ingredients: In a medium bowl, whisk together the powdered sugar, lemon juice, and lemon zest until smooth. The glaze should be thick enough to coat the loaf but thin enough to drizzle easily. If the glaze is too thick, add a little more lemon juice, one teaspoon at a time, until you reach the desired consistency. If it’s too thin, add a little more powdered sugar.
Glazing and Serving
- Glaze the Loaf: Once the loaf is completely cool, place it on a wire rack set over a baking sheet (to catch any drips). Pour the glaze over the loaf, allowing it to drip down the sides. You can use a spatula to spread the glaze evenly.
- Let Glaze Set: Let the glaze set for about 30 minutes before slicing and serving. This allows the glaze to harden slightly and prevents it from being too sticky.
- Serve and Enjoy: Slice the glazed lemon loaf and serve. This loaf is delicious on its own or with a cup of tea or coffee. It’s also a great addition to brunch or dessert. Enjoy!
Conclusion:
This isn’t just another chicken recipe; it’s an experience. The rich, savory sauce, the tender chicken, the aroma that fills your kitchen it all comes together to create a dish that’s truly unforgettable. I wholeheartedly believe this Chicken Marsala recipe is a must-try for anyone who appreciates a classic Italian-American dish with a touch of elegance and comforting flavors. It’s surprisingly simple to make, yet delivers restaurant-quality results that will impress your family and friends.
But why is this particular recipe so special? It’s all about the balance. The sweetness of the Marsala wine perfectly complements the earthy mushrooms and savory chicken broth, creating a depth of flavor that’s simply divine. And the best part? It’s incredibly versatile!
Serving Suggestions and Variations:
Traditionally, Chicken Marsala is served over a bed of pasta, such as linguine or fettuccine. The creamy sauce clings beautifully to the noodles, making each bite a symphony of textures and tastes. However, don’t feel limited to pasta! It’s equally delicious served with creamy mashed potatoes, polenta, or even a simple side of roasted vegetables like asparagus or broccoli.
For a lighter option, consider serving it alongside a fresh salad with a lemon vinaigrette. The acidity of the dressing will cut through the richness of the sauce, creating a perfectly balanced meal.
And if you’re feeling adventurous, why not try some variations?
* Creamy Chicken Marsala: Add a splash of heavy cream or crème fraîche to the sauce at the end for an even richer and more decadent experience.
* Spicy Chicken Marsala: Add a pinch of red pepper flakes to the sauce for a subtle kick of heat.
* Mushroom Medley: Use a variety of mushrooms, such as shiitake, cremini, and oyster mushrooms, for a more complex and earthy flavor.
* Chicken Marsala with Artichokes: Add quartered artichoke hearts to the sauce during the last few minutes of cooking for a tangy and flavorful twist.
* Vegetarian Marsala: Substitute the chicken with thick slices of portobello mushrooms for a delicious vegetarian option. Just be sure to sear the mushrooms well to develop a nice, meaty texture.
No matter how you choose to serve it, I’m confident that this Chicken Marsala will become a new favorite in your household. It’s perfect for a weeknight dinner, a special occasion, or any time you’re craving a comforting and flavorful meal.
So, what are you waiting for? Gather your ingredients, put on some Italian music, and get ready to create a culinary masterpiece. I’ve poured my heart and soul into perfecting this recipe, and I truly believe it’s the best Chicken Marsala you’ll ever taste.
I’m so excited for you to try it! Once you’ve made it, please come back and share your experience in the comments below. I’d love to hear what you think, what variations you tried, and any tips or tricks you discovered along the way. Your feedback is invaluable, and it helps me continue to improve and share delicious recipes with the world. Happy cooking! I hope you enjoy this Chicken Marsala as much as I do.
Chicken Marsala: The Ultimate Guide to Making It Perfectly
I need the recipe to provide a description. Please provide the recipe details.


Leave a Comment