
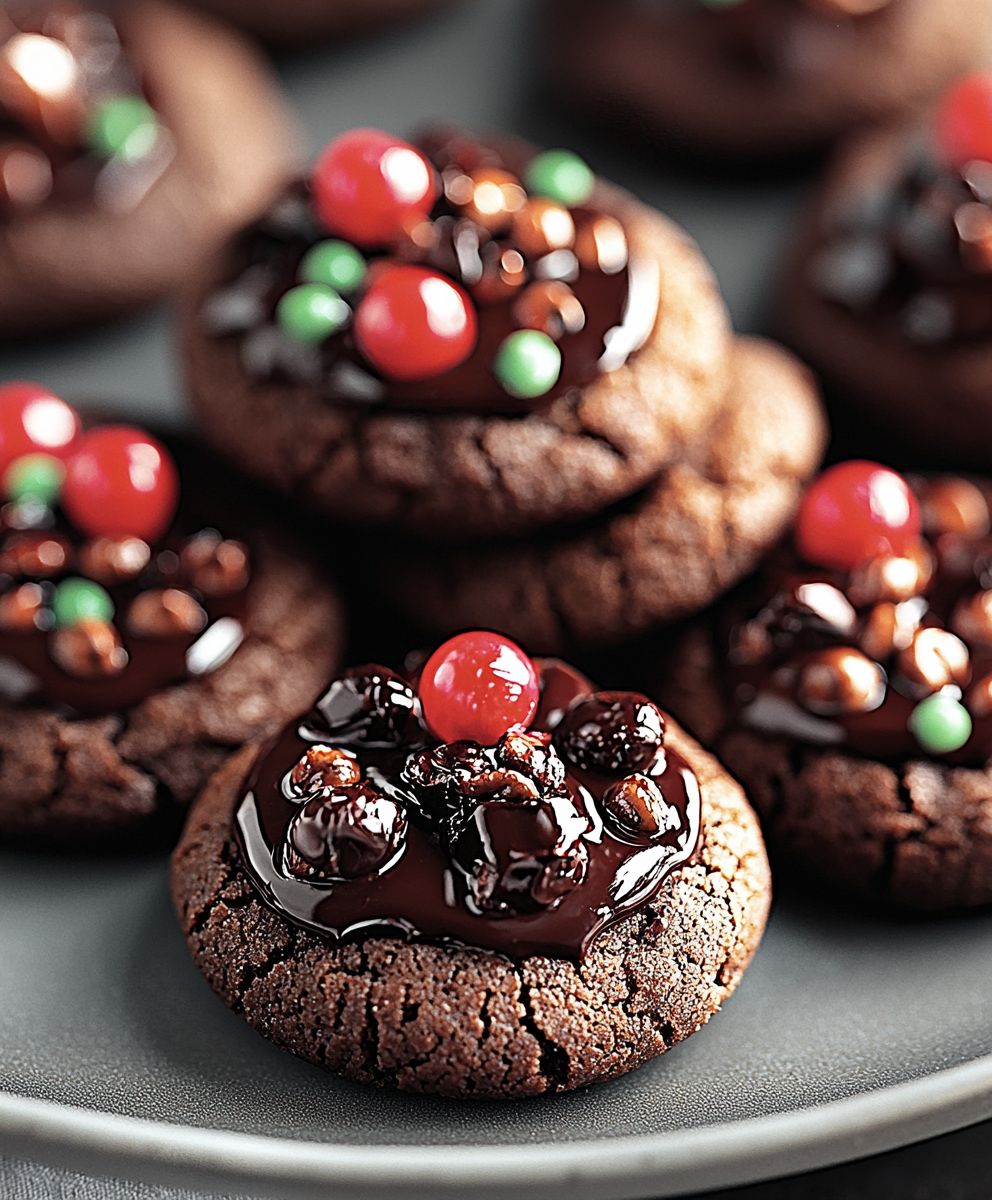
Chocolate blossom cookies, those delightful little mounds of chocolatey goodness crowned with a Hershey’s Kiss, are more than just a treat; they’re a nostalgic trip down memory lane for many. Remember baking these with your grandmother during the holidays, the sweet aroma filling the kitchen with warmth and anticipation? Or perhaps you encountered them at a school bake sale, their irresistible charm beckoning you closer?
While the exact origins of chocolate blossom cookies are shrouded in a bit of mystery, their popularity exploded in the mid-20th century, coinciding with the rise of convenient baking mixes and the iconic Hershey’s Kiss. They quickly became a staple at holiday gatherings and potlucks across America, a testament to their simplicity and crowd-pleasing flavor.
What makes these cookies so universally loved? It’s a combination of factors, really. The soft, slightly chewy chocolate cookie base provides a comforting texture, while the Hershey’s Kiss adds a burst of creamy sweetness that perfectly complements the cocoa. They’re also incredibly easy to make, requiring minimal ingredients and effort, making them a perfect choice for beginner bakers and busy individuals alike. Plus, let’s be honest, they’re just plain adorable! Their festive appearance makes them a welcome addition to any dessert table, guaranteed to bring a smile to everyone’s face. So, let’s get baking and create some sweet memories with this classic recipe!

Ingredients:
- 1 cup (2 sticks) unsalted butter, softened
- 1 ½ cups granulated sugar
- 2 large eggs
- 1 teaspoon vanilla extract
- 2 ¾ cups all-purpose flour
- ¾ cup unsweetened cocoa powder
- 1 teaspoon baking soda
- ½ teaspoon salt
- ¼ cup milk
- Approximately 48 chocolate stars or other small chocolate candies for decoration
Preparing the Dough:
- Cream the Butter and Sugar: In a large bowl, or the bowl of your stand mixer, cream together the softened butter and granulated sugar until light and fluffy. This usually takes about 3-5 minutes on medium speed. Make sure to scrape down the sides of the bowl occasionally to ensure everything is evenly mixed. You don’t want any lumps of butter hiding at the bottom!
- Add Eggs and Vanilla: Beat in the eggs one at a time, mixing well after each addition. Then, stir in the vanilla extract. The mixture should be smooth and well combined.
- Combine Dry Ingredients: In a separate medium bowl, whisk together the all-purpose flour, cocoa powder, baking soda, and salt. Whisking ensures that the baking soda and salt are evenly distributed throughout the flour mixture, which is crucial for proper leavening and flavor.
- Gradually Add Dry Ingredients to Wet Ingredients: Gradually add the dry ingredients to the wet ingredients, mixing on low speed until just combined. Be careful not to overmix! Overmixing can develop the gluten in the flour, resulting in tough cookies. Add the milk and mix until just combined. The dough will be thick and slightly sticky.
- Chill the Dough: Cover the bowl with plastic wrap and refrigerate the dough for at least 2 hours, or preferably overnight. Chilling the dough is essential for several reasons. First, it allows the gluten to relax, resulting in a more tender cookie. Second, it firms up the butter, which prevents the cookies from spreading too much during baking. Third, it deepens the flavor of the cookies.
Shaping and Baking the Cookies:
- Preheat Oven and Prepare Baking Sheets: Preheat your oven to 375°F (190°C). Line baking sheets with parchment paper or silicone baking mats. Parchment paper prevents the cookies from sticking and makes cleanup a breeze. Silicone mats provide even heat distribution and prevent the bottoms of the cookies from browning too quickly.
- Shape the Cookies: Remove the chilled dough from the refrigerator. Using a cookie scoop or a spoon, scoop out rounded tablespoons of dough. Roll each portion into a ball. If the dough is still too sticky to handle easily, you can lightly flour your hands.
- Place on Baking Sheets: Place the dough balls onto the prepared baking sheets, leaving about 2 inches between each cookie to allow for spreading.
- Bake the Cookies: Bake for 8-10 minutes, or until the edges are set and the centers are slightly soft. Be careful not to overbake the cookies, as they will continue to bake on the baking sheet after you remove them from the oven.
- Add Chocolate Blossoms: Immediately after removing the cookies from the oven, gently press a chocolate star or other small chocolate candy into the center of each cookie. The heat from the cookies will slightly melt the chocolate, helping it to adhere to the cookie.
- Cool the Cookies: Let the cookies cool on the baking sheets for a few minutes before transferring them to a wire rack to cool completely. This allows the cookies to firm up slightly, preventing them from breaking when you move them.
Tips and Variations:
- Use High-Quality Cocoa Powder: The quality of your cocoa powder will significantly impact the flavor of the cookies. Opt for a Dutch-processed cocoa powder for a richer, more intense chocolate flavor.
- Don’t Overmix the Dough: Overmixing the dough can develop the gluten in the flour, resulting in tough cookies. Mix until just combined.
- Chill the Dough Thoroughly: Chilling the dough is essential for preventing the cookies from spreading too much during baking. Chill for at least 2 hours, or preferably overnight.
- Adjust Baking Time: Baking times may vary depending on your oven. Keep a close eye on the cookies and adjust the baking time as needed.
- Vary the Chocolate: Instead of chocolate stars, you can use other small chocolate candies, such as chocolate chips, M&Ms, or Hershey’s Kisses.
- Add Extracts: Experiment with different extracts, such as peppermint extract or almond extract, to add a unique flavor to the cookies.
- Make it Gluten-Free: Substitute the all-purpose flour with a gluten-free all-purpose flour blend. Be sure to use a blend that contains xanthan gum, which helps to bind the ingredients together.
- Add Nuts: Add chopped nuts, such as walnuts or pecans, to the dough for added texture and flavor.
- Dust with Powdered Sugar: Once the cookies have cooled completely, dust them with powdered sugar for a festive touch.
Storing the Cookies:
Store the cooled cookies in an airtight container at room temperature for up to 5 days. You can also freeze the cookies for up to 2 months. To freeze, place the cookies in a single layer on a baking sheet and freeze until solid. Then, transfer the frozen cookies to a freezer bag or container. Thaw the cookies at room temperature before serving.
Troubleshooting:
- Cookies are spreading too much: This is usually caused by using butter that is too soft or not chilling the dough long enough. Make sure your butter is softened but not melted, and chill the dough for at least 2 hours.
- Cookies are too dry: This could be caused by overbaking the cookies or using too much flour. Be careful not to overbake the cookies, and measure the flour accurately.
- Cookies are too tough: This is usually caused by overmixing the dough. Mix until just combined.
- Chocolate candies are melting too much: Make sure the cookies are not too hot when you press in the chocolate candies. Let them cool on the baking sheet for a few minutes before adding the candies.
Enjoying Your Chocolate Blossom Cookies:
These Chocolate Blossom Cookies are perfect for any occasion, from holiday gatherings to everyday treats. They are sure to be a hit with family and friends. Enjoy them with a glass of milk, a cup of coffee, or a scoop of ice cream. They are also a great addition to a cookie platter or gift basket.
Detailed Ingredient Breakdown:
- Unsalted Butter: Using unsalted butter allows you to control the amount of salt in the recipe. Make sure the butter is softened to room temperature for easy creaming. If you use salted butter, reduce the amount of salt in the recipe by ¼ teaspoon.
- Granulated Sugar: Granulated sugar provides sweetness and helps to create a tender cookie.
- Large Eggs: Eggs add moisture, richness, and structure to the cookies. Use large eggs for best results.
- Vanilla Extract: Vanilla extract enhances the flavor of the cookies. Use pure vanilla extract for the best flavor.
- All-Purpose Flour: All-purpose flour provides structure to the cookies. Measure the flour accurately using the spoon and level method.
- Unsweetened Cocoa Powder: Unsweetened cocoa powder adds chocolate flavor to the cookies. Use a high-quality cocoa powder for the best flavor. Dutch-processed cocoa powder will give a richer, darker flavor.
- Baking Soda: Baking soda is a leavening agent that helps the cookies to rise.
- Salt: Salt enhances the flavor of the cookies.
- Milk: Milk adds moisture to the dough and helps to bind the ingredients together.
- Chocolate Stars: These are the signature decoration for blossom cookies. You can find them in most baking aisles, especially around the holidays.
Why This Recipe Works:
This recipe is a classic for a reason! The combination of rich chocolate flavor, tender texture, and festive appearance makes these cookies irresistible. The chilling time is crucial for preventing the cookies from spreading too much and for developing the flavor. The use of both butter and milk creates a moist and tender cookie. And the chocolate star in the center adds a touch of sweetness and visual appeal.
Variations on the Theme:
While the classic Chocolate Blossom Cookie is delicious on its own, there are many ways to customize this recipe to suit your taste. Here are a few ideas:
- Peanut Butter Blossoms: Substitute half of the butter with peanut butter for a peanut butter flavor. Use a peanut butter cup
Conclusion:
So, there you have it! These chocolate blossom cookies are more than just a treat; they’re an experience. From the rich, fudgy dough to the satisfying snap of the Hershey’s Kiss, every bite is a little piece of heaven. I truly believe this recipe is a must-try for any baking enthusiast, whether you’re a seasoned pro or just starting out. The process is straightforward, the ingredients are readily available, and the results are simply irresistible.
But why are these cookies so special? It’s the perfect balance of textures and flavors. The slightly crisp edges give way to a soft, chewy center, and the deep chocolate notes are beautifully complemented by the sweet, creamy Kiss. Plus, let’s be honest, they’re just so darn pretty! They’re perfect for holiday baking, potlucks, or simply a cozy night in with a cup of tea. They are guaranteed to be a crowd-pleaser.
Now, for some serving suggestions and variations to really make these cookies your own! While they’re absolutely divine on their own, consider serving them with a scoop of vanilla ice cream for an extra decadent dessert. Or, for a festive touch, dust them with powdered sugar before serving. They also pair wonderfully with a glass of cold milk or a warm mug of hot chocolate.
Feeling adventurous? Here are a few variations you might want to try:
- Peppermint Chocolate Blossoms: Add a teaspoon of peppermint extract to the dough for a festive holiday twist. You could even use peppermint-flavored Hershey’s Kisses!
- Peanut Butter Blossoms: Substitute half of the butter with peanut butter for a nutty, delicious flavor. Use peanut butter blossoms instead of chocolate ones.
- Espresso Chocolate Blossoms: Add a tablespoon of instant espresso powder to the dough to enhance the chocolate flavor and give them a little caffeine kick.
- Double Chocolate Blossoms: Use dark cocoa powder and dark chocolate Kisses for an intensely chocolatey experience.
- Sprinkle Blossoms: Before baking, roll the dough balls in colorful sprinkles for a fun and festive look.
The possibilities are endless! Don’t be afraid to experiment and find your own perfect version of these chocolate blossom cookies. I’m confident that once you try this recipe, it will become a staple in your baking repertoire. It’s a classic for a reason, and I’m so excited for you to experience the joy of making and sharing these delightful treats.
So, what are you waiting for? Preheat that oven, gather your ingredients, and get ready to bake up a batch of these irresistible cookies. I promise you won’t regret it! And most importantly, I’d love to hear about your experience. Did you try any of the variations? Did you make them for a special occasion? Share your photos and stories in the comments below! I can’t wait to see your creations and hear all about your baking adventures. Happy baking!
Remember to tag me in your social media posts so I can see your beautiful chocolate blossom cookies! I’m always inspired by your creativity and enthusiasm. Let’s spread the cookie love!
PrintChocolate Blossom Cookies: A Delicious & Easy Recipe

Rich, tender chocolate cookies topped with a chocolate star. Perfect for holidays or any occasion!
- Prep Time: 20 minutes
- Cook Time: 8 minutes
- Total Time: 150 minutes
- Yield: 48 cookies 1x
Ingredients
Scale- 1 cup (2 sticks) unsalted butter, softened
- 1 ½ cups granulated sugar
- 2 large eggs
- 1 teaspoon vanilla extract
- 2 ¾ cups all-purpose flour
- ¾ cup unsweetened cocoa powder
- 1 teaspoon baking soda
- ½ teaspoon salt
- ¼ cup milk
- Approximately 48 chocolate stars or other small chocolate candies for decoration
Instructions
- In a large bowl, or the bowl of your stand mixer, cream together the softened butter and granulated sugar until light and fluffy. This usually takes about 3-5 minutes on medium speed. Scrape down the sides of the bowl occasionally to ensure everything is evenly mixed.
- Beat in the eggs one at a time, mixing well after each addition. Then, stir in the vanilla extract. The mixture should be smooth and well combined.
- In a separate medium bowl, whisk together the all-purpose flour, cocoa powder, baking soda, and salt.
- Gradually add the dry ingredients to the wet ingredients, mixing on low speed until just combined. Be careful not to overmix! Add the milk and mix until just combined. The dough will be thick and slightly sticky.
- Cover the bowl with plastic wrap and refrigerate the dough for at least 2 hours, or preferably overnight.
- Preheat your oven to 375°F (190°C). Line baking sheets with parchment paper or silicone baking mats.
- Remove the chilled dough from the refrigerator. Using a cookie scoop or a spoon, scoop out rounded tablespoons of dough. Roll each portion into a ball. If the dough is still too sticky to handle easily, you can lightly flour your hands.
- Place the dough balls onto the prepared baking sheets, leaving about 2 inches between each cookie to allow for spreading.
- Bake for 8-10 minutes, or until the edges are set and the centers are slightly soft. Be careful not to overbake the cookies, as they will continue to bake on the baking sheet after you remove them from the oven.
- Immediately after removing the cookies from the oven, gently press a chocolate star or other small chocolate candy into the center of each cookie.
- Let the cookies cool on the baking sheets for a few minutes before transferring them to a wire rack to cool completely.
Notes
- Use high-quality cocoa powder for the best flavor. Dutch-processed cocoa powder is recommended.
- Don’t overmix the dough.
- Chilling the dough is essential.
- Baking times may vary depending on your oven.
- Store cooled cookies in an airtight container at room temperature for up to 5 days, or freeze for up to 2 months.
- If cookies are spreading too much, ensure butter isn’t too soft and chill the dough longer.
- If cookies are too dry, avoid overbaking and measure flour accurately.
- If cookies are too tough, avoid overmixing.
- If chocolate candies are melting too much, let cookies cool slightly before adding them.


Leave a Comment