
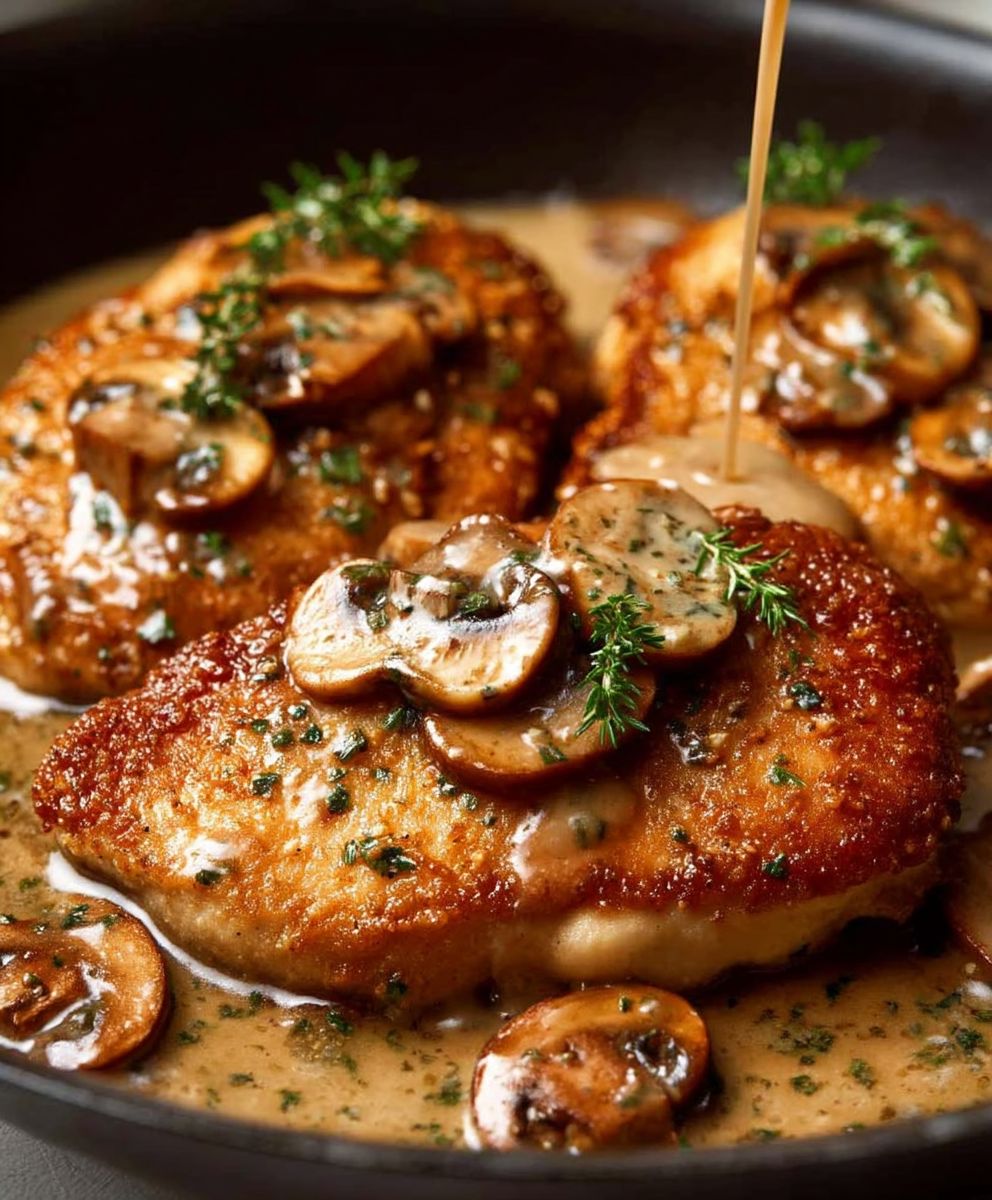
Chicken Marsala, a dish synonymous with comforting elegance, is about to become your new weeknight favorite. Imagine tender chicken cutlets, bathed in a rich, savory sauce infused with the sweet, nutty notes of Marsala wine and earthy mushrooms. Are you drooling yet? I know I am just thinking about it!
While often associated with Italian-American cuisine, the origins of Chicken Marsala are a bit more nuanced. It’s believed to have been created in the 19th century by English families living in western Sicily, who favored the locally produced Marsala wine. Over time, Italian chefs embraced the dish, adapting it to their own culinary styles and eventually introducing it to the United States, where it became a restaurant staple.
What makes Chicken Marsala so universally loved? It’s a symphony of flavors and textures. The sweetness of the Marsala wine perfectly complements the savory chicken and mushrooms, creating a depth of flavor that’s both sophisticated and comforting. The tender chicken, often lightly floured and pan-fried, offers a delightful contrast to the rich, velvety sauce. And let’s not forget its convenience! This dish comes together relatively quickly, making it perfect for busy weeknights or elegant dinner parties. So, are you ready to learn how to make the perfect Chicken Marsala?

Ingredients:
- 1.5 lbs boneless, skinless chicken breasts, about 6 breasts
- 1/2 cup all-purpose flour
- 1/2 teaspoon salt
- 1/4 teaspoon black pepper
- 4 tablespoons olive oil, divided
- 8 ounces cremini mushrooms, sliced
- 1/2 cup dry Marsala wine
- 1/2 cup chicken broth
- 2 tablespoons butter
- 2 tablespoons chopped fresh parsley, for garnish
Preparing the Chicken:
Okay, let’s get started with prepping our chicken. This is a crucial step to ensure it’s tender and cooks evenly. I like to take my time here!
- Pound the Chicken: Place each chicken breast between two sheets of plastic wrap or in a resealable bag. Using a meat mallet or rolling pin, pound the chicken to an even thickness of about 1/4 inch. This helps it cook quickly and evenly. Don’t overdo it, though; you don’t want to tear the chicken.
- Season the Flour: In a shallow dish, combine the flour, salt, and pepper. Mix well to ensure the seasonings are evenly distributed. This seasoned flour will create a lovely crust on the chicken.
- Dredge the Chicken: Dredge each chicken breast in the seasoned flour, making sure to coat both sides completely. Shake off any excess flour. This helps the chicken brown nicely and creates a slight thickening effect for the sauce later.
Sautéing the Chicken and Mushrooms:
Now for the fun part: cooking! This is where the magic happens and the flavors start to develop. Get ready for some delicious aromas!
- Heat the Oil: In a large skillet over medium-high heat, heat 2 tablespoons of olive oil. Make sure the skillet is nice and hot before adding the chicken.
- Cook the Chicken: Add the chicken breasts to the skillet in a single layer, being careful not to overcrowd the pan. You may need to cook the chicken in batches. Cook for about 3-4 minutes per side, or until golden brown and cooked through. The internal temperature should reach 165°F (74°C).
- Remove the Chicken: Once the chicken is cooked, remove it from the skillet and set it aside on a plate. Cover it loosely with foil to keep it warm.
- Sauté the Mushrooms: Add the remaining 2 tablespoons of olive oil to the skillet. Add the sliced mushrooms and cook for about 5-7 minutes, or until they are softened and browned. Stir occasionally to prevent them from sticking to the pan. The mushrooms will release their moisture, so let it evaporate as they cook.
Making the Marsala Sauce:
The sauce is the star of the show! This is where the rich, nutty flavor of the Marsala wine really shines. Don’t skip this step!
- Deglaze the Pan: Pour in the Marsala wine and scrape up any browned bits from the bottom of the skillet. These browned bits, called fond, are packed with flavor and will add depth to the sauce. Let the wine simmer for about 2-3 minutes, allowing it to reduce slightly.
- Add Chicken Broth: Pour in the chicken broth and bring the sauce to a simmer. Let it simmer for another 3-5 minutes, or until the sauce has thickened slightly.
- Finish the Sauce: Stir in the butter until it is melted and the sauce is smooth and glossy. Taste the sauce and adjust the seasoning with salt and pepper as needed.
Bringing it All Together:
Almost there! Now we just need to combine everything and let the flavors meld together. This is the final touch that makes this dish so amazing.
- Return the Chicken: Return the cooked chicken breasts to the skillet with the Marsala sauce. Spoon the sauce over the chicken to coat it evenly.
- Simmer Briefly: Let the chicken simmer in the sauce for about 2-3 minutes, allowing the flavors to meld together. This will also help to reheat the chicken if it has cooled down.
- Serve: Serve the Chicken Marsala immediately, garnished with fresh parsley. I love to serve it over pasta, mashed potatoes, or rice. It’s also delicious with a side of roasted vegetables.
Tips for Success:
- Use Good Quality Marsala Wine: The quality of the Marsala wine will greatly impact the flavor of the sauce. Opt for a dry Marsala wine for the best results.
- Don’t Overcook the Chicken: Overcooked chicken will be dry and tough. Use a meat thermometer to ensure the chicken is cooked to an internal temperature of 165°F (74°C).
- Adjust the Sauce to Your Liking: If you prefer a thicker sauce, you can add a cornstarch slurry (1 tablespoon cornstarch mixed with 2 tablespoons cold water) to the sauce while it is simmering.
- Make it Ahead: You can prepare the Chicken Marsala ahead of time and reheat it when you are ready to serve. The flavors will actually deepen as it sits.
Serving Suggestions:
Chicken Marsala is a versatile dish that pairs well with a variety of sides. Here are a few of my favorite serving suggestions:
- Pasta: Serve over your favorite pasta, such as linguine, fettuccine, or spaghetti.
- Mashed Potatoes: Creamy mashed potatoes are a classic accompaniment to Chicken Marsala.
- Rice: Serve with white rice, brown rice, or wild rice.
- Roasted Vegetables: Roasted asparagus, broccoli, or Brussels sprouts are a healthy and delicious side dish.
- Crusty Bread: Serve with crusty bread for soaking up the delicious Marsala sauce.
Variations:
Want to mix things up a bit? Here are a few variations you can try:
- Chicken Marsala with Cream: Add a splash of heavy cream to the sauce for a richer, creamier flavor.
- Chicken Marsala with Prosciutto: Add crispy prosciutto to the dish for a salty, savory twist.
- Chicken Marsala with Artichoke Hearts: Add quartered artichoke hearts to the sauce for a tangy, Mediterranean flavor.
- Vegetarian Marsala: Substitute the chicken with portobello mushrooms for a delicious vegetarian option.
Storage Instructions:
Leftover Chicken Marsala can be stored in an airtight container in the refrigerator for up to 3-4 days. To reheat, simply warm it up in a skillet over medium heat or in the microwave.
Conclusion:
This recipe for Chocolate Nut Bars is truly a must-try, and I’m not just saying that! The combination of rich, decadent chocolate with the satisfying crunch of nuts creates a symphony of textures and flavors that will have you reaching for seconds (and maybe thirds!). Its the perfect treat to satisfy your sweet tooth without being overly complicated to make. Trust me, once you taste these, you’ll understand why I’m so enthusiastic.
But what makes these bars so special? It’s the perfect balance. The sweetness of the chocolate is perfectly offset by the earthy, nutty flavors. The slightly chewy texture gives way to a satisfying crunch, making each bite an adventure. Plus, they’re incredibly versatile!
Looking for serving suggestions? These bars are fantastic on their own, of course, but they also pair beautifully with a scoop of vanilla ice cream for a truly indulgent dessert. Imagine a warm Chocolate Nut Bar melting slightly over cold ice cream pure bliss! You could also crumble them over yogurt for a quick and easy breakfast treat or pack them in lunchboxes for a delightful midday pick-me-up. They are also a great addition to any dessert platter.
And speaking of versatility, let’s talk variations! Feel free to experiment with different types of nuts. Walnuts, pecans, almonds, or even a mix of all three would work wonderfully. If you’re feeling adventurous, try adding a pinch of sea salt to the chocolate mixture to enhance the sweetness and create a salted caramel effect. For a vegan version, simply substitute the butter with a vegan butter alternative and ensure your chocolate is dairy-free. You can also add dried fruits like cranberries or cherries for an extra burst of flavor and texture. Consider adding a swirl of peanut butter or almond butter on top before baking for an even richer, nuttier experience.
Don’t be afraid to get creative and personalize this recipe to your liking. That’s the beauty of baking it’s all about experimenting and finding what works best for you. Maybe you’ll discover a new favorite combination that you can share with the world!
I truly believe that this Chocolate Nut Bars recipe is a winner. It’s easy to follow, uses readily available ingredients, and delivers exceptional results every time. Whether you’re a seasoned baker or just starting out, I encourage you to give it a try. You won’t be disappointed!
So, what are you waiting for? Preheat your oven, gather your ingredients, and get ready to bake up a batch of these irresistible bars. I’m confident that they’ll become a new favorite in your household.
Once you’ve tried the recipe, I’d love to hear about your experience! Did you make any variations? What did you think of the taste and texture? Share your photos and comments on social media using [Your Hashtag] so I can see your creations. I can’t wait to see what you come up with! Happy baking!
Chocolate Nut Bars: The Ultimate Guide to Delicious Homemade Treats
I need the recipe to provide a description. Please provide the recipe details.

Leave a Comment