
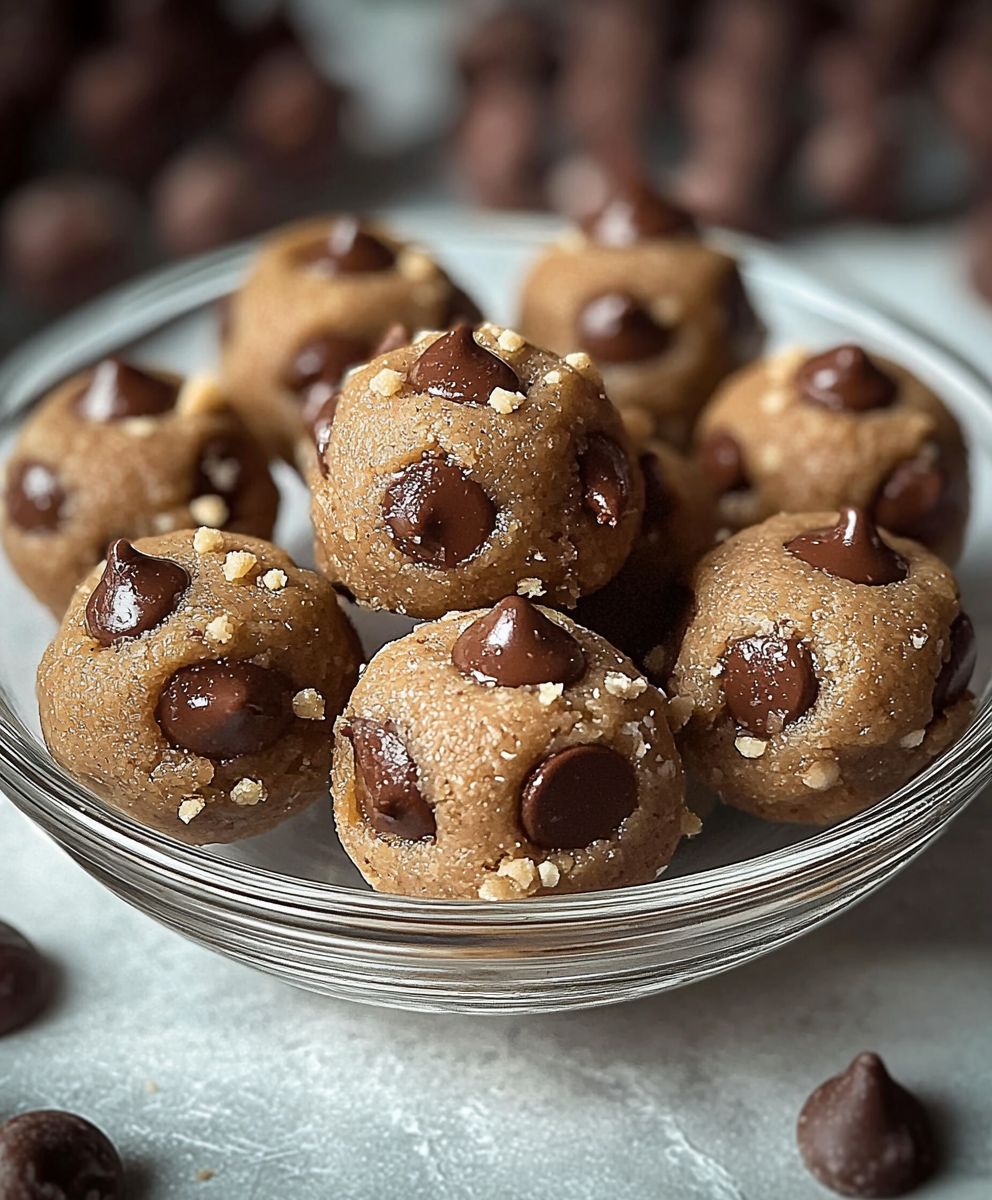
Chocolate peanut butter bites: Prepare to meet your new favorite no-bake treat! Imagine a symphony of rich, dark chocolate melding seamlessly with the creamy, salty goodness of peanut butter, all in a perfectly poppable, bite-sized package. These aren’t just desserts; they’re little bursts of happiness that will satisfy your sweet tooth and leave you craving more.
The combination of chocolate and peanut butter is a classic pairing, deeply rooted in American culinary culture. While the exact origins are debated, many credit the H.B. Reese Candy Company (of Reese’s Peanut Butter Cups fame) for popularizing this iconic flavor duo in the early 20th century. Since then, it has become a beloved staple, inspiring countless variations and adaptations.
What makes these chocolate peanut butter bites so irresistible? It’s the perfect balance of flavors and textures. The smooth, melt-in-your-mouth chocolate complements the slightly gritty, nutty peanut butter beautifully. Plus, they’re incredibly convenient! No oven required, minimal ingredients, and ready in minutes perfect for a quick dessert fix, a party snack, or a delightful homemade gift. Get ready to experience pure bliss with every single bite!

Ingredients:
- 1 cup creamy peanut butter
- 1/2 cup unsalted butter, softened
- 1 cup powdered sugar
- 1/2 cup graham cracker crumbs
- 1 teaspoon vanilla extract
- 12 ounces semi-sweet chocolate chips
- 1 tablespoon coconut oil (or vegetable shortening)
- Optional: Sea salt flakes for sprinkling
Preparing the Peanut Butter Filling
Okay, let’s get started with the heart of these delicious bites: the peanut butter filling! This part is super easy, and you’ll be amazed at how quickly it comes together. Trust me, resisting the urge to eat it straight from the bowl will be the hardest part!
- Cream the Peanut Butter and Butter: In a large mixing bowl, combine the creamy peanut butter and softened unsalted butter. Make sure your butter is truly softened you want it to be easily pliable but not melted. Use an electric mixer (either a stand mixer or a hand mixer) to cream these two ingredients together until they are light and fluffy. This usually takes about 2-3 minutes on medium speed. You’ll know it’s ready when the mixture looks smooth and has increased slightly in volume.
- Add the Powdered Sugar: Gradually add the powdered sugar to the peanut butter and butter mixture, about 1/2 cup at a time. Beat on low speed until the powdered sugar is fully incorporated. Be careful not to add it all at once, or you’ll end up with a cloud of powdered sugar in your kitchen! Scrape down the sides of the bowl as needed to ensure everything is evenly mixed.
- Incorporate Graham Cracker Crumbs and Vanilla: Add the graham cracker crumbs and vanilla extract to the bowl. Mix on low speed until just combined. The graham cracker crumbs add a nice texture and subtle flavor that complements the peanut butter perfectly. The vanilla extract enhances the overall sweetness and aroma. Don’t overmix at this stage; you just want everything to be evenly distributed.
- Chill the Filling: Cover the bowl with plastic wrap and refrigerate the peanut butter filling for at least 30 minutes. This chilling time is crucial because it allows the filling to firm up, making it easier to roll into balls. If you skip this step, the filling will be too soft and sticky to work with. You can chill it for longer if needed, even overnight.
Forming the Peanut Butter Bites
Now that our peanut butter filling is nice and firm, we can start shaping it into those irresistible little bites! This is where the fun really begins, and you’ll start to see your vision come to life.
- Prepare a Baking Sheet: Line a baking sheet with parchment paper or a silicone baking mat. This will prevent the peanut butter bites from sticking to the sheet and make it easier to remove them later.
- Roll into Balls: Remove the chilled peanut butter filling from the refrigerator. Using a small cookie scoop or a spoon, scoop out about 1 tablespoon of the filling at a time. Roll each portion into a smooth ball using your hands. If the filling is still a bit sticky, you can lightly dust your hands with powdered sugar.
- Arrange on Baking Sheet: Place the rolled peanut butter balls onto the prepared baking sheet, leaving a little space between each one. This will allow them to chill evenly and prevent them from sticking together.
- Chill Again: Once all the peanut butter balls are formed, place the baking sheet back in the refrigerator and chill for another 15-20 minutes. This second chilling helps them hold their shape even better when we dip them in chocolate.
Melting the Chocolate and Dipping
Alright, the moment we’ve all been waiting for: the chocolate! This is where the magic happens, and those peanut butter bites transform into something truly special. We’ll melt the chocolate to a smooth, glossy perfection and then carefully dip each bite to create a beautiful and delicious treat.
- Melt the Chocolate: In a heat-safe bowl set over a saucepan of simmering water (double boiler method), combine the semi-sweet chocolate chips and coconut oil (or vegetable shortening). Make sure the bottom of the bowl doesn’t touch the water. Stir frequently until the chocolate is completely melted and smooth. The coconut oil or shortening helps to thin the chocolate, making it easier to dip and giving it a nice shine. You can also melt the chocolate in the microwave in 30-second intervals, stirring in between, until melted and smooth. Be careful not to overheat the chocolate, or it will seize up.
- Prepare Dipping Tools: Have a fork or dipping tools ready for dipping the peanut butter balls into the melted chocolate.
- Dip the Peanut Butter Bites: Remove the chilled peanut butter balls from the refrigerator. One at a time, carefully dip each ball into the melted chocolate, ensuring it’s completely coated. Use the fork or dipping tools to lift the chocolate-covered bite out of the bowl, allowing any excess chocolate to drip back into the bowl.
- Place on Baking Sheet: Place the dipped peanut butter bite back onto the parchment-lined baking sheet.
- Sprinkle with Sea Salt (Optional): If desired, sprinkle a few flakes of sea salt on top of each chocolate-covered bite while the chocolate is still wet. The sea salt adds a wonderful contrast of flavors and enhances the sweetness of the chocolate and peanut butter.
- Repeat: Repeat the dipping process with the remaining peanut butter balls until they are all coated in chocolate.
Setting and Storing
We’re almost there! Now we just need to let the chocolate set and then we can finally enjoy our homemade chocolate peanut butter bites. Proper storage will also ensure they stay fresh and delicious for days to come (if they last that long!).
- Chill to Set: Place the baking sheet with the chocolate-covered peanut butter bites back in the refrigerator for at least 30 minutes, or until the chocolate is completely set. This will ensure that the chocolate is firm and doesn’t melt when you handle them.
- Remove from Baking Sheet: Once the chocolate is set, carefully remove the peanut butter bites from the baking sheet. They should easily lift off the parchment paper or silicone baking mat.
- Store Properly: Store the chocolate peanut butter bites in an airtight container in the refrigerator for up to a week. You can also freeze them for longer storage, up to 2-3 months. Just make sure they are well-sealed to prevent freezer burn.
Tips and Variations
Want to customize your chocolate peanut butter bites? Here are a few ideas to get you started:
- Different Chocolate: Experiment with different types of chocolate, such as milk chocolate, dark chocolate, or white chocolate. Each type will give the bites a unique flavor profile.
- Nut Butter Variations: Try using almond butter, cashew butter, or sunflower seed butter instead of peanut butter. This is a great option for those with peanut allergies.
- Add-Ins: Mix chopped nuts, mini chocolate chips, or shredded coconut into the peanut butter filling for added texture and flavor.
- Toppings: Decorate the chocolate-covered bites with sprinkles, chopped nuts, or a drizzle of melted white chocolate.
- Make them Vegan: Use vegan butter, vegan chocolate chips, and a plant-based milk alternative (if needed) to make these bites vegan-friendly.
Enjoy!
And there you have it! Your very own batch of homemade chocolate peanut butter bites. These little treats are perfect for parties, holidays, or just a sweet snack any time of day. Enjoy!
Conclusion:
And there you have it! These chocolate peanut butter bites are truly a must-try for anyone who loves the classic combination of chocolate and peanut butter. They’re incredibly easy to make, require minimal ingredients, and deliver a satisfyingly sweet and salty treat that’s perfect for any occasion. From a quick afternoon snack to a delightful dessert after dinner, these little bites are guaranteed to become a new favorite.
But what makes them so special? It’s the perfect balance of flavors and textures. The rich, decadent chocolate coating gives way to a creamy, peanut buttery center that melts in your mouth. The slight saltiness of the peanut butter complements the sweetness of the chocolate, creating a symphony of flavors that will leave you wanting more. Plus, the no-bake aspect makes them ideal for those days when you want a delicious treat without spending hours in the kitchen.
Beyond their simplicity and deliciousness, these chocolate peanut butter bites are also incredibly versatile. Feel free to experiment with different types of chocolate. Dark chocolate will add a deeper, more intense flavor, while milk chocolate will provide a sweeter, creamier experience. You could even use white chocolate for a unique and visually appealing twist.
For serving suggestions, these bites are fantastic on their own, but you can also get creative. Try serving them with a scoop of vanilla ice cream for a decadent dessert. Or, arrange them on a platter with other sweet treats for a party or gathering. They also make a wonderful homemade gift for friends and family. Package them in a pretty box or tin, and you’ll have a thoughtful and delicious present that everyone will appreciate.
Looking for variations? Consider adding a sprinkle of sea salt on top of the chocolate before it sets for an extra burst of flavor. You could also mix in some chopped nuts, such as peanuts, almonds, or pecans, into the peanut butter mixture for added crunch. Another fun idea is to add a layer of caramel between the chocolate and peanut butter for an even more indulgent treat. If you’re feeling adventurous, try adding a pinch of cayenne pepper to the peanut butter for a spicy kick.
These chocolate peanut butter bites are also easily adaptable to different dietary needs. You can use dairy-free chocolate and peanut butter to make them vegan. Or, use sugar-free chocolate and a natural sweetener to make them a healthier option. The possibilities are endless!
I truly believe that this recipe is a winner. It’s simple, delicious, and versatile, making it perfect for anyone who loves chocolate and peanut butter. So, what are you waiting for? Gather your ingredients, follow the easy steps, and prepare to be amazed by these irresistible treats.
I’m so excited for you to try this recipe! Once you do, I would absolutely love to hear about your experience. Did you make any variations? What did you think of the flavor and texture? Share your thoughts and photos in the comments below. Your feedback is invaluable, and it helps me to continue creating recipes that you’ll love. Happy baking (or rather, no-baking)! I hope you enjoy these chocolate peanut butter bites as much as I do! Let me know what you think!
Chocolate Peanut Butter Bites: The Ultimate No-Bake Recipe
Easy no-bake chocolate peanut butter bites! Creamy peanut butter filling coated in rich chocolate, perfect for a quick and delicious treat.
Ingredients
- 1 cup creamy peanut butter
- 1/2 cup unsalted butter, softened
- 1 cup powdered sugar
- 1/2 cup graham cracker crumbs
- 1 teaspoon vanilla extract
- 12 ounces semi-sweet chocolate chips
- 1 tablespoon coconut oil (or vegetable shortening)
- Optional: Sea salt flakes for sprinkling
Instructions
- Cream the Peanut Butter and Butter: In a large mixing bowl, combine the creamy peanut butter and softened unsalted butter. Use an electric mixer to cream these two ingredients together until they are light and fluffy (2-3 minutes on medium speed).
- Add the Powdered Sugar: Gradually add the powdered sugar to the peanut butter and butter mixture, about 1/2 cup at a time. Beat on low speed until fully incorporated. Scrape down the sides of the bowl as needed.
- Incorporate Graham Cracker Crumbs and Vanilla: Add the graham cracker crumbs and vanilla extract to the bowl. Mix on low speed until just combined. Don’t overmix.
- Chill the Filling: Cover the bowl with plastic wrap and refrigerate the peanut butter filling for at least 30 minutes.
- Prepare a Baking Sheet: Line a baking sheet with parchment paper or a silicone baking mat.
- Roll into Balls: Remove the chilled peanut butter filling from the refrigerator. Using a small cookie scoop or a spoon, scoop out about 1 tablespoon of the filling at a time. Roll each portion into a smooth ball using your hands. Lightly dust your hands with powdered sugar if needed.
- Arrange on Baking Sheet: Place the rolled peanut butter balls onto the prepared baking sheet, leaving a little space between each one.
- Chill Again: Place the baking sheet back in the refrigerator and chill for another 15-20 minutes.
- Melt the Chocolate: In a heat-safe bowl set over a saucepan of simmering water (double boiler method), combine the semi-sweet chocolate chips and coconut oil (or vegetable shortening). Stir frequently until the chocolate is completely melted and smooth. Alternatively, melt in the microwave in 30-second intervals, stirring in between.
- Prepare Dipping Tools: Have a fork or dipping tools ready for dipping the peanut butter balls into the melted chocolate.
- Dip the Peanut Butter Bites: Remove the chilled peanut butter balls from the refrigerator. One at a time, carefully dip each ball into the melted chocolate, ensuring it’s completely coated. Use the fork or dipping tools to lift the chocolate-covered bite out of the bowl, allowing any excess chocolate to drip back into the bowl.
- Place on Baking Sheet: Place the dipped peanut butter bite back onto the parchment-lined baking sheet.
- Sprinkle with Sea Salt (Optional): If desired, sprinkle a few flakes of sea salt on top of each chocolate-covered bite while the chocolate is still wet.
- Repeat: Repeat the dipping process with the remaining peanut butter balls until they are all coated in chocolate.
- Chill to Set: Place the baking sheet with the chocolate-covered peanut butter bites back in the refrigerator for at least 30 minutes, or until the chocolate is completely set.
- Remove from Baking Sheet: Once the chocolate is set, carefully remove the peanut butter bites from the baking sheet.
- Store Properly: Store the chocolate peanut butter bites in an airtight container in the refrigerator for up to a week. You can also freeze them for longer storage, up to 2-3 months.
Notes
- Make sure the butter is softened, but not melted, for the peanut butter filling.
- Chilling the peanut butter filling is crucial for easy rolling.
- Use coconut oil or vegetable shortening to thin the chocolate for easier dipping and a glossy finish.
- Don’t overheat the chocolate when melting.
- Experiment with different types of chocolate, nut butters, and add-ins to customize your bites.
- For vegan bites, use vegan butter, vegan chocolate chips, and a plant-based milk alternative (if needed).

Leave a Comment