
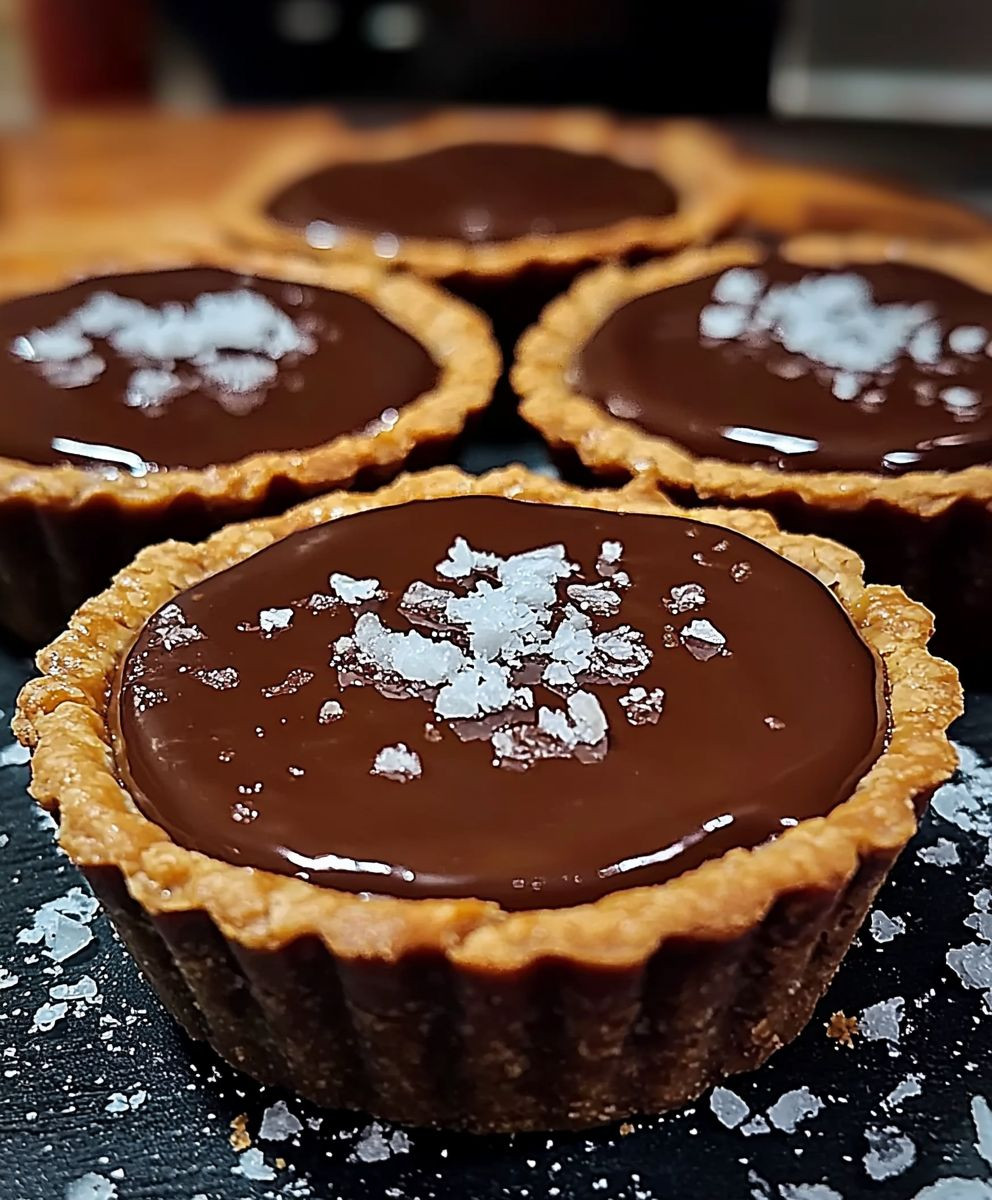
Chocolate Salted Caramel Tarts, oh, where do I even begin? Imagine sinking your teeth into a buttery, crumbly crust, followed by a rush of decadent dark chocolate ganache, and then that sweet and salty explosion of homemade caramel. Its a symphony of flavors and textures that will leave you craving more. Trust me, these aren’t just tarts; they’re an experience!
While the exact origins of salted caramel are debated, its modern popularity can be traced back to French pastry chef Henri Le Roux in the late 1970s. He dared to combine the sweetness of caramel with the unexpected tang of salted butter, creating a sensation that quickly spread throughout the culinary world. The addition of chocolate elevates this classic combination to new heights.
People adore Chocolate Salted Caramel Tarts for so many reasons. The contrast between the rich, bittersweet chocolate and the gooey, salty-sweet caramel is simply irresistible. The buttery shortbread crust adds a delightful textural element, and the individual tart format makes them perfect for elegant desserts or satisfying personal treats. Plus, while they look impressive, they’re surprisingly straightforward to make at home. So, are you ready to embark on this delicious adventure with me? Let’s get baking!

Ingredients:
- For the Chocolate Tart Crust:
- 1 1/2 cups (192g) all-purpose flour
- 1/2 cup (50g) unsweetened cocoa powder
- 1/2 cup (100g) granulated sugar
- 1/4 teaspoon salt
- 1/2 cup (1 stick, 113g) cold unsalted butter, cut into cubes
- 1 large egg yolk
- 2-4 tablespoons ice water
- For the Salted Caramel Filling:
- 1 cup (200g) granulated sugar
- 1/4 cup (60ml) water
- 1/2 cup (120ml) heavy cream, warmed
- 4 tablespoons (1/2 stick, 57g) unsalted butter, cut into cubes
- 1 teaspoon vanilla extract
- 1/2 – 1 teaspoon sea salt flakes, or to taste (Maldon is great!)
- For the Chocolate Ganache Topping:
- 8 ounces (226g) semi-sweet chocolate, finely chopped
- 1 cup (240ml) heavy cream
- 1 tablespoon unsalted butter
Preparing the Chocolate Tart Crust:
- Combine Dry Ingredients: In a large bowl, whisk together the flour, cocoa powder, sugar, and salt. This ensures the cocoa powder is evenly distributed and prevents any clumps.
- Cut in the Butter: Add the cold, cubed butter to the dry ingredients. Using a pastry blender or your fingertips (work quickly to keep the butter cold!), cut the butter into the flour mixture until it resembles coarse crumbs. You should still see small pieces of butter throughout. These butter pieces are key to creating a flaky crust.
- Add the Egg Yolk: In a small bowl, lightly whisk the egg yolk. Add it to the flour mixture. The egg yolk adds richness and helps bind the dough together.
- Add Ice Water: Gradually add the ice water, one tablespoon at a time, mixing after each addition. Mix until the dough just comes together. Be careful not to overmix, as this will develop the gluten and result in a tough crust. You want a shaggy dough that holds together when pressed.
- Form the Dough: Gently gather the dough into a disc. Wrap it tightly in plastic wrap and refrigerate for at least 30 minutes, or up to 2 hours. This chilling time allows the gluten to relax, making the dough easier to roll out and preventing it from shrinking during baking.
- Roll Out the Dough: On a lightly floured surface, roll out the chilled dough into a circle about 12 inches in diameter. The dough should be thin, but not so thin that it tears easily.
- Transfer to Tart Pans: Carefully transfer the rolled-out dough to your tart pans (4-inch individual tart pans are ideal). Gently press the dough into the bottom and up the sides of the pans. Make sure the dough is evenly distributed and there are no air pockets.
- Trim the Edges: Trim the excess dough from the edges of the tart pans. You can use a rolling pin to roll over the edges, or simply trim with a knife.
- Dock the Crusts: Use a fork to prick the bottom of the tart crusts all over. This prevents the crust from puffing up during baking.
- Chill Again: Place the tart pans in the freezer for 15 minutes. This helps the crusts hold their shape during baking and prevents them from shrinking.
- Pre-bake the Crusts: Preheat your oven to 375°F (190°C). Line the tart crusts with parchment paper and fill with pie weights or dried beans. This will weigh down the crusts and prevent them from puffing up.
- Bake: Bake for 15-20 minutes, or until the edges are lightly golden brown. Remove the parchment paper and pie weights and bake for another 5-10 minutes, or until the bottom of the crusts are golden brown.
- Cool Completely: Let the tart crusts cool completely in the pans before filling.
Making the Salted Caramel Filling:
- Prepare the Sugar Syrup: In a medium saucepan, combine the sugar and water. Stir to moisten the sugar.
- Cook the Caramel: Cook over medium heat, without stirring, until the sugar dissolves and the mixture turns a deep amber color. This will take about 8-10 minutes. Watch it carefully, as it can burn quickly. A candy thermometer is helpful here; you’re aiming for around 340°F (170°C). The color is more important than the exact temperature.
- Add the Warm Cream: Carefully pour in the warm heavy cream. The mixture will bubble vigorously, so be cautious. Whisk constantly to combine. The warm cream helps to prevent the caramel from seizing up.
- Add the Butter: Add the cubed butter and whisk until melted and smooth. The butter adds richness and helps to create a smooth, creamy caramel.
- Remove from Heat: Remove the saucepan from the heat and stir in the vanilla extract and sea salt flakes. The vanilla enhances the flavor, and the sea salt provides a delicious contrast to the sweetness of the caramel.
- Cool Slightly: Let the caramel cool slightly for about 5-10 minutes before pouring it into the tart crusts. This will help it thicken slightly and prevent it from soaking into the crust.
- Fill the Tart Crusts: Pour the salted caramel filling into the cooled tart crusts, dividing it evenly among them.
- Chill: Refrigerate the filled tart crusts for at least 1 hour, or until the caramel is set. This will make them easier to handle and prevent the caramel from running when you add the chocolate ganache.
Preparing the Chocolate Ganache Topping:
- Chop the Chocolate: Finely chop the semi-sweet chocolate and place it in a heatproof bowl. Finely chopping the chocolate ensures that it melts evenly and smoothly.
- Heat the Cream: In a small saucepan, heat the heavy cream over medium heat until it just comes to a simmer. Do not boil.
- Pour over Chocolate: Pour the hot cream over the chopped chocolate. Let it sit for 1 minute to allow the heat to melt the chocolate.
- Whisk Until Smooth: Whisk gently until the chocolate is completely melted and the ganache is smooth and glossy.
- Add Butter: Stir in the butter until melted and incorporated. The butter adds shine and richness to the ganache.
- Cool Slightly: Let the ganache cool slightly for about 5-10 minutes before pouring it over the caramel-filled tart crusts. This will help it thicken slightly and prevent it from running off the sides.
- Pour over Tarts: Pour the chocolate ganache over the chilled caramel-filled tart crusts, dividing it evenly among them.
- Chill Again: Refrigerate the tarts for at least 30 minutes, or until the ganache is set. This will make them easier to handle and prevent the ganache from smudging.
Serving and Storage:
- Serve: Before serving, sprinkle the tarts with a pinch of sea salt flakes for an extra touch of flavor and visual appeal.
- Storage: Store the chocolate salted caramel tarts in an airtight container in the refrigerator for up to 3 days. They are best enjoyed cold or at room temperature.
Conclusion:
And there you have it! These Chocolate Salted Caramel Tarts are truly a symphony of flavors and textures, a decadent treat that’s surprisingly easy to create in your own kitchen. From the crisp, buttery shortbread crust to the luscious, flowing salted caramel and the rich, dark chocolate ganache, every element works in perfect harmony to create an unforgettable dessert experience. I genuinely believe this recipe is a must-try for any baking enthusiast, whether you’re a seasoned pro or just starting your culinary journey. Why is it a must-try? Because it’s more than just a dessert; it’s an experience. The combination of sweet, salty, and bitter notes is incredibly satisfying, and the contrasting textures the crunch of the crust, the smoothness of the caramel, and the melt-in-your-mouth ganache will keep you coming back for more. Plus, the individual tart format makes them perfect for portion control (though I can’t guarantee you’ll stop at just one!). They are also incredibly impressive to serve at parties or gatherings, guaranteeing rave reviews from your friends and family. Beyond the basic recipe, there’s plenty of room for experimentation and personalization. For a slightly different flavor profile, try adding a pinch of espresso powder to the chocolate ganache to enhance the chocolate’s richness. Or, if you’re feeling adventurous, incorporate a hint of chili powder into the salted caramel for a subtle kick. You could also swap out the dark chocolate for milk chocolate or even white chocolate, depending on your preference. Serving Suggestions & Variations: * Serve these tarts chilled or at room temperature. A dollop of whipped cream or a scoop of vanilla ice cream makes a delightful accompaniment. * For a festive touch, sprinkle a few flakes of sea salt or chopped nuts on top of the ganache before it sets. * If you’re short on time, you can use store-bought shortbread cookies as the base for the tarts. Simply crush them and press them into the tart tins. * To make these tarts vegan, use vegan butter and chocolate, and substitute the heavy cream in the caramel and ganache with coconut cream. * Consider making mini versions of these tarts for bite-sized treats that are perfect for parties. I’m confident that you’ll absolutely love these Chocolate Salted Caramel Tarts. They’re the perfect balance of indulgence and sophistication, and they’re sure to impress anyone who tries them. The recipe is straightforward and easy to follow, even for beginner bakers. Don’t be intimidated by the multiple components; each step is simple and rewarding. So, what are you waiting for? Gather your ingredients, preheat your oven, and get ready to embark on a delicious baking adventure. I can’t wait to hear about your experience making these tarts. Please, don’t hesitate to share your photos and feedback in the comments below. Let me know what variations you tried and how they turned out. Did you add a secret ingredient? Did you make them for a special occasion? I’m eager to hear all about it! Happy baking, and enjoy every single bite of these decadent treats! I hope this recipe for Chocolate Salted Caramel Tarts becomes a new favorite in your household, just as it has in mine. PrintChocolate Salted Caramel Tarts: A Decadent Dessert Recipe

Rich chocolate tarts with chocolate crust, salted caramel filling, and chocolate ganache topping.
- Prep Time: 45 minutes
- Cook Time: 35 minutes
- Total Time: 80 minutes
- Yield: 6 (4-inch) individual tarts 1x
Ingredients
- 1 1/2 cups (192g) all-purpose flour
- 1/2 cup (50g) unsweetened cocoa powder
- 1/2 cup (100g) granulated sugar
- 1/4 teaspoon salt
- 1/2 cup (1 stick, 113g) cold unsalted butter, cut into cubes
- 1 large egg yolk
- 2–4 tablespoons ice water
- 1 cup (200g) granulated sugar
- 1/4 cup (60ml) water
- 1/2 cup (120ml) heavy cream, warmed
- 4 tablespoons (1/2 stick, 57g) unsalted butter, cut into cubes
- 1 teaspoon vanilla extract
- 1/2 – 1 teaspoon sea salt flakes, or to taste (Maldon is great!)
- 8 ounces (226g) semi-sweet chocolate, finely chopped
- 1 cup (240ml) heavy cream
- 1 tablespoon unsalted butter
Instructions
- Combine Dry Ingredients: In a large bowl, whisk together the flour, cocoa powder, sugar, and salt.
- Cut in the Butter: Add the cold, cubed butter to the dry ingredients. Using a pastry blender or your fingertips (work quickly to keep the butter cold!), cut the butter into the flour mixture until it resembles coarse crumbs.
- Add the Egg Yolk: In a small bowl, lightly whisk the egg yolk. Add it to the flour mixture.
- Add Ice Water: Gradually add the ice water, one tablespoon at a time, mixing after each addition. Mix until the dough just comes together. Be careful not to overmix.
- Form the Dough: Gently gather the dough into a disc. Wrap it tightly in plastic wrap and refrigerate for at least 30 minutes, or up to 2 hours.
- Roll Out the Dough: On a lightly floured surface, roll out the chilled dough into a circle about 12 inches in diameter.
- Transfer to Tart Pans: Carefully transfer the rolled-out dough to your tart pans (4-inch individual tart pans are ideal). Gently press the dough into the bottom and up the sides of the pans.
- Trim the Edges: Trim the excess dough from the edges of the tart pans.
- Dock the Crusts: Use a fork to prick the bottom of the tart crusts all over.
- Chill Again: Place the tart pans in the freezer for 15 minutes.
- Pre-bake the Crusts: Preheat your oven to 375°F (190°C). Line the tart crusts with parchment paper and fill with pie weights or dried beans.
- Bake: Bake for 15-20 minutes, or until the edges are lightly golden brown. Remove the parchment paper and pie weights and bake for another 5-10 minutes, or until the bottom of the crusts are golden brown.
- Cool Completely: Let the tart crusts cool completely in the pans before filling.
- Prepare the Sugar Syrup: In a medium saucepan, combine the sugar and water. Stir to moisten the sugar.
- Cook the Caramel: Cook over medium heat, without stirring, until the sugar dissolves and the mixture turns a deep amber color. This will take about 8-10 minutes. Watch it carefully, as it can burn quickly.
- Add the Warm Cream: Carefully pour in the warm heavy cream. The mixture will bubble vigorously, so be cautious. Whisk constantly to combine.
- Add the Butter: Add the cubed butter and whisk until melted and smooth.
- Remove from Heat: Remove the saucepan from the heat and stir in the vanilla extract and sea salt flakes.
- Cool Slightly: Let the caramel cool slightly for about 5-10 minutes before pouring it into the tart crusts.
- Fill the Tart Crusts: Pour the salted caramel filling into the cooled tart crusts, dividing it evenly among them.
- Chill: Refrigerate the filled tart crusts for at least 1 hour, or until the caramel is set.
- Chop the Chocolate: Finely chop the semi-sweet chocolate and place it in a heatproof bowl.
- Heat the Cream: In a small saucepan, heat the heavy cream over medium heat until it just comes to a simmer. Do not boil.
- Pour over Chocolate: Pour the hot cream over the chopped chocolate. Let it sit for 1 minute to allow the heat to melt the chocolate.
- Whisk Until Smooth: Whisk gently until the chocolate is completely melted and the ganache is smooth and glossy.
- Add Butter: Stir in the butter until melted and incorporated.
- Cool Slightly: Let the ganache cool slightly for about 5-10 minutes before pouring it over the caramel-filled tart crusts.
- Pour over Tarts: Pour the chocolate ganache over the chilled caramel-filled tart crusts, dividing it evenly among them.
- Chill Again: Refrigerate the tarts for at least 30 minutes, or until the ganache is set.
- Serve: Before serving, sprinkle the tarts with a pinch of sea salt flakes for an extra touch of flavor and visual appeal.
- Storage: Store the chocolate salted caramel tarts in an airtight container in the refrigerator for up to 3 days. They are best enjoyed cold or at room temperature.
Notes
- For the crust, make sure the butter is very cold. This is key to a flaky crust.
- Don’t overmix the crust dough, or it will become tough.
- When making the caramel, watch it carefully, as it can burn quickly. A candy thermometer is helpful.
- Warm the heavy cream before adding it to the caramel to prevent it from seizing up.
- Use high-quality chocolate for the ganache for the best flavor.
- Maldon sea salt flakes are recommended for the caramel and garnish, but any sea salt flakes will work.


Leave a Comment