
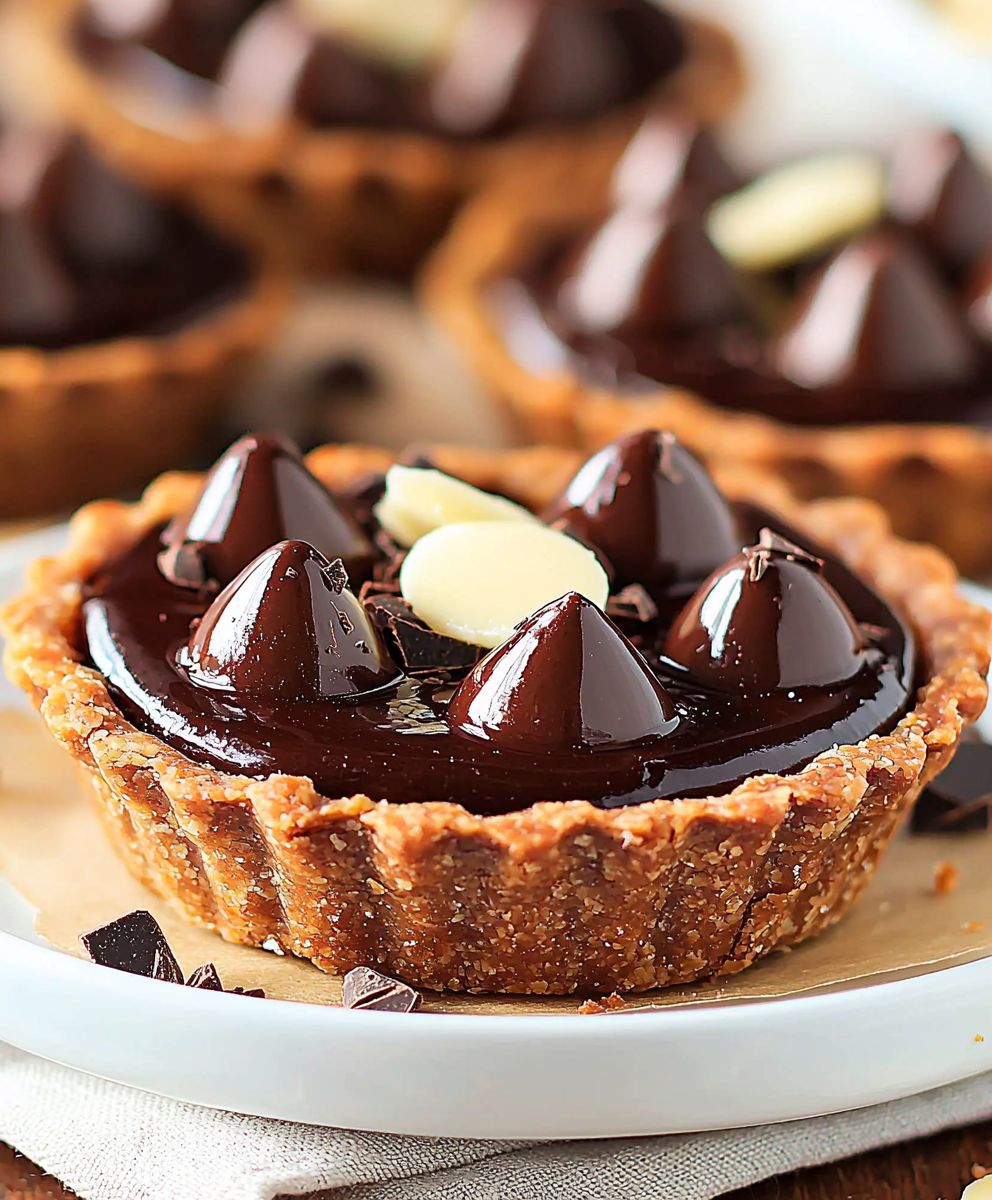
Chocolate Tarts: Prepare to be utterly seduced by these decadent, miniature masterpieces! Imagine sinking your teeth into a crisp, buttery crust that gives way to a luxuriously smooth, intensely chocolatey filling. These aren’t just desserts; they’re an experience, a moment of pure indulgence that will leave you craving more.
The history of chocolate tarts can be traced back to the evolution of pastry-making in Europe, with early versions appearing in aristocratic kitchens as a symbol of wealth and refinement. Over time, they’ve become a beloved treat enjoyed by people of all backgrounds, a testament to the enduring appeal of simple yet elegant flavors. The beauty of chocolate tarts lies in their versatility. They can be dressed up with fresh berries and a dusting of cocoa powder for a sophisticated dessert, or enjoyed simply as they are, a perfect ending to any meal.
What makes these tarts so irresistible? It’s the perfect balance of textures and flavors. The crisp, shortbread-like crust provides a delightful contrast to the rich, creamy chocolate ganache. The intense chocolate flavor, whether you prefer dark, milk, or a blend, is undeniably satisfying. Plus, their individual size makes them ideal for portion control (though we won’t judge if you have more than one!). Whether you’re a seasoned baker or a novice in the kitchen, these chocolate tarts are surprisingly easy to make, promising a delightful reward for your efforts. So, let’s get baking and create some chocolate magic!

Ingredients:
- For the Crust:
- 1 1/4 cups (150g) all-purpose flour
- 1/2 cup (50g) unsweetened cocoa powder
- 1/2 cup (100g) granulated sugar
- 1/4 teaspoon salt
- 1/2 cup (115g) cold unsalted butter, cut into cubes
- 1 large egg yolk
- 2-4 tablespoons ice water
- For the Chocolate Filling:
- 1 cup (240ml) heavy cream
- 8 ounces (225g) bittersweet chocolate, finely chopped
- 2 tablespoons unsalted butter
- 1 teaspoon vanilla extract
- Pinch of salt
- Optional Garnish:
- Fresh raspberries
- Whipped cream
- Chocolate shavings
- Dusting of cocoa powder
Preparing the Chocolate Tart Crust
- Combine Dry Ingredients: In a large bowl, whisk together the flour, cocoa powder, sugar, and salt. Make sure everything is evenly distributed for a consistent flavor and texture in your crust.
- Cut in the Butter: Add the cold, cubed butter to the dry ingredients. Using a pastry blender or your fingertips (work quickly to prevent the butter from melting), cut the butter into the flour mixture until it resembles coarse crumbs. You should still see small pieces of butter, about the size of peas. These little butter pockets are what create a flaky crust!
- Add Egg Yolk and Ice Water: In a small bowl, whisk together the egg yolk and 2 tablespoons of ice water. Pour this mixture over the flour and butter mixture.
- Mix the Dough: Gently mix the ingredients together until a dough starts to form. If the dough is too dry, add the remaining ice water, one tablespoon at a time, until it comes together. Be careful not to overmix the dough, as this will develop the gluten and result in a tough crust.
- Form a Disc and Chill: Turn the dough out onto a lightly floured surface and gently form it into a disc. Wrap the disc tightly in plastic wrap and refrigerate for at least 30 minutes, or up to 2 hours. This chilling time is crucial as it allows the gluten to relax and the butter to firm up, preventing the crust from shrinking during baking.
- Roll Out the Dough: On a lightly floured surface, roll out the chilled dough into a circle about 12 inches in diameter. The dough should be thin, about 1/8 inch thick.
- Transfer to Tart Pan: Carefully transfer the rolled-out dough to a 9-inch tart pan with a removable bottom. Gently press the dough into the bottom and up the sides of the pan.
- Trim and Crimp the Edges: Trim any excess dough from the edges of the pan. You can use a rolling pin to roll over the top of the pan to trim the dough, or use a knife. Crimp the edges of the crust for a decorative finish. You can use a fork to create a simple crimped edge, or get creative with your own design.
- Dock the Crust: Use a fork to prick the bottom of the crust all over. This prevents the crust from puffing up during baking.
- Chill Again: Place the prepared tart crust in the freezer for 15 minutes. This helps the crust hold its shape during baking and prevents it from shrinking.
Baking the Tart Crust
- Preheat Oven: Preheat your oven to 375°F (190°C).
- Blind Bake: Line the tart crust with parchment paper and fill it with pie weights or dried beans. This will weigh down the crust and prevent it from puffing up.
- Bake: Bake the crust for 20 minutes.
- Remove Weights and Bake Again: Carefully remove the parchment paper and pie weights. Bake for another 10-15 minutes, or until the crust is golden brown and cooked through. Keep a close eye on it to prevent burning.
- Cool Completely: Let the baked tart crust cool completely in the pan before filling.
Preparing the Chocolate Filling
- Heat the Heavy Cream: In a saucepan, heat the heavy cream over medium heat until it just begins to simmer. Do not boil.
- Pour Over Chocolate: Remove the saucepan from the heat and pour the hot cream over the finely chopped chocolate in a heatproof bowl.
- Let Sit: Let the mixture sit for 1 minute to allow the heat from the cream to melt the chocolate.
- Whisk Until Smooth: Gently whisk the chocolate and cream together until smooth and glossy. Be patient and whisk slowly to avoid incorporating air into the ganache.
- Add Butter, Vanilla, and Salt: Stir in the butter, vanilla extract, and salt until the butter is melted and the mixture is smooth. The butter adds richness and shine to the ganache, while the vanilla enhances the chocolate flavor.
Assembling the Chocolate Tarts
- Pour Filling into Crust: Pour the chocolate filling into the cooled tart crust. Spread it evenly to create a smooth surface.
- Chill: Refrigerate the tart for at least 2 hours, or preferably overnight, to allow the filling to set completely. This will give the filling a firm, yet creamy texture.
- Garnish (Optional): Before serving, garnish the chocolate tart with fresh raspberries, whipped cream, chocolate shavings, or a dusting of cocoa powder. Get creative and add your own personal touch!
- Serve: Slice and serve the chocolate tart chilled. Enjoy!
Tips for Success:
- Use Cold Ingredients: Cold butter and ice water are essential for creating a flaky crust.
- Don’t Overmix the Dough: Overmixing develops the gluten in the flour, resulting in a tough crust.
- Chill the Dough: Chilling the dough allows the gluten to relax and the butter to firm up, preventing the crust from shrinking during baking.
- Blind Bake the Crust: Blind baking ensures that the crust is fully cooked and prevents it from becoming soggy when filled.
- Use High-Quality Chocolate: The quality of the chocolate will greatly impact the flavor of the filling. Use a good quality bittersweet chocolate for the best results.
- Be Patient: Allow the filling to set completely in the refrigerator before serving.
Variations:
- Add Flavor Extracts: Experiment with different flavor extracts in the filling, such as peppermint, orange, or almond.
- Add Nuts: Sprinkle chopped nuts, such as pecans or walnuts, on top of the filling before chilling.
- Make Mini Tarts: Use mini tart pans to create individual chocolate tarts. Adjust the baking time accordingly.
- Salted Caramel Chocolate Tart: Drizzle salted caramel over the chocolate filling before chilling for a decadent twist.
- Espresso Chocolate Tart: Add a teaspoon of instant espresso powder to the chocolate filling for a coffee-infused flavor.
Storage Instructions:
- Store leftover chocolate tart in the refrigerator for up to 3 days. Cover it tightly with plastic wrap to prevent it from drying out.
Troubleshooting:
- Crust is too tough: You likely overmixed the dough. Be gentle when mixing and avoid overworking the gluten.
- Crust shrunk during baking: Make sure to chill the dough thoroughly before rolling it out and baking. Also, ensure that the oven temperature is accurate.
- Filling is too runny: You may not have used enough chocolate or the cream was not hot enough. Ensure that the cream is heated to a simmer and that you use the correct ratio of chocolate to cream.
- Filling is grainy: This can happen if the chocolate overheats. Be gentle when melting the chocolate and avoid overheating it.
Conclusion:
And there you have it! These decadent Chocolate Tarts are truly a must-try for any chocolate lover. From the buttery, crumbly crust to the intensely rich and smooth chocolate filling, every bite is an explosion of flavor and texture that will leave you wanting more. I know, I know, I’m biased, but trust me on this one! This isn’t just another dessert; it’s an experience. It’s the perfect ending to a special dinner, a delightful treat for a weekend indulgence, or even a thoughtful homemade gift for someone you care about. What makes these tarts so special? It’s the simplicity of the ingredients combined with the careful attention to detail in the preparation. We’re not talking about complicated techniques or hard-to-find items. Just good quality chocolate, butter, eggs, and a little bit of love. And the result? Pure magic. The deep, dark chocolate ganache is perfectly balanced, not too sweet, not too bitter, just right. The crust provides a delightful contrast, adding a subtle nutty flavor and a satisfying crunch. But the best part about this recipe is its versatility! Feel free to experiment and make it your own. For a touch of elegance, try topping the tarts with fresh raspberries or a dusting of cocoa powder. A dollop of whipped cream or a scoop of vanilla ice cream would also be heavenly. If you’re feeling adventurous, you could even add a pinch of sea salt to the chocolate ganache for a salted caramel effect. Or, for a more intense chocolate experience, use a higher percentage of cacao in your chocolate. Here are a few more serving suggestions to get your creative juices flowing: * Espresso Infusion: Add a teaspoon of instant espresso powder to the chocolate ganache for a mocha twist. * Citrus Zest: Grate some orange or lemon zest into the crust for a bright and refreshing flavor. * Nutty Delight: Sprinkle chopped toasted hazelnuts or almonds on top of the tarts before the ganache sets. * Spiced Chocolate: Add a pinch of cinnamon or chili powder to the ganache for a warm and spicy kick. * Boozy Boost: A tablespoon of your favorite liqueur, like Grand Marnier or Frangelico, added to the ganache will elevate the flavor profile. Don’t be intimidated by the thought of making tarts from scratch. This recipe is surprisingly easy to follow, and I’ve included plenty of tips and tricks to ensure your success. The most important thing is to have fun and enjoy the process. Baking should be a relaxing and rewarding experience, so put on some music, pour yourself a glass of wine, and get ready to create something delicious. I truly believe that these Chocolate Tarts will become a new favorite in your household. They’re perfect for any occasion, and they’re guaranteed to impress your friends and family. So, what are you waiting for? Gather your ingredients, preheat your oven, and get ready to bake! I’m so excited for you to try this recipe, and I can’t wait to hear what you think! Please, please, please, let me know how they turn out. Did you make any variations? What did your family and friends think? Share your photos and comments in the section below. I love seeing your creations and hearing your feedback. Happy baking! And remember, the best desserts are made with love! PrintChocolate Tarts: The Ultimate Guide to Baking Delicious Tarts

Decadent chocolate tart with a rich, bittersweet chocolate filling in a homemade cocoa-infused crust. Perfect for chocolate lovers!
- Prep Time: 45 minutes
- Cook Time: 35 minutes
- Total Time: 180 minutes
- Yield: 8 servings 1x
Ingredients
- 1 1/4 cups (150g) all-purpose flour
- 1/2 cup (50g) unsweetened cocoa powder
- 1/2 cup (100g) granulated sugar
- 1/4 teaspoon salt
- 1/2 cup (115g) cold unsalted butter, cut into cubes
- 1 large egg yolk
- 2–4 tablespoons ice water
- 1 cup (240ml) heavy cream
- 8 ounces (225g) bittersweet chocolate, finely chopped
- 2 tablespoons unsalted butter
- 1 teaspoon vanilla extract
- Pinch of salt
- Fresh raspberries
- Whipped cream
- Chocolate shavings
- Dusting of cocoa powder
Instructions
- In a large bowl, whisk together the flour, cocoa powder, sugar, and salt.
- Add the cold, cubed butter to the dry ingredients. Using a pastry blender or your fingertips (work quickly), cut the butter into the flour mixture until it resembles coarse crumbs.
- In a small bowl, whisk together the egg yolk and 2 tablespoons of ice water. Pour this mixture over the flour and butter mixture.
- Gently mix the ingredients together until a dough starts to form. If the dough is too dry, add the remaining ice water, one tablespoon at a time, until it comes together. Be careful not to overmix.
- Turn the dough out onto a lightly floured surface and gently form it into a disc. Wrap the disc tightly in plastic wrap and refrigerate for at least 30 minutes, or up to 2 hours.
- On a lightly floured surface, roll out the chilled dough into a circle about 12 inches in diameter. The dough should be about 1/8 inch thick.
- Carefully transfer the rolled-out dough to a 9-inch tart pan with a removable bottom. Gently press the dough into the bottom and up the sides of the pan.
- Trim any excess dough from the edges of the pan. Crimp the edges of the crust for a decorative finish.
- Use a fork to prick the bottom of the crust all over.
- Place the prepared tart crust in the freezer for 15 minutes.
- Preheat your oven to 375°F (190°C).
- Line the tart crust with parchment paper and fill it with pie weights or dried beans.
- Bake the crust for 20 minutes.
- Carefully remove the parchment paper and pie weights. Bake for another 10-15 minutes, or until the crust is golden brown and cooked through.
- Let the baked tart crust cool completely in the pan before filling.
- In a saucepan, heat the heavy cream over medium heat until it just begins to simmer. Do not boil.
- Remove the saucepan from the heat and pour the hot cream over the finely chopped chocolate in a heatproof bowl.
- Let the mixture sit for 1 minute to allow the heat from the cream to melt the chocolate.
- Gently whisk the chocolate and cream together until smooth and glossy.
- Stir in the butter, vanilla extract, and salt until the butter is melted and the mixture is smooth.
- Pour the chocolate filling into the cooled tart crust. Spread it evenly to create a smooth surface.
- Refrigerate the tart for at least 2 hours, or preferably overnight, to allow the filling to set completely.
- Before serving, garnish the chocolate tart with fresh raspberries, whipped cream, chocolate shavings, or a dusting of cocoa powder.
- Slice and serve the chocolate tart chilled. Enjoy!
Notes
- Use Cold Ingredients: Cold butter and ice water are essential for creating a flaky crust.
- Don’t Overmix the Dough: Overmixing develops the gluten in the flour, resulting in a tough crust.
- Chill the Dough: Chilling the dough allows the gluten to relax and the butter to firm up, preventing the crust from shrinking during baking.
- Blind Bake the Crust: Blind baking ensures that the crust is fully cooked and prevents it from becoming soggy when filled.
- Use High-Quality Chocolate: The quality of the chocolate will greatly impact the flavor of the filling. Use a good quality bittersweet chocolate for the best results.
- Be Patient: Allow the filling to set completely in the refrigerator before serving.
- Add Flavor Extracts: Experiment with different flavor extracts in the filling, such as peppermint, orange, or almond.
- Add Nuts: Sprinkle chopped nuts, such as pecans or walnuts, on top of the filling before chilling.
- Make Mini Tarts: Use mini tart pans to create individual chocolate tarts. Adjust the baking time accordingly.
- Salted Caramel Chocolate Tart: Drizzle salted caramel over the chocolate filling before chilling for a decadent twist.
- Espresso Chocolate Tart: Add a teaspoon of instant espresso powder to the chocolate filling for a coffee-infused flavor.
- Store leftover chocolate tart in the refrigerator for up to 3 days. Cover it tightly with plastic wrap to prevent it from drying out.
- Crust is too tough: You likely overmixed the dough. Be gentle when mixing and avoid overworking the gluten.
- Crust shrunk during baking: Make sure to chill the dough thoroughly before rolling it out and baking. Also, ensure that the oven temperature is accurate.
- Filling is too runny: You may not have used enough chocolate or the cream was not hot enough. Ensure that the cream is heated to a simmer and that you use the correct ratio of chocolate to cream.
- Filling is grainy: This can happen if the chocolate overheats. Be gentle when melting the chocolate and avoid overheating it.
Leave a Comment