
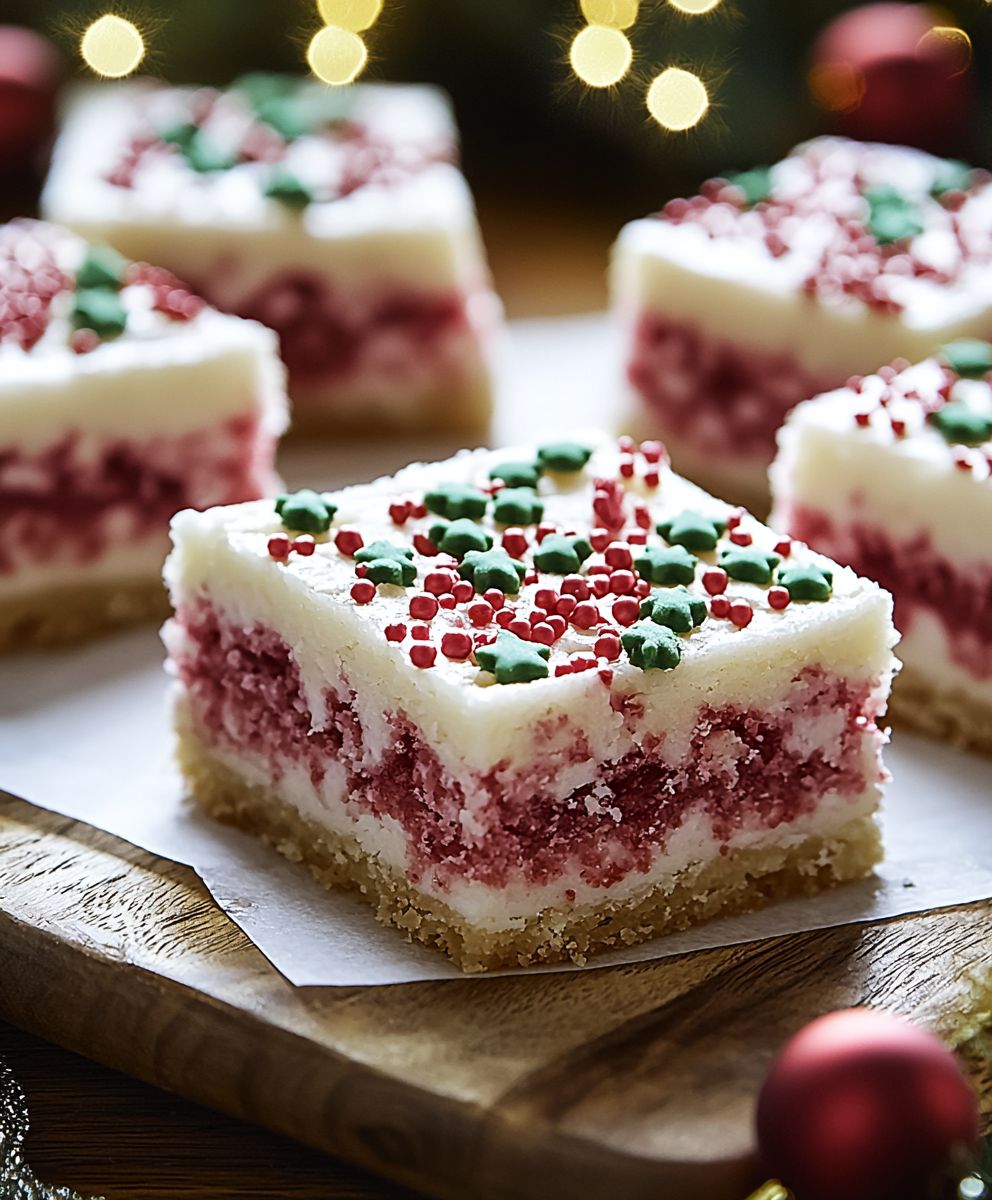
Christmas sugar cookie bars are the answer to your holiday baking prayers! Imagine the delightful taste of classic sugar cookies, but without the endless rolling, cutting, and decorating of individual cookies. This recipe delivers all the festive flavor and cheer in a convenient, crowd-pleasing bar form.
Sugar cookies themselves have a rich history, tracing back to medieval times. They evolved from sugar cakes, with each region adding its own unique twist. Today, they are a beloved tradition during the Christmas season, symbolizing sweetness, joy, and togetherness. These Christmas sugar cookie bars capture that same spirit, offering a modern and effortless way to share the magic of the holidays.
What makes these bars so irresistible? It’s the perfect combination of a soft, chewy base, a creamy, sweet frosting, and of course, those vibrant sprinkles that scream “Christmas!” People adore them because they are incredibly easy to make, require minimal cleanup, and are always a hit at parties and gatherings. Plus, who can resist that nostalgic sugar cookie flavor that instantly transports you back to childhood Christmases? Get ready to create a new holiday tradition with this simple yet spectacular recipe!

Ingredients:
- For the Cookie Base:
- 1 cup (2 sticks) unsalted butter, softened
- 1 ½ cups granulated sugar
- 2 large eggs
- 1 teaspoon vanilla extract
- ½ teaspoon almond extract (optional, but adds a nice touch!)
- 3 cups all-purpose flour
- 1 teaspoon baking powder
- ½ teaspoon salt
- For the Cream Cheese Frosting:
- 8 ounces cream cheese, softened
- ½ cup (1 stick) unsalted butter, softened
- 4 cups powdered sugar
- 2 teaspoons vanilla extract
- 2-4 tablespoons milk or heavy cream (to adjust consistency)
- For Decoration:
- Assorted Christmas sprinkles (red, green, white, gold get creative!)
- Colored sanding sugar (optional)
- Mini chocolate chips (optional)
- Edible glitter (optional, for extra sparkle!)
Preparing the Cookie Base:
- Cream the Butter and Sugar: In a large bowl (or the bowl of your stand mixer), cream together the softened butter and granulated sugar until light and fluffy. This usually takes about 3-5 minutes. Don’t rush this step! Really incorporating air into the butter and sugar is key to a tender cookie base. You’ll know it’s ready when the mixture is noticeably lighter in color and has a whipped texture. Scrape down the sides of the bowl occasionally to ensure everything is evenly mixed.
- Add the Eggs and Extracts: Beat in the eggs one at a time, mixing well after each addition. Make sure each egg is fully incorporated before adding the next. Then, stir in the vanilla extract and almond extract (if using). The almond extract really complements the vanilla and gives the cookies a subtle, festive flavor, but it’s totally optional if you’re not a fan.
- Combine Dry Ingredients: In a separate medium bowl, whisk together the all-purpose flour, baking powder, and salt. Whisking ensures that the baking powder and salt are evenly distributed throughout the flour, which is important for proper leavening and flavor.
- Gradually Add Dry Ingredients to Wet Ingredients: Gradually add the dry ingredients to the wet ingredients, mixing on low speed until just combined. Be careful not to overmix! Overmixing develops the gluten in the flour, which can result in tough cookies. Mix until the flour is almost completely incorporated, then stop and scrape down the sides of the bowl. Give it a few more quick pulses until everything is just combined. A few streaks of flour are okay at this point.
- Press into Baking Pan: Lightly grease a 9×13 inch baking pan. You can also line it with parchment paper, leaving an overhang on the sides, for easy removal later. This is my preferred method! Press the cookie dough evenly into the prepared pan. I find it easiest to use my hands to do this. If the dough is sticky, you can lightly flour your hands or use a piece of parchment paper to press it down. Make sure the dough is spread into an even layer so the bars bake uniformly.
Baking the Cookie Base:
- Bake: Bake in a preheated oven at 350°F (175°C) for 20-25 minutes, or until the edges are lightly golden brown and the center is set. The baking time may vary depending on your oven, so keep a close eye on it. You want the cookie base to be cooked through but still soft. A toothpick inserted into the center should come out with a few moist crumbs attached.
- Cool Completely: Remove the baking pan from the oven and let the cookie base cool completely in the pan before frosting. This is crucial! If you try to frost the bars while they’re still warm, the frosting will melt and become a gooey mess. I usually let them cool for at least an hour, or even longer if I have the time.
Preparing the Cream Cheese Frosting:
- Cream the Cream Cheese and Butter: In a large bowl (or the bowl of your stand mixer), cream together the softened cream cheese and butter until smooth and creamy. Make sure both the cream cheese and butter are at room temperature for the best results. This will prevent lumps in your frosting. Beat them together for several minutes until the mixture is light and fluffy.
- Gradually Add Powdered Sugar: Gradually add the powdered sugar, one cup at a time, mixing on low speed until combined. Be careful not to add the powdered sugar too quickly, or it will create a cloud of dust! Once all the powdered sugar is added, increase the speed to medium and beat for another 2-3 minutes, until the frosting is smooth and fluffy.
- Add Vanilla and Adjust Consistency: Stir in the vanilla extract. Then, add milk or heavy cream, one tablespoon at a time, until the frosting reaches your desired consistency. I usually start with 2 tablespoons and add more if needed. You want the frosting to be thick enough to hold its shape but still spreadable.
Frosting and Decorating:
- Frost the Cookie Bars: Once the cookie base is completely cool, spread the cream cheese frosting evenly over the top. Use an offset spatula or a butter knife to create a smooth, even layer.
- Decorate with Sprinkles: Immediately sprinkle the frosting with your favorite Christmas sprinkles, colored sanding sugar, mini chocolate chips, and edible glitter (if using). The frosting is easiest to decorate when it’s still soft, so don’t wait too long! Get creative and have fun with it! You can create patterns, use different colors, or even let the kids help.
- Chill (Optional): For best results, chill the frosted cookie bars in the refrigerator for at least 30 minutes before cutting and serving. This will help the frosting set and make the bars easier to cut cleanly. However, this step is optional.
- Cut and Serve: Cut the cookie bars into squares or rectangles using a sharp knife. If you lined the pan with parchment paper, you can simply lift the bars out of the pan using the overhang. Store the leftover cookie bars in an airtight container in the refrigerator for up to 3-4 days.
Conclusion:
And there you have it! These Christmas sugar cookie bars are more than just a dessert; they’re a slice of holiday cheer, baked to golden perfection. I truly believe this recipe is a must-try this Christmas season, and here’s why: It’s incredibly easy, even for novice bakers. Forget the tedious rolling and cutting of individual cookies this recipe streamlines the process, giving you more time to enjoy the festivities. The bars are soft, chewy, and bursting with that classic sugar cookie flavor we all know and love. Plus, the customizable frosting and sprinkles allow you to unleash your inner artist and create a truly festive treat.
But the best part? The sheer joy these bars bring. From the moment you pull them out of the oven, filling your kitchen with that warm, comforting aroma, to the moment you take that first bite, you’ll be transported to a place of holiday magic. They’re perfect for sharing with family and friends, bringing to holiday parties, or simply enjoying as a sweet treat on a cozy winter evening.
Looking for serving suggestions? These bars are fantastic on their own, but they also pair beautifully with a scoop of vanilla ice cream or a warm mug of hot chocolate. For a more decadent treat, try drizzling them with melted white chocolate or adding a dollop of whipped cream.
And don’t be afraid to get creative with variations! Want to add a little extra flavor? Try incorporating a teaspoon of almond extract into the dough. Feeling adventurous? Swirl some raspberry jam into the frosting for a tangy twist. You could even add chopped nuts or dried cranberries to the batter for added texture and flavor. Consider using different food colorings to create a rainbow of festive bars. The possibilities are endless!
These Christmas sugar cookie bars are also incredibly versatile. They can be cut into squares, rectangles, or even festive shapes using cookie cutters. They also freeze well, so you can make them ahead of time and have them on hand for unexpected guests or last-minute holiday gatherings. Simply wrap them tightly in plastic wrap and store them in the freezer for up to a month. When you’re ready to serve them, thaw them at room temperature for a few hours.
I’m confident that this recipe will become a new holiday tradition in your home. It’s simple, delicious, and guaranteed to bring a smile to everyone’s face. So, gather your ingredients, preheat your oven, and get ready to bake some holiday magic!
I’m so excited for you to try this recipe! Once you do, I’d love to hear about your experience. Did you make any variations? What did your family and friends think? Share your photos and stories in the comments below. Let’s spread the holiday cheer and inspire others to bake these delightful Christmas sugar cookie bars. Happy baking, and happy holidays!
Christmas Sugar Cookie Bars: Easy Recipe & Festive Ideas
Festive Christmas cookie bars with a buttery base, creamy cream cheese frosting, and colorful holiday sprinkles. Perfect for sharing!
Ingredients
- 1 cup (2 sticks) unsalted butter, softened
- 1 ½ cups granulated sugar
- 2 large eggs
- 1 teaspoon vanilla extract
- ½ teaspoon almond extract (optional)
- 3 cups all-purpose flour
- 1 teaspoon baking powder
- ½ teaspoon salt
- 8 ounces cream cheese, softened
- ½ cup (1 stick) unsalted butter, softened
- 4 cups powdered sugar
- 2 teaspoons vanilla extract
- 2-4 tablespoons milk or heavy cream (to adjust consistency)
- Assorted Christmas sprinkles
- Colored sanding sugar (optional)
- Mini chocolate chips (optional)
- Edible glitter (optional)
Instructions
- Cream the Butter and Sugar: In a large bowl (or the bowl of your stand mixer), cream together the softened butter and granulated sugar until light and fluffy (3-5 minutes). Scrape down the sides of the bowl occasionally.
- Add the Eggs and Extracts: Beat in the eggs one at a time, mixing well after each addition. Stir in the vanilla extract and almond extract (if using).
- Combine Dry Ingredients: In a separate medium bowl, whisk together the all-purpose flour, baking powder, and salt.
- Gradually Add Dry Ingredients to Wet Ingredients: Gradually add the dry ingredients to the wet ingredients, mixing on low speed until just combined. Be careful not to overmix.
- Press into Baking Pan: Lightly grease a 9×13 inch baking pan (or line with parchment paper). Press the cookie dough evenly into the prepared pan.
- Bake: Bake in a preheated oven at 350°F (175°C) for 20-25 minutes, or until the edges are lightly golden brown and the center is set.
- Cool Completely: Remove the baking pan from the oven and let the cookie base cool completely in the pan before frosting.
- Cream the Cream Cheese and Butter: In a large bowl (or the bowl of your stand mixer), cream together the softened cream cheese and butter until smooth and creamy.
- Gradually Add Powdered Sugar: Gradually add the powdered sugar, one cup at a time, mixing on low speed until combined.
- Add Vanilla and Adjust Consistency: Stir in the vanilla extract. Then, add milk or heavy cream, one tablespoon at a time, until the frosting reaches your desired consistency.
- Frost the Cookie Bars: Once the cookie base is completely cool, spread the cream cheese frosting evenly over the top.
- Decorate with Sprinkles: Immediately sprinkle the frosting with your favorite Christmas sprinkles, colored sanding sugar, mini chocolate chips, and edible glitter (if using).
- Chill (Optional): For best results, chill the frosted cookie bars in the refrigerator for at least 30 minutes before cutting and serving.
- Cut and Serve: Cut the cookie bars into squares or rectangles using a sharp knife. Store the leftover cookie bars in an airtight container in the refrigerator for up to 3-4 days.
Notes
- Softened butter and cream cheese are crucial for smooth frosting.
- Don’t overmix the cookie dough to avoid tough cookies.
- Cool the cookie base completely before frosting to prevent melting.
- Get creative with your decorations!
- Chilling the frosted bars helps the frosting set and makes them easier to cut.

Leave a Comment