
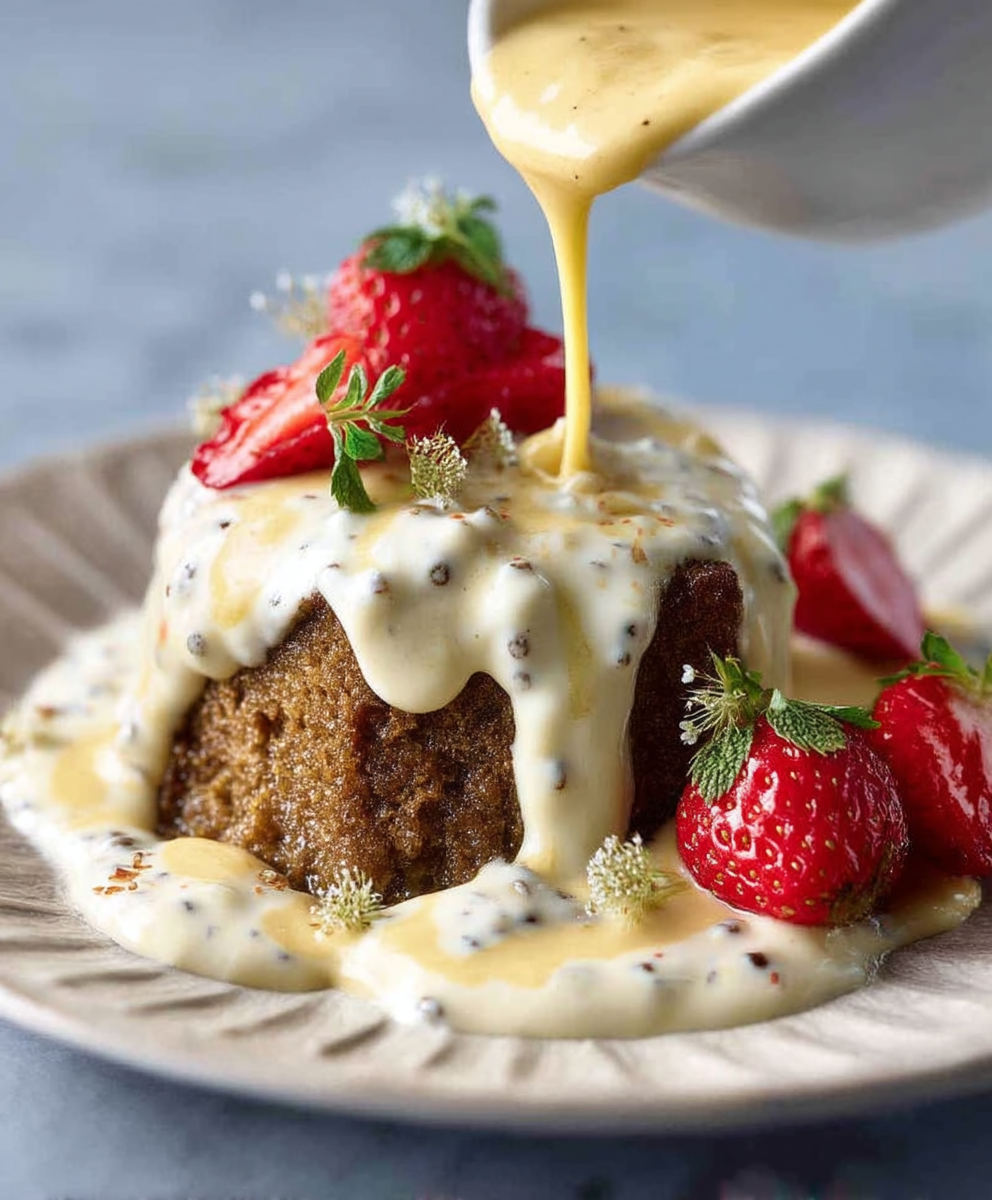
Classic Creme Anglaise, that velvety smooth, vanilla-infused custard sauce, is the unsung hero of the dessert world. Have you ever wondered how to elevate a simple fruit tart or a humble slice of cake to a truly decadent experience? The answer, my friends, lies in mastering this elegant sauce. It’s a skill that will impress your guests and delight your own taste buds.
While its exact origins are debated, Creme Anglaise, meaning “English cream,” has been a staple in European cuisine for centuries. It’s believed to have evolved from earlier custard recipes, becoming refined over time into the delicate sauce we know and love today. Think of it as the sophisticated cousin of vanilla pudding, offering a lighter, more nuanced flavor profile.
So, why is classic Creme Anglaise so beloved? Its appeal is multifaceted. The silky texture melts in your mouth, creating a luxurious sensation. The subtle sweetness and rich vanilla aroma perfectly complement a wide range of desserts, from fresh berries and poached pears to chocolate lava cakes and bread pudding. Plus, while it may seem intimidating, making Creme Anglaise from scratch is surprisingly straightforward with the right technique. I’m here to guide you through each step, ensuring you achieve that perfect, pourable consistency every time. Get ready to unlock a world of dessert possibilities!

Ingredients:
- 6 large egg yolks
- 1/2 cup (100g) granulated sugar
- 2 cups (480ml) heavy cream
- 1 cup (240ml) whole milk
- 1 vanilla bean, split lengthwise and seeds scraped (or 1 teaspoon pure vanilla extract)
- Pinch of salt
Preparing the Custard Base
- Separate the Eggs: Carefully separate the egg yolks from the whites. Place the yolks in a medium-sized, heatproof bowl. Set the whites aside for another use (meringues, anyone?). It’s crucial to avoid any yolk contamination in the whites for best results in other recipes.
- Whisk Yolks and Sugar: Add the granulated sugar to the bowl with the egg yolks. Using a whisk, vigorously whisk the yolks and sugar together until the mixture becomes pale yellow and slightly thickened. This step is important because it incorporates air into the mixture, which helps create a smoother, richer custard. Don’t rush this step; aim for a ribbon-like consistency when you lift the whisk.
- Prepare the Vanilla Bean (if using): If you’re using a vanilla bean, use a paring knife to carefully split it lengthwise. Use the back of the knife to scrape out the tiny black seeds. Add both the seeds and the pod to a medium-sized saucepan. The pod will infuse the cream and milk with even more vanilla flavor. If you’re using vanilla extract, hold off on adding it until the end of the cooking process.
- Combine Cream and Milk: In the saucepan with the vanilla bean (or without, if using extract), pour in the heavy cream and whole milk. Add a pinch of salt to enhance the flavors.
- Heat the Cream Mixture: Place the saucepan over medium heat. Gently heat the cream and milk mixture until it just begins to simmer around the edges. You’ll see small bubbles forming. It’s crucial not to boil the mixture, as this can scald the milk and affect the final texture of the crème anglaise. If you are using a vanilla bean, remove the pod after the mixture has simmered for a few minutes to extract the most flavor.
Tempering the Egg Yolks
- Temper the Yolks: This is the most important step to prevent scrambled eggs! Slowly drizzle a small amount (about 1/4 cup) of the hot cream mixture into the egg yolk mixture while whisking constantly and vigorously. This process is called tempering. The goal is to gradually raise the temperature of the egg yolks so they don’t cook too quickly when added to the hot cream.
- Repeat Tempering: Continue adding the hot cream mixture to the egg yolks in small increments (about 1/4 cup at a time), whisking constantly after each addition. Repeat this process until you’ve added about half of the hot cream mixture to the egg yolks.
- Combine Mixtures: Pour the tempered egg yolk mixture back into the saucepan with the remaining hot cream mixture.
Cooking the Crème Anglaise
- Cook Over Low Heat: Place the saucepan back over low heat. This is where patience is key! Cook the crème anglaise, stirring constantly with a wooden spoon or heat-resistant spatula, until it thickens enough to coat the back of the spoon.
- Stir Constantly: It’s essential to stir constantly and thoroughly, making sure to scrape the bottom and sides of the saucepan to prevent the custard from sticking and scorching.
- Check for Doneness: To test for doneness, dip the back of a clean spoon into the custard. Then, run your finger across the coated spoon. If the line you draw remains distinct and doesn’t run back together, the crème anglaise is ready. The temperature should be around 170-175°F (77-79°C). Using a thermometer is the most accurate way to ensure the custard is cooked properly.
- Avoid Overcooking: Be very careful not to overcook the crème anglaise, as it will curdle. If you see any signs of curdling (small lumps forming), immediately remove the saucepan from the heat and whisk vigorously. You can also try straining the custard through a fine-mesh sieve to remove any lumps.
Finishing and Cooling
- Strain the Custard: Immediately pour the crème anglaise through a fine-mesh sieve into a clean bowl. This will remove any lumps or cooked egg particles, resulting in a perfectly smooth and silky custard.
- Add Vanilla Extract (if using): If you’re using vanilla extract, stir it into the strained crème anglaise.
- Cool Quickly: To prevent a skin from forming on the surface of the custard, press a piece of plastic wrap directly onto the surface. This will create an airtight seal.
- Chill Thoroughly: Refrigerate the crème anglaise for at least 2 hours, or preferably overnight, to allow it to chill completely and for the flavors to meld together.
Serving Suggestions
Crème anglaise is incredibly versatile and can be used in a variety of ways. Here are a few serving suggestions:
- As a Sauce: Drizzle it over fresh fruit, berries, cakes, pastries, or ice cream.
- As a Base: Use it as a base for other desserts, such as mousses, parfaits, or trifles.
- As a Drink: Enjoy it chilled as a light and refreshing dessert drink.
- With Chocolate: It pairs beautifully with chocolate desserts, such as chocolate lava cake or brownies.
- With Coffee: Add a spoonful to your coffee for a rich and creamy treat.
Tips for Success
- Use Fresh Ingredients: Fresh, high-quality ingredients will result in the best-tasting crème anglaise.
- Low and Slow: Cooking the custard over low heat is crucial to prevent curdling.
- Constant Stirring: Stirring constantly ensures even cooking and prevents sticking.
- Don’t Overcook: Overcooking will result in a curdled custard.
- Strain for Smoothness: Straining the custard through a fine-mesh sieve will remove any lumps and create a perfectly smooth texture.
- Chill Thoroughly: Chilling the custard allows the flavors to meld together and improves the texture.
Troubleshooting
- Curdled Crème Anglaise: If your crème anglaise curdles, immediately remove it from the heat and whisk vigorously. You can also try straining it through a fine-mesh sieve to remove the lumps. In some cases, adding a tablespoon of cold milk or cream can help to smooth it out.
- Thin Crème Anglaise: If your crème anglaise is too thin, you may not have cooked it long enough. Return it to low heat and continue cooking, stirring constantly, until it thickens to the desired consistency. Be careful not to overcook it.
- Lumpy Crème Anglaise: A lumpy crème anglaise is usually caused by overcooking or not stirring constantly. Straining the custard through a fine-mesh sieve will remove the lumps.
Storage
Crème anglaise can be stored in an airtight container in the refrigerator for up to 3 days. Be sure to press a piece of plastic wrap directly onto the surface to prevent a skin from forming.
Conclusion:
This isn’t just another meatball recipe; it’s a passport to the sun-drenched shores of Greece, a culinary hug from a yiayia you’ve never met! These Greek Meatballs Keftedes are a must-try because they deliver an explosion of fresh, vibrant flavors in every single bite. The combination of fragrant herbs, savory meat, and a hint of lemon creates a symphony on your palate that’s both comforting and exciting. Trust me, once you’ve tasted these, you’ll be making them again and again.
But the best part? They’re incredibly versatile! Serve them as a delightful appetizer with a generous dollop of creamy tzatziki sauce for dipping. Imagine your guests’ faces lighting up as they savor the juicy, flavorful meatballs. Or, transform them into a satisfying main course by pairing them with a simple Greek salad and a side of fluffy rice pilaf. For a heartier meal, simmer them in a rich tomato sauce and serve over pasta a comforting twist on a classic Italian dish.
And don’t be afraid to experiment! Feel free to add a pinch of red pepper flakes for a touch of heat, or incorporate some finely chopped sun-dried tomatoes for an extra layer of Mediterranean flavor. If you’re feeling adventurous, try grilling the meatballs instead of frying them for a smoky char that adds a whole new dimension to the dish. You could even bake them for a healthier, less greasy option. The possibilities are truly endless!
I’ve personally made these Greek Meatballs Keftedes countless times, and they’re always a crowd-pleaser. They’re perfect for weeknight dinners, potlucks, or even a fancy dinner party. They’re also a great way to introduce your family to the wonderful world of Greek cuisine.
So, what are you waiting for? Gather your ingredients, put on some Greek music, and get ready to embark on a culinary adventure! I promise you won’t be disappointed. This recipe is simple enough for even beginner cooks to master, and the results are absolutely divine.
I’m so confident that you’ll love these meatballs that I’m practically begging you to try them! And once you do, I’d absolutely love to hear about your experience. Did you make any variations? What did you serve them with? What did your family think? Share your photos and stories in the comments below I can’t wait to see your creations! Let’s spread the love for these amazing Greek Meatballs Keftedes and bring a little taste of Greece into everyone’s home. Happy cooking!
Classic Creme Anglaise: The Ultimate Guide to Making It Perfectly
A rich, smooth, and versatile French custard sauce, perfect drizzled over fruit, cakes, or enjoyed on its own.
Ingredients
- 6 large egg yolks
- 1/2 cup (100g) granulated sugar
- 2 cups (480ml) heavy cream
- 1 cup (240ml) whole milk
- 1 vanilla bean, split lengthwise and seeds scraped (or 1 teaspoon pure vanilla extract)
- Pinch of salt
Instructions
- Separate the Eggs: Carefully separate the egg yolks from the whites. Place the yolks in a medium-sized, heatproof bowl. Set the whites aside for another use.
- Whisk Yolks and Sugar: Add the granulated sugar to the bowl with the egg yolks. Using a whisk, vigorously whisk the yolks and sugar together until the mixture becomes pale yellow and slightly thickened.
- Prepare the Vanilla Bean (if using): If you’re using a vanilla bean, use a paring knife to carefully split it lengthwise. Use the back of the knife to scrape out the tiny black seeds. Add both the seeds and the pod to a medium-sized saucepan. If you’re using vanilla extract, hold off on adding it until the end of the cooking process.
- Combine Cream and Milk: In the saucepan with the vanilla bean (or without, if using extract), pour in the heavy cream and whole milk. Add a pinch of salt to enhance the flavors.
- Heat the Cream Mixture: Place the saucepan over medium heat. Gently heat the cream and milk mixture until it just begins to simmer around the edges. It’s crucial not to boil the mixture. If you are using a vanilla bean, remove the pod after the mixture has simmered for a few minutes to extract the most flavor.
- Temper the Yolks: Slowly drizzle a small amount (about 1/4 cup) of the hot cream mixture into the egg yolk mixture while whisking constantly and vigorously.
- Repeat Tempering: Continue adding the hot cream mixture to the egg yolks in small increments (about 1/4 cup at a time), whisking constantly after each addition. Repeat this process until you’ve added about half of the hot cream mixture to the egg yolks.
- Combine Mixtures: Pour the tempered egg yolk mixture back into the saucepan with the remaining hot cream mixture.
- Cook Over Low Heat: Place the saucepan back over low heat. Cook the crème anglaise, stirring constantly with a wooden spoon or heat-resistant spatula, until it thickens enough to coat the back of the spoon.
- Stir Constantly: It’s essential to stir constantly and thoroughly, making sure to scrape the bottom and sides of the saucepan to prevent the custard from sticking and scorching.
- Check for Doneness: To test for doneness, dip the back of a clean spoon into the custard. Then, run your finger across the coated spoon. If the line you draw remains distinct and doesn’t run back together, the crème anglaise is ready. The temperature should be around 170-175°F (77-79°C).
- Avoid Overcooking: Be very careful not to overcook the crème anglaise, as it will curdle.
- Strain the Custard: Immediately pour the crème anglaise through a fine-mesh sieve into a clean bowl.
- Add Vanilla Extract (if using): If you’re using vanilla extract, stir it into the strained crème anglaise.
- Cool Quickly: To prevent a skin from forming on the surface of the custard, press a piece of plastic wrap directly onto the surface.
- Chill Thoroughly: Refrigerate the crème anglaise for at least 2 hours, or preferably overnight, to allow it to chill completely and for the flavors to meld together.
Notes
- Use Fresh Ingredients: Fresh, high-quality ingredients will result in the best-tasting crème anglaise.
- Low and Slow: Cooking the custard over low heat is crucial to prevent curdling.
- Constant Stirring: Stirring constantly ensures even cooking and prevents sticking.
- Don’t Overcook: Overcooking will result in a curdled custard.
- Strain for Smoothness: Straining the custard through a fine-mesh sieve will remove any lumps and create a perfectly smooth texture.
- Chill Thoroughly: Chilling the custard allows the flavors to meld together and improves the texture.
- Curdled Crème Anglaise: If your crème anglaise curdles, immediately remove it from the heat and whisk vigorously. You can also try straining it through a fine-mesh sieve to remove the lumps. In some cases, adding a tablespoon of cold milk or cream can help to smooth it out.
- Thin Crème Anglaise: If your crème anglaise is too thin, you may not have cooked it long enough. Return it to low heat and continue cooking, stirring constantly, until it thickens to the desired consistency. Be careful not to overcook it.
- Lumpy Crème Anglaise: A lumpy crème anglaise is usually caused by overcooking or not stirring constantly. Straining the custard through a fine-mesh sieve will remove the lumps.
- Storage: Crème anglaise can be stored in an airtight container in the refrigerator for up to 3 days. Be sure to press a piece of plastic wrap directly onto the surface to prevent a skin from forming.


Leave a Comment