
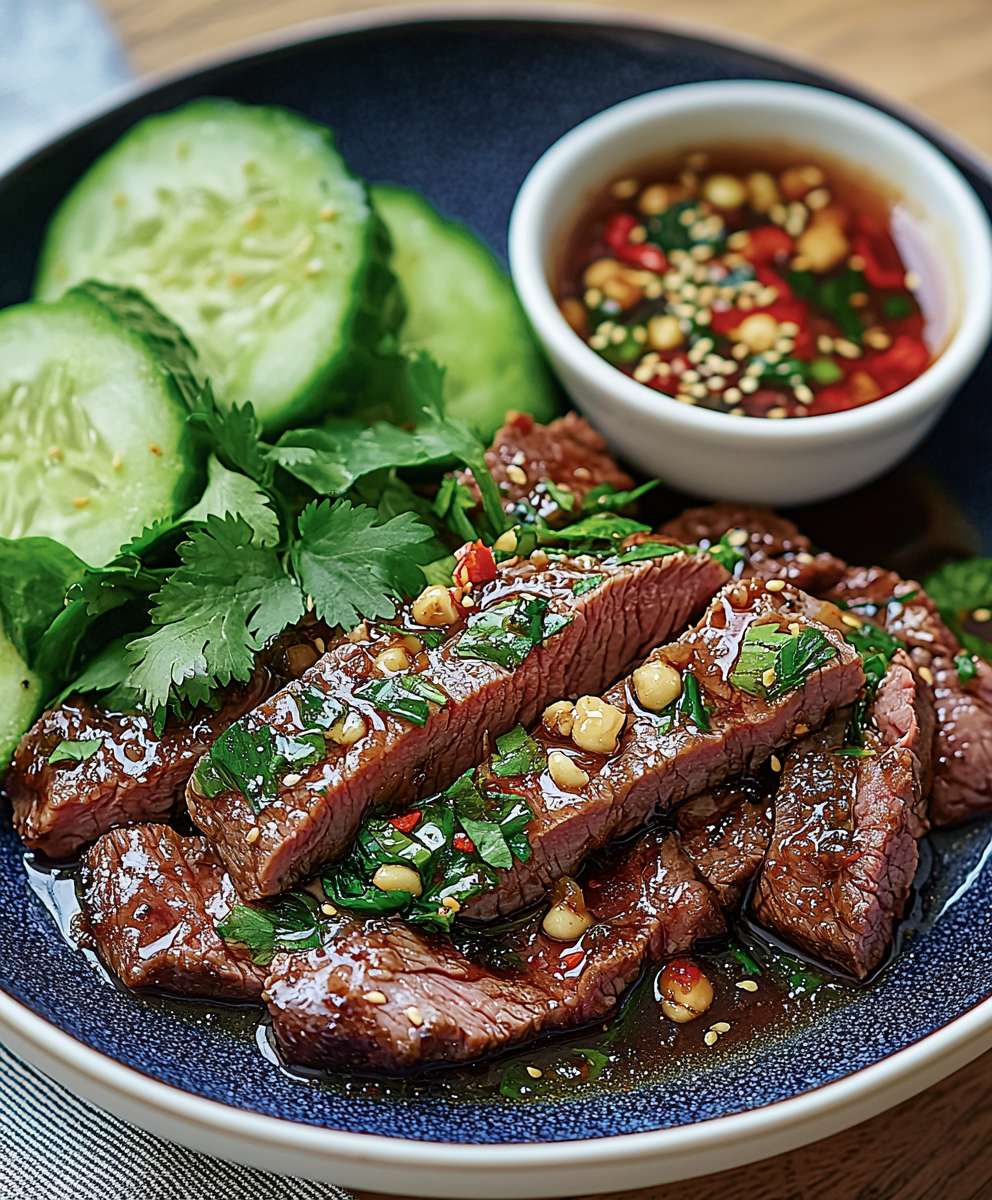
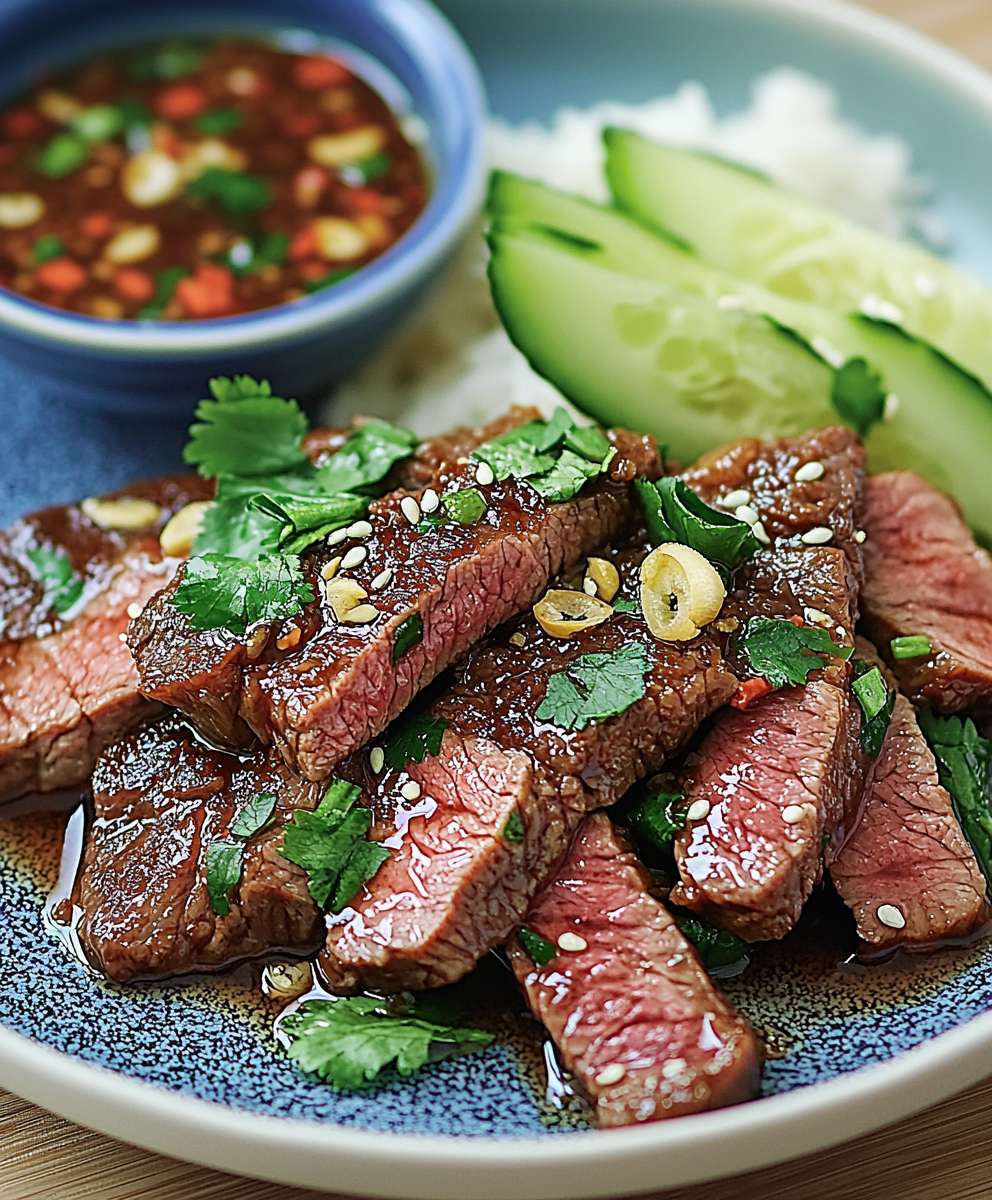
Crying Tiger Beef, or Suea Rong Hai as it’s known in Thailand, isn’t just a meal; it’s an experience. Imagine sinking your teeth into perfectly grilled, thinly sliced steak, bursting with savory, spicy, and slightly sweet flavors. The tantalizing aroma alone is enough to make your mouth water, but the taste? Absolutely unforgettable. This isn’t your average weeknight dinner; it’s a culinary adventure that will transport you straight to the vibrant streets of Thailand.
The name “Crying Tiger” is shrouded in a bit of mystery and folklore. One popular story suggests that the dish is so delicious, it would even make a tiger weep with longing after finishing it. Another, perhaps more practical, explanation claims the beef was once considered the best part of the cow, reserved for royalty, leaving the tiger with only the less desirable cuts, hence its “crying” over the loss. Regardless of its origin, the dish has become a beloved staple in Thai cuisine, celebrated for its bold flavors and satisfying textures.
What makes Crying Tiger Beef so irresistible? It’s the perfect balance of flavors the umami-rich beef, the fiery chili, the tangy lime, and the fragrant herbs all working in harmony. The grilling process imparts a smoky char that adds another layer of complexity. People love it because it’s relatively quick and easy to prepare, yet delivers a restaurant-quality experience in the comfort of their own home. Plus, it’s incredibly versatile serve it with sticky rice, fresh vegetables, or even as a flavorful addition to salads. Get ready to discover your new favorite way to enjoy steak!
Ingredients:
- For the Marinade:
- 1.5 lbs (approximately 680g) flank steak, trimmed of excess fat
- 4 cloves garlic, minced
- 2 tablespoons soy sauce (low sodium preferred)
- 2 tablespoons fish sauce
- 1 tablespoon oyster sauce
- 1 tablespoon brown sugar
- 1 tablespoon vegetable oil
- 1 teaspoon ground black pepper
- 1/2 teaspoon red pepper flakes (optional, for extra heat)
- For the Dipping Sauce:
- 3 tablespoons fish sauce
- 3 tablespoons lime juice, freshly squeezed
- 2 tablespoons brown sugar
- 2 tablespoons water
- 1-3 Thai bird chilies, finely chopped (adjust to your spice preference)
- 2 cloves garlic, minced
- 2 tablespoons cilantro, chopped
- 1 tablespoon toasted rice powder (optional, for added texture and flavor)
- For Serving:
- Cooked jasmine rice, for serving
- Fresh cilantro sprigs, for garnish
- Sliced cucumber, for serving
- Lime wedges, for serving
- Lettuce leaves (optional, for wrapping)
Preparing the Marinade and Beef:
- Prepare the Flank Steak: Begin by thoroughly patting the flank steak dry with paper towels. This is crucial for achieving a good sear later on. Excess moisture will steam the beef instead of allowing it to develop a beautiful crust.
- Slice the Beef: With a sharp knife, thinly slice the flank steak against the grain. Slicing against the grain shortens the muscle fibers, resulting in a more tender and easier-to-chew final product. Aim for slices that are about 1/4 inch (6mm) thick. This is important for even cooking and maximum flavor absorption from the marinade.
- Combine Marinade Ingredients: In a medium-sized bowl, whisk together the minced garlic, soy sauce, fish sauce, oyster sauce, brown sugar, vegetable oil, and black pepper. If you’re using red pepper flakes for an extra kick, add them now. Make sure the brown sugar is fully dissolved into the liquid.
- Marinate the Beef: Add the sliced beef to the marinade, ensuring that all the pieces are well coated. Gently massage the marinade into the beef with your hands. This helps the flavors penetrate the meat more effectively.
- Refrigerate: Cover the bowl with plastic wrap or transfer the beef to a resealable bag. Refrigerate for at least 30 minutes, or preferably for 2-4 hours. The longer the beef marinates, the more flavorful and tender it will become. However, avoid marinating for longer than 6 hours, as the acids in the marinade can start to break down the meat too much, resulting in a mushy texture.
Making the Dipping Sauce:
- Combine Wet Ingredients: In a small bowl, whisk together the fish sauce, lime juice, and water. The lime juice should be freshly squeezed for the best flavor. Bottled lime juice often lacks the bright, zesty notes of fresh lime.
- Add Sweetness: Add the brown sugar to the mixture and stir until it is completely dissolved. Taste the sauce and adjust the amount of brown sugar to your liking. The goal is to achieve a balance between salty, sour, and sweet flavors.
- Incorporate Aromatics and Spice: Add the minced garlic, chopped Thai bird chilies (if using), and chopped cilantro to the sauce. The Thai bird chilies are very spicy, so start with a small amount and add more to taste. If you prefer a milder sauce, you can remove the seeds from the chilies before chopping them.
- Add Toasted Rice Powder (Optional): If you’re using toasted rice powder, add it to the sauce and stir well. Toasted rice powder adds a nutty flavor and a slightly gritty texture that is characteristic of many Thai dipping sauces. You can find toasted rice powder at Asian grocery stores, or you can make your own by toasting uncooked rice in a dry skillet until it is golden brown, then grinding it into a powder using a spice grinder or mortar and pestle.
- Adjust to Taste: Taste the dipping sauce and adjust the ingredients as needed. You may want to add more lime juice for acidity, more fish sauce for saltiness, more brown sugar for sweetness, or more chilies for heat. The perfect dipping sauce is a matter of personal preference, so don’t be afraid to experiment until you find a balance of flavors that you enjoy.
- Refrigerate (Optional): While the dipping sauce can be served immediately, it’s often best to let it sit for at least 15 minutes to allow the flavors to meld together. You can also refrigerate the sauce for up to a day.
Cooking the Beef:
- Prepare Your Cooking Method: You have several options for cooking the beef: grilling, pan-searing, or broiling. Grilling is the most traditional method and imparts a smoky flavor. Pan-searing is a good option if you don’t have a grill or if the weather is bad. Broiling is the quickest method, but it requires careful attention to prevent burning.
- Grilling: Preheat your grill to high heat. Make sure the grates are clean and lightly oiled to prevent sticking. Remove the beef from the marinade and discard the marinade. Grill the beef for 2-3 minutes per side, or until it is cooked to your desired level of doneness. For medium-rare, aim for an internal temperature of 130-135°F (54-57°C).
- Pan-Searing: Heat a large skillet (cast iron is ideal) over high heat. Add a tablespoon of vegetable oil to the skillet and let it heat until it is shimmering. Remove the beef from the marinade and discard the marinade. Sear the beef for 2-3 minutes per side, or until it is cooked to your desired level of doneness. Avoid overcrowding the pan, as this will lower the temperature and prevent the beef from searing properly. If necessary, cook the beef in batches.
- Broiling: Preheat your broiler to high. Place the beef on a broiler pan and broil for 2-3 minutes per side, or until it is cooked to your desired level of doneness. Watch the beef carefully to prevent burning.
- Rest the Beef: Once the beef is cooked, remove it from the heat and let it rest for 5-10 minutes before slicing. This allows the juices to redistribute throughout the meat, resulting in a more tender and flavorful final product. Tent the beef loosely with foil to keep it warm while it rests.
- Slice the Beef: After resting, slice the beef thinly against the grain. This is crucial for ensuring that the beef is tender and easy to chew. Use a sharp knife and slice at a slight angle.
Serving the Crying Tiger Beef:
- Plate the Rice: Place a generous portion of cooked jasmine rice on each plate. The fragrant rice complements the savory beef and spicy dipping sauce perfectly.
- Arrange the Beef: Arrange the sliced beef over the rice. Be sure to fan out the slices so they look appealing.
- Garnish: Garnish with fresh cilantro sprigs and sliced cucumber. The cilantro adds a fresh, herbaceous note, while the cucumber provides a cool, refreshing contrast to the spicy beef.
- Serve with Dipping Sauce: Serve the dipping sauce on the side. Encourage your guests to dip each bite of beef into the sauce for maximum flavor.
- Offer Lime Wedges: Provide lime wedges for those who want to add an extra burst of acidity to their dish.
- Optional: Lettuce Wraps: For a lighter meal, you can serve the beef with lettuce leaves. Guests can wrap the beef, rice, and cucumber in the lettuce leaves for a refreshing and healthy bite.
- Enjoy! Serve immediately and enjoy your delicious Crying Tiger Beef! The combination of tender, flavorful beef, spicy dipping sauce, and fragrant rice is sure to be a hit.
Conclusion:
And there you have it! Crying Tiger Beef, a dish that’s as bold in flavor as it is simple to prepare. I truly believe this recipe is a must-try for anyone looking to add a little excitement to their weeknight dinners or impress guests with a restaurant-quality meal at home. The combination of tender, perfectly seared beef, the vibrant, herbaceous marinade, and that fiery dipping sauce is simply irresistible. It’s a symphony of sweet, sour, salty, and spicy that will dance on your taste buds and leave you wanting more.
But why is this recipe so special? It’s more than just a delicious meal; it’s an experience. The aroma that fills your kitchen as the beef sizzles in the pan is intoxicating. The anticipation builds as you prepare the dipping sauce, knowing that each ingredient is contributing to a flavor explosion. And then, finally, the moment you take that first bite pure bliss! The beef is tender and juicy, the marinade has infused it with a depth of flavor, and the dipping sauce adds that perfect kick of heat. It’s a culinary adventure that you can embark on right in your own kitchen.
Beyond its incredible flavor, this Crying Tiger Beef recipe is also incredibly versatile. Serve it with a side of fluffy jasmine rice and some steamed vegetables for a complete and satisfying meal. Or, for a lighter option, try serving it over a bed of crisp lettuce with some fresh herbs and a drizzle of the dipping sauce. You could even use the marinated beef in tacos or lettuce wraps for a fun and flavorful twist.
Looking for variations? Feel free to experiment with different cuts of beef. While I personally love using sirloin steak for its tenderness and flavor, you could also try using flank steak or ribeye. Just be sure to adjust the cooking time accordingly. You can also adjust the level of spice in the dipping sauce to your liking. If you prefer a milder flavor, simply reduce the amount of chili flakes. And if you’re feeling adventurous, try adding a touch of fish sauce or lime juice to the marinade for an extra layer of complexity.
I’m confident that you’ll love this Crying Tiger Beef recipe as much as I do. It’s a guaranteed crowd-pleaser that’s perfect for any occasion. So, what are you waiting for? Gather your ingredients, fire up your stove, and get ready to experience the magic of Thai cuisine.
I’m so excited for you to try this recipe! Once you’ve had a chance to make it, I would absolutely love to hear about your experience. Did you make any modifications? What did you serve it with? What did your family and friends think? Share your thoughts and photos in the comments below! Your feedback is invaluable, and it helps me to continue creating recipes that you’ll love. Don’t be shy let me know what you think of this incredible **Crying Tiger Beef**! Happy cooking!
Crying Tiger Beef: The Ultimate Guide to Thai Grilled Steak
Tender flank steak, marinated and grilled or pan-seared, with a spicy Thai dipping sauce. A flavorful and unforgettable dish!
Ingredients
- 1.5 lbs (approximately 680g) flank steak, trimmed of excess fat
- 4 cloves garlic, minced
- 2 tablespoons soy sauce (low sodium preferred)
- 2 tablespoons fish sauce
- 1 tablespoon oyster sauce
- 1 tablespoon brown sugar
- 1 tablespoon vegetable oil
- 1 teaspoon ground black pepper
- 1/2 teaspoon red pepper flakes (optional, for extra heat)
- 3 tablespoons fish sauce
- 3 tablespoons lime juice, freshly squeezed
- 2 tablespoons brown sugar
- 2 tablespoons water
- 1-3 Thai bird chilies, finely chopped (adjust to your spice preference)
- 2 cloves garlic, minced
- 2 tablespoons cilantro, chopped
- 1 tablespoon toasted rice powder (optional, for added texture and flavor)
- Cooked jasmine rice, for serving
- Fresh cilantro sprigs, for garnish
- Sliced cucumber, for serving
- Lime wedges, for serving
- Lettuce leaves (optional, for wrapping)
Instructions
- Prepare the Flank Steak: Pat the flank steak dry with paper towels.
- Slice the Beef: Thinly slice the flank steak against the grain into 1/4 inch (6mm) thick slices.
- Combine Marinade Ingredients: In a medium bowl, whisk together the minced garlic, soy sauce, fish sauce, oyster sauce, brown sugar, vegetable oil, and black pepper (and red pepper flakes, if using).
- Marinate the Beef: Add the sliced beef to the marinade, ensuring all pieces are coated. Gently massage the marinade into the beef.
- Refrigerate: Cover and refrigerate for at least 30 minutes, or preferably 2-4 hours (but no more than 6 hours).
- Combine Wet Ingredients (Dipping Sauce): In a small bowl, whisk together the fish sauce, lime juice, and water.
- Add Sweetness (Dipping Sauce): Add the brown sugar and stir until dissolved. Adjust to taste.
- Incorporate Aromatics and Spice (Dipping Sauce): Add the minced garlic, chopped Thai bird chilies (if using), and chopped cilantro.
- Add Toasted Rice Powder (Optional – Dipping Sauce): Add toasted rice powder and stir well.
- Adjust to Taste (Dipping Sauce): Taste and adjust ingredients as needed.
- Refrigerate (Optional – Dipping Sauce): Let sit for 15 minutes or refrigerate for up to a day.
- Prepare Your Cooking Method: Choose grilling, pan-searing, or broiling.
- Grilling: Preheat grill to high heat. Grill beef for 2-3 minutes per side for medium-rare (130-135°F/54-57°C).
- Pan-Searing: Heat a large skillet over high heat with vegetable oil. Sear beef for 2-3 minutes per side for medium-rare. Cook in batches if needed.
- Broiling: Preheat broiler to high. Broil beef on a broiler pan for 2-3 minutes per side for medium-rare. Watch carefully to prevent burning.
- Rest the Beef: Let the beef rest for 5-10 minutes before slicing.
- Slice the Beef: Slice the beef thinly against the grain.
- Plate the Rice: Place cooked jasmine rice on each plate.
- Arrange the Beef: Arrange the sliced beef over the rice.
- Garnish: Garnish with fresh cilantro sprigs and sliced cucumber.
- Serve with Dipping Sauce: Serve the dipping sauce on the side.
- Offer Lime Wedges: Provide lime wedges.
- Optional: Lettuce Wraps: Serve with lettuce leaves for wrapping.
- Enjoy!
Notes
- Patting the flank steak dry is crucial for a good sear.
- Slicing the beef against the grain ensures tenderness.
- Marinating for too long can make the meat mushy.
- Freshly squeezed lime juice is best for the dipping sauce.
- Thai bird chilies are very spicy; adjust to your preference.
- Toasted rice powder adds a nutty flavor and texture to the dipping sauce.
- Resting the beef allows the juices to redistribute, resulting in a more tender final product.


Leave a Comment