
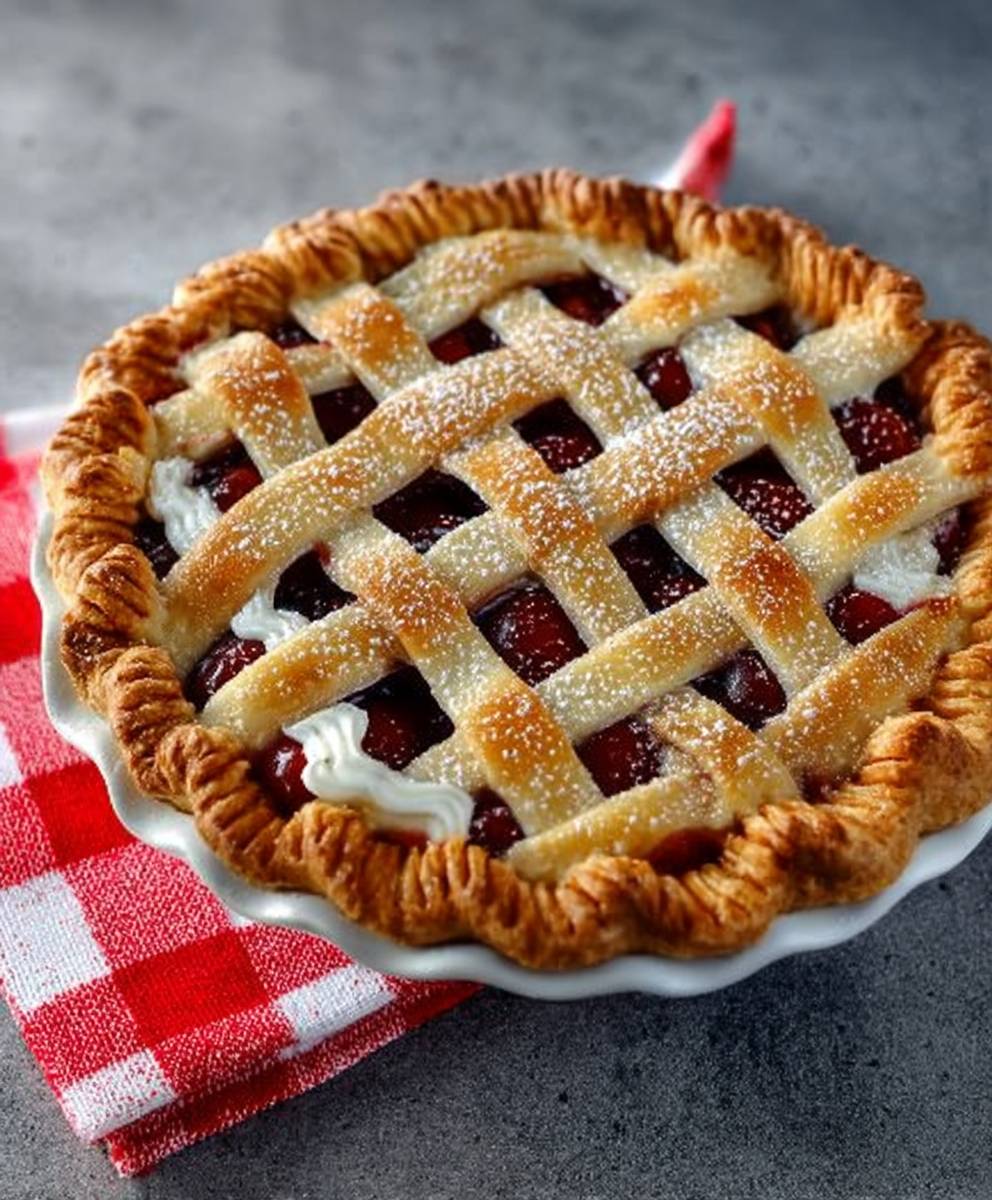
Deep dish cherry pie, a dessert so profoundly comforting, it’s practically a hug in a crust. Imagine sinking your fork into a buttery, flaky pastry, only to be met with a burst of sweet and tart cherries, their juices mingling into a luscious, ruby-red filling. Is your mouth watering yet? Mine certainly is! This isn’t just any pie; it’s an experience, a nostalgic trip back to grandma’s kitchen, and a guaranteed crowd-pleaser at any gathering.
While the exact origins of cherry pie are debated, fruit pies, in general, have been a beloved dessert staple for centuries, with variations appearing across numerous cultures. The American version, particularly the deep dish cherry pie, has become synonymous with Americana, often associated with holidays, family traditions, and good old-fashioned home baking. It’s a symbol of warmth and abundance, a sweet ending to a satisfying meal.
But what is it about this particular pie that makes it so irresistible? For me, it’s the perfect balance of flavors and textures. The tartness of the cherries cuts through the richness of the buttery crust, creating a symphony of sensations on your palate. The deep dish aspect ensures a generous filling-to-crust ratio, maximizing the cherry goodness in every bite. Plus, let’s be honest, there’s something incredibly satisfying about serving a pie that looks as impressive as it tastes. So, let’s get baking and create a deep dish cherry pie that will have everyone begging for seconds!

Ingredients:
- For the Crust:
- 2 ½ cups all-purpose flour, plus more for dusting
- 1 teaspoon salt
- 1 cup (2 sticks) cold unsalted butter, cut into ½-inch cubes
- ½ cup cold vegetable shortening, cut into ½-inch pieces
- 6-8 tablespoons ice water
- For the Cherry Filling:
- 6 cups fresh or frozen pitted cherries (if frozen, thaw and drain well)
- ¾ cup granulated sugar (adjust to taste depending on cherry sweetness)
- ¼ cup cornstarch
- ¼ teaspoon almond extract
- 1 tablespoon lemon juice
- Pinch of salt
- 2 tablespoons unsalted butter, cut into small pieces
- For the Topping:
- 2 tablespoons milk or cream
- 1 tablespoon granulated sugar, for sprinkling
Preparing the Crust:
- Combine Dry Ingredients: In a large bowl, whisk together the flour and salt. This ensures the salt is evenly distributed throughout the dough, which is crucial for flavor and gluten development.
- Cut in the Fat: Add the cold butter and shortening to the flour mixture. Using a pastry blender or your fingertips (work quickly to keep the fat cold!), cut the fat into the flour until the mixture resembles coarse crumbs. You should still see some small pieces of butter and shortening these will create flaky layers in the crust. The size of the pieces should be about pea-sized.
- Add Ice Water: Gradually add the ice water, one tablespoon at a time, mixing gently after each addition. Use a fork or your hands to bring the dough together. Be careful not to overmix! Add just enough water until the dough starts to come together in a shaggy mass. The amount of water needed can vary depending on the humidity and the flour you’re using.
- Form the Dough: Turn the dough out onto a lightly floured surface. Gently gather it into a ball. Divide the dough in half. Flatten each half into a disc, wrap tightly in plastic wrap, and refrigerate for at least 2 hours, or preferably overnight. This chilling time is essential for relaxing the gluten in the dough, which will make it easier to roll out and prevent it from shrinking during baking.
Making the Cherry Filling:
- Combine Filling Ingredients: In a large bowl, combine the cherries, sugar, cornstarch, almond extract, lemon juice, and salt. Gently toss to coat the cherries evenly. The cornstarch will act as a thickener for the cherry juices as the pie bakes. The almond extract enhances the cherry flavor, and the lemon juice adds a touch of brightness.
- Let it Sit: Let the cherry mixture sit for about 15-20 minutes, allowing the juices to release. This will help the cornstarch to dissolve and prevent a grainy filling.
Assembling the Pie:
- Preheat Oven: Preheat your oven to 400°F (200°C). Place a baking sheet on the lower rack of the oven. This will help to catch any drips from the pie and prevent your oven from getting messy.
- Roll Out the Bottom Crust: On a lightly floured surface, roll out one of the dough discs into a 12-inch circle. The circle should be large enough to fit into your deep-dish pie plate with some overhang. Gently transfer the dough to the pie plate, pressing it into the bottom and up the sides. Trim the edges, leaving about a 1-inch overhang.
- Add the Filling: Pour the cherry filling into the prepared pie crust. Dot the top of the filling with the small pieces of butter. This will add richness and flavor to the filling.
- Roll Out the Top Crust: Roll out the remaining dough disc into a 12-inch circle. Cut vents in the top crust to allow steam to escape during baking. This will prevent the crust from puffing up too much and potentially bursting. You can cut simple slits or get creative with decorative shapes.
- Cover the Pie: Carefully place the top crust over the cherry filling. Trim the edges, leaving a 1-inch overhang.
- Seal and Crimp the Edges: Fold the overhang of the top and bottom crusts under and crimp the edges using a fork or your fingers to create a decorative seal. This will help to prevent the filling from leaking out during baking.
- Prepare for Baking: Brush the top crust with milk or cream and sprinkle with granulated sugar. This will give the crust a beautiful golden-brown color and a slightly sweet flavor.
Baking the Pie:
- Bake: Place the pie on the preheated baking sheet in the oven. Bake for 50-60 minutes, or until the crust is golden brown and the filling is bubbling. If the crust starts to brown too quickly, you can cover the edges with aluminum foil.
- Cool: Remove the pie from the oven and let it cool completely on a wire rack before slicing and serving. This is crucial for allowing the filling to set properly. If you cut into the pie while it’s still warm, the filling will be runny. Cooling can take several hours, so be patient!
Tips for Success:
- Keep Ingredients Cold: The key to a flaky pie crust is to keep the butter and shortening cold. This prevents the fat from melting into the flour, which would result in a tough crust.
- Don’t Overmix: Overmixing the dough will develop the gluten, resulting in a tough crust. Mix just until the dough comes together.
- Chill the Dough: Chilling the dough allows the gluten to relax, making it easier to roll out and preventing it from shrinking during baking.
- Use a Baking Sheet: Baking the pie on a baking sheet will catch any drips and prevent your oven from getting messy.
- Cool Completely: Let the pie cool completely before slicing and serving to allow the filling to set properly.
- Adjust Sugar to Taste: The amount of sugar in the filling can be adjusted to taste depending on the sweetness of the cherries.
- Frozen Cherries: If using frozen cherries, make sure to thaw them completely and drain them well before using. This will prevent the filling from being too watery.
- Blind Baking: For an extra crispy bottom crust, you can blind bake the bottom crust before adding the filling. To do this, line the crust with parchment paper and fill it with pie weights or dried beans. Bake at 375°F (190°C) for 15-20 minutes, or until the crust is lightly golden. Remove the parchment paper and pie weights and continue baking for another 5-10 minutes, or until the crust is golden brown.
Variations:
- Cherry Crumble Pie: Instead of a top crust, you can top the pie with a crumble topping made from flour, butter, sugar, and oats.
- Cherry Almond Pie: Add more almond extract to the filling or sprinkle sliced almonds on top of the crust before baking.
- Cherry Chocolate Pie: Add chocolate chips to the filling or drizzle melted chocolate over the top of the pie after baking.
- Spiced Cherry Pie: Add a pinch of cinnamon, nutmeg, or cloves to the filling for a warm, spiced flavor.
Conclusion:
And there you have it! This deep dish cherry pie recipe is more than just a dessert; it’s an experience. From the satisfyingly crisp, buttery crust to the burst of sweet and tart cherry filling, every bite is a little slice of heaven. I truly believe this pie deserves a spot on your baking repertoire, and here’s why: it’s surprisingly simple to make, even for beginner bakers. The instructions are straightforward, and the results are consistently impressive. Forget store-bought pies loaded with artificial flavors and preservatives; this homemade version is bursting with fresh, natural goodness that you can taste in every mouthful.
But the real magic lies in the flavor. The combination of sweet cherries and a hint of almond extract creates a symphony of flavors that will tantalize your taste buds. The deep dish format ensures a generous filling-to-crust ratio, so you get plenty of that delicious cherry goodness in every slice. It’s the perfect balance of sweet and tart, rich and comforting everything you could want in a classic cherry pie.
Now, let’s talk serving suggestions! While this pie is absolutely divine on its own, a scoop of vanilla ice cream or a dollop of freshly whipped cream takes it to the next level. The cold creaminess perfectly complements the warm, fruity pie, creating a delightful contrast in textures and temperatures. For a more sophisticated touch, try serving it with a drizzle of balsamic glaze or a sprinkle of chopped pistachios.
And don’t be afraid to experiment with variations! If you’re feeling adventurous, try adding a crumble topping made with oats, brown sugar, and butter for extra texture and sweetness. Or, for a more decadent treat, incorporate a layer of chocolate ganache beneath the cherry filling. You could even swap out some of the cherries for other fruits like raspberries or blueberries for a unique flavor twist. The possibilities are endless!
I’ve poured my heart and soul into perfecting this recipe, and I’m confident that you’ll love it as much as I do. It’s the perfect dessert for any occasion, from casual family gatherings to elegant dinner parties. Imagine the smiles on your loved ones’ faces when you present them with a slice of this homemade masterpiece. It’s a surefire way to impress and create lasting memories.
So, what are you waiting for? Grab your apron, gather your ingredients, and get baking! I promise you won’t regret it. This deep dish cherry pie is a guaranteed crowd-pleaser, and I can’t wait to hear about your experience.
Once you’ve tried this recipe, please come back and share your thoughts in the comments below. Did you make any variations? What did your family and friends think? I’m always eager to learn from your experiences and see how you’ve made this recipe your own. Happy baking, and enjoy every delicious bite! Don’t forget to rate the recipe too! Your feedback helps other bakers discover this amazing pie. I’m sure you’ll agree, this is the best deep dish cherry pie you’ll ever make!
Deep Dish Cherry Pie: The Ultimate Guide to Baking Perfection
Classic homemade cherry pie with a flaky, buttery crust and a sweet-tart cherry filling.
Ingredients
- 2 ½ cups all-purpose flour, plus more for dusting
- 1 teaspoon salt
- 1 cup (2 sticks) cold unsalted butter, cut into ½-inch cubes
- ½ cup cold vegetable shortening, cut into ½-inch pieces
- 6-8 tablespoons ice water
- 6 cups fresh or frozen pitted cherries (if frozen, thaw and drain well)
- ¾ cup granulated sugar (adjust to taste depending on cherry sweetness)
- ¼ cup cornstarch
- ¼ teaspoon almond extract
- 1 tablespoon lemon juice
- Pinch of salt
- 2 tablespoons unsalted butter, cut into small pieces
- 2 tablespoons milk or cream
- 1 tablespoon granulated sugar, for sprinkling
Instructions
- In a large bowl, whisk together the flour and salt.
- Add the cold butter and shortening to the flour mixture. Using a pastry blender or your fingertips (work quickly to keep the fat cold!), cut the fat into the flour until the mixture resembles coarse crumbs. You should still see some small pieces of butter and shortening these will create flaky layers in the crust. The size of the pieces should be about pea-sized.
- Gradually add the ice water, one tablespoon at a time, mixing gently after each addition. Use a fork or your hands to bring the dough together. Be careful not to overmix! Add just enough water until the dough starts to come together in a shaggy mass. The amount of water needed can vary depending on the humidity and the flour you’re using.
- Turn the dough out onto a lightly floured surface. Gently gather it into a ball. Divide the dough in half. Flatten each half into a disc, wrap tightly in plastic wrap, and refrigerate for at least 2 hours, or preferably overnight.
- In a large bowl, combine the cherries, sugar, cornstarch, almond extract, lemon juice, and salt. Gently toss to coat the cherries evenly.
- Let the cherry mixture sit for about 15-20 minutes, allowing the juices to release.
- Preheat your oven to 400°F (200°C). Place a baking sheet on the lower rack of the oven.
- On a lightly floured surface, roll out one of the dough discs into a 12-inch circle. Gently transfer the dough to the pie plate, pressing it into the bottom and up the sides. Trim the edges, leaving about a 1-inch overhang.
- Pour the cherry filling into the prepared pie crust. Dot the top of the filling with the small pieces of butter.
- Roll out the remaining dough disc into a 12-inch circle. Cut vents in the top crust to allow steam to escape during baking.
- Carefully place the top crust over the cherry filling. Trim the edges, leaving a 1-inch overhang.
- Fold the overhang of the top and bottom crusts under and crimp the edges using a fork or your fingers to create a decorative seal.
- Brush the top crust with milk or cream and sprinkle with granulated sugar.
- Place the pie on the preheated baking sheet in the oven. Bake for 50-60 minutes, or until the crust is golden brown and the filling is bubbling. If the crust starts to brown too quickly, you can cover the edges with aluminum foil.
- Remove the pie from the oven and let it cool completely on a wire rack before slicing and serving.
Notes
- Keep ingredients cold for a flaky crust.
- Don’t overmix the dough.
- Chill the dough for easier rolling.
- Use a baking sheet to catch drips.
- Cool completely before slicing.
- Adjust sugar to taste.
- Thaw and drain frozen cherries well.
- For an extra crispy bottom crust, blind bake the bottom crust before adding the filling.

Leave a Comment