
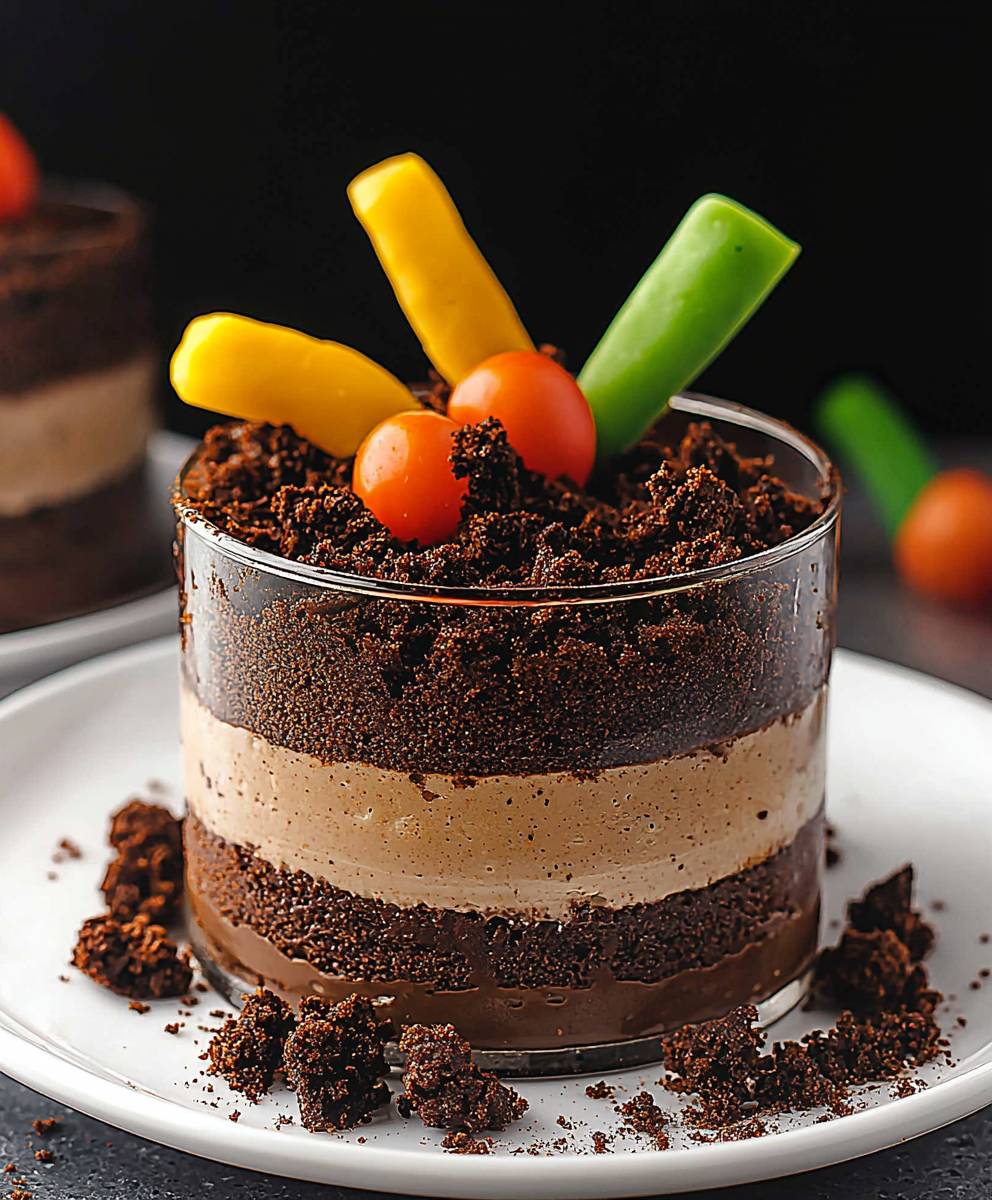
Dirt Cake: Prepare to unearth a dessert that’s as fun to make as it is to devour! Remember those childhood days spent digging in the garden? Well, this whimsical treat brings back all the joy, without the actual dirt (promise!). This isn’t just a cake; it’s an experience, a conversation starter, and a guaranteed crowd-pleaser for kids and adults alike.
While its exact origins are shrouded in a bit of mystery, dirt cake has become a staple at potlucks, birthday parties, and school events across America. Its playful presentation, mimicking a miniature garden, makes it an instant hit. But beyond the novelty, lies a surprisingly delicious combination of creamy pudding, rich chocolate cookies, and those adorable gummy worms that everyone loves.
What makes this dessert so irresistible? It’s the delightful contrast of textures the smooth, cool pudding against the crumbly, chocolatey “dirt.” The sweetness is perfectly balanced, and the gummy worms add a playful chewiness that keeps you coming back for more. Plus, it’s incredibly easy to make, requiring no baking and minimal effort. So, whether you’re looking for a nostalgic treat or a fun dessert to impress your friends, this dirt cake recipe is sure to be a winner!

Ingredients:
- 1 (15 ounce) package chocolate sandwich cookies (like Oreos)
- 1 (8 ounce) package cream cheese, softened
- 1/2 cup (1 stick) butter, softened
- 1 cup powdered sugar
- 1 (3.4 ounce) package instant vanilla pudding mix
- 3 cups milk
- 1 (12 ounce) container frozen whipped topping, thawed
- Gummy worms
- Optional: Crushed chocolate graham crackers for layering
- Optional: Fresh mint sprigs for garnish
- Optional: Small plastic flower decorations
Preparing the “Dirt”: Cookie Crumbs
Okay, let’s get started! The first thing we need to do is create our “dirt.” This is the fun part crushing the cookies!
- Crush the Cookies: The most important step! You have a couple of options here. You can use a food processor for a super fine, even crumb. Just pulse the cookies until they are finely ground. If you don’t have a food processor, no worries! Place the cookies in a large resealable bag. Seal the bag tightly, removing as much air as possible. Then, using a rolling pin, rolling back and forth over the bag until the cookies are crushed into fine crumbs. You can also use a meat mallet or even the bottom of a heavy pan. The key is to get them as fine as possible so it really resembles dirt.
- Reserve Some Crumbs: Before you use all the cookie crumbs, set aside about 1/2 cup to 1 cup for topping the finished dirt cake. This will give it that extra “dirt” look and make it look even more appealing.
Making the Creamy Filling
Now for the delicious, creamy filling that makes this dirt cake so irresistible! This part is super easy, I promise!
- Cream Together Cream Cheese and Butter: In a large bowl, using an electric mixer (either a stand mixer or a hand mixer), cream together the softened cream cheese and butter until they are light and fluffy. This is really important because you don’t want any lumps of cream cheese in your filling. Make sure both the cream cheese and butter are at room temperature for the best results. This usually takes about 2-3 minutes.
- Add Powdered Sugar: Gradually add the powdered sugar to the cream cheese and butter mixture, mixing on low speed until it is fully incorporated. Be careful not to add it all at once, or you’ll end up with a cloud of powdered sugar! Scrape down the sides of the bowl as needed to ensure everything is well combined.
- Prepare the Pudding: In a separate bowl, whisk together the instant vanilla pudding mix and the milk until the pudding starts to thicken. This usually takes about 2 minutes. It’s important to use instant pudding mix for this recipe, as it sets up quickly and helps to stabilize the filling.
- Combine Pudding and Cream Cheese Mixture: Gently fold the pudding mixture into the cream cheese mixture until everything is smooth and well combined. Be careful not to overmix, as this can deflate the filling.
- Fold in Whipped Topping: Finally, gently fold in the thawed whipped topping until everything is evenly distributed. Again, be gentle! You want to keep the filling light and airy.
Assembling the Dirt Cake
This is where the magic happens! We’re going to layer everything together to create our dirt cake masterpiece. You can use a large trifle bowl, a 9×13 inch baking dish, or even individual cups for serving. I personally love using a trifle bowl because it shows off all the beautiful layers.
- First Layer: Cookie Crumbs: Spread a layer of the crushed cookie crumbs on the bottom of your chosen dish. This will be the foundation of your dirt cake. Use about 1/3 of the cookie crumbs for this layer.
- Second Layer: Creamy Filling: Spread half of the creamy filling over the cookie crumb layer. Make sure to spread it evenly so that every bite is filled with deliciousness.
- Optional Layer: Chocolate Graham Cracker Crumbs: If you’re using chocolate graham crackers, sprinkle a layer of the crushed graham crackers over the creamy filling. This adds another layer of chocolatey goodness and a bit of texture.
- Third Layer: Cookie Crumbs: Add another layer of cookie crumbs, using about half of the remaining crumbs.
- Fourth Layer: Creamy Filling: Spread the remaining creamy filling over the cookie crumb layer.
- Final Layer: Cookie Crumbs: Top the dirt cake with the remaining cookie crumbs. This is where you’ll use the crumbs you reserved earlier.
Decorating the Dirt Cake
Now for the fun part decorating! This is where you can really get creative and make your dirt cake look like a real garden.
- Add Gummy Worms: Arrange gummy worms on top of the dirt cake, making them look like they are crawling out of the dirt. You can bury some of them partially in the cookie crumbs for a more realistic effect.
- Optional: Add Flowers: If you’re using plastic flowers, stick them into the dirt cake to create a garden scene. You can also use fresh mint sprigs for a more natural look.
- Optional: Add Other Decorations: Get creative! You can add other decorations like chocolate rocks, candy bugs, or even small toy shovels and rakes.
Chilling and Serving
Almost there! The final step is to chill the dirt cake so that the flavors can meld together and the filling can set up properly.
- Chill the Dirt Cake: Cover the dirt cake with plastic wrap and refrigerate for at least 4 hours, or preferably overnight. This will allow the flavors to meld together and the filling to firm up.
- Serve and Enjoy: Before serving, you can add a few more gummy worms or decorations if you like. Serve the dirt cake cold and enjoy!
Tips and Variations
- Make it Gluten-Free: Use gluten-free chocolate sandwich cookies and gluten-free instant vanilla pudding mix to make this dirt cake gluten-free.
- Add Chocolate Chips: Stir in some chocolate chips into the creamy filling for an extra chocolatey treat.
- Use Different Flavors of Pudding: Experiment with different flavors of instant pudding mix, such as chocolate, butterscotch, or cheesecake.
- Make Individual Dirt Cups: Layer the ingredients in individual cups for a fun and easy dessert. This is great for parties or picnics.
- Add a Layer of Brownie: For an even richer dessert, add a layer of crumbled brownies to the dirt cake.
- Use Different Types of Cookies: While Oreos are the classic choice, you can also use other types of chocolate sandwich cookies or even chocolate wafers.
- Make it Vegan: Use vegan cream cheese, vegan butter, vegan whipped topping, and vegan chocolate sandwich cookies to make this dirt cake vegan.
Storage Instructions
Store leftover dirt cake in the refrigerator for up to 3 days. Cover it tightly with plastic wrap to prevent it from drying out.
Enjoy!
I hope you enjoy making and eating this delicious dirt cake! It’s a fun and easy dessert that’s perfect for any occasion. Let me know in the comments if you try it and how it turns out!
Conclusion:
So, there you have it! This Dirt Cake recipe isn’t just a dessert; it’s a nostalgic trip back to childhood, a guaranteed crowd-pleaser, and surprisingly easy to make. I truly believe this is a must-try recipe for anyone looking to add a little fun and whimsy to their baking repertoire. The combination of creamy pudding, crunchy cookies, and those adorable gummy worms is simply irresistible. It’s the perfect dessert for birthday parties, potlucks, or even just a fun weekend treat.
But why is this particular Dirt Cake recipe so special? It’s all about the balance. We’ve carefully tweaked the ingredients to ensure the pudding is perfectly creamy, the cookie crumbs are just the right texture, and the overall sweetness is balanced without being overwhelming. Plus, the presentation is always a hit! Who can resist a dessert that looks like a miniature garden?
Now, let’s talk serving suggestions and variations. While the classic gummy worm topping is always a winner, feel free to get creative! You could add crushed Oreo “tombstones” for a spooky Halloween treat, or use different colored gummy candies to create a rainbow effect. For a more sophisticated twist, try using chocolate pudding instead of vanilla, or add a layer of fresh berries for a burst of flavor. You could even layer the ingredients in individual clear cups for a more elegant presentation.
Here are a few more ideas to spark your creativity:
Serving Suggestions:
- Serve chilled for the best flavor and texture.
- Garnish with fresh mint leaves for a pop of color.
- Pair with a scoop of vanilla ice cream for an extra decadent treat.
- Serve in individual flower pots for a truly authentic “dirt” experience.
Variations:
- Use different flavors of pudding, such as chocolate, butterscotch, or pistachio.
- Add a layer of cream cheese frosting for extra richness.
- Mix in chopped nuts or chocolate chips for added texture and flavor.
- Use gluten-free cookies for a gluten-free version.
- Create a layered parfait with the ingredients for a more elegant presentation.
I’m so excited for you to try this recipe! I know you’ll love it as much as I do. It’s a guaranteed hit with kids and adults alike, and it’s sure to bring a smile to everyone’s face.
So, what are you waiting for? Gather your ingredients, put on your apron, and get ready to create some delicious Dirt Cake magic! And don’t forget to share your creations with me! I’d love to see your photos and hear about your experiences. Tag me on social media using #MyDirtCakeAdventure or leave a comment below. I can’t wait to see what you come up with! Happy baking! I am confident that this recipe will become a staple in your dessert rotation. It’s simple, fun, and utterly delicious. Enjoy!
Dirt Cake: The Ultimate Guide to Making This Classic Dessert
A fun and easy no-bake dessert that looks like dirt! Layers of crushed chocolate cookies, creamy pudding filling, and gummy worms make this Dirt Cake a crowd-pleaser for kids and adults alike.
Ingredients
- 1 (15 ounce) package chocolate sandwich cookies (like Oreos)
- 1 (8 ounce) package cream cheese, softened
- 1/2 cup (1 stick) butter, softened
- 1 cup powdered sugar
- 1 (3.4 ounce) package instant vanilla pudding mix
- 3 cups milk
- 1 (12 ounce) container frozen whipped topping, thawed
- Gummy worms
- Optional: Crushed chocolate graham crackers for layering
- Optional: Fresh mint sprigs for garnish
- Optional: Small plastic flower decorations
Instructions
- Crush the Cookies: Crush the chocolate sandwich cookies in a food processor or in a resealable bag using a rolling pin until they are fine crumbs. Reserve 1/2 to 1 cup of the crumbs for topping.
- Cream Cheese Mixture: In a large bowl, cream together the softened cream cheese and butter with an electric mixer until light and fluffy (2-3 minutes).
- Add Powdered Sugar: Gradually add the powdered sugar to the cream cheese mixture, mixing on low speed until fully incorporated. Scrape down the sides of the bowl as needed.
- Prepare Pudding: In a separate bowl, whisk together the instant vanilla pudding mix and milk until the pudding starts to thicken (about 2 minutes).
- Combine Pudding and Cream Cheese: Gently fold the pudding mixture into the cream cheese mixture until smooth and well combined.
- Fold in Whipped Topping: Gently fold in the thawed whipped topping until evenly distributed.
- Assemble the Cake:
- Spread a layer of cookie crumbs on the bottom of a trifle bowl or 9×13 inch baking dish (about 1/3 of the crumbs).
- Spread half of the creamy filling over the cookie crumb layer.
- (Optional) Sprinkle a layer of crushed chocolate graham crackers over the creamy filling.
- Add another layer of cookie crumbs (about half of the remaining crumbs).
- Spread the remaining creamy filling over the cookie crumb layer.
- Top with the remaining cookie crumbs, including the reserved crumbs.
- Decorate: Arrange gummy worms on top of the dirt cake. Add plastic flowers or fresh mint sprigs, if desired.
- Chill: Cover the dirt cake with plastic wrap and refrigerate for at least 4 hours, or preferably overnight.
- Serve: Serve cold and enjoy!
Notes
- For a gluten-free version, use gluten-free chocolate sandwich cookies and gluten-free instant vanilla pudding mix.
- Stir in chocolate chips into the creamy filling for an extra chocolatey treat.
- Experiment with different flavors of instant pudding mix, such as chocolate, butterscotch, or cheesecake.
- Make individual dirt cups by layering the ingredients in individual cups.
- Add a layer of crumbled brownies to the dirt cake for an even richer dessert.
- Use different types of cookies, such as chocolate wafers, instead of Oreos.
- Make it vegan by using vegan cream cheese, vegan butter, vegan whipped topping, and vegan chocolate sandwich cookies.
- Store leftover dirt cake in the refrigerator for up to 3 days, covered tightly with plastic wrap.


Leave a Comment