
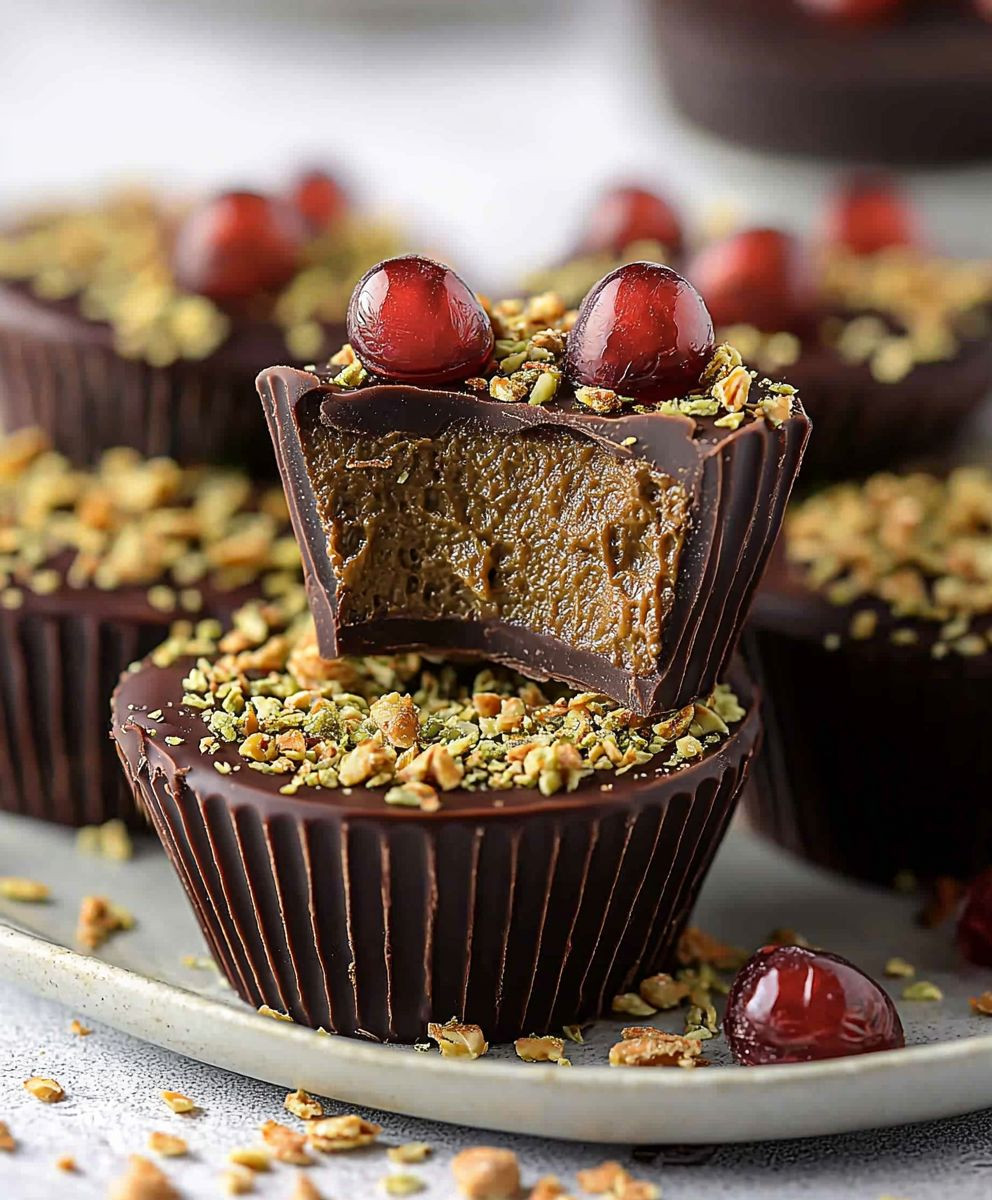
Dubai Chocolate Cups: Prepare to be transported to a world of decadent delight with these exquisite treats! Imagine sinking your teeth into a rich, creamy chocolate shell, filled with a luscious, date-infused caramel that whispers of Arabian nights. These aren’t just desserts; they’re an experience, a miniature edible journey to the heart of Dubai.
While the exact origins of these specific chocolate cups are modern, they draw inspiration from the rich culinary heritage of the Middle East, where dates are revered as a symbol of hospitality and sweetness. Dates have been a staple food in the region for millennia, and their natural caramel-like flavor pairs beautifully with the intensity of dark chocolate.
What makes Dubai Chocolate Cups so irresistible? It’s the perfect harmony of textures and flavors. The snap of the chocolate gives way to the smooth, chewy caramel, creating a symphony in your mouth. People adore these cups because they offer a sophisticated indulgence that’s surprisingly easy to make at home. They are perfect for impressing guests at a dinner party or simply treating yourself to a moment of pure bliss. Plus, the combination of chocolate and dates provides a boost of energy and antioxidants, making them a guilt-free pleasure. So, are you ready to embark on this delicious adventure with me? Let’s get started!

Ingredients:
- For the Chocolate Cups:
- 12 ounces high-quality dark chocolate (70% cacao or higher), finely chopped
- 1 tablespoon vegetable shortening (optional, for smoother melting)
- For the Date Filling:
- 1 cup Medjool dates, pitted and roughly chopped
- 1/4 cup heavy cream
- 2 tablespoons unsalted butter
- 1/4 teaspoon ground cardamom
- Pinch of sea salt
- For the Pistachio Garnish:
- 1/4 cup shelled pistachios, roughly chopped
- Optional Garnishes:
- Edible gold leaf
- Sea salt flakes
Preparing the Chocolate Cups:
Okay, let’s get started with the most important part the chocolate cups themselves! This requires a little patience, but trust me, it’s worth it. We’re going to temper the chocolate to give it that beautiful shine and snap.
- Melt the Chocolate: Place the chopped chocolate and vegetable shortening (if using) in a heat-safe bowl set over a saucepan of simmering water (double boiler). Make sure the bottom of the bowl doesn’t touch the water. Stir frequently until the chocolate is completely melted and smooth. Alternatively, you can melt the chocolate in the microwave in 30-second intervals, stirring in between, until melted. Be careful not to overheat it!
- Temper the Chocolate (Method 1 – Seeding): This is my preferred method. Remove the melted chocolate from the heat. Add about 1/3 of the chopped chocolate (that hasn’t been melted) to the melted chocolate and stir continuously until the added chocolate is completely melted and the mixture is smooth. This “seeds” the chocolate and helps it to temper properly. You can check the temper by spreading a small amount of chocolate on parchment paper and placing it in the fridge for a few minutes. If it sets up shiny and snaps cleanly, you’ve done it right!
- Temper the Chocolate (Method 2 – Temperature Control): If you have a candy thermometer, you can use this method. Melt the chocolate as described above. Then, remove from heat and let it cool to around 88-90°F (31-32°C) for dark chocolate. Stir frequently to ensure even cooling. Then, gently warm it back up to 90-92°F (32-33°C). This process helps to stabilize the cocoa butter crystals in the chocolate.
- Prepare the Cup Molds: You can use silicone molds or paper cupcake liners placed in a muffin tin. Silicone molds are easier to remove the cups from, but paper liners work just fine.
- Coat the Molds: Spoon about a tablespoon of the tempered chocolate into each mold. Use the back of a spoon to spread the chocolate evenly up the sides of the mold, creating a thin, even layer. Make sure to cover the entire surface.
- Chill the First Layer: Place the molds in the refrigerator for about 10-15 minutes, or until the chocolate is firm.
- Second Layer (Optional but Recommended): Remove the molds from the refrigerator and apply a second layer of chocolate, repeating the spreading process. This will make the cups sturdier and less likely to break.
- Chill Again: Return the molds to the refrigerator for another 10-15 minutes, or until the chocolate is completely set.
- Remove the Cups: Once the chocolate is firm, gently peel the silicone molds away from the chocolate cups. If using paper liners, carefully peel them away. If the cups are sticking, you can try placing them in the freezer for a few minutes to help them release.
Making the Date Filling:
Now for the delicious, gooey date filling! This is where the Dubai magic really happens. The combination of dates, cream, and cardamom is just divine.
- Prepare the Dates: If your dates are very dry, you can soak them in warm water for about 10 minutes to soften them. Drain them well before proceeding.
- Combine Ingredients: In a medium saucepan, combine the chopped dates, heavy cream, butter, cardamom, and sea salt.
- Cook the Filling: Place the saucepan over medium heat and cook, stirring constantly, until the dates have softened and the mixture has thickened into a smooth, paste-like consistency. This should take about 5-7 minutes. If the mixture seems too thick, you can add a tablespoon or two more of heavy cream.
- Cool Slightly: Remove the saucepan from the heat and let the date filling cool slightly before filling the chocolate cups. This will prevent the chocolate from melting.
Assembling the Dubai Chocolate Cups:
Almost there! Now it’s time to put everything together and create these little bites of heaven.
- Fill the Chocolate Cups: Spoon the date filling into the chocolate cups, filling them almost to the top.
- Garnish with Pistachios: Sprinkle the chopped pistachios over the date filling in each cup.
- Optional Garnishes: If desired, add a small piece of edible gold leaf or a sprinkle of sea salt flakes to each cup for an extra touch of elegance.
- Chill (Optional): You can chill the filled chocolate cups in the refrigerator for about 10-15 minutes to help the filling set up slightly, but they are also delicious served at room temperature.
- Serve and Enjoy! These Dubai Chocolate Cups are best enjoyed within a few days of making them. Store them in an airtight container in the refrigerator.
Tips and Tricks for Perfect Dubai Chocolate Cups:
- Use High-Quality Chocolate: The quality of the chocolate will greatly impact the flavor of the final product. Opt for a good quality dark chocolate with a high cacao percentage (70% or higher).
- Don’t Overheat the Chocolate: Overheating the chocolate can cause it to seize and become grainy. Melt it slowly and carefully, stirring frequently.
- Tempering is Key: Tempering the chocolate is essential for achieving a shiny, snappy finish. If you’re new to tempering, don’t be discouraged if it takes a few tries to get it right. Practice makes perfect!
- Adjust the Sweetness: If you prefer a sweeter filling, you can add a tablespoon or two of honey or maple syrup to the date mixture.
- Get Creative with Garnishes: Feel free to experiment with different garnishes. Other options include chopped almonds, shredded coconut, or a drizzle of melted white chocolate.
- Make Ahead: You can make the chocolate cups and date filling ahead of time and store them separately. Assemble the cups just before serving.
- Storage: Store the finished chocolate cups in an airtight container in the refrigerator for up to 3 days.
Troubleshooting:
- Chocolate is Seizing: If your chocolate seizes (becomes thick and grainy), try adding a tablespoon of hot water and stirring vigorously. This can sometimes help to bring it back together.
- Chocolate Cups are Sticking to the Molds: If the chocolate cups are sticking to the molds, try placing them in the freezer for a few minutes to help them release. You can also gently tap the molds on a hard surface to loosen the cups.
- Date Filling is Too Thick: If the date filling is too thick, add a tablespoon or two more of heavy cream until it reaches the desired consistency.
- Date Filling is Too Thin: If the date filling is too thin, cook it for a few more minutes, stirring constantly, until it thickens up.
Variations:
- Milk Chocolate Cups: If you prefer milk chocolate, you can use milk chocolate instead of dark chocolate for the cups.
- White Chocolate Cups: For a sweeter option, try using white chocolate for the cups.
- Nut Butter Filling: Replace the date filling with a nut butter filling made from almond butter, peanut butter, or cashew butter.
- Coffee Filling: Add a teaspoon of instant coffee powder to the date filling for a coffee-flavored twist.
- Spice it Up: Add a pinch of chili powder to the date filling for a spicy kick.
Conclusion:
This isn’t just another dessert recipe; it’s a passport to a luxurious, melt-in-your-mouth experience. These Dubai Chocolate Cups are truly a must-try for anyone who appreciates the finer things in life, or simply wants to impress their friends and family with a show-stopping treat. The combination of rich, dark chocolate, the subtle spice of cardamom, and the creamy, date-infused filling creates a symphony of flavors that will dance on your palate. I promise you, once you take that first bite, you’ll understand why I’m so enthusiastic about this recipe! But the best part? It’s surprisingly easy to make! Don’t let the elegant presentation fool you; with just a few simple steps and readily available ingredients, you can whip up a batch of these decadent cups in no time. Forget spending a fortune at a fancy bakery; now you can create your own gourmet desserts right in your own kitchen. And the possibilities are endless! While I’ve shared my favorite version, feel free to get creative and experiment with different variations. For a truly indulgent experience, try adding a dollop of whipped cream or a scoop of vanilla ice cream on top. A sprinkle of chopped pistachios or a drizzle of salted caramel would also be divine. If you’re feeling adventurous, you could even incorporate other spices like cinnamon or nutmeg into the chocolate mixture. For serving suggestions, these Dubai Chocolate Cups are perfect as an after-dinner treat, a special occasion dessert, or even a luxurious afternoon snack. They also make a wonderful gift for friends and loved ones. Imagine presenting a beautifully arranged box of these homemade delights they’re sure to be impressed! You can serve them chilled, straight from the refrigerator, or at room temperature, depending on your preference. I personally love them slightly chilled, as it enhances the contrast between the cool chocolate and the warm, spiced filling. Don’t be intimidated by the name; this recipe is designed to be accessible to bakers of all skill levels. I’ve included detailed instructions and helpful tips to guide you through each step of the process. And if you have any questions along the way, don’t hesitate to reach out in the comments section below. I’m always happy to help! So, what are you waiting for? Gather your ingredients, preheat your oven, and get ready to embark on a culinary adventure. I’m confident that you’ll absolutely love these Dubai Chocolate Cups as much as I do. They’re the perfect blend of elegance, flavor, and simplicity. I’m so excited for you to try this recipe! Once you’ve made your own batch of these delightful treats, I would absolutely love to hear about your experience. Share your photos and comments on social media using the hashtag #DubaiChocolateCups, or leave a review on the recipe page. I can’t wait to see your creations and hear your feedback! Happy baking! Let me know what variations you tried and how they turned out. Your insights might inspire other bakers to try new and exciting combinations. Let’s build a community of chocolate lovers, one delicious cup at a time! PrintDubai Chocolate Cups: A Decadent Guide to the Best Treats
Decadent dark chocolate cups filled with a rich, cardamom-spiced date filling and topped with pistachios. A taste of Dubai in every bite!
- Prep Time: 30 minutes
- Cook Time: 15 minutes
- Total Time: 45 minutes
- Yield: 12–15 chocolate cups 1x
Ingredients
- 12 ounces high-quality dark chocolate (70% cacao or higher), finely chopped
- 1 tablespoon vegetable shortening (optional, for smoother melting)
- 1 cup Medjool dates, pitted and roughly chopped
- 1/4 cup heavy cream
- 2 tablespoons unsalted butter
- 1/4 teaspoon ground cardamom
- Pinch of sea salt
- 1/4 cup shelled pistachios, roughly chopped
- Edible gold leaf
- Sea salt flakes
Instructions
- Melt the Chocolate: Place the chopped chocolate and vegetable shortening (if using) in a heat-safe bowl set over a saucepan of simmering water (double boiler). Make sure the bottom of the bowl doesn’t touch the water. Stir frequently until the chocolate is completely melted and smooth. Alternatively, you can melt the chocolate in the microwave in 30-second intervals, stirring in between, until melted. Be careful not to overheat it!
- Temper the Chocolate (Method 1 – Seeding): This is my preferred method. Remove the melted chocolate from the heat. Add about 1/3 of the chopped chocolate (that hasn’t been melted) to the melted chocolate and stir continuously until the added chocolate is completely melted and the mixture is smooth. This “seeds” the chocolate and helps it to temper properly. You can check the temper by spreading a small amount of chocolate on parchment paper and placing it in the fridge for a few minutes. If it sets up shiny and snaps cleanly, you’ve done it right!
- Temper the Chocolate (Method 2 – Temperature Control): If you have a candy thermometer, you can use this method. Melt the chocolate as described above. Then, remove from heat and let it cool to around 88-90°F (31-32°C) for dark chocolate. Stir frequently to ensure even cooling. Then, gently warm it back up to 90-92°F (32-33°C). This process helps to stabilize the cocoa butter crystals in the chocolate.
- Prepare the Cup Molds: You can use silicone molds or paper cupcake liners placed in a muffin tin. Silicone molds are easier to remove the cups from, but paper liners work just fine.
- Coat the Molds: Spoon about a tablespoon of the tempered chocolate into each mold. Use the back of a spoon to spread the chocolate evenly up the sides of the mold, creating a thin, even layer. Make sure to cover the entire surface.
- Chill the First Layer: Place the molds in the refrigerator for about 10-15 minutes, or until the chocolate is firm.
- Second Layer (Optional but Recommended): Remove the molds from the refrigerator and apply a second layer of chocolate, repeating the spreading process. This will make the cups sturdier and less likely to break.
- Chill Again: Return the molds to the refrigerator for another 10-15 minutes, or until the chocolate is completely set.
- Remove the Cups: Once the chocolate is firm, gently peel the silicone molds away from the chocolate cups. If using paper liners, carefully peel them away. If the cups are sticking, you can try placing them in the freezer for a few minutes to help them release.
- Prepare the Dates: If your dates are very dry, you can soak them in warm water for about 10 minutes to soften them. Drain them well before proceeding.
- Combine Ingredients: In a medium saucepan, combine the chopped dates, heavy cream, butter, cardamom, and sea salt.
- Cook the Filling: Place the saucepan over medium heat and cook, stirring constantly, until the dates have softened and the mixture has thickened into a smooth, paste-like consistency. This should take about 5-7 minutes. If the mixture seems too thick, you can add a tablespoon or two more of heavy cream.
- Cool Slightly: Remove the saucepan from the heat and let the date filling cool slightly before filling the chocolate cups. This will prevent the chocolate from melting.
- Fill the Chocolate Cups: Spoon the date filling into the chocolate cups, filling them almost to the top.
- Garnish with Pistachios: Sprinkle the chopped pistachios over the date filling in each cup.
- Optional Garnishes: If desired, add a small piece of edible gold leaf or a sprinkle of sea salt flakes to each cup for an extra touch of elegance.
- Chill (Optional): You can chill the filled chocolate cups in the refrigerator for about 10-15 minutes to help the filling set up slightly, but they are also delicious served at room temperature.
- Serve and Enjoy! These Dubai Chocolate Cups are best enjoyed within a few days of making them. Store them in an airtight container in the refrigerator.
Notes
- Use high-quality chocolate for the best flavor.
- Don’t overheat the chocolate, melt it slowly and carefully.
- Tempering the chocolate is essential for a shiny, snappy finish.
- Adjust the sweetness of the filling to your preference.
- Get creative with garnishes!
- The chocolate cups and date filling can be made ahead of time.
- Store finished chocolate cups in an airtight container in the refrigerator for up to 3 days.


Leave a Comment