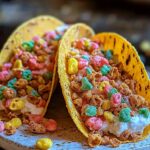
Fruity Pebbles Cheesecake Tacos: A Deliciously Fun Dessert Recipe
Crunchy Fruity Pebbles taco shells filled with creamy cheesecake filling, topped with whipped cream and more Fruity Pebbles! A fun and colorful dessert that’s sure to be a hit.
- Prep Time: 25 minutes
- Cook Time: 10 minutes
- Total Time: 60 minutes
- Yield: 6-8 tacos 1x
Ingredients
Scale
- 2 cups Fruity Pebbles cereal
- 4 tablespoons unsalted butter, melted
- 2 tablespoons granulated sugar
- 16 ounces cream cheese, softened
- 1 cup powdered sugar
- 1 teaspoon vanilla extract
- 1/2 cup heavy cream
- 1/4 cup Fruity Pebbles cereal, crushed (for mixing into the filling)
- 1 cup whipped cream
- 1/2 cup Fruity Pebbles cereal, whole (for garnish)
- Fresh berries (strawberries, blueberries, raspberries), optional
- Chocolate syrup, optional
Instructions
- Preheat oven to 350°F (175°C). Line a baking sheet with parchment paper.
- Pulse the 2 cups of Fruity Pebbles cereal in a food processor until you have a fine, almost sandy texture. If you don’t have a food processor, you can place the cereal in a large zip-top bag and crush it with a rolling pin.
- In a medium bowl, combine the crushed Fruity Pebbles, melted butter, and granulated sugar. Mix well until everything is evenly coated.
- Take about 2-3 tablespoons of the Fruity Pebbles mixture and press it onto the prepared baking sheet in a circle, approximately 4-5 inches in diameter. Repeat with the remaining mixture, leaving some space between each circle.
- Bake for 8-10 minutes, or until they are lightly golden around the edges and slightly firm to the touch.
- As soon as you remove the baking sheet from the oven, carefully and quickly fold each warm Fruity Pebbles circle in half to create a taco shell shape. Hold the folded shape for a few seconds until it starts to set. To help them maintain their shape while cooling, you can prop them up between the bars of an oven rack or use a muffin tin to hold them in place.
- Allow the Fruity Pebbles taco shells to cool completely on the baking sheet or in the muffin tin.
- Make sure your cream cheese is completely softened before you start.
- In a large bowl, beat the softened cream cheese with the powdered sugar using an electric mixer until smooth and creamy.
- Add the vanilla extract to the cream cheese mixture and beat until combined.
- Gradually add the heavy cream to the cream cheese mixture, beating on medium speed until the filling is light and fluffy.
- Gently fold in the crushed Fruity Pebbles cereal into the cheesecake filling.
- Cover the bowl with plastic wrap and refrigerate the cheesecake filling for at least 30 minutes to allow it to firm up slightly.
- Carefully spoon or pipe the chilled cheesecake filling into each Fruity Pebbles taco shell.
- Top each filled taco shell with a dollop of whipped cream.
- Sprinkle the tops of the tacos with whole Fruity Pebbles cereal for added crunch and visual appeal.
- If desired, add fresh berries (strawberries, blueberries, raspberries) and/or a drizzle of chocolate syrup to the tacos.
- Serve immediately.
Notes
- Make Ahead: You can make the Fruity Pebbles taco shells and the cheesecake filling ahead of time and store them separately. Assemble the tacos just before serving.
- Different Cereal: Feel free to experiment with other cereals! Cocoa Pebbles, Cinnamon Toast Crunch, or even Lucky Charms would all be delicious.
- Chocolate Shells: Dip the finished Fruity Pebbles taco shells in melted chocolate for an extra decadent treat.
- Fruit Filling: Add a layer of fruit filling (such as strawberry jam or blueberry compote) to the taco shells before adding the cheesecake filling.
- Mini Tacos: Make mini Fruity Pebbles Cheesecake Tacos by using smaller circles of cereal mixture to create smaller taco shells. These are perfect for parties or individual servings.
Find it online: https://mmmflavors.com/fruity-pebbles-cheesecake-tacos/
