
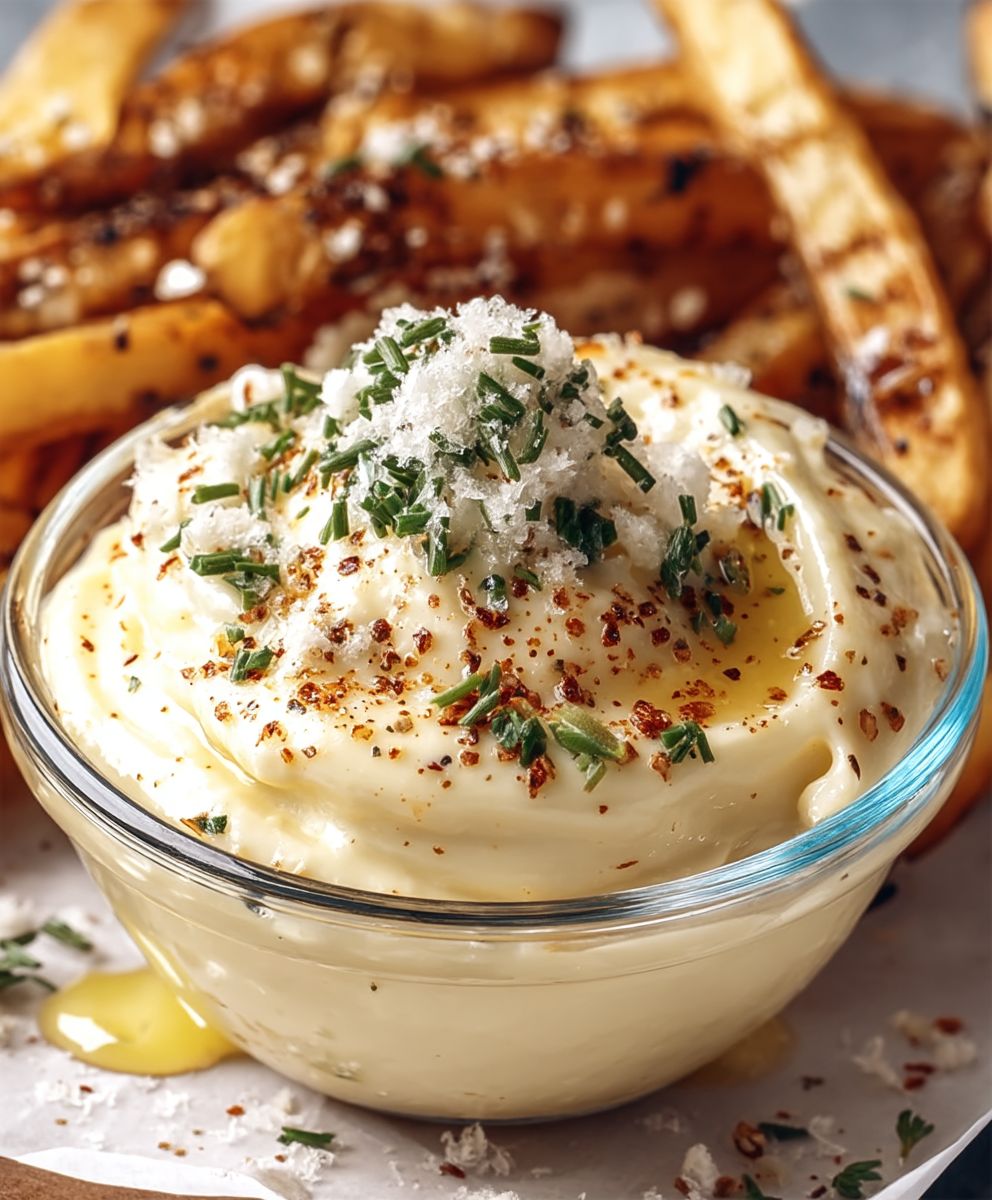
Garlic Aioli, that creamy, dreamy, garlicky goodness, is about to become your new favorite condiment! Forget boring mayonnaise; this vibrant sauce will elevate everything from simple sandwiches to grilled seafood to a whole new level of deliciousness. Have you ever wondered how a few simple ingredients can create such an explosion of flavor? I certainly have, and I’m excited to share my foolproof recipe with you.
While variations exist across the Mediterranean, the roots of aioli can be traced back to ancient times. The word itself comes from the Catalan “all i oli,” meaning “garlic and oil.” Traditionally, it was made with just those two ingredients, laboriously emulsified by hand with a mortar and pestle. Thankfully, we have modern conveniences to speed up the process, but the essence remains the same: pure, unadulterated garlic flavor suspended in a luscious, creamy base.
People adore garlic aioli for its incredible versatility and bold taste. The pungent garlic perfectly complements the richness of the emulsion, creating a flavor profile that’s both satisfying and addictive. Whether you’re dipping crispy fries, spreading it on a juicy burger, or using it as a vibrant sauce for roasted vegetables, this simple condiment adds a touch of magic to any dish. Plus, it’s surprisingly easy to make at home, allowing you to customize the garlic intensity to your liking. So, are you ready to unlock the secrets to the perfect homemade aioli? Let’s get started!

Ingredients:
- 1 cup mayonnaise (preferably homemade for the best flavor, but store-bought works too!)
- 4-6 cloves garlic, minced (adjust to your garlic preference I love a strong garlic flavor!)
- 1-2 tablespoons lemon juice, freshly squeezed (this brightens everything up!)
- 1-2 tablespoons extra virgin olive oil (adds richness and depth)
- 1/4 teaspoon salt (or more, to taste)
- 1/8 teaspoon black pepper (freshly ground is best!)
- Optional: Pinch of cayenne pepper (for a little kick!)
- Optional: 1 tablespoon finely chopped fresh parsley or chives (for added freshness and color)
Preparing the Garlic Aioli:
- Mince the Garlic: This is the most crucial step! You want the garlic to be finely minced so it incorporates evenly into the aioli. I recommend using a garlic press if you have one, or carefully mincing it with a sharp knife. The finer the mince, the less likely you are to have large, overpowering pieces of garlic. If you’re feeling adventurous, you can even roast the garlic for a sweeter, milder flavor. To roast, wrap a whole head of garlic in foil with a drizzle of olive oil and bake at 400°F (200°C) for about 45 minutes, or until soft. Let it cool slightly, then squeeze out the roasted garlic cloves and mash them before adding to the aioli.
- Combine the Ingredients: In a medium-sized bowl, add the mayonnaise, minced garlic, lemon juice, olive oil, salt, and pepper. If you’re using cayenne pepper or fresh herbs, add them now as well.
- Whisk Vigorously: Now, whisk all the ingredients together until they are thoroughly combined and the aioli is smooth and creamy. This might take a minute or two, but it’s important to ensure that the garlic is evenly distributed and the flavors are well-blended. You can also use an immersion blender for an even smoother texture. Just be careful not to over-blend, as this can make the aioli too thin.
- Taste and Adjust: This is where you get to customize the aioli to your liking! Taste the aioli and adjust the seasonings as needed. If you want a stronger garlic flavor, add another clove of minced garlic. If you prefer a tangier aioli, add a little more lemon juice. If it needs more salt or pepper, add a pinch at a time until it reaches your desired flavor. Don’t be afraid to experiment!
- Chill and Let the Flavors Meld: This is a crucial step! Cover the bowl with plastic wrap and refrigerate the aioli for at least 30 minutes, or preferably an hour or two. This allows the flavors to meld together and the garlic to mellow out slightly. The longer it chills, the better it will taste! I often make it a day ahead of time for the best flavor.
Tips and Variations:
Here are some ideas to elevate your garlic aioli:
- Smoked Paprika Aioli: Add 1/2 teaspoon of smoked paprika for a smoky and slightly sweet flavor.
- Chipotle Aioli: Add 1-2 teaspoons of adobo sauce from a can of chipotle peppers in adobo sauce for a spicy and smoky kick.
- Herb Aioli: Experiment with different fresh herbs like dill, tarragon, or basil. Finely chop about 1-2 tablespoons of your favorite herb and add it to the aioli.
- Roasted Red Pepper Aioli: Roast a red bell pepper until the skin is blackened. Peel off the skin, remove the seeds, and puree the pepper in a food processor. Add about 2-3 tablespoons of the roasted red pepper puree to the aioli.
- Saffron Aioli: Infuse a pinch of saffron threads in a tablespoon of warm water for about 10 minutes. Add the saffron and the infused water to the aioli for a luxurious and flavorful twist.
- Vegan Aioli: Use vegan mayonnaise instead of regular mayonnaise. You can find vegan mayonnaise at most grocery stores.
Serving Suggestions:
Garlic aioli is incredibly versatile and can be used in so many ways! Here are some of my favorite serving suggestions:
- As a Dip: Serve it as a dip for vegetables, fries, sweet potato fries, or grilled artichokes.
- As a Spread: Use it as a spread for sandwiches, burgers, or wraps. It’s especially delicious on a grilled chicken sandwich or a veggie burger.
- As a Sauce: Drizzle it over grilled fish, chicken, or vegetables. It’s also great with roasted potatoes or asparagus.
- With Seafood: It’s a classic accompaniment to seafood dishes like grilled shrimp, calamari, or crab cakes.
- With Eggs: Serve it alongside scrambled eggs, omelets, or frittatas.
- As a Salad Dressing: Thin it out with a little water or lemon juice and use it as a creamy salad dressing.
Storing Garlic Aioli:
Store leftover garlic aioli in an airtight container in the refrigerator for up to 3-4 days. The flavor may intensify over time, so keep that in mind. If you notice any signs of spoilage, such as a sour smell or discoloration, discard it immediately.
Troubleshooting:
Sometimes, things don’t go exactly as planned. Here are some common issues and how to fix them:
- Aioli is too thin: If your aioli is too thin, you can try adding a little more mayonnaise to thicken it up. Whisk it in gradually until you reach your desired consistency.
- Aioli is too thick: If your aioli is too thick, you can thin it out with a little water or lemon juice. Add it a teaspoon at a time until it reaches your desired consistency.
- Aioli is too garlicky: If your aioli is too garlicky, you can try adding a little more mayonnaise or lemon juice to balance out the flavor. You can also let it sit in the refrigerator for a longer period of time, as the garlic flavor will mellow out over time.
- Aioli is too bland: If your aioli is too bland, you can add more salt, pepper, or lemon juice to enhance the flavor. You can also try adding a pinch of cayenne pepper or some fresh herbs for added complexity.
- Aioli is bitter: Sometimes, garlic can become bitter if it’s overcooked or if it’s old. If your aioli is bitter, it’s best to start over with fresh garlic. You can also try roasting the garlic to mellow out its flavor.
Why Homemade is Best (But Store-Bought Works!):
While store-bought mayonnaise is perfectly acceptable for this recipe, I truly believe that homemade mayonnaise elevates the aioli to a whole new level. The flavor is richer, the texture is creamier, and you have complete control over the ingredients. If you’re feeling ambitious, I highly recommend trying to make your own mayonnaise. There are tons of great recipes online, and it’s surprisingly easy to do! However, if you’re short on time or just not in the mood to make mayonnaise from scratch, don’t worry store-bought will still work just fine. Just be sure to choose a high-quality mayonnaise for the best results.
Garlic: The Star of the Show
The garlic is the heart and soul of this aioli, so it’s important to choose good quality garlic. Look for firm, plump cloves with no signs of sprouting or bruising. Fresh garlic will have a stronger flavor than older garlic. As I mentioned earlier, you can adjust the amount of garlic to your liking. If you’re not a big fan of garlic, start with 4 cloves and add more if needed. If you’re a garlic lover like me, feel free to use 6 or even more! Just be aware that the garlic flavor will intensify over time, so it’s best to start with less and add more if necessary.
Lemon Juice: The Brightening Agent
The lemon juice adds a bright, tangy flavor that balances out the richness of the mayonnaise and the pungency of the garlic. Freshly squeezed lemon juice is always best, as it has a brighter and more vibrant flavor than bottled lemon juice. If you don’t have any fresh lemons on hand, you can use bottled lemon juice, but be sure to choose a high-quality brand. You can also experiment with other citrus juices, such as lime juice or orange juice, for a different flavor profile.
Olive Oil: The Finishing Touch
The olive oil adds richness and depth to the aioli.
Conclusion:
This isn’t just another condiment; it’s a flavor explosion waiting to happen! I truly believe this Garlic Aioli recipe is a must-try for anyone who loves bold, creamy, and utterly delicious additions to their meals. It’s incredibly versatile, surprisingly easy to make, and elevates even the simplest dishes to gourmet status. Forget the bland store-bought stuff; once you’ve tasted homemade aioli, you’ll never go back.
Why is it a must-try? Because it’s more than just garlic and mayonnaise. It’s a symphony of flavors, a perfect balance of creamy richness, pungent garlic, and bright lemon. It’s the kind of sauce that makes you want to lick the bowl clean (and trust me, I have!). Plus, the satisfaction of creating something so delicious from scratch is incredibly rewarding. You control the ingredients, ensuring the highest quality and the perfect level of garlic intensity to suit your taste.
But the real magic lies in its versatility. Think beyond dipping! This aioli is fantastic slathered on sandwiches and burgers, adding a creamy, garlicky kick that takes them to the next level. Imagine a juicy grilled chicken sandwich with crispy bacon and a generous dollop of this aioli pure heaven! It’s also incredible with roasted vegetables, transforming simple carrots, broccoli, or Brussels sprouts into a delectable side dish. I love using it as a dipping sauce for fries, sweet potato fries, or even onion rings. And don’t even get me started on how amazing it is with seafood! Grilled shrimp, pan-seared scallops, or even a simple fish taco are all elevated by the creamy, garlicky goodness of this aioli.
Serving Suggestions and Variations:
The possibilities are truly endless! For a spicier kick, add a pinch of cayenne pepper or a dash of your favorite hot sauce. If you’re feeling adventurous, try adding a tablespoon of chopped fresh herbs like parsley, chives, or dill for a burst of freshness. A squeeze of lime juice instead of lemon juice can also add a unique twist. For a smoky flavor, try using smoked paprika. And if you’re looking for a vegan option, simply substitute the mayonnaise with your favorite vegan mayonnaise alternative. You can even roast the garlic before making the aioli for a sweeter, more mellow garlic flavor.
Don’t be afraid to experiment and make it your own!
I’m confident that this Garlic Aioli will become a staple in your kitchen. It’s the perfect way to add a touch of gourmet flair to your everyday meals. It’s quick, easy, and incredibly satisfying to make.
So, what are you waiting for? Gather your ingredients, follow the simple steps, and prepare to be amazed. I promise you won’t be disappointed.
Now, I want to hear from you! Once you’ve tried this recipe, please share your experience in the comments below. Let me know what you thought, what variations you tried, and what dishes you paired it with. I’m always eager to hear your feedback and learn from your culinary adventures. Happy cooking!
Garlic Aioli: The Ultimate Guide to Making Perfect Aioli
Creamy and flavorful garlic aioli, perfect as a dip, spread, or sauce. Easy to customize with variations like smoked paprika, chipotle, or fresh herbs.
Ingredients
- 1 cup mayonnaise (preferably homemade)
- 4-6 cloves garlic, minced
- 1-2 tablespoons lemon juice, freshly squeezed
- 1-2 tablespoons extra virgin olive oil
- 1/4 teaspoon salt (or to taste)
- 1/8 teaspoon black pepper (freshly ground)
- Optional: Pinch of cayenne pepper
- Optional: 1 tablespoon finely chopped fresh parsley or chives
Instructions
- Mince the Garlic: Mince garlic finely. A garlic press is recommended. For a milder flavor, roast garlic (wrap a whole head of garlic in foil with a drizzle of olive oil and bake at 400°F (200°C) for about 45 minutes, or until soft. Let it cool slightly, then squeeze out the roasted garlic cloves and mash them before adding to the aioli.)
- Combine Ingredients: In a medium bowl, combine mayonnaise, minced garlic, lemon juice, olive oil, salt, pepper, cayenne pepper (if using), and herbs (if using).
- Whisk Vigorously: Whisk all ingredients until smooth and creamy. An immersion blender can be used for an even smoother texture.
- Taste and Adjust: Taste and adjust seasonings as needed. Add more garlic for a stronger flavor, more lemon juice for tanginess, or salt and pepper to taste.
- Chill and Let Flavors Meld: Cover and refrigerate for at least 30 minutes (preferably 1-2 hours) to allow flavors to meld.
Notes
- Variations:
- Smoked Paprika Aioli: Add 1/2 teaspoon of smoked paprika.
- Chipotle Aioli: Add 1-2 teaspoons of adobo sauce from canned chipotle peppers.
- Herb Aioli: Add 1-2 tablespoons of finely chopped fresh herbs (dill, tarragon, basil).
- Roasted Red Pepper Aioli: Add 2-3 tablespoons of roasted red pepper puree.
- Saffron Aioli: Infuse a pinch of saffron threads in a tablespoon of warm water for about 10 minutes. Add the saffron and the infused water to the aioli.
- Vegan Aioli: Use vegan mayonnaise.
- Serving Suggestions: Serve as a dip for vegetables, fries, or grilled artichokes; as a spread for sandwiches or burgers; as a sauce for grilled fish, chicken, or vegetables; with seafood or eggs; or as a salad dressing.
- Storage: Store in an airtight container in the refrigerator for up to 3-4 days.
- Troubleshooting:
- Too Thin: Add more mayonnaise.
- Too Thick: Thin with water or lemon juice.
- Too Garlicky: Add more mayonnaise or lemon juice, or chill longer.
- Too Bland: Add more salt, pepper, or lemon juice.
- Bitter: Start over with fresh garlic or roast the garlic.
- Homemade mayonnaise is recommended for the best flavor.
- Use fresh, high-quality garlic and lemon juice.


Leave a Comment