
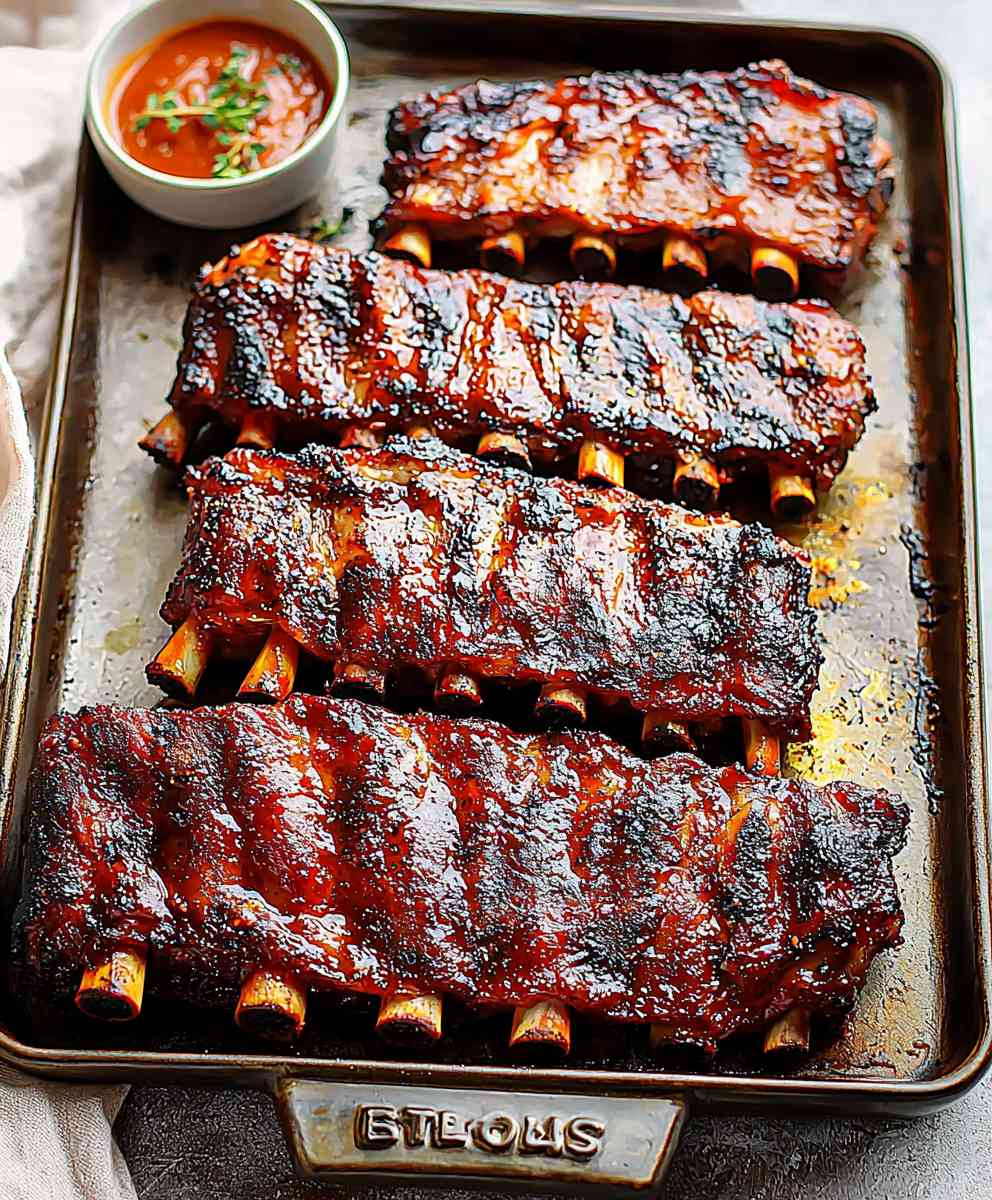
Grilled Ribs: the very words conjure up images of smoky barbecues, lazy summer afternoons, and the satisfying crunch of perfectly charred meat. But achieving that restaurant-quality tenderness and flavor at home can feel like a daunting task. Fear not, fellow grill enthusiasts! I’m here to guide you through the secrets to crafting the most delectable, fall-off-the-bone grilled ribs you’ve ever tasted.
Ribs, in their various forms, have been a staple in cuisines around the world for centuries. From the slow-smoked traditions of the American South to the honey-glazed versions found in Asian cooking, the humble rib has proven its versatility and enduring appeal. In many cultures, sharing ribs is a communal experience, a symbol of friendship and celebration.
What is it about ribs that makes them so irresistible? It’s the perfect combination of textures the crispy, caramelized exterior giving way to the succulent, melt-in-your-mouth meat. The rich, savory flavor, often enhanced by a carefully crafted rub or marinade, is simply addictive. And let’s be honest, there’s something inherently satisfying about gnawing on a bone and savoring every last morsel. Whether you’re a seasoned pitmaster or a grilling novice, this recipe will empower you to create ribs that will impress your family and friends. Get ready to fire up the grill and embark on a culinary adventure!

Ingredients:
- 4-5 lbs pork ribs (spare ribs or baby back ribs), membrane removed
- Dry Rub:
- 1/4 cup brown sugar, packed
- 1/4 cup paprika
- 2 tablespoons garlic powder
- 2 tablespoons onion powder
- 1 tablespoon kosher salt
- 1 tablespoon black pepper
- 1 tablespoon chili powder
- 1 teaspoon cayenne pepper (optional, for heat)
- 1 teaspoon dried oregano
- 1 teaspoon dried thyme
- Mop Sauce (Optional, but highly recommended):
- 1 cup apple cider vinegar
- 1/2 cup apple juice
- 1/4 cup Worcestershire sauce
- 2 tablespoons brown sugar
- 1 tablespoon Dijon mustard
- 1 teaspoon hot sauce (optional)
- BBQ Sauce (Your favorite brand or homemade):
- Approximately 1-2 cups, depending on how saucy you like your ribs
- Wood chips for smoking (hickory, apple, or cherry are great choices)
Preparing the Ribs:
- Remove the Membrane: This is crucial for tender ribs! Flip the ribs over so the bone side is facing up. You’ll see a thin, silvery membrane covering the bones. Use a butter knife to loosen a corner of the membrane. Then, grab the loosened membrane with a paper towel (this helps you get a good grip) and pull it off. It might come off in one piece, or you might need to pull it off in sections. Don’t worry if you don’t get every single bit, but try to remove as much as possible.
- Trim the Ribs (Optional): If you’re using spare ribs, you might want to trim off the excess fat and cartilage. This will make them easier to handle and cook more evenly. I usually trim off the flap of meat on the back of the ribs, as it tends to dry out during cooking.
- Prepare the Dry Rub: In a medium bowl, combine all the dry rub ingredients: brown sugar, paprika, garlic powder, onion powder, salt, pepper, chili powder, cayenne pepper (if using), oregano, and thyme. Mix well to ensure everything is evenly distributed.
- Apply the Dry Rub: Generously rub the dry rub all over the ribs, on both sides. Make sure to get into all the nooks and crannies. Don’t be shy! The more rub, the more flavor. Once the ribs are coated, wrap them tightly in plastic wrap and refrigerate for at least 2 hours, or preferably overnight. This allows the flavors to penetrate the meat.
Preparing the Grill for Indirect Heat:
- Choose Your Grill: You can use a charcoal grill, a gas grill, or a smoker for this recipe. I prefer using a charcoal grill for the best smoky flavor, but a gas grill will work just fine.
- Set Up for Indirect Heat: This is key to cooking ribs low and slow. For a charcoal grill, arrange the coals on one side of the grill, leaving the other side empty. This creates a hot zone and a cool zone. For a gas grill, turn on the burners on one side of the grill to medium-low heat, leaving the other burners off.
- Add Wood Chips (For Charcoal Grill): Soak your wood chips in water for at least 30 minutes before grilling. This will help them smoke longer. Drain the wood chips and add them to the hot coals. You can use a smoker box or just toss them directly onto the coals. Replenish the wood chips as needed throughout the cooking process to maintain a consistent smoke.
- Maintain Temperature: Aim for a grill temperature of around 225-250°F (107-121°C). Use a grill thermometer to monitor the temperature and adjust the vents or burners as needed to maintain a consistent temperature. This is crucial for tender, juicy ribs.
Cooking the Ribs:
- The 3-2-1 Method (Optional, but Recommended): This is a popular method for cooking ribs that results in incredibly tender and flavorful meat. It involves smoking the ribs for 3 hours, wrapping them in foil for 2 hours, and then grilling them uncovered for 1 hour.
- Smoking the Ribs (3 Hours): Place the ribs on the cool side of the grill, bone-side down. Close the lid and let them smoke for 3 hours, maintaining a temperature of 225-250°F (107-121°C). If using a mop sauce, brush the ribs with the sauce every hour. This will help keep them moist and add flavor.
- Wrapping the Ribs (2 Hours): After 3 hours of smoking, remove the ribs from the grill. Place each rack of ribs on a large sheet of heavy-duty aluminum foil. Add a few tablespoons of apple juice or beer to the foil, along with a pat of butter or a drizzle of honey (optional). Wrap the ribs tightly in the foil, sealing the edges to create a packet. This will help the ribs steam and become even more tender.
- Grilling the Wrapped Ribs (2 Hours): Return the wrapped ribs to the cool side of the grill. Close the lid and let them cook for 2 hours, maintaining a temperature of 225-250°F (107-121°C).
- Grilling the Unwrapped Ribs (1 Hour): After 2 hours of cooking in foil, carefully remove the ribs from the foil packets. Discard the foil and any liquid. Place the ribs back on the cool side of the grill, bone-side down.
- Applying BBQ Sauce (Optional): If you want to add BBQ sauce, brush the ribs with your favorite sauce during the last 30 minutes of cooking. Apply the sauce in thin layers, allowing it to caramelize slightly between each application. Be careful not to burn the sauce.
- Checking for Doneness: The ribs are done when the meat is very tender and easily pulls away from the bone. You can also use a toothpick to check for doneness. Insert the toothpick between the bones; it should slide in and out easily with little resistance. Another way to check is to pick up the rack of ribs with tongs. If the ribs bend easily and almost break in the middle, they’re done.
- Resting the Ribs: Once the ribs are done, remove them from the grill and let them rest for 10-15 minutes before slicing and serving. This allows the juices to redistribute, resulting in even more tender and flavorful ribs.
Serving:
- Slicing the Ribs: Use a sharp knife to slice the ribs between the bones.
- Serving Suggestions: Serve the ribs with your favorite BBQ sides, such as coleslaw, potato salad, baked beans, and corn on the cob.
- Enjoy! Enjoy your delicious, tender, and smoky grilled ribs!
Conclusion:
So there you have it! This isn’t just another recipe; it’s your ticket to becoming the grill master you’ve always dreamed of being. These Grilled Ribs are truly a must-try because they deliver that perfect balance of smoky flavor, tender meat, and a finger-licking-good sauce that will have everyone begging for more. Trust me, once you taste these, you’ll never look at ribs the same way again.
What makes these ribs so special? It’s the combination of the carefully selected rub, the slow and low grilling technique, and that final glaze of our secret sauce. The rub infuses the meat with a depth of flavor that penetrates all the way to the bone, while the slow grilling ensures that the ribs are fall-off-the-bone tender. And that sauce? It’s the perfect blend of sweet, savory, and a little bit of spice that complements the smoky flavor of the ribs perfectly.
But the best part about this recipe is that it’s incredibly versatile. Feel free to experiment with different rubs and sauces to create your own signature flavor. Want to kick up the heat? Add a pinch of cayenne pepper to the rub or a dash of hot sauce to the glaze. Prefer a sweeter flavor? Use brown sugar instead of white sugar in the rub and add a touch of honey to the glaze. The possibilities are endless!
Serving Suggestions and Variations:
- Serve these Grilled Ribs with classic barbecue sides like coleslaw, potato salad, and baked beans.
- For a lighter meal, pair them with a fresh green salad and grilled corn on the cob.
- Get creative with your sauces! Try a tangy vinegar-based sauce, a sweet and fruity sauce, or a spicy chipotle sauce.
- Consider using different types of wood chips for smoking to add unique flavor profiles. Hickory, mesquite, and applewood are all great options.
- For a fun twist, try making rib sandwiches with toasted buns and your favorite toppings.
- Don’t forget the drinks! Ice-cold beer, lemonade, or sweet tea are all perfect accompaniments to these delicious ribs.
I’m confident that this recipe will become a family favorite. It’s perfect for backyard barbecues, summer cookouts, or any occasion where you want to impress your friends and family with your grilling skills. And the best part? It’s easier to make than you might think. With a little bit of patience and attention to detail, you can create restaurant-quality ribs right in your own backyard.
So, what are you waiting for? Fire up your grill, gather your ingredients, and get ready to experience the best Grilled Ribs you’ve ever tasted. I’m so excited for you to try this recipe and see for yourself how amazing it is. And when you do, please don’t hesitate to share your experience with me! I’d love to hear your feedback, see your photos, and learn about any variations you’ve made. You can leave a comment below, tag me on social media, or send me an email. I can’t wait to hear from you!
Happy grilling, and enjoy!
Grilled Ribs: The Ultimate Guide to Perfect BBQ Ribs
Tender, smoky ribs cooked low and slow with a flavorful dry rub and optional mop sauce. The 3-2-1 method ensures ultimate tenderness.
Ingredients
- 4-5 lbs pork ribs (spare ribs or baby back ribs), membrane removed
- 1/4 cup brown sugar, packed
- 1/4 cup paprika
- 2 tablespoons garlic powder
- 2 tablespoons onion powder
- 1 tablespoon kosher salt
- 1 tablespoon black pepper
- 1 tablespoon chili powder
- 1 teaspoon cayenne pepper (optional, for heat)
- 1 teaspoon dried oregano
- 1 teaspoon dried thyme
- 1 cup apple cider vinegar
- 1/2 cup apple juice
- 1/4 cup Worcestershire sauce
- 2 tablespoons brown sugar
- 1 tablespoon Dijon mustard
- 1 teaspoon hot sauce (optional)
- Approximately 1-2 cups BBQ Sauce (Your favorite brand or homemade)
- Wood chips for smoking (hickory, apple, or cherry are great choices)
Instructions
- Remove the Membrane: Flip the ribs over so the bone side is facing up. Use a butter knife to loosen a corner of the membrane. Grab the loosened membrane with a paper towel and pull it off.
- Trim the Ribs (Optional): Trim off excess fat and cartilage from spare ribs for even cooking.
- Prepare the Dry Rub: In a medium bowl, combine all dry rub ingredients and mix well.
- Apply the Dry Rub: Generously rub the dry rub all over the ribs, on both sides. Wrap tightly in plastic wrap and refrigerate for at least 2 hours, or preferably overnight.
- Prepare the Grill for Indirect Heat: Set up your grill (charcoal, gas, or smoker) for indirect heat. For charcoal, arrange coals on one side. For gas, turn on burners on one side to medium-low.
- Add Wood Chips (For Charcoal Grill): Soak wood chips for 30 minutes, then add to hot coals. Replenish as needed.
- Maintain Temperature: Aim for a grill temperature of 225-250°F (107-121°C).
- Smoking the Ribs (3 Hours): Place the ribs on the cool side of the grill, bone-side down. Close the lid and let them smoke for 3 hours, maintaining a temperature of 225-250°F (107-121°C). If using a mop sauce, brush the ribs with the sauce every hour.
- Wrapping the Ribs (2 Hours): After 3 hours of smoking, remove the ribs from the grill. Place each rack of ribs on a large sheet of heavy-duty aluminum foil. Add a few tablespoons of apple juice or beer to the foil, along with a pat of butter or a drizzle of honey (optional). Wrap the ribs tightly in the foil, sealing the edges to create a packet.
- Grilling the Wrapped Ribs (2 Hours): Return the wrapped ribs to the cool side of the grill. Close the lid and let them cook for 2 hours, maintaining a temperature of 225-250°F (107-121°C).
- Grilling the Unwrapped Ribs (1 Hour): After 2 hours of cooking in foil, carefully remove the ribs from the foil packets. Discard the foil and any liquid. Place the ribs back on the cool side of the grill, bone-side down.
- Applying BBQ Sauce (Optional): If you want to add BBQ sauce, brush the ribs with your favorite sauce during the last 30 minutes of cooking. Apply the sauce in thin layers, allowing it to caramelize slightly between each application. Be careful not to burn the sauce.
- Checking for Doneness: The ribs are done when the meat is very tender and easily pulls away from the bone. You can also use a toothpick to check for doneness. Insert the toothpick between the bones; it should slide in and out easily with little resistance. Another way to check is to pick up the rack of ribs with tongs. If the ribs bend easily and almost break in the middle, they’re done.
- Resting the Ribs: Once the ribs are done, remove them from the grill and let them rest for 10-15 minutes before slicing and serving.
- Slicing the Ribs: Use a sharp knife to slice the ribs between the bones.
- Serving Suggestions: Serve with your favorite BBQ sides.
- Enjoy!
Notes
- The 3-2-1 method is optional but highly recommended for incredibly tender ribs.
- Adjust the amount of cayenne pepper in the dry rub to your desired level of heat.
- Soaking wood chips is crucial for longer smoke duration.
- Maintaining a consistent grill temperature is key for even cooking.
- Resting the ribs after cooking allows the juices to redistribute, resulting in more tender and flavorful ribs.
Leave a Comment