
Homemade beignets are a delightful treat that transport you straight to the vibrant streets of New Orleans with every bite. These pillowy, deep-fried pastries, dusted with a generous coating of powdered sugar, have a rich history rooted in French cuisine, making them a beloved staple in Creole culture. I remember the first time I tasted a beignet; the warm, fluffy texture combined with the sweet, sugary exterior was simply irresistible. It’s no wonder that people adore this dish! Not only are homemade beignets a delicious indulgence, but they are also surprisingly easy to make, allowing you to enjoy a taste of New Orleans right in your own kitchen. In this Homemade Beignets Guide, I will walk you through the steps to create these mouthwatering delights, ensuring that you can share this culinary joy with family and friends.

Ingredients:
- 2 cups all-purpose flour
- 1/4 cup granulated sugar
- 1 tablespoon baking powder
- 1/2 teaspoon salt
- 1/2 cup whole milk
- 2 large eggs
- 1/4 cup unsalted butter, melted
- 1 teaspoon vanilla extract
- Vegetable oil, for frying
- Powdered sugar, for dusting
Preparing the Dough
1. **Mix the Dry Ingredients**: In a large mixing bowl, I start by whisking together the flour, granulated sugar, baking powder, and salt. This ensures that all the dry ingredients are well combined and helps to aerate the flour, which is crucial for fluffy beignets. 2. **Combine the Wet Ingredients**: In a separate bowl, I whisk together the milk, eggs, melted butter, and vanilla extract until smooth. It’s important to make sure the butter isn’t too hot, or it could cook the eggs. 3. **Combine Wet and Dry Mixtures**: Gradually pour the wet mixture into the dry ingredients, stirring gently with a wooden spoon or spatula. I mix until just combined; it’s okay if there are a few lumps. Overmixing can lead to tough beignets, and we want them to be light and airy. 4. **Knead the Dough**: On a lightly floured surface, I turn out the dough and knead it gently for about 1-2 minutes. I want to bring it together into a cohesive ball without overworking it. If the dough is too sticky, I sprinkle a little more flour as needed. 5. **Let the Dough Rest**: I cover the dough with a clean kitchen towel and let it rest for about 30 minutes. This resting period allows the gluten to relax, making it easier to roll out later.Rolling and Cutting the Dough
6. **Roll Out the Dough**: After the dough has rested, I lightly flour my work surface again and roll out the dough to about 1/4 inch thick. I try to keep it as even as possible to ensure uniform cooking. 7. **Cut the Beignets**: Using a sharp knife or a pizza cutter, I cut the dough into squares, about 2 inches by 2 inches. I find that a ruler can help me get the sizes just right, but it’s not necessary. The beignets will puff up during frying, so they don’t need to be perfect. 8. **Prepare for Frying**: I place the cut squares on a floured baking sheet, making sure they don’t touch each other. This helps prevent them from sticking together while I prepare the oil.Frying the Beignets
9. **Heat the Oil**: In a deep pot or a heavy-bottomed skillet, I pour in enough vegetable oil to submerge the beignets (about 2-3 inches deep). I heat the oil over medium heat until it reaches 350°F (175°C). I use a candy thermometer to check the temperature, as it’s crucial for achieving that perfect golden brown color. 10. **Fry the Beignets**: Once the oil is hot, I carefully drop a few beignet squares into the oil, being careful not to overcrowd the pot. I fry them for about 2-3 minutes on each side, or until they puff up and turn a beautiful golden brown. I use a slotted spoon to flip them and remove them from the oil. 11. **Drain Excess Oil**: After frying, I place the beignets on a plate lined with paper towels to absorb any excess oil. This step is important to keep them from becoming greasy.Dusting and Serving
12. **Dust with Powdered Sugar**: While the beignets are still warm, I generously dust them with powdered sugar. I like to do this in a large bowl or a paper bag to ensure they get an even coating. The sweetness of the powdered sugar contrasts beautifully with the warm, fluffy dough. 13. **Serve Immediately**: Beignets are best enjoyed fresh and warm. I like to serve them with a side of coffee or hot chocolate for dipping. They can also be enjoyed plain or with a drizzle of chocolate or caramel sauce for an extra treat.Storing Leftovers
14. **Storing Beignets**: If I have any leftovers (which is rare!), I let them cool completely and then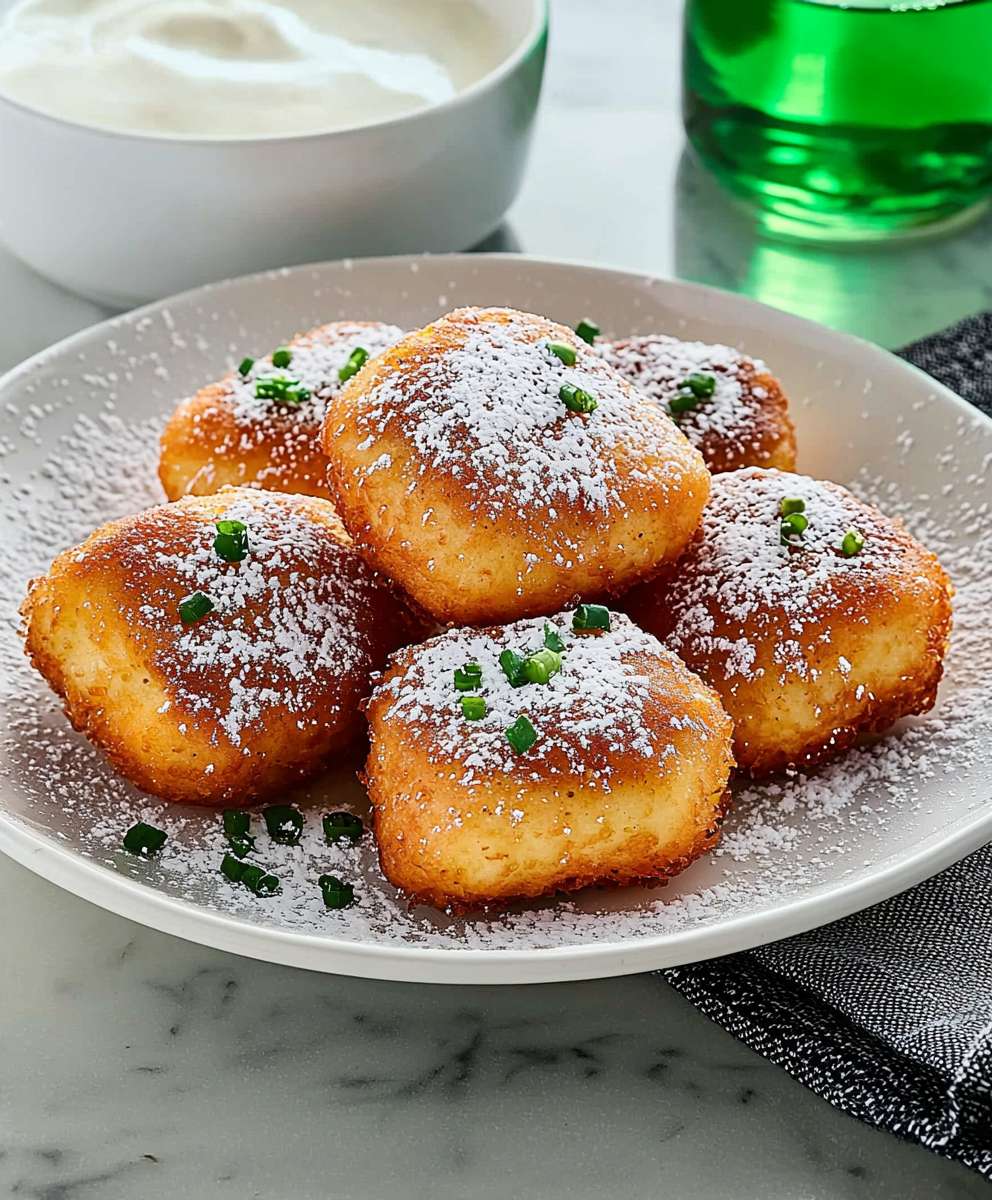
Conclusion:
In conclusion, this homemade beignets recipe is an absolute must-try for anyone looking to indulge in a delightful treat that brings a taste of New Orleans right into your kitchen. The fluffy, pillowy texture combined with the sweet dusting of powdered sugar makes these beignets a perfect companion for your morning coffee or an afternoon snack. Plus, they’re incredibly versatile! You can serve them plain, or get creative by adding fillings like chocolate, fruit preserves, or even a hint of cinnamon for an extra twist. I encourage you to gather your ingredients and give this recipe a go. The joy of making beignets from scratch is not just in the delicious end result, but also in the process of creating something special. Once you take that first bite, I promise you’ll understand why these little pastries are so beloved. And don’t forget to share your experience! I’d love to hear how your homemade beignets turned out, any variations you tried, or even your favorite serving suggestions. Let’s spread the love for this delightful treat together! PrintHomemade Beignets Guide: Master the Art of Perfectly Fluffy Treats
Enjoy the irresistible taste of homemade beignets, fluffy and golden fried treats dusted with powdered sugar. Perfect for breakfast or a sweet snack, they pair beautifully with coffee or hot chocolate.
- Prep Time: 30 minutes
- Cook Time: 15 minutes
- Total Time: 75 minutes
- Yield: 12 beignets 1x
Ingredients
- 2 cups all-purpose flour
- 1/4 cup granulated sugar
- 1 tablespoon baking powder
- 1/2 teaspoon salt
- 1/2 cup whole milk
- 2 large eggs
- 1/4 cup unsalted butter, melted
- 1 teaspoon vanilla extract
- Vegetable oil, for frying
- Powdered sugar, for dusting
Instructions
- In a large mixing bowl, whisk together the flour, granulated sugar, baking powder, and salt.
- In a separate bowl, whisk together the milk, eggs, melted butter, and vanilla extract until smooth.
- Gradually pour the wet mixture into the dry ingredients, stirring gently until just combined. A few lumps are okay.
- On a lightly floured surface, turn out the dough and knead gently for about 1-2 minutes until cohesive.
- Cover the dough with a clean kitchen towel and let it rest for about 30 minutes.
- Roll out the dough to about 1/4 inch thick on a floured surface.
- Cut the dough into 2-inch squares using a sharp knife or pizza cutter.
- Place the cut squares on a floured baking sheet, ensuring they don’t touch.
- In a deep pot, heat vegetable oil to 350°F (175°C).
- Drop a few squares into the hot oil, frying for 2-3 minutes on each side until golden brown.
- Remove the beignets with a slotted spoon and place them on paper towels to drain.
- While warm, dust generously with powdered sugar.
- Enjoy fresh with coffee or hot chocolate.
Notes
- Ensure the oil is at the correct temperature for optimal frying.
- Beignets are best served fresh but can be stored in an airtight container for up to 2 days.

Leave a Comment