
Honey Ginger Chicken Dish is a delightful culinary creation that brings together the perfect balance of sweetness and spice. As I prepared this dish for the first time, I was instantly captivated by the aromatic blend of honey and ginger wafting through my kitchen. This recipe not only tantalizes the taste buds but also carries a rich history rooted in Asian cuisine, where ginger has long been celebrated for its medicinal properties and flavor-enhancing qualities.
People adore this Honey Ginger Chicken Dish for its tender chicken, enveloped in a luscious glaze that is both sticky and savory. The combination of honey’s natural sweetness and ginger’s warm, zesty kick creates a symphony of flavors that dance on the palate. Plus, its incredibly convenient to prepare, making it a go-to option for busy weeknights or special gatherings. Join me as we explore this mouthwatering recipe that is sure to become a favorite in your household!

Ingredients:
- 4 boneless, skinless chicken breasts
- 1/4 cup honey
- 2 tablespoons fresh ginger, grated
- 3 cloves garlic, minced
- 1/4 cup soy sauce
- 2 tablespoons rice vinegar
- 1 tablespoon sesame oil
- 1 tablespoon olive oil
- 1/2 teaspoon black pepper
- 1/4 teaspoon red pepper flakes (optional, for heat)
- 1/4 cup green onions, chopped (for garnish)
- Sesame seeds (for garnish)
Preparing the Marinade
1. In a medium-sized mixing bowl, combine the honey, grated ginger, minced garlic, soy sauce, rice vinegar, sesame oil, olive oil, black pepper, and red pepper flakes (if using). 2. Whisk the ingredients together until they are well blended. The honey should dissolve into the liquid, creating a smooth marinade. 3. Taste the marinade and adjust the seasoning if necessary. If you prefer it sweeter, add a bit more honey; if you like it saltier, add a splash more soy sauce.Marinating the Chicken
4. Place the chicken breasts in a large resealable plastic bag or a shallow dish. 5. Pour the marinade over the chicken, ensuring that each piece is well coated. 6. Seal the bag or cover the dish with plastic wrap, and refrigerate for at least 30 minutes. For best results, marinate for 2-4 hours or even overnight. This allows the flavors to penetrate the chicken deeply.Preparing for Cooking
7. Once the chicken has marinated, remove it from the refrigerator. 8. Preheat your grill or stovetop grill pan over medium-high heat. If youre using a grill, make sure to oil the grates to prevent sticking. 9. While the grill is heating, take the chicken out of the marinade and let any excess drip off. Discard the leftover marinade, as it has been in contact with raw chicken.Cooking the Chicken
10. Place the chicken breasts on the hot grill or grill pan. 11. Cook the chicken for about 6-7 minutes on one side without moving it. This will help create those beautiful grill marks and ensure a nice sear. 12. After 6-7 minutes, flip the chicken over and cook for an additional 6-7 minutes on the other side. The chicken is done when it reaches an internal temperature of 165°F (75°C). 13. If you want to add a bit more flavor, you can brush some of the reserved marinade (that hasnt touched raw chicken) onto the chicken during the last few minutes of cooking.Resting the Chicken
14. Once the chicken is cooked through, remove it from the grill and place it on a cutting board. 15. Let the chicken rest for about 5 minutes. This resting period allows the juices to redistribute throughout the meat, making it more tender and juicy.Assembling the Dish
16. After resting, slice the chicken into strips or serve it whole, depending on your preference. 17. Arrange the chicken on a serving platter. 18. Drizzle any remaining marinade (that was not in contact with raw chicken) over the top for added flavor. 19. Garnish with chopped green onions and a sprinkle of sesame seeds for a nice crunch and visual appeal.Serving Suggestions
20. This Honey Ginger Chicken pairs beautifully with steamed jasmine rice or quinoa. 21. You can also serve it alongside stir-fried vegetables, such as bell peppers, broccoli, and snap peas, for a complete meal. 22. If you want to add a refreshing touch, consider serving a side salad with a light vinaigrette.Storing Leftovers
23. If you have any leftovers, allow the chicken to cool completely before storing it. 24. Place the chicken in an airtight container and refrigerate for up to 3 days. 25. To reheat, simply warm it in the microwave or on the stovetop over low heat until heated through.Tips for Success
26. For a more intense ginger flavor, you can add more grated ginger to the marinade. 27. If you prefer a thicker sauce, you can simmer the reserved marinade in a small saucepan over medium heat until it reduces and thick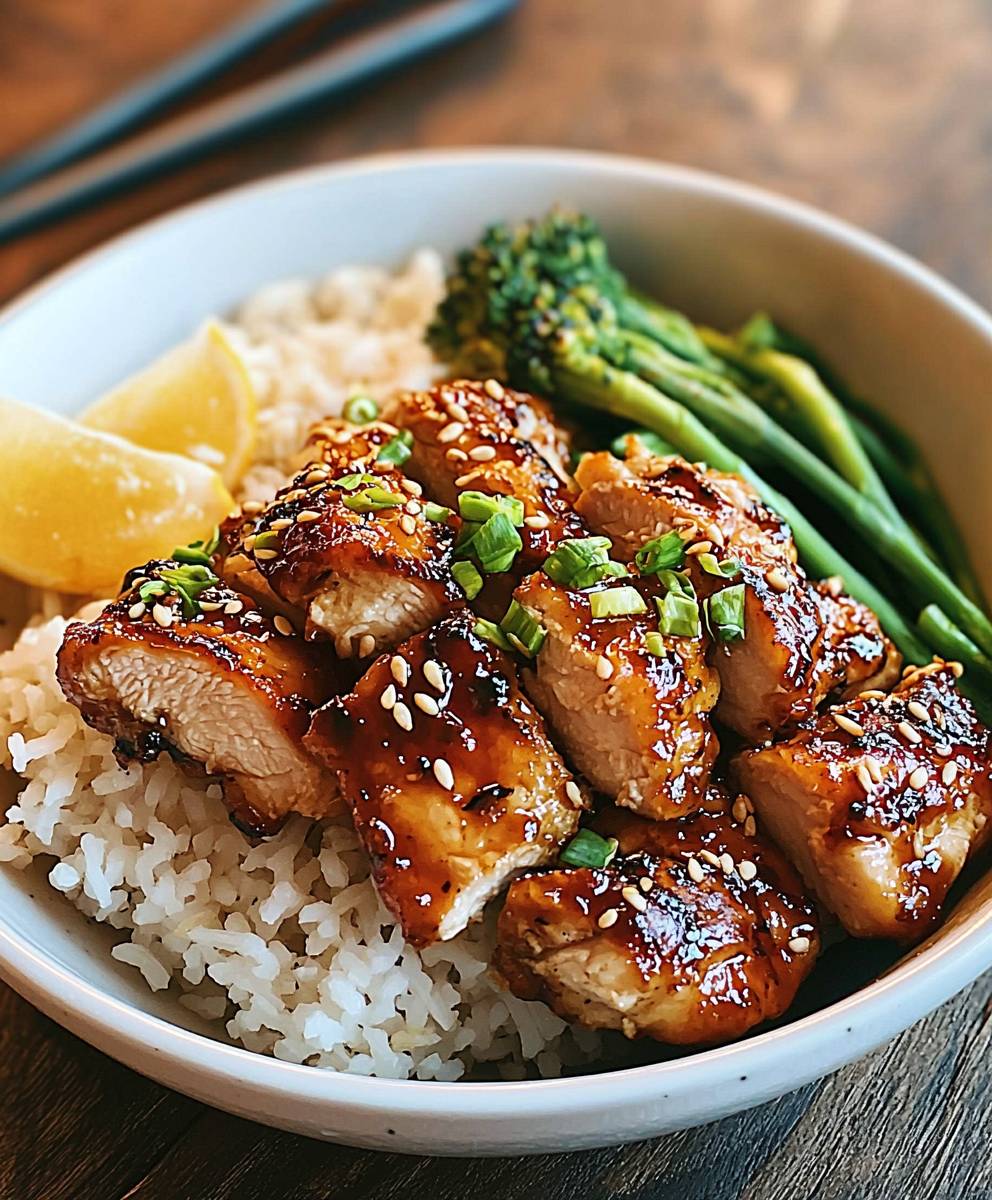
Conclusion:
In summary, this Honey Ginger Chicken dish is an absolute must-try for anyone looking to elevate their weeknight dinners with a burst of flavor and a touch of sweetness. The combination of honey and ginger creates a delightful balance that not only tantalizes your taste buds but also fills your kitchen with an irresistible aroma. Whether you’re serving it over a bed of fluffy rice, alongside steamed vegetables, or even in a wrap for a quick lunch, this recipe offers versatility that can easily adapt to your preferences. Feel free to experiment with variationsadd some crushed red pepper for a spicy kick, toss in some colorful bell peppers for added crunch, or even substitute chicken with tofu for a vegetarian option. The possibilities are endless, and I encourage you to make this dish your own! I can’t wait for you to try this Honey Ginger Chicken recipe. Once you do, Id love to hear about your experience! Share your thoughts, any tweaks you made, or even a photo of your delicious creation. Cooking is all about sharing joy, and I hope this dish brings a smile to your face and warmth to your table. Happy cooking! PrintHoney Ginger Chicken Dish: A Delicious Recipe for Flavorful Meals

This Honey Ginger Chicken features tender grilled chicken marinated in a sweet and zesty honey-ginger sauce, making it a perfect dish for any occasion. Quick to prepare and bursting with flavor, it’s ideal for weeknight dinners or weekend gatherings.
- Prep Time: 10 minutes
- Cook Time: 15 minutes
- Total Time: 25 minutes
- Yield: 4 servings 1x
Ingredients
- 4 boneless, skinless chicken breasts
- 1/4 cup honey
- 2 tablespoons fresh ginger, grated
- 3 cloves garlic, minced
- 1/4 cup soy sauce
- 2 tablespoons rice vinegar
- 1 tablespoon sesame oil
- 1 tablespoon olive oil
- 1/2 teaspoon black pepper
- 1/4 teaspoon red pepper flakes (optional, for heat)
- 1/4 cup green onions, chopped (for garnish)
- Sesame seeds (for garnish)
Instructions
- In einer mittelgroßen Schüssel Honig, geriebenen Ingwer, gehackten Knoblauch, Sojasauce, Reisessig, Sesamöl, Olivenöl, schwarzen Pfeffer und rote Pfefferflocken (falls verwendet) vermengen. Gut verrühren.
- Die Marinade probieren und nach Bedarf die Gewürze anpassen. Bei Bedarf mehr Honig für Süße oder mehr Sojasauce für Salzigkeit hinzufügen.
- Die Hähnchenbrust in einen großen, wiederverschließbaren Plastikbeutel oder eine flache Schüssel legen. Die Marinade über das Hähnchen gießen, sodass jedes Stück gut bedeckt ist. Den Beutel verschließen oder die Schüssel abdecken und mindestens 30 Minuten, vorzugsweise 2-4 Stunden oder über Nacht im Kühlschrank marinieren.
- Den Grill oder die Grillpfanne bei mittlerer bis hoher Hitze vorheizen. Die Grillroste einölen, falls ein Grill verwendet wird. Das Hähnchen aus der Marinade nehmen, überschüssige Marinade abtropfen lassen und die restliche Marinade entsorgen.
- Das Hähnchen auf den heißen Grill oder die Grillpfanne legen. 6-7 Minuten auf einer Seite ohne Bewegung garen. Wenden und weitere 6-7 Minuten garen, bis die Innentemperatur 165°F (75°C) erreicht. Optional die reservierte Marinade (nicht in Kontakt mit rohem Hähnchen) in den letzten Minuten des Garens auftragen.
- Das Hähnchen vom Grill nehmen und 5 Minuten auf einem Schneidebrett ruhen lassen, damit sich die Säfte verteilen können.
- Das Hähnchen in Streifen schneiden oder ganz servieren. Auf einer Servierplatte anrichten, mit der verbleibenden Marinade (nicht in Kontakt mit rohem Hähnchen) beträufeln und mit gehackten Frühlingszwiebeln und Sesamsamen garnieren.
Notes
- Der Teig darf während der Ruhezeit nicht bewegt werden.
- Für ein intensiveres Knoblaucharoma können mehr Zehen verwendet werden.


Leave a Comment