
Jam cookies, those delightful little pockets of sweetness, are more than just a treat; they’re a tiny burst of sunshine on a plate! Imagine biting into a buttery, crumbly cookie that gives way to a luscious, fruity center. Is your mouth watering yet? Mine certainly is! These aren’t just any cookies; they’re a nostalgic trip back to childhood, a comforting hug in baked form.
While the exact origins of filled cookies are debated, variations have popped up across cultures for centuries. From Linzer cookies in Austria to thumbprint cookies enjoyed worldwide, the concept of encasing a sweet filling in dough is a universal expression of culinary creativity. These cookies often graced holiday tables and special occasions, becoming cherished family traditions passed down through generations.
What makes jam cookies so irresistible? It’s the perfect balance of textures and flavors. The buttery, slightly crisp cookie provides a wonderful contrast to the soft, gooey jam. Plus, they’re incredibly versatile! You can use your favorite jam strawberry, raspberry, apricot, the possibilities are endless! They’re also relatively easy to make, making them a perfect baking project for beginners and seasoned bakers alike. Whether you’re looking for a quick dessert, a delightful afternoon snack, or a charming addition to a tea party, these cookies are guaranteed to be a crowd-pleaser. So, let’s get baking and create some sweet memories!

Ingredients:
- 225g (1 cup) unsalted butter, softened
- 150g (¾ cup) granulated sugar
- 1 large egg
- 1 teaspoon vanilla extract
- 300g (2 ½ cups) all-purpose flour, plus more for dusting
- ¼ teaspoon salt
- Approximately 1 cup of your favorite jam (raspberry, strawberry, apricot, or a combination!)
- Powdered sugar, for dusting (optional)
Preparing the Dough:
- Cream the Butter and Sugar: In a large bowl, or in the bowl of a stand mixer fitted with the paddle attachment, cream together the softened butter and granulated sugar until light and fluffy. This usually takes about 3-5 minutes. Make sure your butter is truly softened; otherwise, you’ll end up with lumps. I like to let mine sit out for about an hour before starting.
- Add the Egg and Vanilla: Beat in the egg and vanilla extract until well combined. Scrape down the sides of the bowl to ensure everything is evenly mixed. The mixture should be smooth and creamy at this point.
- Combine Dry Ingredients: In a separate medium bowl, whisk together the flour and salt. This helps to evenly distribute the salt throughout the dough.
- Gradually Add Dry Ingredients to Wet Ingredients: Gradually add the dry ingredients to the wet ingredients, mixing on low speed until just combined. Be careful not to overmix the dough, as this can result in tough cookies. Mix until the flour is just incorporated, and then stop. A few streaks of flour are okay at this point.
- Form the Dough into a Disc and Chill: Turn the dough out onto a lightly floured surface. Gently form it into a disc, about 1 inch thick. Wrap the disc tightly in plastic wrap and refrigerate for at least 1 hour, or preferably 2 hours. This chilling time is crucial! It allows the gluten to relax, preventing the cookies from spreading too much in the oven and resulting in a more tender cookie. You can even chill it overnight if you want to get a head start.
Shaping and Filling the Cookies:
- Preheat Oven and Prepare Baking Sheets: Preheat your oven to 175°C (350°F). Line two baking sheets with parchment paper or silicone baking mats. This will prevent the cookies from sticking and make cleanup a breeze.
- Roll Out the Dough: Remove the chilled dough from the refrigerator and let it sit at room temperature for about 5-10 minutes to soften slightly. On a lightly floured surface, roll out the dough to about ¼ inch thickness. If the dough is sticking, add a little more flour to the surface.
- Cut Out the Cookies: Use your favorite cookie cutters to cut out the cookies. I like to use a variety of shapes, such as circles, stars, and hearts. For the top cookies, you’ll need to cut out a smaller shape in the center (e.g., a smaller circle, heart, or star) to create a window for the jam to peek through. You can use a small cookie cutter or even a piping tip for this.
- Place Cookies on Baking Sheets: Carefully transfer the cut-out cookies to the prepared baking sheets, leaving about 1 inch of space between each cookie.
- Fill the Cookies: Spoon about ½ teaspoon of jam into the center of each bottom cookie (the ones without the cut-out). Be careful not to overfill them, as the jam will spread during baking. If you’re using different flavors of jam, you can create a variety of cookies.
- Top with Cut-Out Cookies: Gently place the cut-out cookies on top of the jam-filled cookies, lining them up as best as you can. Lightly press down around the edges to seal the top and bottom cookies together.
Baking the Cookies:
- Bake the Cookies: Bake the cookies for 10-12 minutes, or until the edges are lightly golden brown. Keep a close eye on them, as they can burn easily. The baking time will depend on the size and thickness of your cookies, so adjust accordingly.
- Cool the Cookies: Remove the baking sheets from the oven and let the cookies cool on the baking sheets for a few minutes before transferring them to a wire rack to cool completely. This will prevent them from breaking.
Finishing Touches:
- Dust with Powdered Sugar (Optional): Once the cookies are completely cool, you can dust them with powdered sugar for a pretty finishing touch. This is entirely optional, but it adds a nice touch of sweetness and visual appeal.
- Enjoy! These jam cookies are best enjoyed within a few days of baking. Store them in an airtight container at room temperature. They are perfect with a cup of tea or coffee, or as a sweet treat any time of day.
Tips for Perfect Jam Cookies:
- Use High-Quality Jam: The flavor of the jam is a key component of these cookies, so be sure to use a high-quality jam that you love. I prefer to use homemade jam, but store-bought jam works just as well.
- Don’t Overmix the Dough: Overmixing the dough will result in tough cookies. Mix the dry ingredients into the wet ingredients until just combined.
- Chill the Dough: Chilling the dough is essential for preventing the cookies from spreading too much in the oven.
- Don’t Overfill the Cookies: Overfilling the cookies with jam will cause the jam to spill out during baking.
- Let the Cookies Cool Completely: Let the cookies cool completely before dusting them with powdered sugar, as the powdered sugar will melt if the cookies are still warm.
- Experiment with Different Flavors: Feel free to experiment with different flavors of jam and cookie cutters to create your own unique jam cookies. You can also add a pinch of cinnamon or nutmeg to the dough for a warm, spiced flavor.
- Re-roll Scraps: Don’t throw away the dough scraps! You can re-roll them and cut out more cookies. However, the more you re-roll the dough, the tougher the cookies will become, so try to minimize the amount of re-rolling.
- Freezing the Dough: You can freeze the cookie dough for up to 2 months. Wrap the dough tightly in plastic wrap and then place it in a freezer bag. When you’re ready to bake the cookies, thaw the dough in the refrigerator overnight.
- Preventing Jam Bubbling: To minimize jam bubbling over during baking, you can brush the top of the jam with a little bit of egg white before placing the top cookie on. This creates a barrier and helps to keep the jam contained.
- Adding Zest: For an extra burst of flavor, consider adding the zest of a lemon or orange to the cookie dough. This will complement the sweetness of the jam beautifully.
Troubleshooting:
- Cookies Spreading Too Much: If your cookies are spreading too much in the oven, it could be due to a few reasons: the butter was too soft, the dough wasn’t chilled long enough, or the oven temperature is too low. Make sure your butter is softened but not melted, chill the dough for at least 1 hour, and double-check your oven temperature.
- Cookies Too Dry: If your cookies are too dry, it could be because you overbaked them or used too much flour. Be sure to bake the cookies until they are just lightly golden brown around the edges, and measure your flour accurately.
- Jam Burning: If the jam is burning during baking, try using a thicker jam or reducing the oven temperature slightly. You can also try placing a piece of aluminum foil loosely over the cookies during the last few minutes of baking to protect the jam.
Conclusion:
And there you have it! These aren’t just any cookies; they’re little pockets of sunshine, bursting with flavor and guaranteed to bring a smile to your face. I truly believe this jam cookies recipe is a must-try for anyone who loves a classic treat with a homemade touch. The buttery, melt-in-your-mouth dough combined with the sweet, fruity filling is a match made in heaven. It’s the kind of cookie that evokes warm memories and creates new ones with every bite.
But why is this recipe so special? It’s the simplicity, really. We’re not talking about complicated techniques or hard-to-find ingredients. This is a recipe that’s accessible to everyone, from seasoned bakers to complete beginners. Plus, the results are consistently delicious. You’ll be amazed at how easily these cookies come together and how quickly they disappear!
Beyond the ease and deliciousness, the versatility of this recipe is another reason to give it a go. Feel free to experiment with different types of jam. Raspberry and strawberry are classic choices, but don’t be afraid to venture out and try apricot, fig, or even a spicy pepper jam for a unique twist. You can also play around with the dough. Add a touch of lemon zest for a brighter flavor, or incorporate some chopped nuts for added texture.
Serving Suggestions and Variations:
* Dust with powdered sugar: For an elegant touch, dust the cooled cookies with powdered sugar.
* Drizzle with glaze: A simple glaze made from powdered sugar and milk adds extra sweetness and visual appeal.
* Sandwich cookies: Use two cookies to sandwich a generous dollop of whipped cream or buttercream frosting.
* Different shapes: Get creative with cookie cutters! Hearts, stars, or even simple circles will work beautifully.
* Nutty addition: Add finely chopped almonds, pecans, or walnuts to the dough for a nutty crunch.
* Chocolate chips: Incorporate mini chocolate chips into the dough for a chocolatey surprise.
* Spice it up: Add a pinch of cinnamon, nutmeg, or cardamom to the dough for a warm, spiced flavor.
* Vegan option: Substitute the butter with a vegan butter alternative and use a plant-based milk for the egg wash.
These cookies are perfect for any occasion. Serve them with a cup of tea or coffee for a cozy afternoon treat. Pack them in lunchboxes for a sweet surprise. Bring them to potlucks and parties they’re always a crowd-pleaser. Or simply enjoy them straight from the oven, warm and gooey.
I’m so excited for you to try this recipe and experience the joy of homemade jam cookies for yourself. I’m confident that you’ll love them as much as I do. So, gather your ingredients, preheat your oven, and get ready to bake some magic!
And now, for the most important part: I want to hear from you! Once you’ve made these cookies, please share your experience in the comments below. Did you try any variations? What was your favorite type of jam to use? Did you encounter any challenges? Your feedback is invaluable and helps me improve my recipes for everyone. Plus, it’s always fun to connect with fellow bakers and share our culinary adventures. So, don’t be shy let me know what you think! Happy baking!
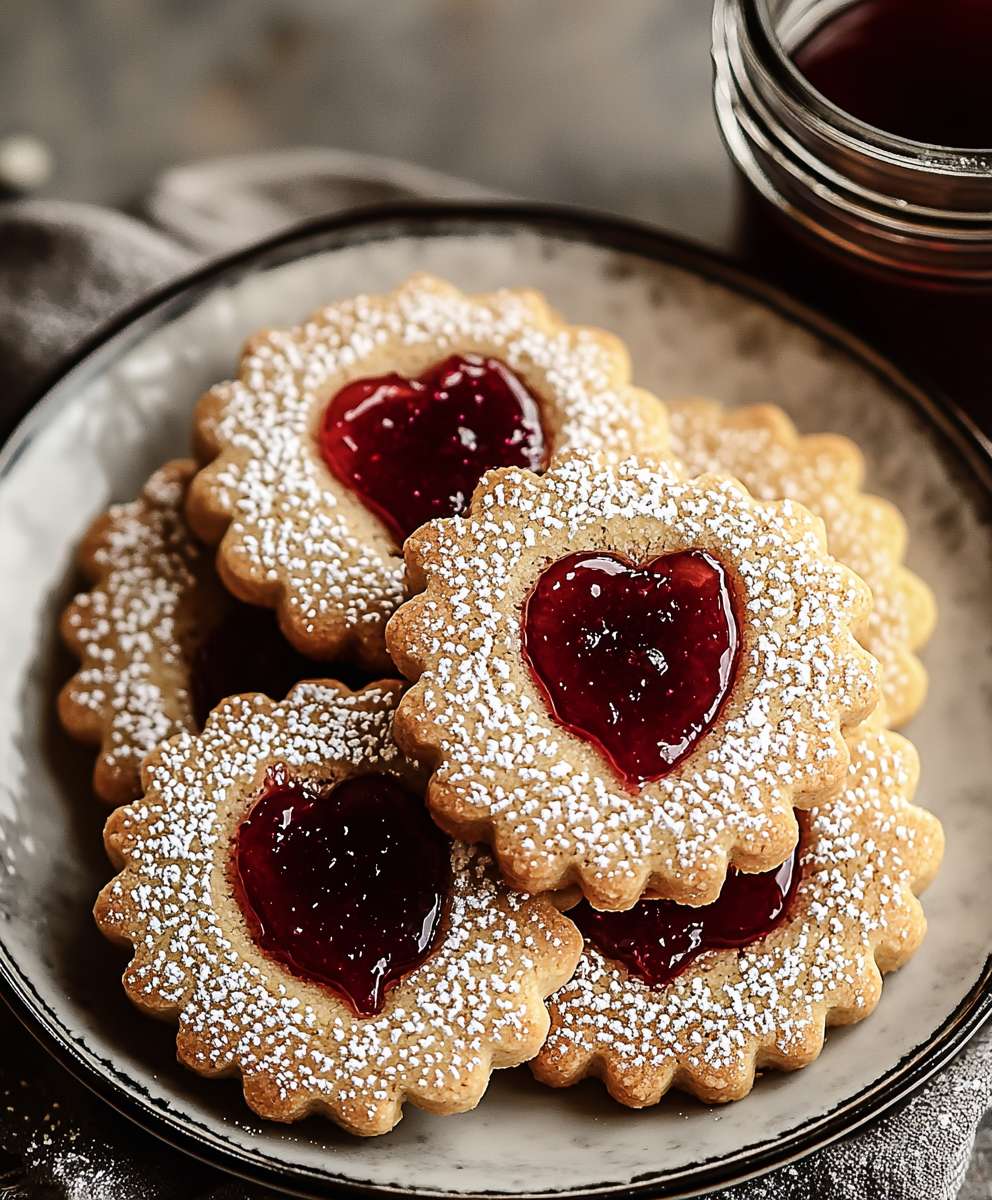
Jam Cookies: The Ultimate Guide to Baking Delicious Treats
Delicate, buttery jam-filled cookies perfect for any occasion. Linzer-style cookies with a tender shortbread base, sweet jam filling, and a dusting of powdered sugar.
Ingredients
- 225g (1 cup) unsalted butter, softened
- 150g (¾ cup) granulated sugar
- 1 large egg
- 1 teaspoon vanilla extract
- 300g (2 ½ cups) all-purpose flour, plus more for dusting
- ¼ teaspoon salt
- Approximately 1 cup of your favorite jam (raspberry, strawberry, apricot, or a combination!)
- Powdered sugar, for dusting (optional)
Instructions
- Cream the Butter and Sugar: In a large bowl, or in the bowl of a stand mixer fitted with the paddle attachment, cream together the softened butter and granulated sugar until light and fluffy. This usually takes about 3-5 minutes.
- Add the Egg and Vanilla: Beat in the egg and vanilla extract until well combined. Scrape down the sides of the bowl to ensure everything is evenly mixed.
- Combine Dry Ingredients: In a separate medium bowl, whisk together the flour and salt.
- Gradually Add Dry Ingredients to Wet Ingredients: Gradually add the dry ingredients to the wet ingredients, mixing on low speed until just combined. Be careful not to overmix the dough.
- Form the Dough into a Disc and Chill: Turn the dough out onto a lightly floured surface. Gently form it into a disc, about 1 inch thick. Wrap the disc tightly in plastic wrap and refrigerate for at least 1 hour, or preferably 2 hours.
- Preheat Oven and Prepare Baking Sheets: Preheat your oven to 175°C (350°F). Line two baking sheets with parchment paper or silicone baking mats.
- Roll Out the Dough: Remove the chilled dough from the refrigerator and let it sit at room temperature for about 5-10 minutes to soften slightly. On a lightly floured surface, roll out the dough to about ¼ inch thickness.
- Cut Out the Cookies: Use your favorite cookie cutters to cut out the cookies. For the top cookies, you’ll need to cut out a smaller shape in the center.
- Place Cookies on Baking Sheets: Carefully transfer the cut-out cookies to the prepared baking sheets, leaving about 1 inch of space between each cookie.
- Fill the Cookies: Spoon about ½ teaspoon of jam into the center of each bottom cookie (the ones without the cut-out). Be careful not to overfill them.
- Top with Cut-Out Cookies: Gently place the cut-out cookies on top of the jam-filled cookies, lining them up as best as you can. Lightly press down around the edges to seal the top and bottom cookies together.
- Bake the Cookies: Bake the cookies for 10-12 minutes, or until the edges are lightly golden brown.
- Cool the Cookies: Remove the baking sheets from the oven and let the cookies cool on the baking sheets for a few minutes before transferring them to a wire rack to cool completely.
- Dust with Powdered Sugar (Optional): Once the cookies are completely cool, you can dust them with powdered sugar for a pretty finishing touch.
- Enjoy! Store them in an airtight container at room temperature.
Notes
- Use high-quality jam for the best flavor.
- Don’t overmix the dough.
- Chilling the dough is essential.
- Don’t overfill the cookies with jam.
- Let the cookies cool completely before dusting with powdered sugar.
- Experiment with different flavors of jam and cookie cutters.
- You can freeze the cookie dough for up to 2 months.
- To minimize jam bubbling over during baking, you can brush the top of the jam with a little bit of egg white before placing the top cookie on.
- For an extra burst of flavor, consider adding the zest of a lemon or orange to the cookie dough.


Leave a Comment