
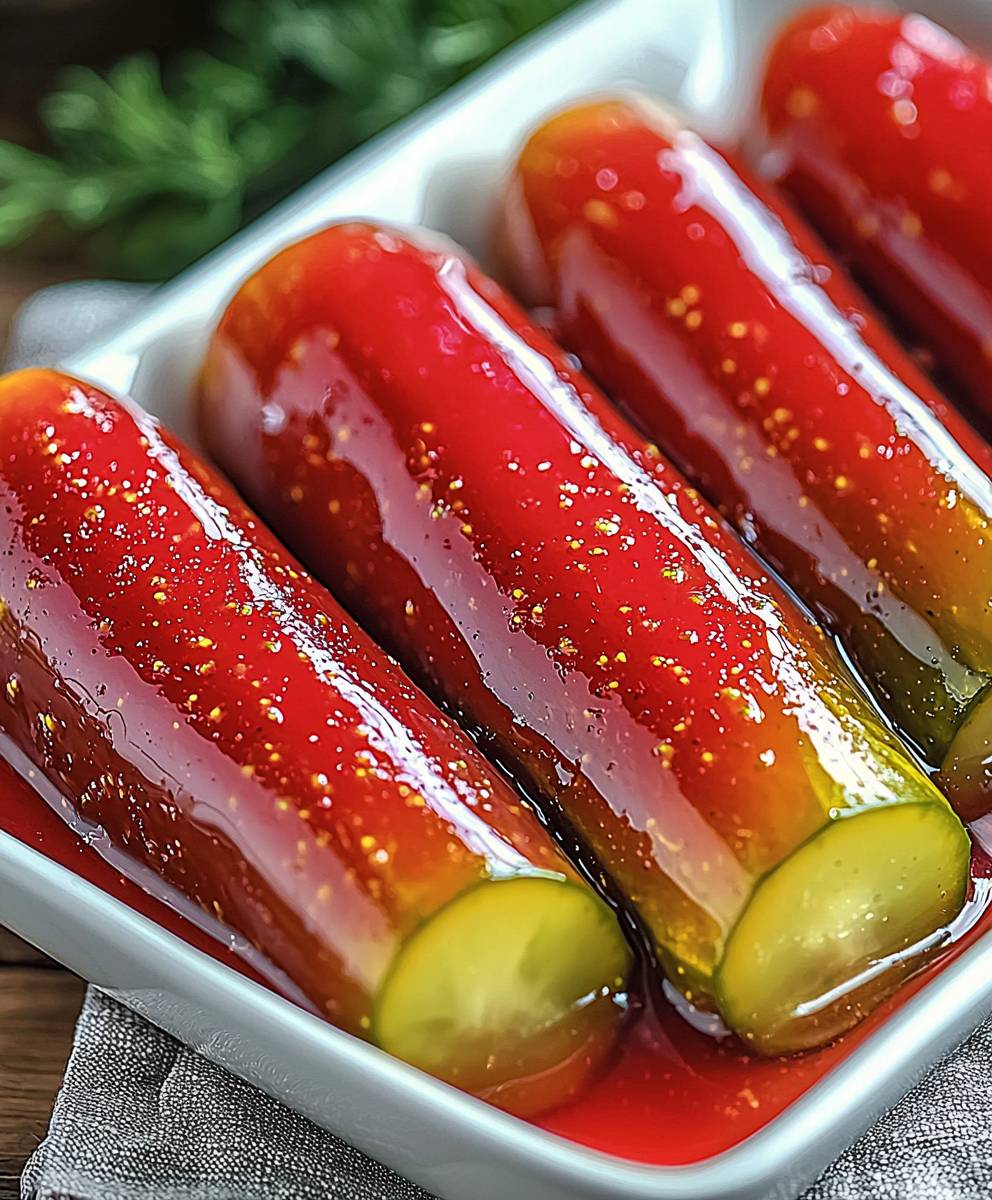
Kool Aid Pickles, a surprisingly vibrant and tangy treat, might sound like a culinary experiment gone wrong, but trust me, they’re a delightful explosion of flavor that will tantalize your taste buds! Have you ever wondered what happens when the sweet nostalgia of childhood meets the briny tang of a classic pickle? The answer is a surprisingly addictive snack that’s been a Southern secret for generations.
While the exact origins of Kool Aid Pickles are shrouded in mystery, they’re believed to have emerged from the resourceful kitchens of the American South, where ingenuity and a love for bold flavors reign supreme. Some say it was a way to entice children to eat their vegetables, while others claim it was simply a happy accident born from a surplus of Kool-Aid and a jar of pickles. Whatever the true story, this unique concoction has become a beloved regional specialty.
What makes these pickles so irresistible? It’s the unexpected combination of sweet, sour, and salty that creates a truly unforgettable taste sensation. The crisp, refreshing crunch of the pickle is perfectly balanced by the fruity sweetness of the Kool-Aid, resulting in a snack that’s both satisfying and surprisingly addictive. Plus, they’re incredibly easy to make, requiring just a few simple ingredients and minimal effort. Get ready to pucker up and experience a flavor adventure unlike any other!

Ingredients:
- 1 gallon dill pickles (whole or spears, your preference)
- 1 cup sugar
- 1 packet unsweetened Kool-Aid (any flavor, but Tropical Punch, Cherry, and Grape are popular)
- 1 cup pickle juice (from the gallon jar)
Preparing the Kool-Aid Brine
Okay, let’s get started! The first thing we need to do is create the magical Kool-Aid brine that will transform our ordinary pickles into something extraordinary. This is where the flavor explosion begins, so pay close attention!
- Drain the Pickles: Carefully drain the entire gallon of dill pickles. You can use a colander for this, or simply pour the juice out into a large bowl, being careful not to let any pickles escape. We need to reserve one cup of this pickle juice, so don’t discard it all!
- Measure the Pickle Juice: Using a measuring cup, carefully scoop out exactly one cup of the pickle juice you just drained. Set this aside; we’ll need it shortly.
- Combine Ingredients: In a large, non-reactive bowl (glass or plastic is best; avoid metal), combine the one cup of pickle juice, one cup of sugar, and the entire packet of unsweetened Kool-Aid. The size of the bowl is important because you’ll eventually add the pickles back in.
- Whisk Vigorously: Now, grab a whisk and get ready to put in a little elbow grease. Whisk the mixture together until the sugar and Kool-Aid are completely dissolved. This might take a few minutes, so be patient. You want a smooth, vibrant liquid with no grainy bits of sugar or Kool-Aid powder remaining. The color will depend on the flavor of Kool-Aid you chose, but it should be intensely colored.
- Taste Test (Optional): If you’re feeling adventurous, you can give the brine a little taste. Keep in mind that it will be very concentrated at this stage. This is just to give you an idea of the flavor profile. If you want it sweeter, you can add a little more sugar, but remember that the pickles will absorb the flavor over time.
Soaking the Pickles
Now comes the waiting game! This is where the magic truly happens. The longer the pickles soak in the Kool-Aid brine, the more intense the flavor will be. I recommend at least three days, but you can go longer for an even bolder taste.
- Return the Pickles: Gently place the drained pickles back into the bowl with the Kool-Aid brine. Make sure all the pickles are submerged in the liquid. If necessary, you can use a smaller bowl or plate to weigh them down and keep them fully immersed.
- Refrigerate: Cover the bowl tightly with plastic wrap or a lid and place it in the refrigerator. This is crucial for food safety and to allow the flavors to meld properly.
- The Waiting Game (Day 1): On the first day, give the pickles a gentle stir or turn them over a few times. This helps to ensure that all sides of the pickles are evenly exposed to the brine.
- The Waiting Game (Day 2): Repeat the stirring or turning process on the second day. You might notice that the pickles are already starting to take on the color of the Kool-Aid.
- The Waiting Game (Day 3 and Beyond): Continue to stir or turn the pickles once a day for at least three days. After three days, you can start tasting them to see if they’ve reached your desired level of flavor. If you want a stronger flavor, simply let them soak for a few more days. Some people even soak them for a week or more!
Serving and Storage
Finally, the moment we’ve all been waiting for! It’s time to enjoy your homemade Kool-Aid pickles. But before you dive in, let’s talk about serving and storage to ensure they stay fresh and delicious.
- Remove from Brine: When the pickles have reached your desired flavor intensity, remove them from the Kool-Aid brine. You can use a slotted spoon or tongs to do this.
- Drain Excess Liquid: Place the pickles on a plate lined with paper towels to drain any excess liquid. This will prevent them from being too soggy.
- Serving Suggestions: Kool-Aid pickles are a fun and quirky snack that can be enjoyed on their own. They’re also a great conversation starter at parties and gatherings. You can serve them chilled or at room temperature, depending on your preference. They pair well with other snacks like chips, pretzels, and cheese.
- Storage: To store your Kool-Aid pickles, place them in an airtight container and keep them refrigerated. They will last for several weeks in the refrigerator, but they’re usually so delicious that they don’t last that long!
- Important Note: Because these pickles are made with sugar, they may become slightly softer than traditional dill pickles. This is perfectly normal and doesn’t affect the flavor.
Troubleshooting and Tips
Even with the best instructions, sometimes things don’t go exactly as planned. Here are a few troubleshooting tips and extra hints to help you make the perfect Kool-Aid pickles.
- Pickles Not Sweet Enough: If your pickles aren’t sweet enough after soaking for several days, you can add more sugar to the brine. Remove the pickles from the brine, add a few tablespoons of sugar, whisk until dissolved, and then return the pickles to the brine.
- Pickles Too Sweet: If your pickles are too sweet, you can add a little more pickle juice to the brine to balance out the sweetness.
- Kool-Aid Flavor Too Weak: If the Kool-Aid flavor is too weak, you can add another packet of Kool-Aid to the brine.
- Pickles Too Soft: As mentioned earlier, the pickles may become slightly softer due to the sugar. To minimize this, use firm, crisp dill pickles to begin with.
- Experiment with Flavors: Don’t be afraid to experiment with different Kool-Aid flavors! Watermelon, Lemonade, and Blue Raspberry are also popular choices.
- Spice it Up: For a spicy kick, you can add a pinch of red pepper flakes to the brine.
- Use Quality Pickles: The quality of your dill pickles will affect the final result. Choose pickles that are crisp, flavorful, and not too sour.
- Patience is Key: The longer the pickles soak, the better they will taste. Don’t rush the process!
Variations and Adaptations
Once you’ve mastered the basic Kool-Aid pickle recipe, you can start experimenting with different variations and adaptations to create your own unique flavor combinations. Here are a few ideas to get you started:
- Spicy Kool-Aid Pickles: Add a pinch of red pepper flakes or a few slices of jalapeño to the brine for a spicy kick.
- Sweet and Sour Kool-Aid Pickles: Add a splash of apple cider vinegar to the brine for a tangy twist.
- Garlic Kool-Aid Pickles: Add a few cloves of minced garlic to the brine for a savory flavor.
- Herb-Infused Kool-Aid Pickles: Add fresh herbs like dill, parsley, or thyme to the brine for an aromatic flavor.
- Rainbow Kool-Aid Pickles: Use different Kool-Aid flavors to create a colorful assortment of pickles.
- Kool-Aid Pickle Relish: Chop up the Kool-Aid pickles and mix them with mayonnaise, mustard, and other seasonings to create a unique pickle relish.
Why Kool-Aid Pickles Work
You might be wondering, “Why does this even work?” The science behind Kool-Aid pickles is actually quite simple. Pickles are naturally porous, which means they have tiny holes that allow liquids to pass through. When you soak the pickles in the Kool-Aid brine, the sugar and Kool-Aid flavor molecules are absorbed into the pickle, replacing some of the original dill flavor. The longer the pickles soak, the more flavor they absorb, resulting in a sweet, tangy, and intensely flavored pickle.
The sugar in the brine also helps to soften the pickles slightly, giving them a unique texture. The combination of sweet, sour, and salty flavors is what makes Kool-Aid pickles so addictive. They’re a fun and unexpected treat that’s sure to surprise and delight your taste buds.
A Fun Project for All Ages
Making Kool-Aid pickles is a fun and easy project that can be enjoyed by people of all ages. It’s a great way to get kids involved in the kitchen and teach them about the science of food. Plus, it’s a delicious and rewarding experience that will leave you with a unique and flavorful snack to share with your friends and family
Conclusion:
So there you have it! Kool-Aid Pickles, a surprisingly delightful and undeniably quirky treat that’s guaranteed to spark conversation and tickle your taste buds. I know, I know, it sounds a little out there. But trust me on this one. The sweet and tangy combination is unexpectedly addictive, and the vibrant color makes them a fun addition to any snack table.
Why is this recipe a must-try? Because it’s more than just a pickle; it’s an experience! It’s a nostalgic trip back to childhood summers, a playful experiment in flavor, and a guaranteed conversation starter. It’s incredibly easy to make, requiring minimal ingredients and effort, making it perfect for a quick and fun project with kids or a last-minute addition to a potluck. Plus, it’s a fantastic way to use up any leftover Kool-Aid packets you might have lurking in your pantry. Forget boring snacks; these Kool-Aid Pickles are a burst of unexpected joy!
But the fun doesn’t stop there! Feel free to experiment with different Kool-Aid flavors to find your perfect pickle profile. Watermelon Kool-Aid creates a refreshing and summery pickle, while grape Kool-Aid offers a deeper, more intense sweetness. Lemon-Lime Kool-Aid adds a zesty twist, and cherry Kool-Aid delivers a classic, candy-like flavor. Don’t be afraid to get creative and mix and match flavors to create your own signature Kool-Aid Pickle masterpiece!
Serving Suggestions and Variations:
* Enjoy them straight from the jar as a unique and refreshing snack.
* Chop them up and add them to salads for a sweet and tangy crunch.
* Serve them alongside grilled meats or sandwiches for a surprising flavor contrast.
* Use them as a quirky garnish for cocktails or mocktails.
* For a spicier kick, add a pinch of chili flakes to the brine.
* For a more intense flavor, let the pickles marinate in the brine for a longer period of time, up to a week.
* Consider using different types of pickles, such as dill pickles or bread and butter pickles, to create different flavor profiles.
Ready to embark on your Kool-Aid Pickle adventure? I truly believe you’ll be pleasantly surprised by this unexpected treat. It’s a fun, easy, and delicious way to add a little bit of whimsy to your life.
So, grab your favorite Kool-Aid flavor, a jar of pickles, and get ready to create some magic! I’m confident that you’ll love these Kool-Aid Pickles as much as I do.
And now, for the most important part: I want to hear about your experience! Did you try this recipe? What Kool-Aid flavor did you use? What did you think? Share your photos, comments, and variations in the comments section below. I can’t wait to see what you create! Let’s spread the Kool-Aid Pickle love! Happy pickling!
Kool Aid Pickles: The Sweet and Sour Treat You Need to Try
Sweet and tangy Kool-Aid pickles are a fun, quirky snack made by soaking dill pickles in a sugary Kool-Aid brine. A surprisingly delicious treat!
Ingredients
- 1 gallon dill pickles (whole or spears, your preference)
- 1 cup sugar
- 1 packet unsweetened Kool-Aid (any flavor, but Tropical Punch, Cherry, and Grape are popular)
- 1 cup pickle juice (from the gallon jar)
Instructions
- Drain the Pickles: Drain the entire gallon of dill pickles, reserving 1 cup of the pickle juice.
- Combine Ingredients: In a large, non-reactive bowl, combine the 1 cup of pickle juice, 1 cup of sugar, and the entire packet of unsweetened Kool-Aid.
- Whisk Vigorously: Whisk the mixture together until the sugar and Kool-Aid are completely dissolved.
- Return the Pickles: Gently place the drained pickles back into the bowl with the Kool-Aid brine, ensuring they are submerged. Weigh them down with a smaller bowl or plate if needed.
- Refrigerate: Cover the bowl tightly with plastic wrap or a lid and place it in the refrigerator.
- Soak: Stir or turn the pickles over once a day for at least three days. Taste after three days and continue soaking for a stronger flavor, up to a week or more.
- Remove from Brine: Remove the pickles from the Kool-Aid brine using a slotted spoon or tongs.
- Drain Excess Liquid: Place the pickles on a plate lined with paper towels to drain any excess liquid.
- Serve: Serve chilled or at room temperature.
- Store: Store in an airtight container in the refrigerator for several weeks.
Notes
- The longer the pickles soak, the more intense the flavor will be.
- Pickles may become slightly softer due to the sugar.
- Experiment with different Kool-Aid flavors!
- For a spicy kick, add a pinch of red pepper flakes to the brine.
- If pickles aren’t sweet enough, add more sugar to the brine.
- If pickles are too sweet, add more pickle juice to the brine.
- Use firm, crisp dill pickles for best results.


Leave a Comment