
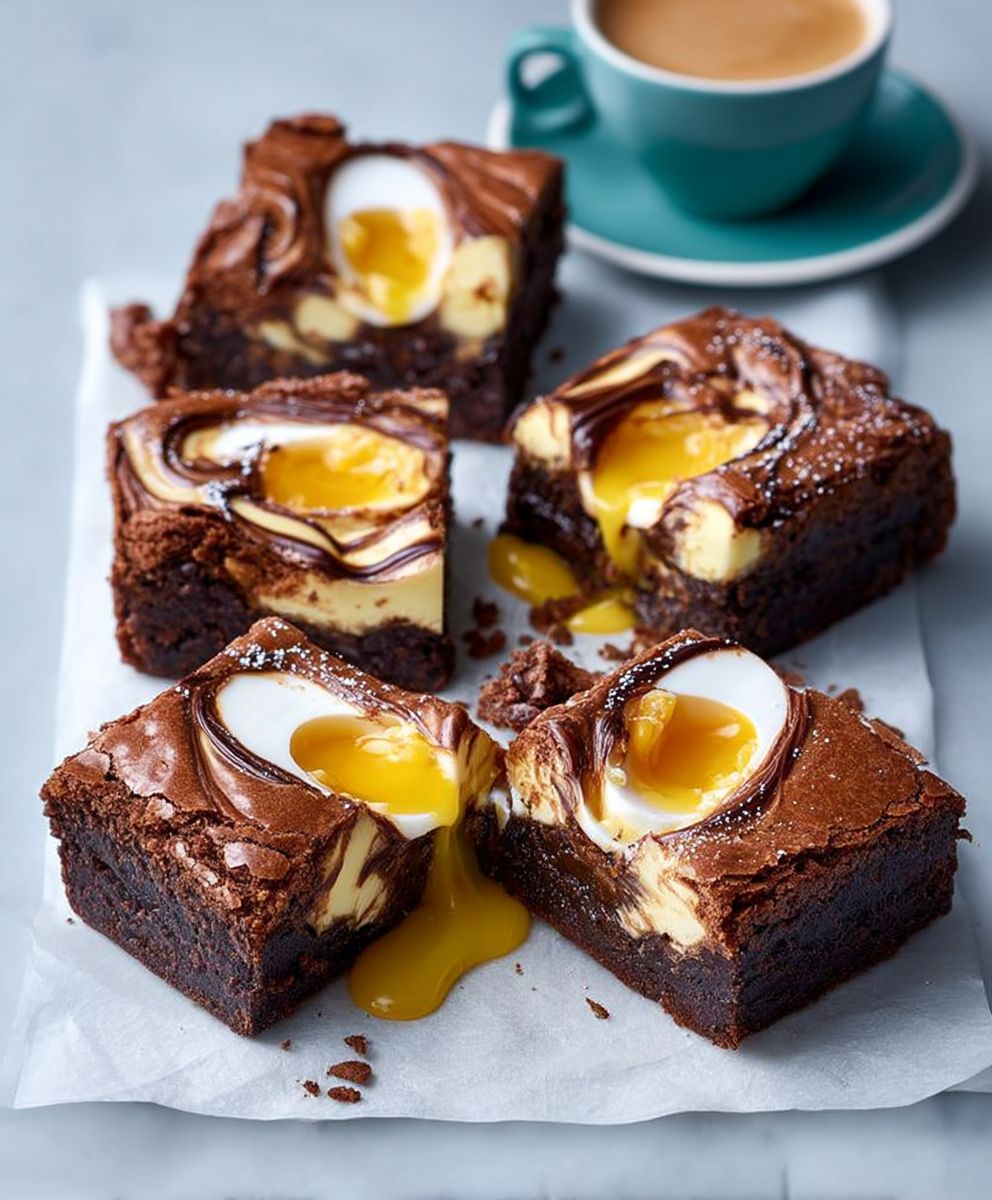
Creme Egg Brownies: Prepare to enter a realm of chocolatey indulgence where gooey, molten centers meet fudgy brownie perfection! Imagine sinking your teeth into a rich, decadent brownie, only to be met with the unmistakable burst of a Cadbury Creme Egg. It’s a symphony of textures and flavors that will leave you craving more.
While the classic Creme Egg is a relatively modern invention, dating back to the early 20th century in the UK, its popularity exploded, becoming synonymous with Easter celebrations. The idea of incorporating this iconic treat into other desserts is a stroke of genius, elevating familiar favorites to new heights of deliciousness. And that’s precisely what we’ve done with these incredible Creme Egg Brownies.
People adore this dish for its playful combination of textures and flavors. The fudgy brownie provides a comforting, familiar base, while the Creme Egg center adds a delightful surprise a burst of sweet, creamy fondant that melts in your mouth. They’re incredibly easy to make, requiring minimal effort for maximum impact, making them perfect for baking with kids or whipping up a batch for a last-minute Easter gathering. The combination of rich chocolate and sweet, gooey fondant is simply irresistible, making these brownies a guaranteed crowd-pleaser. Get ready to experience brownie bliss!

Ingredients:
- 200g dark chocolate, broken into pieces
- 200g unsalted butter, cubed
- 3 large eggs
- 200g golden caster sugar
- 80g plain flour
- 40g cocoa powder
- Pinch of salt
- 6 Creme Eggs, halved
Making the Brownie Batter
- Preheat your oven to 180°C (160°C fan/Gas Mark 4). Line a 20cm (8 inch) square baking tin with baking parchment, ensuring the paper overhangs the sides for easy removal later. This is crucial for getting those perfect, clean brownie edges!
- In a heatproof bowl set over a pan of simmering water (make sure the bottom of the bowl doesn’t touch the water!), melt the dark chocolate and butter together. Stir occasionally until smooth and glossy. This is called a bain-marie, and it’s the best way to melt chocolate without burning it. Be patient and don’t rush this step!
- Once melted, remove the bowl from the heat and let it cool slightly for about 5-10 minutes. This is important because you don’t want to cook the eggs when you add them.
- While the chocolate mixture is cooling, in a separate large bowl, whisk the eggs and sugar together until pale and slightly thickened. You can use an electric whisk or do it by hand, but an electric whisk will definitely make it easier and faster. You’re looking for a ribbon-like consistency when you lift the whisk.
- Gradually pour the cooled chocolate mixture into the egg mixture, whisking continuously until well combined. Be gentle, you don’t want to knock all the air out of the eggs.
- In a separate bowl, sift together the flour, cocoa powder, and salt. Sifting is important to remove any lumps and ensure a smooth brownie batter.
- Gently fold the dry ingredients into the wet ingredients until just combined. Be careful not to overmix, as this can result in tough brownies. A few streaks of flour are okay at this stage.
Baking the Brownies
- Pour the brownie batter into the prepared baking tin and spread it evenly.
- Arrange the Creme Egg halves on top of the brownie batter, cut-side up, pressing them in slightly. You can arrange them in a grid pattern or randomly, it’s up to you!
- Bake in the preheated oven for 20-25 minutes, or until the edges are set and the center is still slightly gooey. The baking time may vary depending on your oven, so keep an eye on them. A skewer inserted into the center should come out with moist crumbs attached.
- Remove the brownies from the oven and let them cool completely in the tin before cutting. This is the hardest part, but it’s essential for getting clean cuts and preventing the brownies from falling apart. I usually let them cool for at least an hour, or even longer if I can resist!
Cutting and Serving
- Once the brownies are completely cool, lift them out of the tin using the overhanging baking parchment.
- Cut the brownies into squares using a sharp knife. I find it helpful to wipe the knife clean between each cut for a neater finish.
- Serve and enjoy! These Creme Egg brownies are best enjoyed warm or at room temperature. They’re delicious on their own, or you can serve them with a scoop of vanilla ice cream or a dollop of whipped cream.
Tips and Variations
- For extra fudgy brownies: Reduce the baking time by a few minutes.
- For cakier brownies: Increase the flour by 20g.
- Add-ins: Feel free to add other ingredients to the batter, such as chopped nuts, chocolate chips, or a swirl of caramel sauce.
- Storage: These brownies can be stored in an airtight container at room temperature for up to 3 days.
- Freezing: You can also freeze the brownies for up to 2 months. Wrap them tightly in plastic wrap and then in foil. Thaw them overnight in the refrigerator before serving.
- Chocolate Quality: The quality of the chocolate you use will greatly impact the flavor of the brownies. I recommend using a good quality dark chocolate with at least 70% cocoa solids.
- Don’t Overbake: Overbaked brownies are dry and crumbly. The key to fudgy brownies is to underbake them slightly. They should still be slightly gooey in the center when you take them out of the oven.
- Cooling Time: As mentioned before, cooling the brownies completely is crucial for getting clean cuts. If you try to cut them while they’re still warm, they’ll be messy and fall apart.
- Serving Suggestions: These brownies are delicious on their own, but they’re also great with a scoop of ice cream, a dollop of whipped cream, or a drizzle of chocolate sauce. You can also dust them with powdered sugar for a pretty presentation.
- Experiment with Flavors: While this recipe is for Creme Egg brownies, you can easily adapt it to make other types of brownies. Try using different types of chocolate, adding different extracts (like vanilla or almond), or incorporating other candies or nuts.
- Make it Gluten-Free: To make these brownies gluten-free, simply substitute the plain flour with a gluten-free flour blend. Make sure to use a blend that is designed for baking and contains xanthan gum.
Troubleshooting
- Brownies are too dry: You may have overbaked them. Try reducing the baking time next time. Also, make sure you’re not using too much flour.
- Brownies are too gooey: You may have underbaked them. Try increasing the baking time next time. Also, make sure your oven is properly calibrated.
- Brownies are too crumbly: You may have overmixed the batter. Be careful not to overmix when you’re folding in the dry ingredients.
- Brownies are too tough: You may have used too much flour or overmixed the batter.
- Creme Eggs are melting too much: Make sure your oven temperature is accurate. Also, try placing the Creme Eggs on top of the batter just a few minutes before the end of the baking time.
Why This Recipe Works
This recipe is a guaranteed crowd-pleaser for several reasons:
- The Perfect Balance of Flavors: The rich, dark chocolate perfectly complements the sweet, creamy filling of the Creme Eggs. It’s a delightful combination that’s hard to resist.
- Fudgy Texture: The high butter and chocolate content ensures that these brownies are incredibly fudgy and moist. They’re not cakey or dry, but perfectly dense and decadent.
- Easy to Make: This recipe is relatively simple and straightforward, even for beginner bakers. The steps are easy to follow, and there are no complicated techniques involved.
- Customizable: As mentioned earlier, this recipe is easily customizable. You can add different ingredients, change the type of chocolate, or even make it gluten-free.
- Visually Appealing: The Creme Eggs add a fun and festive touch to these brownies, making them perfect for parties and special occasions. They look as good as they taste!
Nutritional Information (Approximate, per serving)
Please note that the following nutritional information is an estimate and may vary depending on the specific ingredients used.
- Calories: 450-500
- Fat: 30-35g
- Saturated Fat: 20-25g
- Cholesterol: 150-170mg
- Sodium: 100-150mg
- Carbohydrates: 40-45g
- Sugar: 30-35g
- Protein: 5-7g
Enjoy your delicious Creme Egg brownies! I hope you love them as much as I do!
Conclusion:
This lime poached rhubarb recipe is truly a revelation, transforming tart rhubarb into a sweet, tangy, and utterly irresistible treat. If you’ve ever been on the fence about rhubarb, or simply looking for a fresh and exciting way to enjoy it, this is the recipe that will change your mind. The bright citrus notes of the lime perfectly complement the rhubarb’s natural tang, creating a flavor profile that is both sophisticated and comforting. It’s a simple recipe, yes, but the end result is anything but ordinary.
Why is this a must-try? Because it’s incredibly versatile! Beyond the delightful flavor, the poached rhubarb itself is a blank canvas for culinary creativity. Think of it as a vibrant, flavorful component that can elevate so many dishes.
Serving Suggestions and Variations:
Don’t just stop at eating it straight from the pot (though I won’t judge if you do!). Here are a few ideas to get you started:
* Breakfast Bliss: Spoon it over your morning yogurt or granola for a burst of flavor and a healthy start to your day. A dollop of Greek yogurt and a sprinkle of toasted almonds? Divine!
* Dessert Darling: Serve it warm with a scoop of vanilla ice cream or a dollop of whipped cream for a simple yet elegant dessert. For an extra touch, crumble some ginger snaps on top.
* Pastry Perfection: Use it as a filling for tarts, pies, or crumbles. Imagine a rhubarb and almond tart with this lime-infused rhubarb pure heaven!
* Savory Surprise: Believe it or not, this poached rhubarb can also work in savory dishes. Try pairing it with grilled pork or duck for a sweet and tangy counterpoint.
* Cocktail Companion: Muddle a spoonful into your favorite cocktail for a unique and refreshing twist. A rhubarb mojito, anyone?
* Rhubarb Compote: Blend the poached rhubarb with a little of the poaching liquid for a smooth and flavorful compote.
* Rhubarb Chutney: Add some ginger, chili flakes, and a touch of vinegar to the poached rhubarb for a sweet and spicy chutney that pairs perfectly with cheese and crackers.
And the variations are endless! Feel free to experiment with different citrus fruits orange or grapefruit would also work beautifully. You could also add a touch of spice, such as ginger, cardamom, or star anise, to the poaching liquid for an extra layer of flavor. A splash of rosewater or orange blossom water would also add a delicate floral note.
I truly believe that this lime poached rhubarb recipe is a winner. It’s easy to make, incredibly delicious, and endlessly adaptable. I’ve poured my heart into perfecting this recipe, and I’m so excited for you to try it.
So, what are you waiting for? Head to your kitchen, gather your ingredients, and get poaching! I promise you won’t be disappointed. And most importantly, I’d love to hear about your experience. Did you try any of the serving suggestions or variations? What did you think of the flavor? Share your photos and comments below I can’t wait to see what you create! Happy cooking!
Lime Poached Rhubarb: A Delicious and Easy Dessert Recipe
Tart and sweet poached rhubarb with bright lime and a hint of vanilla. A simple and elegant dessert or topping.
Ingredients
- 1.5 lbs fresh rhubarb, trimmed and cut into 1-inch pieces
- 1 cup granulated sugar
- 1 cup water
- 1/2 cup fresh lime juice (from about 4-5 limes)
- 1 tablespoon lime zest, finely grated
- 1 vanilla bean, split lengthwise and seeds scraped (optional, but highly recommended!)
- Pinch of salt
Instructions
- Wash the rhubarb stalks thoroughly to remove any dirt. Trim off the leafy ends (these are poisonous, so discard them!) and the very bottom of the stalks.
- Cut the rhubarb into 1-inch pieces. Try to keep the pieces relatively uniform in size so they cook evenly.
- In a medium-sized, heavy-bottomed saucepan, combine the granulated sugar, water, fresh lime juice, and lime zest.
- If using a vanilla bean, split it lengthwise with a sharp knife. Scrape out the seeds and add both the seeds and the pod to the saucepan.
- Add a pinch of salt to the saucepan.
- Place the saucepan over medium heat and stir until the sugar is completely dissolved.
- Once the sugar is dissolved, bring the mixture to a gentle simmer.
- Gently add the rhubarb pieces to the simmering poaching liquid. Make sure the rhubarb is mostly submerged in the liquid.
- Reduce the heat to low, so the liquid is barely simmering. Cover the saucepan with a lid.
- Poach the rhubarb for about 5-10 minutes, or until it is tender but still holds its shape. Check the rhubarb frequently during the poaching process. Gently stir the rhubarb occasionally to ensure it cooks evenly.
- Once the rhubarb is cooked to your liking, remove the saucepan from the heat.
- Carefully transfer the poached rhubarb and the poaching liquid to a heatproof bowl.
- Let the rhubarb cool to room temperature. This will take about 30-45 minutes.
- Once the rhubarb is cooled, cover the bowl with plastic wrap and refrigerate for at least 2 hours, or preferably overnight.
- Before serving, remove the vanilla bean pod (if used).
- The poached rhubarb can be stored in an airtight container in the refrigerator for up to 5 days.
- Serve as a simple dessert, with ice cream, as a topping for pancakes or waffles, in a crumble or crisp, with shortbread cookies, as a component in a parfait, as a filling for tarts or pies, or garnished with fresh mint.
Notes
- Adjust the sweetness to your liking by reducing the amount of sugar.
- Experiment with adding other spices to the poaching liquid, such as ginger, cardamom, or star anise.
- Use different citrus fruits, such as lemon, orange, or grapefruit.
- Add a splash of your favorite liqueur to the poaching liquid for an extra kick.
- Use brown sugar instead of granulated sugar for a deeper, more caramel-like flavor.
- If you don’t have fresh limes, you can use bottled lime juice, but the flavor won’t be quite as bright and fresh.
- Don’t overcook the rhubarb; it should be tender but still hold its shape.
- Use a heavy-bottomed saucepan to prevent scorching.


Leave a Comment