
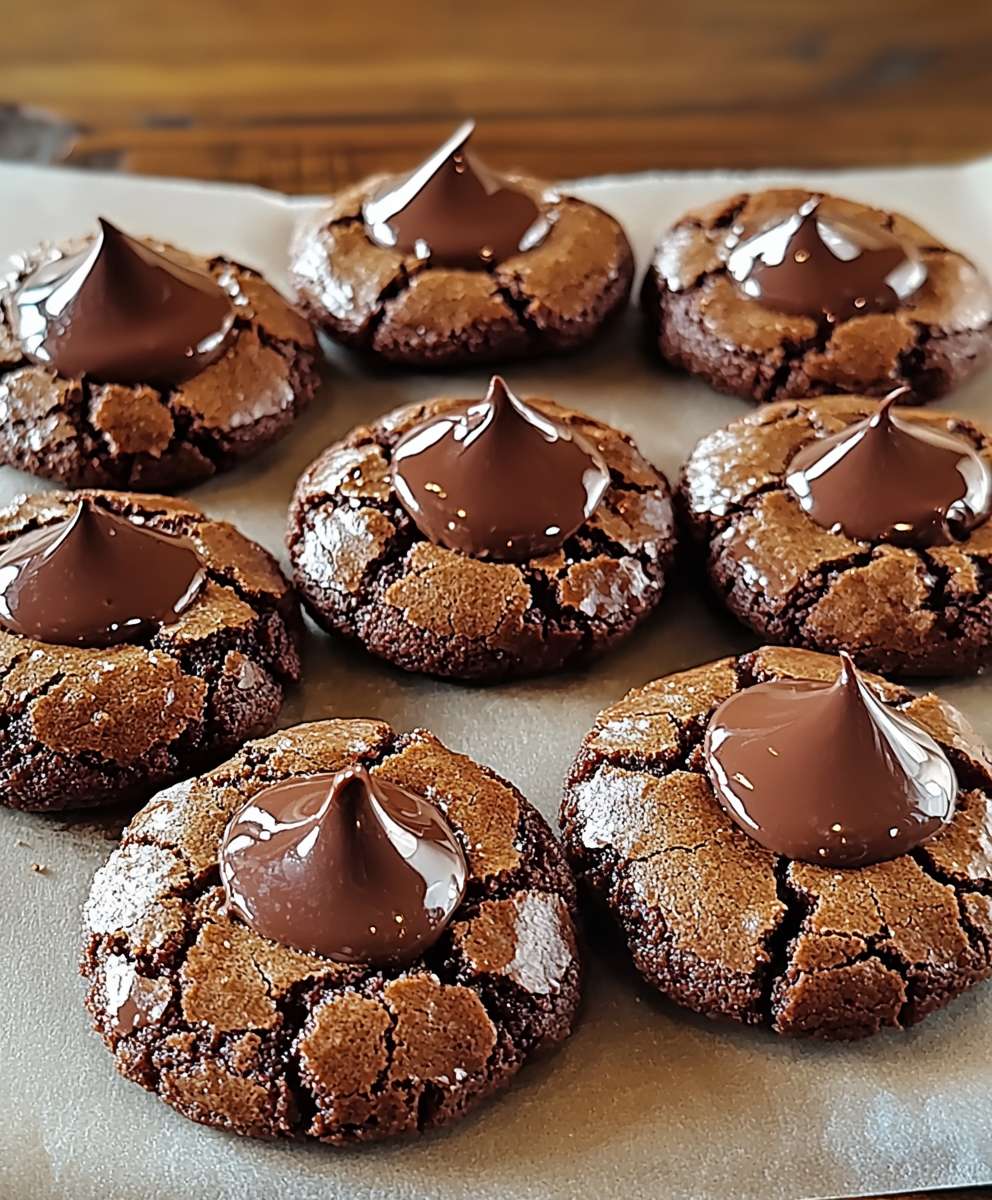
Meltaway Brownie Cookies: Prepare to experience a chocolate revelation! Imagine a cookie that boasts the rich, fudgy intensity of a brownie, but with the delicate, melt-in-your-mouth texture of a perfectly baked cookie. That’s precisely what we’re creating today. These aren’t your average cookies; they’re a decadent treat that will redefine your definition of chocolate bliss.
While the exact origins of this delightful hybrid are somewhat shrouded in mystery, the concept of combining brownie batter with cookie techniques has been around for decades. It’s a testament to our collective love for both brownies and cookies, a desire to have the best of both worlds in a single, irresistible bite. Think of it as a culinary mashup for the ages!
What makes Meltaway Brownie Cookies so universally adored? It’s the symphony of textures and flavors. The slightly crisp edges give way to an intensely fudgy center that practically dissolves on your tongue. The deep, dark chocolate flavor is rich and satisfying, without being overly sweet. Plus, they’re surprisingly easy to make, requiring no special equipment or complicated techniques. Whether you’re a seasoned baker or a kitchen novice, you can whip up a batch of these heavenly cookies in no time. Get ready to indulge in a truly unforgettable chocolate experience!

Ingredients:
- 1 cup (2 sticks) unsalted butter, softened
- 1 ½ cups granulated sugar
- ¾ cup unsweetened cocoa powder
- ½ teaspoon baking powder
- ½ teaspoon salt
- 2 large eggs
- 1 teaspoon vanilla extract
- 1 ¾ cups all-purpose flour
- 1 cup semi-sweet chocolate chips (optional, but highly recommended!)
- Powdered sugar, for dusting (essential for that meltaway effect!)
Preparing the Dough: The Foundation of Deliciousness
- Cream the Butter and Sugar: In a large bowl, or the bowl of your stand mixer, cream together the softened butter and granulated sugar until light and fluffy. This usually takes about 3-5 minutes. Don’t rush this step! The air you incorporate here is crucial for the cookie’s texture. You want it to be pale and almost whipped. Scrape down the sides of the bowl occasionally to ensure everything is evenly mixed.
- Incorporate the Cocoa, Baking Powder, and Salt: Add the unsweetened cocoa powder, baking powder, and salt to the creamed butter and sugar mixture. Mix on low speed until well combined. Be careful not to overmix at this stage, as it can develop the gluten in the flour later on. The mixture will look quite dry and crumbly at this point, and that’s perfectly normal.
- Add the Eggs and Vanilla: Beat in the eggs one at a time, mixing well after each addition. Make sure each egg is fully incorporated before adding the next. Then, stir in the vanilla extract. The mixture should start to come together and look more like a cohesive dough.
- Gradually Add the Flour: Gradually add the all-purpose flour, mixing on low speed until just combined. Be very careful not to overmix the dough. Overmixing will develop the gluten in the flour, resulting in tough cookies. Mix until the flour disappears, and then stop. A few streaks of flour are okay at this point.
- Stir in the Chocolate Chips (Optional but Encouraged!): Gently fold in the semi-sweet chocolate chips, if using. I highly recommend using them! They add a wonderful richness and texture to the cookies. Distribute them evenly throughout the dough.
- Chill the Dough: This is a crucial step! Cover the bowl with plastic wrap and refrigerate the dough for at least 2 hours, or preferably overnight. Chilling the dough allows the gluten to relax, which results in a more tender cookie. It also prevents the cookies from spreading too much during baking. The longer you chill the dough, the better the flavor and texture will be. I often make the dough the day before I plan to bake the cookies.
Baking the Cookies: The Transformation
- Preheat the Oven: Preheat your oven to 350°F (175°C). Line baking sheets with parchment paper or silicone baking mats. Parchment paper is my preferred method as it prevents sticking and makes cleanup a breeze.
- Scoop the Dough: Remove the chilled dough from the refrigerator. Using a cookie scoop or a spoon, scoop rounded tablespoons of dough onto the prepared baking sheets, leaving about 2 inches between each cookie. The cookies will spread slightly during baking, so it’s important to give them enough space.
- Bake the Cookies: Bake for 9-11 minutes, or until the edges are set and the centers are still slightly soft. The cookies will look slightly underbaked, but they will continue to set up as they cool. Don’t overbake them, or they will be dry and crumbly.
- Cool on Baking Sheets: Remove the baking sheets from the oven and let the cookies cool on the baking sheets for a few minutes before transferring them to a wire rack to cool completely. This allows them to firm up slightly and prevents them from breaking when you move them.
The Meltaway Magic: The Finishing Touch
- Dust with Powdered Sugar: Once the cookies are completely cool, dust them generously with powdered sugar. This is what gives them that signature “meltaway” texture and appearance. You can use a sifter or a small strainer to evenly distribute the powdered sugar. Don’t be shy! The more powdered sugar, the better.
- Second Dusting (Optional but Recommended): For an extra meltaway effect, you can dust the cookies with powdered sugar a second time after the first layer has settled. This will create a thicker, more opaque coating of powdered sugar.
Tips and Tricks for Perfect Meltaway Brownie Cookies
- Use High-Quality Cocoa Powder: The quality of your cocoa powder will significantly impact the flavor of the cookies. Use a good-quality Dutch-processed cocoa powder for the best results. Dutch-processed cocoa powder is less acidic and has a smoother, richer flavor.
- Don’t Overmix the Dough: Overmixing the dough will develop the gluten in the flour, resulting in tough cookies. Mix until the flour is just combined, and then stop.
- Chill the Dough Thoroughly: Chilling the dough is essential for preventing the cookies from spreading too much during baking and for developing the flavor. Chill the dough for at least 2 hours, or preferably overnight.
- Don’t Overbake the Cookies: Overbaking the cookies will make them dry and crumbly. Bake them until the edges are set and the centers are still slightly soft. They will continue to set up as they cool.
- Use a Cookie Scoop: Using a cookie scoop will ensure that all of your cookies are the same size, which will help them bake evenly.
- Adjust Baking Time for Your Oven: Every oven is different, so you may need to adjust the baking time slightly. Keep a close eye on the cookies and bake them until they are just set.
- Experiment with Flavors: Feel free to experiment with different flavors and add-ins. You can add chopped nuts, dried fruit, or even a pinch of espresso powder to the dough.
- Storage: Store the cookies in an airtight container at room temperature for up to 3 days. They are best enjoyed within the first 24 hours.
- Freezing: You can freeze the unbaked cookie dough for up to 2 months. Scoop the dough into balls and place them on a baking sheet lined with parchment paper. Freeze until solid, then transfer to a freezer bag. When ready to bake, bake from frozen, adding a few minutes to the baking time. You can also freeze the baked cookies for up to 2 months. Thaw them completely before serving.
- Troubleshooting:
- Cookies are spreading too much: The dough may not have been chilled long enough, or the oven temperature may be too low. Make sure to chill the dough for at least 2 hours and check your oven temperature.
- Cookies are dry and crumbly: The cookies may have been overbaked, or the dough may have been overmixed. Make sure to bake them until they are just set and avoid overmixing the dough.
- Cookies are too tough: The dough may have been overmixed. Avoid overmixing the dough.
Variations: Spice Things Up!
- Peppermint Meltaway Brownie Cookies: Add ½ teaspoon of peppermint extract to the dough and sprinkle crushed peppermint candies on top before baking.
- Salted Caramel Meltaway Brownie Cookies: Drizzle the baked cookies with salted caramel sauce and sprinkle with sea salt.
- Espresso Meltaway Brownie Cookies: Add 1 teaspoon of espresso powder to the dough for a mocha flavor.
- Nutella Meltaway Brownie Cookies: Swirl a spoonful of Nutella into the center of each cookie before baking.
- Double Chocolate Meltaway Brownie Cookies: Use dark chocolate chips instead of semi-sweet chocolate chips.
Serving Suggestions: The Perfect Presentation
- Serve these cookies with a glass of cold milk or a cup of hot coffee.
- Package them in a pretty box or tin for a thoughtful gift.
- Add them to a dessert platter for a party or gathering.
- Enjoy them as a sweet treat any time of day!
Conclusion:
And there you have it! These Meltaway Brownie Cookies are truly something special, and I genuinely believe they deserve a spot in your regular baking rotation. Why? Because they deliver that intense, fudgy brownie experience in a perfectly portioned, incredibly satisfying cookie form. Forget choosing between a brownie and a cookie with this recipe, you get the best of both worlds! The crackled tops, the chewy edges, and the melt-in-your-mouth center are simply irresistible.
But beyond the amazing texture and flavor, these cookies are surprisingly easy to make. The recipe is straightforward, using ingredients you likely already have in your pantry. No fancy techniques or complicated steps required! This makes them perfect for a quick weeknight treat or a weekend baking project with the kids. Plus, the aroma that fills your kitchen while they’re baking is pure bliss.
These Meltaway Brownie Cookies are more than just a recipe; they’re an experience. They’re a little bit of chocolatey happiness that you can share with friends and family, or simply enjoy all by yourself (we won’t judge!).
Now, let’s talk about serving suggestions and variations, because the possibilities are endless! For a classic experience, enjoy them warm, straight from the oven, with a tall glass of cold milk. Or, take it up a notch and serve them with a scoop of vanilla ice cream for a decadent dessert. A sprinkle of sea salt on top enhances the chocolate flavor beautifully.
Feeling adventurous? Try adding some mix-ins! Chopped walnuts, pecans, or macadamia nuts would add a delightful crunch. Chocolate chips (milk, dark, or white) would amplify the chocolatey goodness. A swirl of peanut butter or Nutella before baking would create a delicious marbled effect. You could even add a pinch of espresso powder to the batter for a mocha-flavored twist. Get creative and experiment with your favorite flavors!
Another fun variation is to use different types of chocolate. While this recipe calls for semi-sweet chocolate, you could easily substitute dark chocolate for a richer, more intense flavor, or milk chocolate for a sweeter, more classic taste. Just be sure to adjust the sugar accordingly to balance the sweetness.
These cookies also make fantastic gifts! Package them in a cute box or tin, and they’re sure to be a hit with anyone who receives them. They’re perfect for holidays, birthdays, or just because.
I’m so confident that you’ll love these Meltaway Brownie Cookies. They’re a crowd-pleaser, a guaranteed success, and a truly unforgettable treat. So, what are you waiting for? Preheat your oven, gather your ingredients, and get ready to bake some magic!
I can’t wait to hear about your baking adventures! Once you’ve tried this recipe, please come back and leave a comment below. Let me know what you thought, what variations you tried, and any tips or tricks you discovered along the way. Sharing your experience will not only help other bakers but will also inspire me to create even more delicious recipes for you. Happy baking, and enjoy every single bite of these incredible Meltaway Brownie Cookies!
Meltaway Brownie Cookies: The Ultimate Guide to Baking Perfection
Fudgy brownie cookies that melt in your mouth! These chocolatey treats are coated in powdered sugar for an irresistible experience.
Ingredients
- 1 cup (2 sticks) unsalted butter, softened
- 1 ½ cups granulated sugar
- ¾ cup unsweetened cocoa powder
- ½ teaspoon baking powder
- ½ teaspoon salt
- 2 large eggs
- 1 teaspoon vanilla extract
- 1 ¾ cups all-purpose flour
- 1 cup semi-sweet chocolate chips (optional, but highly recommended!)
- Powdered sugar, for dusting
Instructions
- In a large bowl, or the bowl of your stand mixer, cream together the softened butter and granulated sugar until light and fluffy (3-5 minutes). Scrape down the sides of the bowl occasionally.
- Add the unsweetened cocoa powder, baking powder, and salt to the creamed butter and sugar mixture. Mix on low speed until well combined.
- Beat in the eggs one at a time, mixing well after each addition. Stir in the vanilla extract.
- Gradually add the all-purpose flour, mixing on low speed until just combined. Be careful not to overmix.
- Gently fold in the semi-sweet chocolate chips, if using.
- Cover the bowl with plastic wrap and refrigerate the dough for at least 2 hours, or preferably overnight.
- Preheat your oven to 350°F (175°C). Line baking sheets with parchment paper or silicone baking mats.
- Remove the chilled dough from the refrigerator. Using a cookie scoop or a spoon, scoop rounded tablespoons of dough onto the prepared baking sheets, leaving about 2 inches between each cookie.
- Bake for 9-11 minutes, or until the edges are set and the centers are still slightly soft.
- Remove the baking sheets from the oven and let the cookies cool on the baking sheets for a few minutes before transferring them to a wire rack to cool completely.
- Once the cookies are completely cool, dust them generously with powdered sugar.
- For an extra meltaway effect, you can dust the cookies with powdered sugar a second time after the first layer has settled.
Notes
- Use high-quality cocoa powder for the best flavor. Dutch-processed is recommended.
- Don’t overmix the dough.
- Chilling the dough is essential.
- Don’t overbake the cookies.
- Store in an airtight container at room temperature for up to 3 days.
- Freeze unbaked dough or baked cookies for up to 2 months.


Leave a Comment