
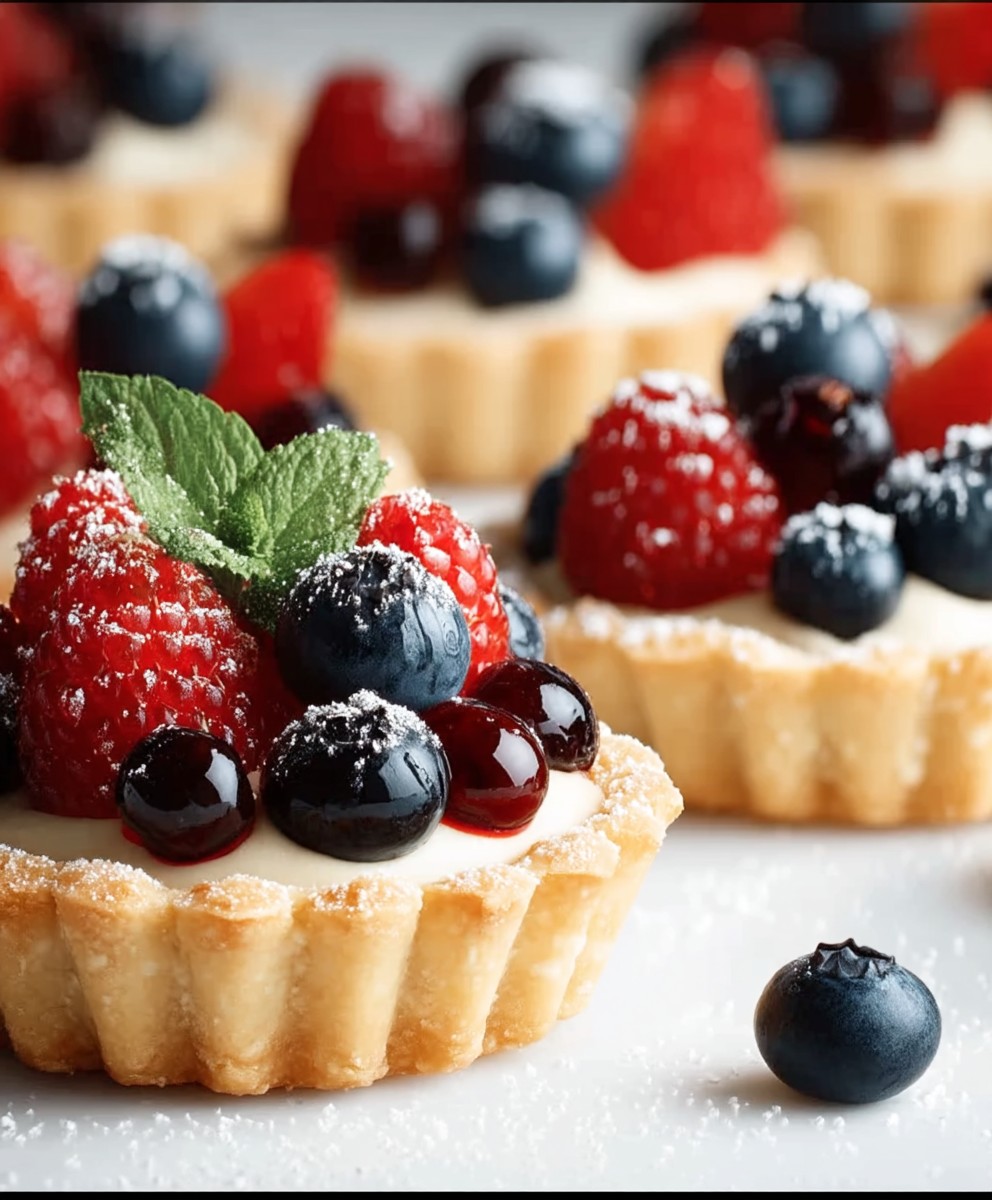
Mini Fruit Tarts: Prepare to be captivated by these delightful, bite-sized explosions of flavor! Imagine a buttery, crumbly crust cradling a luscious, creamy filling, all topped with a vibrant mosaic of fresh, seasonal fruits. These aren’t just desserts; they’re edible jewels that are guaranteed to brighten any occasion.
Fruit tarts, in their various forms, have a rich history, tracing back to medieval Europe where pastry chefs showcased their skills with elaborate fruit-filled creations. While the grand, family-sized tarts were reserved for special feasts, these mini fruit tarts bring that same elegance and deliciousness to a more accessible, individual serving. They’re perfect for parties, afternoon tea, or simply a sweet treat to brighten your day.
What makes these little gems so irresistible? It’s the perfect balance of textures and tastes. The crisp, buttery crust provides a satisfying crunch, while the smooth, creamy filling offers a melt-in-your-mouth sensation. And then, of course, there’s the fruit! The natural sweetness and slight tartness of the berries, kiwi, and other fruits complement the richness of the pastry and cream, creating a symphony of flavors that dance on your palate. Plus, they’re incredibly convenient easy to eat, easy to serve, and undeniably beautiful. Get ready to impress your friends and family with these stunning and delicious mini fruit tarts!

Ingredients:
- For the Tart Crusts:
- 1 1/2 cups all-purpose flour
- 1/2 cup (1 stick) unsalted butter, cold and cubed
- 1/4 cup granulated sugar
- 1/4 teaspoon salt
- 1 large egg yolk
- 2-4 tablespoons ice water
- For the Pastry Cream Filling:
- 2 cups whole milk
- 1/2 cup granulated sugar
- 1/4 cup cornstarch
- 1/4 teaspoon salt
- 4 large egg yolks
- 2 tablespoons unsalted butter
- 1 teaspoon vanilla extract
- For the Glaze:
- 1/4 cup apricot jam
- 1 tablespoon water
- For the Fruit Toppings:
- 1 cup fresh strawberries, hulled and sliced
- 1 cup fresh blueberries
- 1 cup fresh raspberries
- 1 kiwi, peeled and sliced
- 1/2 cup mandarin orange segments (canned or fresh)
- Other fruits of your choice (e.g., grapes, blackberries, pineapple)
Preparing the Tart Crusts:
- Combine Dry Ingredients: In a large bowl, whisk together the flour, sugar, and salt. This ensures the salt and sugar are evenly distributed throughout the flour, which is important for both flavor and texture.
- Cut in the Butter: Add the cold, cubed butter to the flour mixture. Using a pastry blender or your fingertips, cut the butter into the flour until the mixture resembles coarse crumbs. The key here is to work quickly so the butter stays cold. Cold butter prevents gluten development, resulting in a tender, flaky crust. If using your fingertips, gently rub the butter between your fingers and the flour, avoiding overworking the dough.
- Add the Egg Yolk: In a small bowl, whisk the egg yolk lightly. Add the egg yolk to the flour and butter mixture. The egg yolk adds richness and helps bind the dough together.
- Add Ice Water: Gradually add the ice water, one tablespoon at a time, mixing until the dough just comes together. Be careful not to add too much water, as this can make the crust tough. The amount of water needed will vary depending on the humidity and the dryness of your flour. Stop adding water when the dough starts to clump together and form a shaggy mass.
- Form the Dough: Gently gather the dough into a disc. Wrap the disc tightly in plastic wrap and refrigerate for at least 30 minutes, or up to 2 hours. This chilling period allows the gluten to relax, making the dough easier to roll out and preventing it from shrinking during baking.
- Roll Out the Dough: On a lightly floured surface, roll out the chilled dough to about 1/8 inch thickness. Work quickly and keep the dough cold to prevent it from sticking. If the dough becomes too warm and sticky, return it to the refrigerator for a few minutes to chill.
- Cut Out Tart Shells: Use a cookie cutter or a sharp knife to cut out circles of dough slightly larger than the diameter of your mini tart pans. I like to use a fluted cookie cutter for a decorative edge.
- Press into Tart Pans: Gently press the dough circles into the mini tart pans, making sure the dough is evenly distributed and reaches the edges of the pans. Trim any excess dough from the edges of the pans with a sharp knife or scissors.
- Dock the Crusts: Use a fork to prick the bottom of each tart shell several times. This prevents the crust from puffing up during baking.
- Chill Again: Place the tart pans in the refrigerator for another 15-20 minutes. This helps the crusts maintain their shape during baking.
- Bake the Crusts: Preheat your oven to 375°F (190°C). Line the tart shells with parchment paper and fill with pie weights or dried beans. This will prevent the crusts from puffing up and losing their shape. Bake for 15-20 minutes, or until the edges are lightly golden brown.
- Remove Weights and Bake Further: Remove the parchment paper and pie weights. Bake for another 5-10 minutes, or until the crusts are golden brown all over. Keep a close eye on them to prevent burning.
- Cool Completely: Remove the tart shells from the oven and let them cool completely in the pans before filling. This is crucial to prevent the pastry cream from melting and making the crust soggy.
Preparing the Pastry Cream Filling:
- Heat the Milk: In a medium saucepan, heat the milk over medium heat until it is just simmering. Be careful not to let it boil.
- Whisk Sugar, Cornstarch, and Salt: In a separate bowl, whisk together the sugar, cornstarch, and salt. This ensures the cornstarch is evenly distributed and prevents lumps from forming in the pastry cream.
- Whisk in Egg Yolks: Add the egg yolks to the sugar mixture and whisk until smooth and pale yellow. The egg yolks add richness and help thicken the pastry cream.
- Temper the Egg Yolks: Slowly pour a small amount of the hot milk into the egg yolk mixture, whisking constantly. This process is called tempering and it prevents the egg yolks from scrambling when they are added to the hot milk.
- Combine Mixtures: Pour the tempered egg yolk mixture into the saucepan with the remaining hot milk.
- Cook and Thicken: Cook over medium heat, whisking constantly, until the pastry cream thickens and comes to a boil. Continue to cook for 1-2 minutes, whisking constantly, to ensure the cornstarch is fully cooked. The pastry cream should be thick enough to coat the back of a spoon.
- Remove from Heat: Remove the saucepan from the heat and stir in the butter and vanilla extract. The butter adds richness and shine to the pastry cream, while the vanilla extract enhances the flavor.
- Cool and Chill: Pour the pastry cream into a bowl, cover the surface with plastic wrap (pressing the plastic wrap directly onto the surface of the cream to prevent a skin from forming), and refrigerate for at least 2 hours, or until completely chilled. Chilling the pastry cream allows it to thicken further and develop its flavor.
Assembling the Mini Fruit Tarts:
- Prepare the Glaze: In a small saucepan, combine the apricot jam and water. Heat over low heat, stirring constantly, until the jam is melted and smooth. Strain the glaze through a fine-mesh sieve to remove any lumps. This will give you a smooth, glossy glaze.
- Fill the Tart Shells: Once the tart shells and pastry cream are completely cooled, spoon the pastry cream into the tart shells, filling them to the top. You can use a piping bag for a neater presentation, but a spoon works just fine.
- Arrange the Fruit: Arrange the fresh fruit on top of the pastry cream in a decorative pattern. Get creative with your arrangement! You can create concentric circles, alternating rows, or a random assortment of fruit.
- Glaze the Fruit: Brush the fruit with the apricot glaze. This will give the fruit a beautiful shine and help to preserve it. The glaze also adds a touch of sweetness that complements the fruit and pastry cream.
- Chill Before Serving: Refrigerate the assembled mini fruit tarts for at least 30 minutes before serving. This will allow the pastry cream to set further and the flavors to meld together.
Tips for Success:
- Use Cold Ingredients: Cold butter and ice water are essential for a tender, flaky crust.
- Don’t Overwork the Dough: Overworking the dough will develop the gluten, resulting in a tough crust.
- Chill the Dough: Chilling the dough allows the gluten to relax and prevents the crust from shrinking during baking.
- Use Pie Weights: Pie weights prevent the crust from puffing up during baking.
- Cook the Pastry Cream Properly: Cook the pastry cream until it is thick enough to coat the back of a spoon.
- Chill the Pastry Cream: Chilling the pastry cream allows it to thicken further and develop its flavor.
- Get Creative with the Fruit: Use a variety of fresh fruits to create a beautiful and delicious presentation.
- Glaze the Fruit: Glazing the fruit gives it a beautiful shine and helps to preserve it.
Variations:
- Different Crusts:
Conclusion:
These Mini Fruit Tarts are more than just a dessert; they’re a burst of sunshine on a plate, a delightful symphony of textures and flavors that will leave you and your loved ones craving more. From the buttery, crumbly crust to the creamy, dreamy filling and the vibrant, jewel-toned fruit topping, every element works in perfect harmony to create a truly unforgettable treat. I genuinely believe that this recipe is a must-try for anyone who appreciates a touch of elegance and a whole lot of deliciousness in their baking.
Why are these mini tarts so special? Well, beyond their undeniable beauty, they’re surprisingly easy to make. Don’t let the fancy appearance intimidate you! I’ve broken down each step to be as clear and straightforward as possible, ensuring that even novice bakers can achieve impressive results. Plus, the individual serving sizes make them perfect for parties, potlucks, or even just a special treat for yourself. No slicing, no mess, just pure, unadulterated tart enjoyment.
But the best part about these Mini Fruit Tarts is their versatility. Feel free to get creative with your fruit selection! While I’ve suggested a mix of berries, kiwi, and mandarin oranges, the possibilities are endless. Consider using seasonal fruits like peaches and plums in the summer, or apples and pears in the fall. You could even add a sprinkle of toasted nuts or a drizzle of chocolate for an extra touch of indulgence.
Looking for serving suggestions? These tarts are wonderful on their own, but they also pair beautifully with a scoop of vanilla ice cream or a dollop of whipped cream. For a truly decadent experience, try serving them with a glass of chilled Moscato or a light dessert wine. And if you’re feeling adventurous, you could even experiment with different fillings. A lemon curd filling would add a tangy twist, while a chocolate ganache filling would satisfy any chocolate lover’s cravings.
Variations to Explore:
* Lemon Curd Tarts: Replace the pastry cream with a homemade or store-bought lemon curd for a zesty and refreshing variation.
* Chocolate Ganache Tarts: Fill the baked tart shells with a rich chocolate ganache and top with fresh raspberries for a decadent treat.
* Nutty Tarts: Add a tablespoon of chopped nuts (almonds, pecans, or walnuts) to the pastry dough for a nutty flavor and texture.
* Tropical Tarts: Use tropical fruits like mango, pineapple, and papaya for a vibrant and exotic twist.
* Mini Fruit Tarts with a hint of spice: Add a pinch of cinnamon or nutmeg to the pastry dough for a warm and comforting flavor.I’m so excited for you to try this recipe and experience the joy of creating these delightful Mini Fruit Tarts for yourself. I truly believe that baking is a form of love, and these tarts are the perfect way to share that love with the people you care about.
So, what are you waiting for? Gather your ingredients, preheat your oven, and get ready to embark on a baking adventure. And when you do, please don’t hesitate to share your experience with me! I’d love to see your creations and hear about any variations you try. You can tag me on social media or leave a comment below. Happy baking! I can’t wait to see your beautiful and delicious Mini Fruit Tarts!
Mini Fruit Tarts: A Delicious & Easy Dessert Recipe
Delicate mini tarts filled with creamy pastry cream and topped with a colorful assortment of fresh fruit, glazed to perfection.
Ingredients
- 1 1/2 cups all-purpose flour
- 1/2 cup (1 stick) unsalted butter, cold and cubed
- 1/4 cup granulated sugar
- 1/4 teaspoon salt
- 1 large egg yolk
- 2-4 tablespoons ice water
- 2 cups whole milk
- 1/2 cup granulated sugar
- 1/4 cup cornstarch
- 1/4 teaspoon salt
- 4 large egg yolks
- 2 tablespoons unsalted butter
- 1 teaspoon vanilla extract
- 1/4 cup apricot jam
- 1 tablespoon water
- 1 cup fresh strawberries, hulled and sliced
- 1 cup fresh blueberries
- 1 cup fresh raspberries
- 1 kiwi, peeled and sliced
- 1/2 cup mandarin orange segments (canned or fresh)
- Other fruits of your choice (e.g., grapes, blackberries, pineapple)
Instructions
- In a large bowl, whisk together the flour, sugar, and salt.
- Add the cold, cubed butter to the flour mixture. Using a pastry blender or your fingertips, cut the butter into the flour until the mixture resembles coarse crumbs.
- In a small bowl, whisk the egg yolk lightly. Add the egg yolk to the flour and butter mixture.
- Gradually add the ice water, one tablespoon at a time, mixing until the dough just comes together.
- Gently gather the dough into a disc. Wrap the disc tightly in plastic wrap and refrigerate for at least 30 minutes, or up to 2 hours.
- On a lightly floured surface, roll out the chilled dough to about 1/8 inch thickness.
- Use a cookie cutter or a sharp knife to cut out circles of dough slightly larger than the diameter of your mini tart pans.
- Gently press the dough circles into the mini tart pans, making sure the dough is evenly distributed and reaches the edges of the pans. Trim any excess dough from the edges of the pans with a sharp knife or scissors.
- Use a fork to prick the bottom of each tart shell several times.
- Place the tart pans in the refrigerator for another 15-20 minutes.
- Preheat your oven to 375°F (190°C). Line the tart shells with parchment paper and fill with pie weights or dried beans. Bake for 15-20 minutes, or until the edges are lightly golden brown.
- Remove the parchment paper and pie weights. Bake for another 5-10 minutes, or until the crusts are golden brown all over.
- Remove the tart shells from the oven and let them cool completely in the pans before filling.
- In a medium saucepan, heat the milk over medium heat until it is just simmering.
- In a separate bowl, whisk together the sugar, cornstarch, and salt.
- Add the egg yolks to the sugar mixture and whisk until smooth and pale yellow.
- Slowly pour a small amount of the hot milk into the egg yolk mixture, whisking constantly.
- Pour the tempered egg yolk mixture into the saucepan with the remaining hot milk.
- Cook over medium heat, whisking constantly, until the pastry cream thickens and comes to a boil. Continue to cook for 1-2 minutes, whisking constantly, to ensure the cornstarch is fully cooked.
- Remove the saucepan from the heat and stir in the butter and vanilla extract.
- Pour the pastry cream into a bowl, cover the surface with plastic wrap (pressing the plastic wrap directly onto the surface of the cream to prevent a skin from forming), and refrigerate for at least 2 hours, or until completely chilled.
- In a small saucepan, combine the apricot jam and water. Heat over low heat, stirring constantly, until the jam is melted and smooth. Strain the glaze through a fine-mesh sieve to remove any lumps.
- Once the tart shells and pastry cream are completely cooled, spoon the pastry cream into the tart shells, filling them to the top.
- Arrange the fresh fruit on top of the pastry cream in a decorative pattern.
- Brush the fruit with the apricot glaze.
- Refrigerate the assembled mini fruit tarts for at least 30 minutes before serving.
Notes
- Use Cold Ingredients: Cold butter and ice water are essential for a tender, flaky crust.
- Don’t Overwork the Dough: Overworking the dough will develop the gluten, resulting in a tough crust.
- Chill the Dough: Chilling the dough allows the gluten to relax and prevents the crust from shrinking during baking.
- Use Pie Weights: Pie weights prevent the crust from puffing up during baking.
- Cook the Pastry Cream Properly: Cook the pastry cream until it is thick enough to coat the back of a spoon.
- Chill the Pastry Cream: Chilling the pastry cream allows it to thicken further and develop its flavor.
- Get Creative with the Fruit: Use a variety of fresh fruits to create a beautiful and delicious presentation.
- Glaze the Fruit: Glazing the fruit gives it a beautiful shine and helps to preserve it.
Leave a Comment