
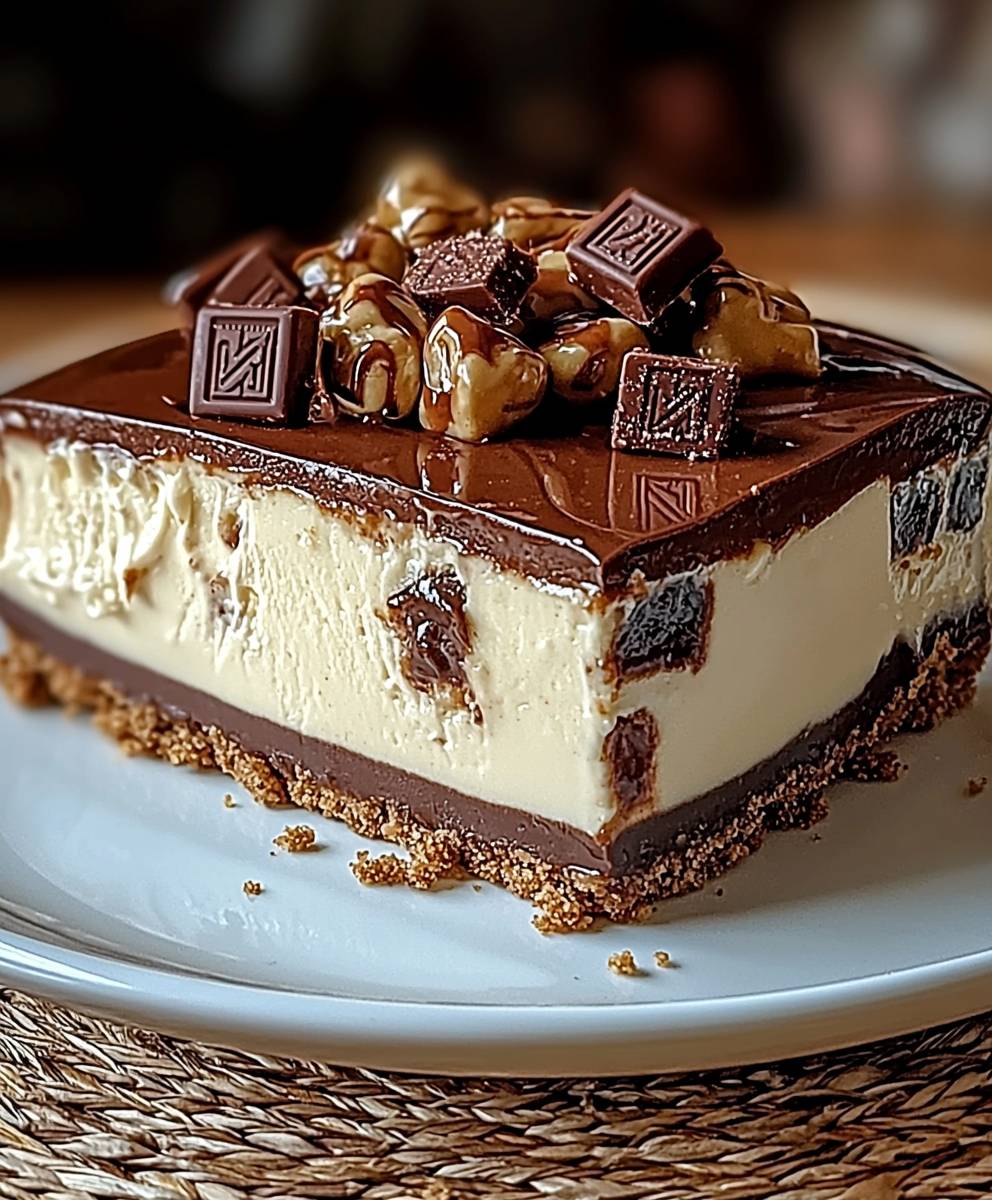
No Bake Twix Cheesecake: Prepare to be amazed! Imagine sinking your fork into a creamy, dreamy cheesecake that perfectly captures the irresistible flavors of a Twix candy bar. Yes, you read that right! This decadent dessert requires absolutely no baking, making it the perfect treat for warm weather or when you simply don’t want to turn on the oven.
While cheesecake itself has a rich history dating back to ancient Greece, this particular twist the No Bake Twix Cheesecake is a modern marvel. It’s a brilliant fusion of classic dessert indulgence and the beloved candy bar we all know and love. Think of it as a celebration of textures and flavors: the smooth, velvety cheesecake filling, the crunchy cookie crust, the gooey caramel, and the satisfying snap of chocolate.
What makes this No Bake Twix Cheesecake so incredibly popular? It’s the perfect combination of ease and indulgence. People adore it because it delivers a show-stopping dessert experience without the fuss of traditional baking. The taste is simply divine a harmonious blend of sweet, salty, and creamy that will have everyone begging for seconds. Plus, it’s incredibly convenient to make ahead of time, making it ideal for parties, potlucks, or any occasion where you want to impress without spending hours in the kitchen. Get ready to experience cheesecake bliss!

Ingredients:
- For the Crust:
- 25 chocolate sandwich cookies (like Oreos), finely crushed
- 6 tablespoons (3 oz) unsalted butter, melted
- For the Cheesecake Filling:
- 24 oz cream cheese, softened to room temperature
- 1 cup granulated sugar
- 1 teaspoon vanilla extract
- 1/2 cup heavy cream
- For the Caramel Layer:
- 1 cup heavy cream
- 1 cup granulated sugar
- 1/4 cup (2 oz) unsalted butter
- 1/4 teaspoon salt
- For the Chocolate Ganache:
- 8 oz semi-sweet chocolate chips
- 1/2 cup heavy cream
- For the Twix Topping:
- 8 fun-size Twix bars, chopped
Preparing the Cookie Crust:
- First, let’s get that cookie crust ready! In a medium bowl, combine the finely crushed chocolate sandwich cookies and the melted butter. Make sure the butter is evenly distributed so the crust holds together nicely.
- Press the mixture firmly into the bottom of a 9-inch springform pan. I like to use the bottom of a measuring cup to really pack it down and create a smooth, even surface. This will be the foundation of our delicious cheesecake!
- Place the crust in the refrigerator to chill while you prepare the cheesecake filling. This helps it firm up and prevents it from crumbling when we add the filling.
Making the No-Bake Cheesecake Filling:
- Now for the star of the show the cheesecake filling! In a large bowl, beat the softened cream cheese with an electric mixer until it’s smooth and creamy. This is crucial! Lumpy cream cheese will ruin the texture of the cheesecake.
- Gradually add the granulated sugar and continue to beat until the mixture is light and fluffy. Don’t overbeat it, though, or you’ll incorporate too much air.
- Stir in the vanilla extract. Vanilla enhances all the other flavors and adds a lovely aroma.
- In a separate bowl, whip the heavy cream until stiff peaks form. This will give the cheesecake a light and airy texture.
- Gently fold the whipped cream into the cream cheese mixture. Be careful not to deflate the whipped cream; we want to keep that airiness!
- Pour the cheesecake filling over the chilled cookie crust in the springform pan. Spread it evenly with a spatula.
- Cover the springform pan with plastic wrap and refrigerate for at least 6 hours, or preferably overnight. This allows the cheesecake to set completely and develop its flavors. Patience is key!
Crafting the Caramel Layer:
- Time for the gooey, irresistible caramel! In a medium saucepan, combine the heavy cream and granulated sugar.
- Cook over medium heat, stirring constantly, until the sugar dissolves and the mixture comes to a boil.
- Once boiling, stop stirring and let the mixture cook until it turns a deep amber color. This usually takes about 8-10 minutes. Keep a close eye on it, as it can burn easily!
- Remove the saucepan from the heat and stir in the butter and salt. Be careful, as the mixture will bubble up when you add the butter.
- Let the caramel cool slightly before pouring it over the chilled cheesecake. This prevents it from melting the cheesecake filling.
- Spread the caramel evenly over the cheesecake and return it to the refrigerator for another 30 minutes to allow the caramel to set slightly.
Creating the Chocolate Ganache:
- Let’s add some chocolatey goodness with a ganache! Place the semi-sweet chocolate chips in a heatproof bowl.
- In a small saucepan, heat the heavy cream over medium heat until it just begins to simmer.
- Pour the hot cream over the chocolate chips and let it sit for about a minute to soften the chocolate.
- Gently whisk the mixture until the chocolate is completely melted and the ganache is smooth and glossy.
- Let the ganache cool slightly before pouring it over the caramel layer.
- Spread the ganache evenly over the caramel and return the cheesecake to the refrigerator for another 30 minutes to allow the ganache to set.
Adding the Twix Topping and Final Touches:
- Finally, the pièce de résistance the Twix topping! Remove the cheesecake from the refrigerator.
- Sprinkle the chopped Twix bars evenly over the chocolate ganache.
- Carefully remove the sides of the springform pan. Run a thin knife around the edge of the cheesecake if it’s sticking to the pan.
- Slice and serve! This No-Bake Twix Cheesecake is best enjoyed chilled.
Tips for Success:
- Room Temperature Cream Cheese: This is absolutely essential for a smooth, lump-free cheesecake filling. Take the cream cheese out of the refrigerator at least an hour before you plan to use it.
- Don’t Overbeat: Overbeating the cream cheese mixture can incorporate too much air, which can cause the cheesecake to crack.
- Patience is a Virtue: Allow the cheesecake to chill for the recommended time. This allows it to set properly and develop its flavors.
- Caramel Caution: Be very careful when making the caramel, as it can get extremely hot and burn easily. Use a candy thermometer if you have one to ensure it reaches the correct temperature.
- Ganache Consistency: If the ganache is too thick, add a tablespoon or two more of heavy cream. If it’s too thin, let it cool for a few more minutes before pouring it over the cheesecake.
Variations:
- Salted Caramel: Add a pinch of sea salt to the caramel for a more intense flavor.
- Different Chocolate: Use milk chocolate or dark chocolate chips for the ganache instead of semi-sweet.
- Other Candy: Substitute other candy bars for the Twix topping, such as Snickers, Milky Way, or Reese’s Peanut Butter Cups.
- Crust Options: Try using graham crackers or shortbread cookies for the crust instead of chocolate sandwich cookies.
Storage Instructions:
Store leftover No-Bake Twix Cheesecake in the refrigerator for up to 3-4 days. Cover it tightly with plastic wrap to prevent it from drying out.
Conclusion:
This No Bake Twix Cheesecake isn’t just a dessert; it’s an experience! From the satisfying crunch of the Oreo crust to the creamy, dreamy cheesecake filling and the decadent Twix topping, every bite is a symphony of textures and flavors. It’s the perfect balance of sweet and salty, rich and refreshing, and incredibly easy to make. Seriously, if you’re looking for a show-stopping dessert that requires minimal effort, this is it. Why is this a must-try? Because it’s a guaranteed crowd-pleaser! Imagine serving this at your next gathering the oohs and aahs will be music to your ears. It’s also incredibly versatile. Feeling adventurous? Try adding a layer of salted caramel sauce between the crust and the filling for an extra boost of flavor. Or, for a more intense chocolate experience, use chocolate Oreos for the crust and drizzle melted dark chocolate over the finished cheesecake. You could even incorporate chopped Snickers bars alongside the Twix for a truly over-the-top candy bar cheesecake extravaganza! Serving suggestions? This No Bake Twix Cheesecake is delicious on its own, but a dollop of whipped cream or a scoop of vanilla ice cream takes it to the next level. A sprinkle of sea salt on top enhances the caramel and chocolate flavors beautifully. For a more elegant presentation, garnish with fresh berries like raspberries or strawberries. And if you’re serving it at a party, consider cutting it into smaller squares for easy handling. But the best part about this recipe is how forgiving it is. Don’t have Twix bars on hand? Use another candy bar you love! Reese’s Peanut Butter Cups, Milky Ways, or even chopped-up Heath bars would all be fantastic substitutes. The key is to have that combination of chocolate, caramel, and something crunchy to complement the creamy cheesecake filling. I know you might be thinking, “Another cheesecake recipe? Do I really need this?” And my answer is a resounding YES! This No Bake Twix Cheesecake is different. It’s easier, faster, and arguably more delicious than any baked cheesecake you’ve ever tried. Plus, the no-bake aspect makes it perfect for those hot summer days when you don’t want to turn on the oven. So, what are you waiting for? Gather your ingredients, put on some music, and get ready to create a dessert masterpiece. I promise you won’t regret it. And once you’ve made it (and devoured it, of course!), I want to hear all about it! Share your photos, your variations, and your honest opinions in the comments below. Did you add a secret ingredient? Did you try a different candy bar? Did your family and friends love it as much as I do? I can’t wait to see your creations and hear your stories. Happy baking (or rather, no-baking)! Let me know if you have any questions, and most importantly, enjoy every single bite of this incredible No Bake Twix Cheesecake! I’m confident this will become a staple in your dessert rotation. PrintNo Bake Twix Cheesecake: The Ultimate Dessert Recipe
No-bake cheesecake with Oreo crust, creamy filling, homemade caramel, chocolate ganache, and Twix topping.
- Prep Time: 45 minutes
- Cook Time: 15 minutes
- Total Time: 405 minutes
- Yield: 12 servings 1x
Ingredients
- 25 chocolate sandwich cookies (like Oreos), finely crushed
- 6 tablespoons (3 oz) unsalted butter, melted
- 24 oz cream cheese, softened to room temperature
- 1 cup granulated sugar
- 1 teaspoon vanilla extract
- 1/2 cup heavy cream
- 1 cup heavy cream
- 1 cup granulated sugar
- 1/4 cup (2 oz) unsalted butter
- 1/4 teaspoon salt
- 8 oz semi-sweet chocolate chips
- 1/2 cup heavy cream
- 8 fun-size Twix bars, chopped
Instructions
- In a medium bowl, combine the finely crushed chocolate sandwich cookies and the melted butter. Press the mixture firmly into the bottom of a 9-inch springform pan. Place the crust in the refrigerator to chill while you prepare the cheesecake filling.
- In a large bowl, beat the softened cream cheese with an electric mixer until smooth and creamy. Gradually add the granulated sugar and continue to beat until the mixture is light and fluffy. Stir in the vanilla extract. In a separate bowl, whip the heavy cream until stiff peaks form. Gently fold the whipped cream into the cream cheese mixture. Pour the cheesecake filling over the chilled cookie crust in the springform pan. Spread it evenly with a spatula. Cover the springform pan with plastic wrap and refrigerate for at least 6 hours, or preferably overnight.
- In a medium saucepan, combine the heavy cream and granulated sugar. Cook over medium heat, stirring constantly, until the sugar dissolves and the mixture comes to a boil. Once boiling, stop stirring and let the mixture cook until it turns a deep amber color (8-10 minutes). Remove from heat and stir in the butter and salt. Let the caramel cool slightly before pouring it over the chilled cheesecake. Spread the caramel evenly over the cheesecake and return it to the refrigerator for another 30 minutes to allow the caramel to set slightly.
- Place the semi-sweet chocolate chips in a heatproof bowl. In a small saucepan, heat the heavy cream over medium heat until it just begins to simmer. Pour the hot cream over the chocolate chips and let it sit for about a minute to soften the chocolate. Gently whisk the mixture until the chocolate is completely melted and the ganache is smooth and glossy. Let the ganache cool slightly before pouring it over the caramel layer. Spread the ganache evenly over the caramel and return the cheesecake to the refrigerator for another 30 minutes to allow the ganache to set.
- Remove the cheesecake from the refrigerator. Sprinkle the chopped Twix bars evenly over the chocolate ganache. Carefully remove the sides of the springform pan. Run a thin knife around the edge of the cheesecake if it’s sticking to the pan. Slice and serve chilled.
Notes
- Room Temperature Cream Cheese: Essential for a smooth filling.
- Don’t Overbeat: Avoid overbeating the cream cheese mixture.
- Patience is Key: Allow sufficient chilling time.
- Caramel Caution: Be careful when making the caramel.
- Ganache Consistency: Adjust cream for desired consistency.
- Salted Caramel: Add a pinch of sea salt to the caramel.
- Different Chocolate: Use milk or dark chocolate for the ganache.
- Other Candy: Substitute other candy bars for the Twix topping.
- Crust Options: Try graham crackers or shortbread cookies for the crust.
- Storage Instructions: Store leftover cheesecake in the refrigerator for up to 3-4 days, covered tightly.
Leave a Comment