
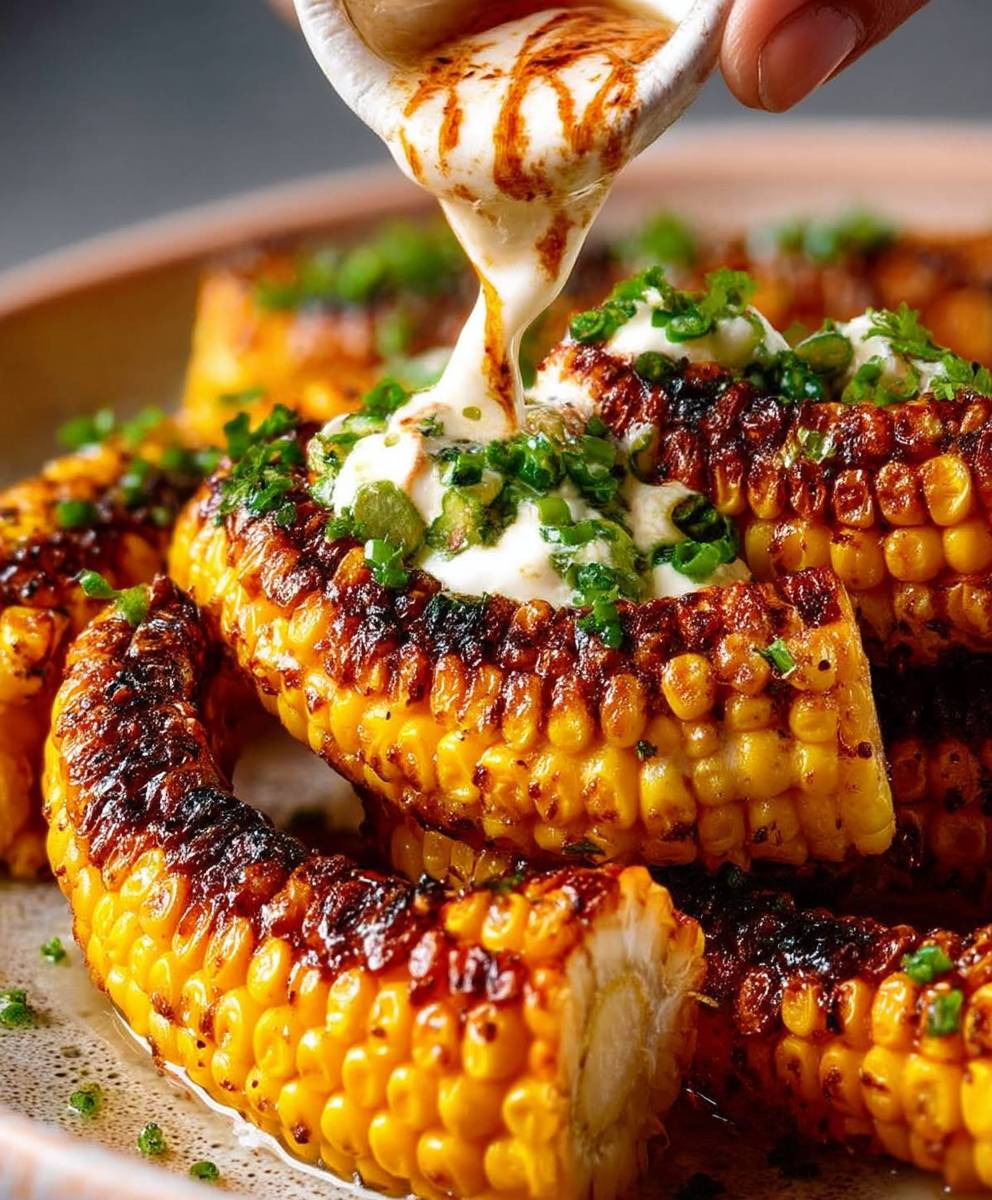
Corn Ribs: Prepare to have your world rocked! Forget everything you thought you knew about corn on the cob because this viral sensation is about to become your new favorite way to enjoy this summer staple. Imagine tender, juicy corn kernels, perfectly charred and curled into irresistible, rib-like shapes, bursting with flavor in every single bite.
While the exact origins of corn ribs are debated, their popularity exploded thanks to social media, where home cooks and chefs alike showcased their creative takes on this playful dish. Some believe the technique draws inspiration from Korean street food, where creative cuts and bold flavors reign supreme. Regardless of its precise history, this innovative preparation has captured the hearts (and stomachs!) of food lovers everywhere.
What makes corn ribs so irresistible? It’s a combination of factors. The unique shape maximizes surface area, allowing for more caramelization and a delightful crispy-chewy texture. The playful presentation makes them a fun and engaging dish to share with friends and family. And, of course, the customizable flavor profiles from smoky BBQ to spicy chili lime mean there’s a corn rib recipe to suit every palate. Get ready to ditch the traditional corn on the cob and embrace the deliciousness of corn ribs!

Ingredients:
- 4 ears of fresh corn, husks and silk removed
- 2 tablespoons olive oil
- 1 teaspoon smoked paprika
- 1/2 teaspoon garlic powder
- 1/2 teaspoon onion powder
- 1/4 teaspoon cayenne pepper (optional, for heat)
- 1/2 teaspoon cumin
- 1/2 teaspoon chili powder
- Salt and freshly ground black pepper to taste
Optional Toppings:
- Lime wedges, for serving
- Chopped cilantro, for garnish
- Cotija cheese, crumbled
- Mexican crema or sour cream
- Hot sauce
Equipment:
- Large cutting board
- Sharp knife (chef’s knife recommended)
- Large bowl
- Baking sheet
- Parchment paper (optional, for easier cleanup)
Instructions:
Preparing the Corn Ribs:
- Cutting the Corn: This is the most crucial step! Carefully stand each ear of corn on its end on the cutting board. Using a very sharp knife, slice the corn lengthwise down the center. Then, slice each half lengthwise again, resulting in four “ribs” per ear of corn. Be extremely careful when cutting; a dull knife can slip. If you’re uncomfortable cutting the corn this way, you can try parboiling it for a few minutes first to soften it slightly, but I find it easier to work with raw corn.
- Inspecting the Ribs: Once you’ve cut all the corn, take a moment to inspect each rib. If any pieces are too thin or unstable, it’s best to discard them. You want ribs that are sturdy enough to hold their shape during cooking.
- Preheating the Oven: Preheat your oven to 400°F (200°C). This high temperature will help the corn ribs caramelize and get those delicious crispy edges.
Seasoning the Corn Ribs:
- Mixing the Spices: In a large bowl, combine the olive oil, smoked paprika, garlic powder, onion powder, cayenne pepper (if using), cumin, chili powder, salt, and pepper. Whisk everything together until it’s well combined and forms a flavorful paste.
- Coating the Corn: Add the corn ribs to the bowl with the spice mixture. Using your hands (or tongs), toss the corn ribs thoroughly to ensure they are evenly coated with the spices. Make sure the spices get into all the nooks and crannies. This is where the flavor really develops, so don’t skimp on the coating!
- Arranging on the Baking Sheet: Line a baking sheet with parchment paper (optional, but it makes cleanup a breeze). Arrange the seasoned corn ribs in a single layer on the baking sheet, making sure they aren’t overcrowded. Overcrowding can steam the corn instead of roasting it, preventing it from getting crispy.
Cooking the Corn Ribs:
- Roasting the Corn: Place the baking sheet in the preheated oven and roast for 20-25 minutes, or until the corn ribs are tender and slightly charred around the edges. Keep an eye on them, as cooking times can vary depending on your oven. You want them to be nicely browned and slightly caramelized.
- Checking for Doneness: To check if the corn ribs are done, pierce one with a fork. It should be tender but still have a slight bite. The edges should be nicely browned and slightly crispy.
- Broiling (Optional): For extra crispy edges, you can broil the corn ribs for the last 1-2 minutes of cooking. Watch them very carefully, as they can burn quickly under the broiler.
Serving and Enjoying:
- Removing from the Oven: Once the corn ribs are cooked to your liking, remove them from the oven and let them cool slightly on the baking sheet.
- Adding Toppings: Transfer the corn ribs to a serving platter. Squeeze fresh lime juice over them. Sprinkle with chopped cilantro and crumbled cotija cheese. Drizzle with Mexican crema or sour cream, if desired. Add a dash of your favorite hot sauce for an extra kick.
- Serving Immediately: Serve the corn ribs immediately while they are still warm and crispy. They are best enjoyed fresh out of the oven.
- Enjoy! These corn ribs are a delicious and fun appetizer or side dish. They’re perfect for barbecues, parties, or any time you’re craving a flavorful and unique snack. Don’t be afraid to experiment with different toppings and seasonings to create your own signature corn rib recipe!
Tips and Variations:
Spice Level:
Adjust the amount of cayenne pepper to control the heat level. If you prefer a milder flavor, omit the cayenne pepper altogether. You can also add a pinch of red pepper flakes for a different kind of heat.
Seasoning Variations:
Get creative with your seasonings! Try using different spice blends, such as taco seasoning, Cajun seasoning, or Italian seasoning. You can also add fresh herbs like thyme, rosemary, or oregano.
Cheese Options:
If you don’t have cotija cheese, you can substitute it with feta cheese, queso fresco, or even Parmesan cheese.
Cooking Methods:
While this recipe focuses on roasting the corn ribs in the oven, you can also grill them or air fry them. Grilling will give them a smoky flavor, while air frying will make them extra crispy.
Grilling Instructions:
To grill the corn ribs, preheat your grill to medium-high heat. Lightly oil the grill grates. Grill the corn ribs for 8-10 minutes, turning occasionally, until they are tender and slightly charred. Watch them carefully to prevent burning.
Air Frying Instructions:
To air fry the corn ribs, preheat your air fryer to 400°F (200°C). Place the corn ribs in the air fryer basket in a single layer. Air fry for 10-12 minutes, flipping halfway through, until they are crispy and golden brown.
Vegan Option:
To make this recipe vegan, simply omit the cotija cheese and Mexican crema. You can substitute the crema with a vegan sour cream or a cashew-based cream sauce.
Storage:
Leftover corn ribs can be stored in an airtight container in the refrigerator for up to 3 days. Reheat them in the oven or air fryer to restore their crispiness.
Serving Suggestions:
Serve these corn ribs as an appetizer, side dish, or snack. They pair well with grilled meats, tacos, salads, and other Mexican-inspired dishes.
Make Ahead:
You can prepare the corn ribs ahead of time by cutting and seasoning them. Store them in an airtight container in the refrigerator for up to 24 hours. When you’re ready to cook them, simply roast, grill, or air fry them as directed.
Safety First:
Remember to use a sharp knife and exercise caution when cutting the corn. If you’re not comfortable cutting the corn yourself, ask someone else to do it for you.
Enjoying the Process:
Cooking should be fun! Don’t be afraid to experiment with different flavors and techniques to create your own unique version of this recipe. The most important thing is to enjoy the process and have fun in the kitchen!
Conclusion:
And there you have it! This No Knead Cheese Bread recipe is truly a game-changer, and I wholeheartedly believe it deserves a permanent spot in your baking repertoire. Why? Because it delivers bakery-quality results with minimal effort. We’re talking about a crusty exterior, a soft, chewy interior, and an explosion of cheesy goodness in every single bite. It’s the kind of bread that makes you want to tear off a piece and savor it slowly, letting the flavors dance on your tongue.
But beyond the incredible taste and texture, the real magic lies in its simplicity. No kneading, no complicated techniques, just a handful of ingredients and a little bit of patience. It’s perfect for busy weeknights when you crave homemade bread but don’t have hours to spend in the kitchen. It’s also a fantastic recipe for beginner bakers who want to experience the satisfaction of creating something truly special.
Think of the possibilities! This No Knead Cheese Bread is absolutely divine served warm with a simple pat of butter. It’s also incredible alongside a hearty bowl of soup or stew, perfect for soaking up all those delicious juices. Imagine dipping it into a creamy tomato soup or using it to mop up the last bits of a flavorful chili.
But don’t stop there! Feel free to get creative and experiment with different variations. Try adding some chopped herbs like rosemary or thyme to the dough for an extra layer of flavor. Or, if you’re feeling adventurous, incorporate some sun-dried tomatoes or olives for a Mediterranean twist. You could even swap out the cheddar cheese for Gruyere, Parmesan, or a blend of your favorite cheeses. The possibilities are endless!
For a truly decadent experience, try slicing the bread and using it to make grilled cheese sandwiches. The crusty exterior will provide the perfect contrast to the melty cheese inside. Or, cube it up and use it to make croutons for your favorite salad. Trust me, once you’ve tasted homemade croutons made with this bread, you’ll never go back to store-bought again.
This recipe is more than just a way to bake bread; it’s an invitation to slow down, enjoy the process, and create something truly special. It’s about sharing the warmth and comfort of homemade food with the people you love. It’s about experiencing the simple joy of baking.
So, what are you waiting for? Gather your ingredients, preheat your oven, and get ready to bake the best No Knead Cheese Bread you’ve ever tasted. I’m confident that you’ll be amazed by the results.
And when you do, please, please, please share your experience! I’d love to hear about your variations, your serving suggestions, and any tips or tricks you discover along the way. Tag me in your photos on social media, leave a comment below, or send me an email. I can’t wait to see what you create! Happy baking!
No Knead Cheese Bread: Easy Recipe & Baking Tips
I am sorry, but I need the recipe to provide a description. Please provide the recipe.

Leave a Comment