
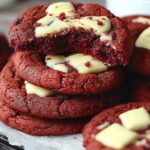
NYC Red Velvet Cookies: Prepare to be utterly captivated by these decadent, crimson-hued treats that are about to redefine your cookie expectations! Forget everything you thought you knew about Red Velvet we’re taking it to a whole new level with these oversized, soft-baked wonders. Imagine sinking your teeth into a slightly crisp edge, giving way to a supremely chewy center, bursting with that signature Red Velvet tang and a generous scattering of creamy white chocolate chips.
While the exact origins of Red Velvet are debated, its popularity soared in the mid-20th century, often associated with upscale hotels and bakeries. The vibrant color, traditionally achieved with beet juice or, more commonly today, red food coloring, adds a touch of elegance and intrigue. But it’s not just about the looks; the subtle cocoa flavor, combined with a hint of buttermilk or vinegar, creates a unique and irresistible taste profile.
People adore NYC Red Velvet Cookies for their delightful combination of textures and flavors. They offer the comforting familiarity of a classic cookie with a sophisticated twist. The slight tang cuts through the sweetness, preventing them from being overly rich, while the soft, almost cake-like interior is simply divine. Plus, their impressive size makes them perfect for sharing (or not!). Whether you’re a seasoned baker or a novice in the kitchen, this recipe is surprisingly easy to follow, guaranteeing impressive results every time. Get ready to bake a batch of these unforgettable cookies and experience the magic of Red Velvet in a whole new way!

Ingredients:
- For the Cookies:
- 2 1/2 cups (315g) all-purpose flour
- 1 teaspoon baking soda
- 1/2 teaspoon salt
- 1 cup (2 sticks or 226g) unsalted butter, softened
- 1 1/2 cups (300g) granulated sugar
- 2 large eggs
- 1 teaspoon vanilla extract
- 1 tablespoon unsweetened cocoa powder
- 1 teaspoon red food coloring (gel is recommended for vibrant color)
- 1 tablespoon white vinegar
- 1 cup (170g) semi-sweet chocolate chips (optional, but highly recommended!)
- For the Cream Cheese Frosting:
- 8 ounces (226g) cream cheese, softened
- 1/2 cup (1 stick or 113g) unsalted butter, softened
- 3-4 cups (360-480g) powdered sugar, sifted
- 1 teaspoon vanilla extract
- 1-2 tablespoons milk or heavy cream (for desired consistency)
Preparing the Red Velvet Cookie Dough
- Combine Dry Ingredients: In a medium bowl, whisk together the flour, baking soda, and salt. Make sure to really whisk it well to distribute the baking soda evenly. This is crucial for the cookies to rise properly and have that signature soft texture. Set this bowl aside for now.
- Cream Butter and Sugar: In a large bowl (or the bowl of your stand mixer), cream together the softened butter and granulated sugar until light and fluffy. This usually takes about 3-5 minutes on medium speed. Don’t rush this step! The more air you incorporate, the lighter and more tender your cookies will be. Scrape down the sides of the bowl occasionally to ensure everything is evenly mixed.
- Add Eggs and Vanilla: Beat in the eggs one at a time, mixing well after each addition. Then, stir in the vanilla extract. Again, scrape down the sides of the bowl to make sure everything is incorporated.
- Prepare the Red Velvet Mixture: In a small bowl, combine the cocoa powder, red food coloring, and white vinegar. The vinegar reacts with the cocoa powder and food coloring to enhance the red color and give the cookies that classic red velvet tang. Mix this well until it forms a smooth paste.
- Incorporate the Red Velvet Mixture: Add the red velvet mixture to the butter and sugar mixture and beat until well combined. The batter should be a vibrant red color. If it’s not quite as red as you’d like, you can add a tiny bit more food coloring, but be careful not to add too much, as it can affect the taste and texture of the cookies.
- Gradually Add Dry Ingredients: Gradually add the dry ingredients to the wet ingredients, mixing on low speed until just combined. Be careful not to overmix the dough, as this can result in tough cookies. Mix until you see the flour is almost all incorporated, then stop and scrape down the sides and bottom of the bowl. Give it one or two more quick pulses until everything is just combined.
- Fold in Chocolate Chips (Optional): Gently fold in the chocolate chips (if using). I highly recommend using them! They add a delicious richness and complement the red velvet flavor perfectly.
- Chill the Dough: Cover the bowl with plastic wrap and chill the dough in the refrigerator for at least 30 minutes, or up to 2 hours. Chilling the dough helps to prevent the cookies from spreading too much during baking and also allows the flavors to meld together. I find that 1 hour is the sweet spot for me.
Baking the Cookies
- Preheat Oven: Preheat your oven to 350°F (175°C). Line baking sheets with parchment paper or silicone baking mats. Parchment paper is my go-to because it prevents sticking and makes cleanup a breeze!
- Scoop the Dough: Use a cookie scoop or spoon to drop rounded tablespoons of dough onto the prepared baking sheets, leaving about 2 inches between each cookie. I usually use a medium-sized cookie scoop, which is about 1.5 tablespoons.
- Bake: Bake for 9-11 minutes, or until the edges are set and the centers are still slightly soft. Keep a close eye on them, as baking times can vary depending on your oven. You want them to be slightly underbaked for that perfect soft and chewy texture.
- Cool: Remove the baking sheets from the oven and let the cookies cool on the baking sheets for a few minutes before transferring them to a wire rack to cool completely. This allows them to firm up a bit so they don’t break when you move them.
Preparing the Cream Cheese Frosting
- Cream Cheese and Butter: In a large bowl (or the bowl of your stand mixer), cream together the softened cream cheese and softened butter until smooth and creamy. Make sure both the cream cheese and butter are truly softened, or you’ll end up with lumps in your frosting.
- Add Vanilla: Stir in the vanilla extract.
- Gradually Add Powdered Sugar: Gradually add the sifted powdered sugar, one cup at a time, beating on low speed until combined. Sifting the powdered sugar is important to prevent lumps in the frosting.
- Adjust Consistency: Add milk or heavy cream, one tablespoon at a time, until the frosting reaches your desired consistency. You want it to be thick enough to hold its shape but still spreadable.
- Beat Until Fluffy: Beat the frosting on medium-high speed for 2-3 minutes, or until light and fluffy. This will help to incorporate air into the frosting and make it even more delicious.
Assembling the NYC Red Velvet Cookies
- Cool Cookies Completely: Make sure the cookies are completely cool before frosting. If they’re even slightly warm, the frosting will melt and slide off.
- Frost the Cookies: Spread a generous amount of cream cheese frosting onto the flat side of one cookie and top with another cookie to create a sandwich. You can also just frost the tops of the cookies if you prefer.
- Optional Decorations: If desired, you can decorate the cookies with sprinkles, chocolate shavings, or a dusting of cocoa powder.
- Chill (Optional): For best results, chill the assembled cookies in the refrigerator for at least 30 minutes before serving. This will help the frosting to set and make the cookies even more delicious. However, they are also amazing at room temperature!
- Serve and Enjoy: Serve the NYC Red Velvet Cookies and enjoy! These cookies are best enjoyed within 2-3 days, but they’re so good, they probably won’t last that long! Store them in an airtight container in the refrigerator.

Conclusion:
So, there you have it! These NYC Red Velvet Cookies are more than just a dessert; they’re an experience. The perfect balance of that classic red velvet tang, the rich chocolate notes, and the satisfyingly chewy texture makes them utterly irresistible. I truly believe this recipe is a must-try for any baking enthusiast, whether you’re a seasoned pro or just starting out. The straightforward instructions and readily available ingredients mean you can whip up a batch of these beauties in no time. But why are these cookies so special? It’s the combination of factors, really. The cream cheese in the batter adds a subtle tang and keeps them incredibly moist, while the generous amount of chocolate chips provides that delightful burst of sweetness in every bite. And let’s not forget that iconic red hue it just makes them so visually appealing! They’re perfect for any occasion, from a casual afternoon treat to a show-stopping dessert at your next gathering. Now, let’s talk serving suggestions and variations. While these cookies are absolutely divine on their own, warm from the oven, there are plenty of ways to elevate them even further. Imagine sandwiching a scoop of vanilla ice cream between two cookies for an epic ice cream sandwich. Or, crumble them over a bowl of yogurt or oatmeal for a decadent breakfast treat. For a truly indulgent experience, try dipping them in melted white chocolate and sprinkling them with red velvet cake crumbs. If you’re feeling adventurous, you can also experiment with different variations of the recipe. Try adding chopped walnuts or pecans for a nutty crunch. Or, swap out the semi-sweet chocolate chips for white chocolate chips for a sweeter, creamier flavor. You could even add a swirl of cream cheese frosting on top for an extra touch of decadence. The possibilities are endless! I’m confident that once you try this recipe, you’ll be hooked. These NYC Red Velvet Cookies are guaranteed to become a new favorite in your household. They’re the perfect combination of comfort and indulgence, and they’re sure to impress your friends and family.Don’t just take my word for it, though!
I wholeheartedly encourage you to give this recipe a try. I’ve poured my heart and soul into perfecting it, and I’m so excited for you to experience the joy of baking and enjoying these incredible cookies.I can’t wait to hear about your baking adventures!
Once you’ve made a batch of these NYC Red Velvet Cookies, please share your experience with me. Let me know what you think of the recipe, what variations you tried, and how much everyone loved them. You can leave a comment below, tag me on social media, or even send me an email. I’m always thrilled to hear from my readers and see their creations. Happy baking, and enjoy! I’m sure you’ll find that this recipe is a keeper, and these cookies will be requested time and time again. They are truly special, and I hope you enjoy them as much as I do! PrintNYC Red Velvet Cookies: The Ultimate Guide to the Best Bakeries
Soft, chewy red velvet cookies sandwiched with creamy, tangy cream cheese frosting. A decadent treat!
- Prep Time: 30 minutes
- Cook Time: 9 minutes
- Total Time: 60 minutes
- Yield: 18–24 sandwich cookies 1x
Ingredients
- 2 1/2 cups (315g) all-purpose flour
- 1 teaspoon baking soda
- 1/2 teaspoon salt
- 1 cup (2 sticks or 226g) unsalted butter, softened
- 1 1/2 cups (300g) granulated sugar
- 2 large eggs
- 1 teaspoon vanilla extract
- 1 tablespoon unsweetened cocoa powder
- 1 teaspoon red food coloring (gel recommended)
- 1 tablespoon white vinegar
- 1 cup (170g) semi-sweet chocolate chips (optional)
- 8 ounces (226g) cream cheese, softened
- 1/2 cup (1 stick or 113g) unsalted butter, softened
- 3–4 cups (360-480g) powdered sugar, sifted
- 1 teaspoon vanilla extract
- 1–2 tablespoons milk or heavy cream (for desired consistency)
Instructions
- In a medium bowl, whisk together the flour, baking soda, and salt. Set aside.
- In a large bowl (or stand mixer), cream together the softened butter and granulated sugar until light and fluffy (3-5 minutes). Scrape down the sides of the bowl occasionally.
- Beat in the eggs one at a time, mixing well after each addition. Stir in the vanilla extract.
- In a small bowl, combine the cocoa powder, red food coloring, and white vinegar. Mix well until it forms a smooth paste.
- Add the red velvet mixture to the butter and sugar mixture and beat until well combined.
- Gradually add the dry ingredients to the wet ingredients, mixing on low speed until just combined. Be careful not to overmix the dough.
- Gently fold in the chocolate chips (if using).
- Cover the bowl with plastic wrap and chill the dough in the refrigerator for at least 30 minutes, or up to 2 hours.
- Preheat your oven to 350°F (175°C). Line baking sheets with parchment paper or silicone baking mats.
- Use a cookie scoop or spoon to drop rounded tablespoons of dough onto the prepared baking sheets, leaving about 2 inches between each cookie.
- Bake for 9-11 minutes, or until the edges are set and the centers are still slightly soft.
- Remove the baking sheets from the oven and let the cookies cool on the baking sheets for a few minutes before transferring them to a wire rack to cool completely.
- In a large bowl (or stand mixer), cream together the softened cream cheese and softened butter until smooth and creamy.
- Stir in the vanilla extract.
- Gradually add the sifted powdered sugar, one cup at a time, beating on low speed until combined.
- Add milk or heavy cream, one tablespoon at a time, until the frosting reaches your desired consistency.
- Beat the frosting on medium-high speed for 2-3 minutes, or until light and fluffy.
- Make sure the cookies are completely cool before frosting.
- Spread a generous amount of cream cheese frosting onto the flat side of one cookie and top with another cookie to create a sandwich. You can also just frost the tops of the cookies if you prefer.
- If desired, you can decorate the cookies with sprinkles, chocolate shavings, or a dusting of cocoa powder.
- For best results, chill the assembled cookies in the refrigerator for at least 30 minutes before serving.
- Serve the NYC Red Velvet Cookies and enjoy! These cookies are best enjoyed within 2-3 days, but they’re so good, they probably won’t last that long! Store them in an airtight container in the refrigerator.
Notes
- Using gel food coloring is recommended for a more vibrant red color.
- Chilling the dough is important to prevent excessive spreading during baking.
- Sifting the powdered sugar prevents lumps in the frosting.
- Make sure the butter and cream cheese are properly softened for smooth frosting.
- Don’t overbake the cookies; slightly underbaked is best for a soft, chewy texture.
- Chocolate chips are optional but highly recommended!


Leave a Comment